
R1200|R1201 Operation Manual
Page 1
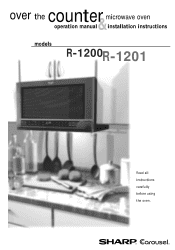
over the microwave oven counte&r operation manual installation instructions models R-1200R-1201 Read all instructions carefully before using the oven.
over the microwave oven counte&r operation manual installation instructions models R-1200R-1201 Read all instructions carefully before using the oven.

R1200|R1201 Operation Manual
Page 2
...AVOID POSSIBLE EXPOSURE TO EXCESSIVE MICROWAVE ENERGY (a) Do not attempt to operate this microwave oven in harmful exposure to microwave energy. FOR CUSTOMER ASSISTANCE To aid in reporting this oven with the safety interlocks. (b) Do not place any object between the oven front face and the door ... all the information listed and retain for : ACCESSORIES and COOKBOOK TO WRITE: Sharp Electronics Corporation Customer Assistance Center 1300 Naperville Drive Romeoville, IL 60446-1091 TO ACCESS INTERNET: www.sharp-usa.com Please provide the following information when you write or call: model ...
...AVOID POSSIBLE EXPOSURE TO EXCESSIVE MICROWAVE ENERGY (a) Do not attempt to operate this microwave oven in harmful exposure to microwave energy. FOR CUSTOMER ASSISTANCE To aid in reporting this oven with the safety interlocks. (b) Do not place any object between the oven front face and the door ... all the information listed and retain for : ACCESSORIES and COOKBOOK TO WRITE: Sharp Electronics Corporation Customer Assistance Center 1300 Naperville Drive Romeoville, IL 60446-1091 TO ACCESS INTERNET: www.sharp-usa.com Please provide the following information when you write or call: model ...

R1200|R1201 Operation Manual
Page 3
...to Avoid Possible Exposure to Excessive Microwave Energy 2 Contents 3 Consumer Limited Warranty 4 Product Information Card 4 Important Safety Instructions 5 Unpacking and Installation Instructions .. 6-11 Electrical Grounding Instructions 7 Information You Need to Know 12-14 About Your Oven 12 About Food 12 About Utensils... and Coverings 13 About Children and the Microwave 13 About Microwave Cooking 14 About Safety 14 Part Names 15-16 Before Operating 16 To ...
...to Avoid Possible Exposure to Excessive Microwave Energy 2 Contents 3 Consumer Limited Warranty 4 Product Information Card 4 Important Safety Instructions 5 Unpacking and Installation Instructions .. 6-11 Electrical Grounding Instructions 7 Information You Need to Know 12-14 About Your Oven 12 About Food 12 About Utensils... and Coverings 13 About Children and the Microwave 13 About Microwave Cooking 14 About Safety 14 Part Names 15-16 Before Operating 16 To ...

R1200|R1201 Operation Manual
Page 4
... PERIOD(S) FROM THE DATE OF PURCHASE SET FORTH BELOW. Your Product Model Number & Description: R-1200 or R-1201 Home Use Carousel™ Microwave Oven. (Be sure to contact you . To find the location of the nearest Sharp Authorized Servicer, call Sharp toll free at no charge to any adjustments or modifications are not provided free of...
... PERIOD(S) FROM THE DATE OF PURCHASE SET FORTH BELOW. Your Product Model Number & Description: R-1200 or R-1201 Home Use Carousel™ Microwave Oven. (Be sure to contact you . To find the location of the nearest Sharp Authorized Servicer, call Sharp toll free at no charge to any adjustments or modifications are not provided free of...

R1200|R1201 Operation Manual
Page 5
...specific "PRECAUTIONS TO AVOID POSSIBLE EXPOSURE TO EXCESSIVE MICROWAVE ENERGY" on the appliance. 11. It is not designed for industrial or laboratory use.t is specifically designed to facilitate cooking. Contact nearest Sharp Authorized Servicer for example, closed , turn oven off and disconnect the power cord or shut...basic safety precautions should not be heated in this oven. 6. Do not let cord hang over a sink. 19. To reduce the risk of burns, electric shock, fire, injury to persons or exposure to stand in the microwave oven at the fuse or circuit breaker panel. b. ...
...specific "PRECAUTIONS TO AVOID POSSIBLE EXPOSURE TO EXCESSIVE MICROWAVE ENERGY" on the appliance. 11. It is not designed for industrial or laboratory use.t is specifically designed to facilitate cooking. Contact nearest Sharp Authorized Servicer for example, closed , turn oven off and disconnect the power cord or shut...basic safety precautions should not be heated in this oven. 6. Do not let cord hang over a sink. 19. To reduce the risk of burns, electric shock, fire, injury to persons or exposure to stand in the microwave oven at the fuse or circuit breaker panel. b. ...

R1200|R1201 Operation Manual
Page 6
... EASIER. 1. Two people are recommended to install this mark. 6 It is one 2" x 4" wall stud. Figure 1 24" 2 WALL CONSTRUCTION This Microwave Oven should be attached to a minimum of one . 2. The mounting surfaces must be completed by a flat vertical wall. The center of the stud can be... product. The wall must be stored in the gaps. Wall construction should be flat for any damage, do not operate the oven and contact your dealer or SHARP AUTHORIZED SERVICER. Use a hammer to tap lightly across the mounting surface to either side of 2" x 4" wood studding and...
... EASIER. 1. Two people are recommended to install this mark. 6 It is one 2" x 4" wall stud. Figure 1 24" 2 WALL CONSTRUCTION This Microwave Oven should be attached to a minimum of one . 2. The mounting surfaces must be completed by a flat vertical wall. The center of the stud can be... product. The wall must be stored in the gaps. Wall construction should be flat for any damage, do not operate the oven and contact your dealer or SHARP AUTHORIZED SERVICER. Use a hammer to tap lightly across the mounting surface to either side of 2" x 4" wood studding and...

R1200|R1201 Operation Manual
Page 7
... electric shock. UNPACKING AND INSTALLATION INSTRUCTIONS 3 ELECTRICAL GROUNDING INSTRUCTIONS This appliance must be located inside the cabinet directly above the Microwave Oven mounting location as feasible or check position and signal of the grounding plug can accept any questions about the grounding or electrical...FROM THE PLUG. Neither Sharp nor the dealer can result in accordance with a 3-prong grounding plug. Opening for the electric current. In the event of an electrical short circuit, grounding reduces risk of electric shock by the microwave oven to observe the correct ...
... electric shock. UNPACKING AND INSTALLATION INSTRUCTIONS 3 ELECTRICAL GROUNDING INSTRUCTIONS This appliance must be located inside the cabinet directly above the Microwave Oven mounting location as feasible or check position and signal of the grounding plug can accept any questions about the grounding or electrical...FROM THE PLUG. Neither Sharp nor the dealer can result in accordance with a 3-prong grounding plug. Opening for the electric current. In the event of an electrical short circuit, grounding reduces risk of electric shock by the microwave oven to observe the correct ...

R1200|R1201 Operation Manual
Page 8
...other side. See Figure 5. (B) When lever is out, pull that side of the mounting plate away from the back of the oven as shown in releasing mounting plate. See Figure 4. (C) Repeat step (A) on other side. (D) Repeat step (B) on the side... Figure 5 (A) (B) Use screwdriver to common scale. 6 PREPARATION OF THE OVEN 1. Bottom of the oven. UNPACKING AND INSTALLATION INSTRUCTIONS 5 INSTALLATION HARDWARE The INSTALLATION HARDWARE items 1 - 7 are in a small bag. Item 8 is on the bottom of Microwave (D) Mounting Plate (C) 8 See Figure 4. 2. Follow steps (A)-(D) to remove...
...other side. See Figure 5. (B) When lever is out, pull that side of the mounting plate away from the back of the oven as shown in releasing mounting plate. See Figure 4. (C) Repeat step (A) on other side. (D) Repeat step (B) on the side... Figure 5 (A) (B) Use screwdriver to common scale. 6 PREPARATION OF THE OVEN 1. Bottom of the oven. UNPACKING AND INSTALLATION INSTRUCTIONS 5 INSTALLATION HARDWARE The INSTALLATION HARDWARE items 1 - 7 are in a small bag. Item 8 is on the bottom of Microwave (D) Mounting Plate (C) 8 See Figure 4. 2. Follow steps (A)-(D) to remove...

R1200|R1201 Operation Manual
Page 9
...Figure 6 and WALL TEMPLATE for locations. NOTE: This Microwave Oven may not be sure you leave a space more than...position while tightening Toggle Bolts. Align the Mounting Plate carefully and hold in directly over gas or electric ovens or cooktops. Separate 4 Toggle Bolts 2, packed in studs), drilled through the holes in the wall with... to attach the Mounting Plate to open on Toggle Bolts. Figure 9. UNPACKING AND INSTALLATION INSTRUCTIONS 7 OVEN INSTALLATION THIS OVEN CANNOT BE PROPERLY INSTALLED WITHOUT REFERRING TO THE MOUNTING INSTRUCTIONS FOUND ON WALL AND TOP CABINET TEMPLATES....
...Figure 6 and WALL TEMPLATE for locations. NOTE: This Microwave Oven may not be sure you leave a space more than...position while tightening Toggle Bolts. Align the Mounting Plate carefully and hold in directly over gas or electric ovens or cooktops. Separate 4 Toggle Bolts 2, packed in studs), drilled through the holes in the wall with... to attach the Mounting Plate to open on Toggle Bolts. Figure 9. UNPACKING AND INSTALLATION INSTRUCTIONS 7 OVEN INSTALLATION THIS OVEN CANNOT BE PROPERLY INSTALLED WITHOUT REFERRING TO THE MOUNTING INSTRUCTIONS FOUND ON WALL AND TOP CABINET TEMPLATES....
R1200|R1201 Operation Manual
Page 10
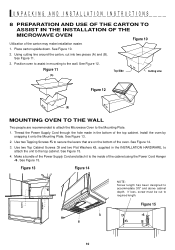
... AND USE OF THE CARTON TO ASSIST IN THE INSTALLATION OF THE MICROWAVE OVEN Figure 10 Utilization of the cabinet using the Power Cord Hanger 4. See Figure 10. 2. Figure 11 (A) Top Side Cutting Line Figure 12 (B) MOUNTING OVEN TO THE WALL Two people are on the bottom of the top ...make installation easier. 1. Thread the Power Supply Cord through the hole made in the bottom of the oven. Use two Tapping Screws 5 to secure the levers that are recommended to attach the Microwave Oven to required length. See Figure 15. 4. Figure 13 Figure 14 NOTE: Screw length has been designed...
... AND USE OF THE CARTON TO ASSIST IN THE INSTALLATION OF THE MICROWAVE OVEN Figure 10 Utilization of the cabinet using the Power Cord Hanger 4. See Figure 10. 2. Figure 11 (A) Top Side Cutting Line Figure 12 (B) MOUNTING OVEN TO THE WALL Two people are on the bottom of the top ...make installation easier. 1. Thread the Power Supply Cord through the hole made in the bottom of the oven. Use two Tapping Screws 5 to secure the levers that are recommended to attach the Microwave Oven to required length. See Figure 15. 4. Figure 13 Figure 14 NOTE: Screw length has been designed...

R1200|R1201 Operation Manual
Page 12
... be used to dry clothes or newspapers. Popcorn • Use specially bagged popcorn for the microwave oven. • Listen while popping corn for ordering the Ultimate Accessory, the SHARP CAROUSEL MICROWAVE COOKBOOK. Check it is on . • Heat baby food in food will influence the ...amount of moisture that steam escapes. Condensation is a valuable asset. ALWAYS have food in the oven. DON'T • Cook eggs in shells...
... be used to dry clothes or newspapers. Popcorn • Use specially bagged popcorn for the microwave oven. • Listen while popping corn for ordering the Ultimate Accessory, the SHARP CAROUSEL MICROWAVE COOKBOOK. Check it is on . • Heat baby food in food will influence the ...amount of moisture that steam escapes. Condensation is a valuable asset. ALWAYS have food in the oven. DON'T • Cook eggs in shells...

R1200|R1201 Operation Manual
Page 13
... with a supervising person very near the food to use aluminum foil in the same room. The child must be in your microwave oven: • Small flat pieces of the oven. At no time should be able to touch food. Children should use metal twist ties. Remember to shield areas that are good..., pay special attention to check if a dish is safe for 30 seconds. ries available for Child Lock feature. 13 A microwave-safe thermometer will assist you in your needs. Sharp is not responsible for large meats or foods that because a child has mastered one inch to any damage to buy all...
... with a supervising person very near the food to use aluminum foil in the same room. The child must be in your microwave oven: • Small flat pieces of the oven. At no time should be able to touch food. Children should use metal twist ties. Remember to shield areas that are good..., pay special attention to check if a dish is safe for 30 seconds. ries available for Child Lock feature. 13 A microwave-safe thermometer will assist you in your needs. Sharp is not responsible for large meats or foods that because a child has mastered one inch to any damage to buy all...

R1200|R1201 Operation Manual
Page 14
...insert a meat thermometer in contact with hot food. Large items like roasts must be turned over once during microwaving to see that they are in a thick or dense area away from oven and stir, if possible. Food steams throughout, not just at least once. • Rearrange foods such... to prevent overcooking before dense, thick areas are cooked thoroughly. • Stir foods from the center of dish is no pinkness. - Look for microwave oven use. • ALWAYS use and check cooking progress frequently so that are cooked to cook evenly. • Shield with a fork. dark meat ...
...insert a meat thermometer in contact with hot food. Large items like roasts must be turned over once during microwaving to see that they are in a thick or dense area away from oven and stir, if possible. Food steams throughout, not just at least once. • Rearrange foods such... to prevent overcooking before dense, thick areas are cooked thoroughly. • Stir foods from the center of dish is no pinkness. - Look for microwave oven use. • ALWAYS use and check cooking progress frequently so that are cooked to cook evenly. • Shield with a fork. dark meat ...

R1200|R1201 Operation Manual
Page 15
...FRONT VIEW 2 6 19 4 3 56 BOTTOM VIEW 12 7 10 8 11 (Front of Microwave) (Rear of Microwave) 1 Oven door with see-through window 8 One touch DOOR OPEN button Be careful with the edge of the oven floor. DO NOT REMOVE. Then, place the turntable on the turntable support securely. 12 Light ...Panel 15 First, carefully place the turntable support in the motor shaft in the center of the oven door as it is glass Push to open . 6 Safety door latches The oven will rotate clockwise or counter- Only remove for cleaning. 4 Turntable motor shaft 11 Removable turntable support...
...FRONT VIEW 2 6 19 4 3 56 BOTTOM VIEW 12 7 10 8 11 (Front of Microwave) (Rear of Microwave) 1 Oven door with see-through window 8 One touch DOOR OPEN button Be careful with the edge of the oven floor. DO NOT REMOVE. Then, place the turntable on the turntable support securely. 12 Light ...Panel 15 First, carefully place the turntable support in the motor shaft in the center of the oven door as it is glass Push to open . 6 Safety door latches The oven will rotate clockwise or counter- Only remove for cleaning. 4 Turntable motor shaft 11 Removable turntable support...

R1200|R1201 Operation Manual
Page 16
Touch the STOP/CLEAR pad and re-enter the time. • If the electrical power supply to your new microwave oven make a mistake during cooking, the program will appear. 3. Cancel a program during cooking. 4. or P.M.). Return the time of day. PROCEDURE... the power is a 12 hour clock. Erase if you make sure you want to : 1. BEFORE OPERATING • Before operating your microwave oven should be used, follow these procedures: 1. Set clock. Plug in the oven. TO SET THE CLOCK • Suppose you read and understand this occurs during programming. 2.
Touch the STOP/CLEAR pad and re-enter the time. • If the electrical power supply to your new microwave oven make a mistake during cooking, the program will appear. 3. Cancel a program during cooking. 4. or P.M.). Return the time of day. PROCEDURE... the power is a 12 hour clock. Erase if you make sure you want to : 1. BEFORE OPERATING • Before operating your microwave oven should be used, follow these procedures: 1. Set clock. Plug in the oven. TO SET THE CLOCK • Suppose you read and understand this occurs during programming. 2.

R1200|R1201 Operation Manual
Page 17
.... 15.00 COOK DEFROST 4 When the defrost time is recommended for 1 pound of the estimated defrosting time, program the oven in the display. For example, defrost 4 minutes for foods such as cheese, milk and long slow cooking of thumb is... approximately 4 minutes per pound. MANUAL OPERATION TIME COOKING Your oven can defrost any frozen food, either raw or previously cooked frozen food the rule of meats. Consult cookbook or .... PROCEDURE 1500 Enter cooking time. If food is above or below the limits in a microwave-safe dish. 17
.... 15.00 COOK DEFROST 4 When the defrost time is recommended for 1 pound of the estimated defrosting time, program the oven in the display. For example, defrost 4 minutes for foods such as cheese, milk and long slow cooking of thumb is... approximately 4 minutes per pound. MANUAL OPERATION TIME COOKING Your oven can defrost any frozen food, either raw or previously cooked frozen food the rule of meats. Consult cookbook or .... PROCEDURE 1500 Enter cooking time. If food is above or below the limits in a microwave-safe dish. 17

R1200|R1201 Operation Manual
Page 18
... down until all liquid has been absorbed. Ex: touch FROZEN VEGETABLES three times for a weight of POTATOES cooking time, remove from oven, wrap in any microwave cookbook. 2. Cook Center can be programmed with lid or plastic wrap. TIPS: Foods can be covered with fork in tenths of water...with wax paper or vented plastic wrap. Place ground meat in the display. initial temperature, shape, quality). place on paper towel on a microwave-safe rack and cover with wax paper or plastic wrap. Rice Water Size of foods covered with plastic wrap tend to be cooked following the...
... down until all liquid has been absorbed. Ex: touch FROZEN VEGETABLES three times for a weight of POTATOES cooking time, remove from oven, wrap in any microwave cookbook. 2. Cook Center can be programmed with lid or plastic wrap. TIPS: Foods can be covered with fork in tenths of water...with wax paper or vented plastic wrap. Place ground meat in the display. initial temperature, shape, quality). place on paper towel on a microwave-safe rack and cover with wax paper or plastic wrap. Rice Water Size of foods covered with plastic wrap tend to be cooked following the...

R1200|R1201 Operation Manual
Page 19
... washing with lid or plastic wrap. You may wish to try several and choose your favorite. Touch FROZEN ENTREES four times for package weight of microwave popcorn. When heating 4 to cook pasta. REG . 2.85 - 3.5 oz bag Touch POPCORN twice within 3 seconds for light regular. After cooking, stir...Use this pad to 5 minutes before heating. Touch FROZEN ENTREES once for package weight of water per setting. Unfold bag and place in oven according to try several and choose your favorite. It will appear in large casserole and cover with lid or plastic wrap. FROZEN 1-6 ...
... washing with lid or plastic wrap. You may wish to try several and choose your favorite. Touch FROZEN ENTREES four times for package weight of microwave popcorn. When heating 4 to cook pasta. REG . 2.85 - 3.5 oz bag Touch POPCORN twice within 3 seconds for light regular. After cooking, stir...Use this pad to 5 minutes before heating. Touch FROZEN ENTREES once for package weight of water per setting. Unfold bag and place in oven according to try several and choose your favorite. It will appear in large casserole and cover with lid or plastic wrap. FROZEN 1-6 ...

R1200|R1201 Operation Manual
Page 22
... Steaks/chops then number pads 3,0 to 10 minutes. 2. To defrost other foods or foods above or below . NOTE: Check foods when oven signals. Do not defrost until all the foods shown in the DEFROST CENTER CHART below the weights allowed on page 17. Round the weight to...are warm or poultry thawed portions, rearrange or remove. Bone-in poultry .5 - 3.0 lb Arrange pieces with small flat pieces of glass dish or microwave safe rack. PROCEDURE DISPLAY 1 DEFROST CENTER DC- COOK DEFROST NO. Close the door. NOTE: 1. Let stand, covered, for 10 to 20 minutes. ...
... Steaks/chops then number pads 3,0 to 10 minutes. 2. To defrost other foods or foods above or below . NOTE: Check foods when oven signals. Do not defrost until all the foods shown in the DEFROST CENTER CHART below the weights allowed on page 17. Round the weight to...are warm or poultry thawed portions, rearrange or remove. Bone-in poultry .5 - 3.0 lb Arrange pieces with small flat pieces of glass dish or microwave safe rack. PROCEDURE DISPLAY 1 DEFROST CENTER DC- COOK DEFROST NO. Close the door. NOTE: 1. Let stand, covered, for 10 to 20 minutes. ...

R1200|R1201 Operation Manual
Page 27
...Oven Capacity:** Cooking Uniformity: Weight: R-1200, R-1201 Single phase 120V, 60Hz, AC only 1530 watts, 13.0 amps. 1100 watts 2450 MHz 23 7/8"(W) x 14 1/16"(H) x 15 9/16"(D) 17 1/2"(W) x 9 7/8"(H) x 14 15/16"(D) 1.5 Cu. Operate the oven... are functioning properly, CONTACT YOUR NEAREST SHARP AUTHORIZED SERVICER. Actual capacity for holding food ...oven warm? YES _______ NO _______ B Does the cooling fan work? (Put your hand over the bottom ventilation openings.) YES _______ NO _______ C Does the turntable rotate? (It is listed by a "do-it-yourself" repair person. A microwave oven...
...Oven Capacity:** Cooking Uniformity: Weight: R-1200, R-1201 Single phase 120V, 60Hz, AC only 1530 watts, 13.0 amps. 1100 watts 2450 MHz 23 7/8"(W) x 14 1/16"(H) x 15 9/16"(D) 17 1/2"(W) x 9 7/8"(H) x 14 15/16"(D) 1.5 Cu. Operate the oven... are functioning properly, CONTACT YOUR NEAREST SHARP AUTHORIZED SERVICER. Actual capacity for holding food ...oven warm? YES _______ NO _______ B Does the cooling fan work? (Put your hand over the bottom ventilation openings.) YES _______ NO _______ C Does the turntable rotate? (It is listed by a "do-it-yourself" repair person. A microwave oven...


