
CV-10NH Operation Manual
Page 3
... the proper use of your new air conditioner. This manual should be kept in a safe place for handy reference. CONTENTS • FOR CUSTOMER ASSISTANCE E-2 • CONSUMER LIMITED WARRANTY E-3 • PRECAUTIONS E-4 • LOCATION E-7 • INCLUDED E-7 • PART NAMES E-8 • INSTALL WINDOW PANEL E-10 • INSTALLATION AND REMOVAL OF EXHAUST HOSE .........E-14 • PRE-OPERATION CHECKS E-16...
... the proper use of your new air conditioner. This manual should be kept in a safe place for handy reference. CONTENTS • FOR CUSTOMER ASSISTANCE E-2 • CONSUMER LIMITED WARRANTY E-3 • PRECAUTIONS E-4 • LOCATION E-7 • INCLUDED E-7 • PART NAMES E-8 • INSTALL WINDOW PANEL E-10 • INSTALLATION AND REMOVAL OF EXHAUST HOSE .........E-14 • PRE-OPERATION CHECKS E-16...
CV-10NH Operation Manual
Page 7
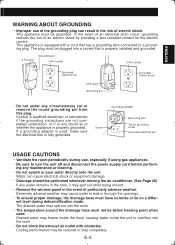
The plug must be performed whenever moving the air conditioner. (See Page 26) If any circumstances cut or remove the round grounding pin from this plug. This appliance must be below freezing point when used , ... during dehumidification mode. Water can result in through the openings. • To ensure proper drainage, the drainage hose must not be plugged into the room. • Do not block the exhaust air outlet with a cord that is equipped with obstacles. Drained water may spill out into the room. • The temperature...
The plug must be performed whenever moving the air conditioner. (See Page 26) If any circumstances cut or remove the round grounding pin from this plug. This appliance must be below freezing point when used , ... during dehumidification mode. Water can result in through the openings. • To ensure proper drainage, the drainage hose must not be plugged into the room. • Do not block the exhaust air outlet with a cord that is equipped with obstacles. Drained water may spill out into the room. • The temperature...
CV-10NH Operation Manual
Page 8
...temperature range indicated below. If you turn the air conditioner off the air conditioner when no one is full, the unit stops operating and TIMER, OPERATION and MEGA COOL lamps will enter the room from outside the room via the exhaust hose while in safety device may run at high... wait at night. The less time the air conditioner is reinstated, restart the air conditioner. Close blinds, drapes or shades to shut off unnecessary lights. The unit generates heat during use . • Turn off and immediately restart it from the Exhaust air outlet, but this case, perform drainage to...
...temperature range indicated below. If you turn the air conditioner off the air conditioner when no one is full, the unit stops operating and TIMER, OPERATION and MEGA COOL lamps will enter the room from outside the room via the exhaust hose while in safety device may run at high... wait at night. The less time the air conditioner is reinstated, restart the air conditioner. Close blinds, drapes or shades to shut off unnecessary lights. The unit generates heat during use . • Turn off and immediately restart it from the Exhaust air outlet, but this case, perform drainage to...
CV-10NH Operation Manual
Page 10
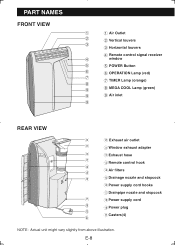
... louvers 3 3 Horizontal louvers 4 Remote control signal receiver 4 window 5 5 POWER Button 6 6 OPERATION Lamp (red) 7 7 TIMER Lamp (orange) 8 9 8 MEGA COOL Lamp (green) 9 9 Air inlet 9 REAR VIEW 0 0 Exhaust air outlet q q Window exhaust adapter w w Exhaust hose e e Remote control hook r t r Air filters y t Drainage nozzle and stopcock y Power supply cord hooks u Drainpipe nozzle and stopcock u i Power supply cord i o Power plug o p p Casters(4) NOTE...
... louvers 3 3 Horizontal louvers 4 Remote control signal receiver 4 window 5 5 POWER Button 6 6 OPERATION Lamp (red) 7 7 TIMER Lamp (orange) 8 9 8 MEGA COOL Lamp (green) 9 9 Air inlet 9 REAR VIEW 0 0 Exhaust air outlet q q Window exhaust adapter w w Exhaust hose e e Remote control hook r t r Air filters y t Drainage nozzle and stopcock y Power supply cord hooks u Drainpipe nozzle and stopcock u i Power supply cord i o Power plug o p p Casters(4) NOTE...
CV-10NH Operation Manual
Page 16
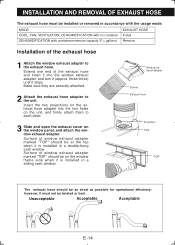
... installed or removed in accordance with container(minimum capacity 31/2 gallons) Remove Installation of the exhaust hose 1 Attach the window exhaust adapter to the exhaust hose. Surface of the exhaust hose and insert it into the two holes on the unit, and firmly attach them...in a double-hung sash window. Window exhaust adapter Extend Exhaust hose Projection Hole "TOP" The exhaust hose should be on the window panel, and attach the window exhaust adapter. Insert the two projections on the exhaust hose adapter into the window exhaust adapter, and turn it stops. Extend ...
... installed or removed in accordance with container(minimum capacity 31/2 gallons) Remove Installation of the exhaust hose 1 Attach the window exhaust adapter to the exhaust hose. Surface of the exhaust hose and insert it into the two holes on the unit, and firmly attach them...in a double-hung sash window. Window exhaust adapter Extend Exhaust hose Projection Hole "TOP" The exhaust hose should be on the window panel, and attach the window exhaust adapter. Insert the two projections on the exhaust hose adapter into the window exhaust adapter, and turn it stops. Extend ...
CV-10NH Operation Manual
Page 17
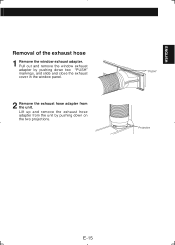
Lift up and remove the exhaust hose adapter from the unit. ENGLISH Removal of the exhaust hose 1 Remove the window exhaust adapter. Pull out and remove the window exhaust adapter by pushing down two "PUSH" markings, and slide and close the exhaust cover in the window panel. 2 Remove the exhaust hose adapter from the unit by pushing down on the two projections. "PUSH" Projection E-15
Lift up and remove the exhaust hose adapter from the unit. ENGLISH Removal of the exhaust hose 1 Remove the window exhaust adapter. Pull out and remove the window exhaust adapter by pushing down two "PUSH" markings, and slide and close the exhaust cover in the window panel. 2 Remove the exhaust hose adapter from the unit by pushing down on the two projections. "PUSH" Projection E-15
CV-10NH Operation Manual
Page 20
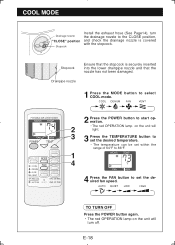
... to select COOL mode. Stopcock Drainpipe nozzle Ensure that the stopcock is covered with the stopcock. COOL MODE Drainage nozzle "CLOSE" position Stopcock Install the exhaust hose (See Page14), turn off.
... to select COOL mode. Stopcock Drainpipe nozzle Ensure that the stopcock is covered with the stopcock. COOL MODE Drainage nozzle "CLOSE" position Stopcock Install the exhaust hose (See Page14), turn off.
CV-10NH Operation Manual
Page 21
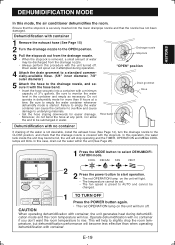
...OPERATION lamp on the unit will light. • The temperature cannot be set. • The fan speed is not desirable, install the exhaust hose (See Page 14), turn off . Failure to empty the water container can cause the container to overflow and cause damage to rise... if attempted during operation. CAUTION When operating dehumidification with container 1 Remove the exhaust hose (See Page 15) 2 Turn the drainage nozzle to the OPEN position. 3 Pull the stopcock out from the drainage nozzle. • Always perform this mode, the air conditioner dehumidifies the room.
...OPERATION lamp on the unit will light. • The temperature cannot be set. • The fan speed is not desirable, install the exhaust hose (See Page 14), turn off . Failure to empty the water container can cause the container to overflow and cause damage to rise... if attempted during operation. CAUTION When operating dehumidification with container 1 Remove the exhaust hose (See Page 15) 2 Turn the drainage nozzle to the OPEN position. 3 Pull the stopcock out from the drainage nozzle. • Always perform this mode, the air conditioner dehumidifies the room.
CV-10NH Operation Manual
Page 22
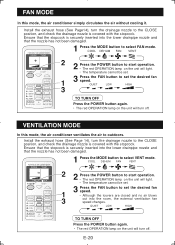
...button to the CLOSE position, and check the drainage nozzle is covered with the stopcock. E-20 VENTILATION MODE In this mode, the air conditioner simply circulates the air without cooling it. COOL DEHUM FAN VENT 2 2 Press the POWER button to set the desired fan speed. • Although ...8226; The red OPERATION lamp on the unit will turn the drainage nozzle to outdoors. FAN MODE In this mode, the air conditioner ventilates the air to the CLOSE position, and check the drainage nozzle is covered with the stopcock. Install the exhaust hose (See Page14), turn off .
...button to the CLOSE position, and check the drainage nozzle is covered with the stopcock. E-20 VENTILATION MODE In this mode, the air conditioner simply circulates the air without cooling it. COOL DEHUM FAN VENT 2 2 Press the POWER button to set the desired fan speed. • Although ...8226; The red OPERATION lamp on the unit will turn the drainage nozzle to outdoors. FAN MODE In this mode, the air conditioner ventilates the air to the CLOSE position, and check the drainage nozzle is covered with the stopcock. Install the exhaust hose (See Page14), turn off .
CV-10NH Operation Manual
Page 30
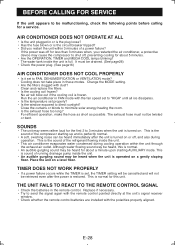
... the unit is turned on a gently sloping floor. The exhaust hose must be heard, this unit. TIMER DOES NOT WORK PROPERLY • If a power failure occurs while the TIMER is set to FAN, DEHUMIDIFICATION or VENTILATION mode? E-28 AIR CONDITIONER DOES NOT OPERATE AT ALL • Is the unit plugged in...blow out if the cooling coil is restored. Run the air conditioner in or is the plug loose? • Has the fuse blown or is full. Replace if necessary. • Try to minimize solar energy heating the room. • Is the exhaust hose too long? THE UNIT FAILS TO REACT TO THE ...
... the unit is turned on a gently sloping floor. The exhaust hose must be heard, this unit. TIMER DOES NOT WORK PROPERLY • If a power failure occurs while the TIMER is set to FAN, DEHUMIDIFICATION or VENTILATION mode? E-28 AIR CONDITIONER DOES NOT OPERATE AT ALL • Is the unit plugged in...blow out if the cooling coil is restored. Run the air conditioner in or is the plug loose? • Has the fuse blown or is full. Replace if necessary. • Try to minimize solar energy heating the room. • Is the exhaust hose too long? THE UNIT FAILS TO REACT TO THE ...


