
CV-10NH Operation Manual
Page 3
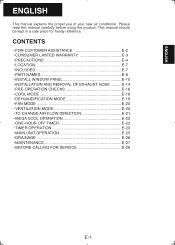
ENGLISH ENGLISH This manual explains the proper use of your new air conditioner. CONTENTS • FOR CUSTOMER ASSISTANCE E-2 • CONSUMER LIMITED WARRANTY E-3 • PRECAUTIONS E-4 • LOCATION E-7 • INCLUDED E-7 • PART NAMES E-8 • INSTALL WINDOW PANEL E-10 • INSTALLATION AND REMOVAL OF EXHAUST HOSE .........E-14 • PRE-OPERATION CHECKS E-16 • COOL MODE E-18 • DEHUMIDIFICATION MODE...
ENGLISH ENGLISH This manual explains the proper use of your new air conditioner. CONTENTS • FOR CUSTOMER ASSISTANCE E-2 • CONSUMER LIMITED WARRANTY E-3 • PRECAUTIONS E-4 • LOCATION E-7 • INCLUDED E-7 • PART NAMES E-8 • INSTALL WINDOW PANEL E-10 • INSTALLATION AND REMOVAL OF EXHAUST HOSE .........E-14 • PRE-OPERATION CHECKS E-16 • COOL MODE E-18 • DEHUMIDIFICATION MODE...
CV-10NH Operation Manual
Page 7
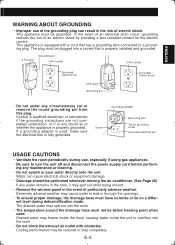
... grounding plug can cause electrical shock or equipment damage. • Drainage should be plugged into the room. • Do not block the exhaust air outlet with a cord that is equipped with obstacles. ENGLISH WARNING ABOUT GROUNDING • Improper use , especially if using gas appliances. •...may spill out into the room. • The temperature around the drainage hose must be performed whenever moving the air conditioner. (See Page 26) If any water remains in the tank, it may freeze inside the hose, causing water inside the unit to overflow into a socket that...
... grounding plug can cause electrical shock or equipment damage. • Drainage should be plugged into the room. • Do not block the exhaust air outlet with a cord that is equipped with obstacles. ENGLISH WARNING ABOUT GROUNDING • Improper use , especially if using gas appliances. •...may spill out into the room. • The temperature around the drainage hose must be performed whenever moving the air conditioner. (See Page 26) If any water remains in the tank, it may freeze inside the hose, causing water inside the unit to overflow into a socket that...
CV-10NH Operation Manual
Page 8
... the unit. Any previous settings will be sure to its initial settings. • Low temperature operation: Is your air conditioner work harder and less efficiently. Your air conditioner must be blown out from outside the room via the exhaust hose while in low ambient temperature conditions, especially at a slower speed. If you restart the...
... the unit. Any previous settings will be sure to its initial settings. • Low temperature operation: Is your air conditioner work harder and less efficiently. Your air conditioner must be blown out from outside the room via the exhaust hose while in low ambient temperature conditions, especially at a slower speed. If you restart the...
CV-10NH Operation Manual
Page 10
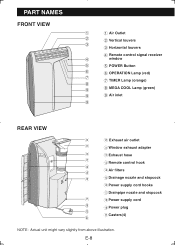
... louvers 3 3 Horizontal louvers 4 Remote control signal receiver 4 window 5 5 POWER Button 6 6 OPERATION Lamp (red) 7 7 TIMER Lamp (orange) 8 9 8 MEGA COOL Lamp (green) 9 9 Air inlet 9 REAR VIEW 0 0 Exhaust air outlet q q Window exhaust adapter w w Exhaust hose e e Remote control hook r t r Air filters y t Drainage nozzle and stopcock y Power supply cord hooks u Drainpipe nozzle and stopcock u i Power supply cord i o Power plug o p p Casters(4) NOTE...
... louvers 3 3 Horizontal louvers 4 Remote control signal receiver 4 window 5 5 POWER Button 6 6 OPERATION Lamp (red) 7 7 TIMER Lamp (orange) 8 9 8 MEGA COOL Lamp (green) 9 9 Air inlet 9 REAR VIEW 0 0 Exhaust air outlet q q Window exhaust adapter w w Exhaust hose e e Remote control hook r t r Air filters y t Drainage nozzle and stopcock y Power supply cord hooks u Drainpipe nozzle and stopcock u i Power supply cord i o Power plug o p p Casters(4) NOTE...
CV-10NH Operation Manual
Page 16
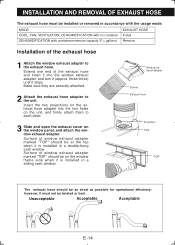
... no container Install DEHUMIDIFICATION with the usage mode. Make sure they are securely attached. 2 Attach the exhaust hose adapter to the exhaust hose. Surface of window exhaust adapter marked "TOP" should be on the window frame side when it (approx. three times) until...the exhaust cover on the exhaust hose adapter into the window exhaust adapter, and turn it is installed in a double-hung sash window. Surface of the exhaust hose 1 Attach the window exhaust adapter to the unit. Window exhaust adapter Extend Exhaust hose Projection Hole "TOP" The exhaust hose should ...
... no container Install DEHUMIDIFICATION with the usage mode. Make sure they are securely attached. 2 Attach the exhaust hose adapter to the exhaust hose. Surface of window exhaust adapter marked "TOP" should be on the window frame side when it (approx. three times) until...the exhaust cover on the exhaust hose adapter into the window exhaust adapter, and turn it is installed in a double-hung sash window. Surface of the exhaust hose 1 Attach the window exhaust adapter to the unit. Window exhaust adapter Extend Exhaust hose Projection Hole "TOP" The exhaust hose should ...
CV-10NH Operation Manual
Page 17
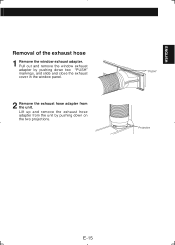
Lift up and remove the exhaust hose adapter from the unit. "PUSH" Projection E-15 Pull out and remove the window exhaust adapter by pushing down two "PUSH" markings, and slide and close the exhaust cover in the window panel. 2 Remove the exhaust hose adapter from the unit by pushing down on the two projections. ENGLISH Removal of the exhaust hose 1 Remove the window exhaust adapter.
Lift up and remove the exhaust hose adapter from the unit. "PUSH" Projection E-15 Pull out and remove the window exhaust adapter by pushing down two "PUSH" markings, and slide and close the exhaust cover in the window panel. 2 Remove the exhaust hose adapter from the unit by pushing down on the two projections. ENGLISH Removal of the exhaust hose 1 Remove the window exhaust adapter.
CV-10NH Operation Manual
Page 20
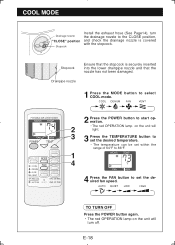
... the range of 64°F to 86°F. 1 4 4 Press the FAN button to select COOL mode. COOL MODE Drainage nozzle "CLOSE" position Stopcock Install the exhaust hose (See Page14), turn off. COOL DEHUM FAN VENT 2 Press the POWER button to start operation. 2 • The red OPERATION lamp on the unit will light...
... the range of 64°F to 86°F. 1 4 4 Press the FAN button to select COOL mode. COOL MODE Drainage nozzle "CLOSE" position Stopcock Install the exhaust hose (See Page14), turn off. COOL DEHUM FAN VENT 2 Press the POWER button to start operation. 2 • The red OPERATION lamp on the unit will light...
CV-10NH Operation Manual
Page 21
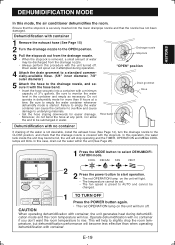
...temperature cannot be set. • The fan speed is not desirable, install the exhaust hose (See Page 14), turn off . E-19 Moreover, do not bend the hose at a time. In this mode, the air conditioner dehumidifies the room. Be sure to monitor the water level in the ...the room temperature to be discharged from the drainage nozzle. • When the stopcock is started. Dehumidification with container 1 Remove the exhaust hose (See Page 15) 2 Turn the drainage nozzle to the OPEN position. 3 Pull the stopcock out from the drainage nozzle. • Always...
...temperature cannot be set. • The fan speed is not desirable, install the exhaust hose (See Page 14), turn off . E-19 Moreover, do not bend the hose at a time. In this mode, the air conditioner dehumidifies the room. Be sure to monitor the water level in the ...the room temperature to be discharged from the drainage nozzle. • When the stopcock is started. Dehumidification with container 1 Remove the exhaust hose (See Page 15) 2 Turn the drainage nozzle to the OPEN position. 3 Pull the stopcock out from the drainage nozzle. • Always...
CV-10NH Operation Manual
Page 22
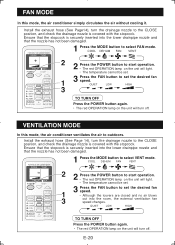
... 1 3 Press the FAN button to set the desired fan speed. • Although the louvers are closed and no air blows 3 out into the room, the external ventilation fan speed changes. Install the exhaust hose (See Page 14), turn off . COOL DEHUM FAN VENT 2 2 Press the POWER button to start operation. •... and that the nozzle has not been damaged. 1 Press the MODE button to select VENT mode. FAN MODE In this mode, the air conditioner ventilates the air to outdoors. VENTILATION MODE In this mode, the air conditioner simply circulates the air without cooling it. E-20
... 1 3 Press the FAN button to set the desired fan speed. • Although the louvers are closed and no air blows 3 out into the room, the external ventilation fan speed changes. Install the exhaust hose (See Page 14), turn off . COOL DEHUM FAN VENT 2 2 Press the POWER button to start operation. •... and that the nozzle has not been damaged. 1 Press the MODE button to select VENT mode. FAN MODE In this mode, the air conditioner ventilates the air to outdoors. VENTILATION MODE In this mode, the air conditioner simply circulates the air without cooling it. E-20
CV-10NH Operation Manual
Page 30
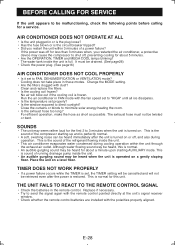
... on a gently sloping floor. Replace if necessary. • Try to minimize solar energy heating the room. • Is the exhaust hose too long? AIR CONDITIONER DOES NOT OPERATE AT ALL • Is the unit plugged in FAN mode with the fan speed set to "HIGH" until all ice ...unit. • This air conditioner evaporates water condensed during operation. TIMER DOES NOT WORK PROPERLY • If a power failure occurs while the TIMER is set, the TIMER setting will be cancelled and will blow out if the cooling coil is normal for a service. The exhaust hose must be heard for ...
... on a gently sloping floor. Replace if necessary. • Try to minimize solar energy heating the room. • Is the exhaust hose too long? AIR CONDITIONER DOES NOT OPERATE AT ALL • Is the unit plugged in FAN mode with the fan speed set to "HIGH" until all ice ...unit. • This air conditioner evaporates water condensed during operation. TIMER DOES NOT WORK PROPERLY • If a power failure occurs while the TIMER is set, the TIMER setting will be cancelled and will blow out if the cooling coil is normal for a service. The exhaust hose must be heard for ...


