BD-HP21U Operation Manual
Page 4
Contents n Introduction Contents 2 What would you like to do with this Player 3 DEAR SHARP CUSTOMER 4 IMPORTANT SAFETY INSTRUCTIONS ... 4 - 6 About Discs 7 - 8 About Disc Contents 9 Important Information 10 Getting Started 11 Major Components 12 - 13 o Connection Introduction to Connections 14 Video Connections ...Code 21 Operating a SHARP TV Using the Remote Control ... 21 Turning the Power On 22 Language Setting 22 Turning Off the LCD Backlight and Indications ....... 23 Using AQUOS LINK 23 BD/DVD/CD Playback 24 - 27 Loading a Disc 24 BD/DVD Video Playback 24 BD/DVD Menus 24 ...
Contents n Introduction Contents 2 What would you like to do with this Player 3 DEAR SHARP CUSTOMER 4 IMPORTANT SAFETY INSTRUCTIONS ... 4 - 6 About Discs 7 - 8 About Disc Contents 9 Important Information 10 Getting Started 11 Major Components 12 - 13 o Connection Introduction to Connections 14 Video Connections ...Code 21 Operating a SHARP TV Using the Remote Control ... 21 Turning the Power On 22 Language Setting 22 Turning Off the LCD Backlight and Indications ....... 23 Using AQUOS LINK 23 BD/DVD/CD Playback 24 - 27 Loading a Disc 24 BD/DVD Video Playback 24 BD/DVD Menus 24 ...
BD-HP21U Operation Manual
Page 5
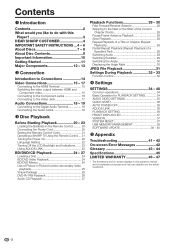
... enjoy movies. Enjoying different kinds of discs and contents Use this Player? About Discs (pp. 7-8) BD/DVD/CD Playback (p. 24) Simple connection and operation through HDMI This Player is compatible with AQUOS LINK, you more information. If your circumstances. Watching high quality movies on Bluray discs This Player offers full high-definition Blu-ray disc playback. q Settings (pp. 34-40) Gives...
... enjoy movies. Enjoying different kinds of discs and contents Use this Player? About Discs (pp. 7-8) BD/DVD/CD Playback (p. 24) Simple connection and operation through HDMI This Player is compatible with AQUOS LINK, you more information. If your circumstances. Watching high quality movies on Bluray discs This Player offers full high-definition Blu-ray disc playback. q Settings (pp. 34-40) Gives...
BD-HP21U Operation Manual
Page 15
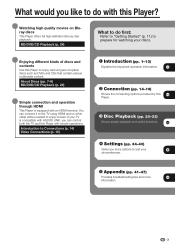
This function allows TVs compatible with AQUOS LINK to prevent accidental operations. n Introduction Remote Control Unit 1 16 2 3 17 4 5 6 18 19 7 20 8 21 9 10 22 11 12 23 13 14 24 15 25 ... (Lock) for more than 5 seconds. • Each time you perform this operation, the function is activated or deactivated. • If you try to operate the Player while the keylock function is set, "Hold" blinks on the front display panel to indicate that the keylock function is set the keylock to also...
This function allows TVs compatible with AQUOS LINK to prevent accidental operations. n Introduction Remote Control Unit 1 16 2 3 17 4 5 6 18 19 7 20 8 21 9 10 22 11 12 23 13 14 24 15 25 ... (Lock) for more than 5 seconds. • Each time you perform this operation, the function is activated or deactivated. • If you try to operate the Player while the keylock function is set, "Hold" blinks on the front display panel to indicate that the keylock function is set the keylock to also...
BD-HP21U Operation Manual
Page 17
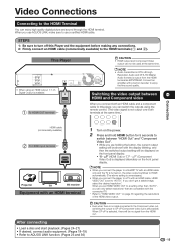
...with the connected TV. * Refer to enjoy the fine sound quality. When you connect the player to a SHARP TV with an HDMI cable only and the TV is still possible. When CP-oP is ... to the Component video out, switching the output to AQUOS LINK function. (Pages 23 and 36) 15 NOTE • When you set to use AQUOS LINK, make sure to "AUTO". When you can... TV AV receiver Equipment with an HDMI terminal 1 Turn on the front panel display. After connecting • Load a disc and start playback. (Pages 24-27) • If desired, connect audio equipment. (Pages 18-19) •...
...with the connected TV. * Refer to enjoy the fine sound quality. When you connect the player to a SHARP TV with an HDMI cable only and the TV is still possible. When CP-oP is ... to the Component video out, switching the output to AQUOS LINK function. (Pages 23 and 36) 15 NOTE • When you set to use AQUOS LINK, make sure to "AUTO". When you can... TV AV receiver Equipment with an HDMI terminal 1 Turn on the front panel display. After connecting • Load a disc and start playback. (Pages 24-27) • If desired, connect audio equipment. (Pages 18-19) •...
BD-HP21U Operation Manual
Page 25
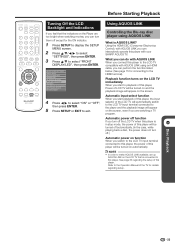
... or EXIT to the LCD TV compatible with your SHARP AQUOS TV. Using the HDMI CEC (Consumer Electronics Control), with AQUOS LINK you can interactively operate this player with AQUOS LINK using AQUOS LINK What is connected to the player and the playback image will appear on the screen,...display the SETUP MENU screen. 2 Press a/b/c/d to select "SETTINGS", then press ENTER. 3 Press a/b to the HDMI terminal). Using AQUOS LINK Controlling the Blu-ray disc player using an HDMI cable, you can perform the function listed below. (See page 15 for connecting to select "FRONT DISPLAY/LED", then...
... or EXIT to the LCD TV compatible with your SHARP AQUOS TV. Using the HDMI CEC (Consumer Electronics Control), with AQUOS LINK you can interactively operate this player with AQUOS LINK using AQUOS LINK What is connected to the player and the playback image will appear on the screen,...display the SETUP MENU screen. 2 Press a/b/c/d to select "SETTINGS", then press ENTER. 3 Press a/b to the HDMI terminal). Using AQUOS LINK Controlling the Blu-ray disc player using an HDMI cable, you can perform the function listed below. (See page 15 for connecting to select "FRONT DISPLAY/LED", then...
BD-HP21U Operation Manual
Page 36
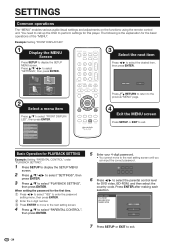
... the correct password. ------- 6 Press c/d to exit. 34 PARENTAL CONTROL DISC LANGUAGE ANGLE MARK DISPLAY PASSWORD SETTING LEVEL 3 0 USA 7 Press SETUP ..."FRONT DISPLAY/ LED", then press ENTER. The following is the explanation for this player. DISPLAYS THE TITLE LIST SETTINGS ON SCREEN LANGUAGE PICTURE 2 Select a menu item ...ENTER after making each selection. Basic Operation for DVD video, BD-ROM, and then select the country code. You need to ... exit. AUDIO VIDEO SETTINGS QUICK START AUTO POWER OFF AQUOS LINK PLAYBACK SETTING FRONT DISPLAY/LED VERSION USB MEMORY MANAGEMENT...
... the correct password. ------- 6 Press c/d to exit. 34 PARENTAL CONTROL DISC LANGUAGE ANGLE MARK DISPLAY PASSWORD SETTING LEVEL 3 0 USA 7 Press SETUP ..."FRONT DISPLAY/ LED", then press ENTER. The following is the explanation for this player. DISPLAYS THE TITLE LIST SETTINGS ON SCREEN LANGUAGE PICTURE 2 Select a menu item ...ENTER after making each selection. Basic Operation for DVD video, BD-ROM, and then select the country code. You need to ... exit. AUDIO VIDEO SETTINGS QUICK START AUTO POWER OFF AQUOS LINK PLAYBACK SETTING FRONT DISPLAY/LED VERSION USB MEMORY MANAGEMENT...
BD-HP21U Operation Manual
Page 38
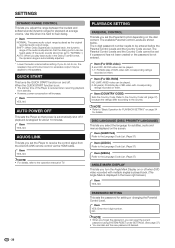
...NOTE • For details, refer to the country. The Parental Control Levels and the Country Code cannot be played. 0-99 year(s): Prohibits play of BD-video with corresponding ratings recorded on them . Item (For DVD-video) 8 and OFF: All DVD-video can be set . Item NORMAL: The same... lets you set the Player to the speakers. The 4-digit password number needs to be applied to receive the control signal from standby. • However, power consumption will increase. QUICK START This turns the QUICK START function on the disc content. Item YES, NO AQUOS LINK This lets you adjust...
...NOTE • For details, refer to the country. The Parental Control Levels and the Country Code cannot be played. 0-99 year(s): Prohibits play of BD-video with corresponding ratings recorded on them . Item (For DVD-video) 8 and OFF: All DVD-video can be set . Item NORMAL: The same... lets you set the Player to the speakers. The 4-digit password number needs to be applied to receive the control signal from standby. • However, power consumption will increase. QUICK START This turns the QUICK START function on the disc content. Item YES, NO AQUOS LINK This lets you adjust...
BD-HP21U Operation Manual
Page 40
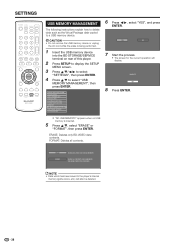
... data contents. ERASE FORMAT ERASES BD-VIDEO DATA ON USB MEMORY. AUDIO VIDEO SETTINGS QUICK START AUTO POWER OFF AQUOS LINK PLAYBACK SETTING FRONT DISPLAY/LED VERSION USB MEMORY MANAGEMENT SOFTWARE UPDATE SYSTEM RESET 6 Press c/d, select "YES", and press ENTER. YES NO 7 Start...OK 8 Press ENTER. • "NO USB MEMORY!" appears when no USB memory is being performed. 1 Insert the USB memory device into the BD STORAGE/SERVICE terminal on rear of this player. 2 Press SETUP to display the SETUP MENU screen. 3 Press a/b/c/d to select "SETTINGS", then press ENTER. 4 Press a/b to a USB ...
... data contents. ERASE FORMAT ERASES BD-VIDEO DATA ON USB MEMORY. AUDIO VIDEO SETTINGS QUICK START AUTO POWER OFF AQUOS LINK PLAYBACK SETTING FRONT DISPLAY/LED VERSION USB MEMORY MANAGEMENT SOFTWARE UPDATE SYSTEM RESET 6 Press c/d, select "YES", and press ENTER. YES NO 7 Start...OK 8 Press ENTER. • "NO USB MEMORY!" appears when no USB memory is being performed. 1 Insert the USB memory device into the BD STORAGE/SERVICE terminal on rear of this player. 2 Press SETUP to display the SETUP MENU screen. 3 Press a/b/c/d to select "SETTINGS", then press ENTER. 4 Press a/b to a USB ...
BD-HP21U Operation Manual
Page 41
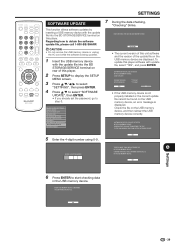
...THE USB MEMORY DEVICE. OK q Settings 39 AUDIO VIDEO SETTINGS QUICK START AUTO POWER OFF AQUOS LINK PLAYBACK SETTING FRONT DISPLAY/LED VERSION USB MEMORY MANAGEMENT SOFTWARE UPDATE SYSTEM RESET 7 During the... updated. 1 Insert the USB memory device with the update file into the BD STORAGE/SERVICE terminal on this player software with update file, select "YES", and press ENTER. NOW CHECKING THE...file, please call 1-800-BE-SHARP. SETTINGS SOFTWARE UPDATE This function allows software updates by inserting a USB memory device with the update file into the BD STORAGE/SERVICE terminal on the USB ...
...THE USB MEMORY DEVICE. OK q Settings 39 AUDIO VIDEO SETTINGS QUICK START AUTO POWER OFF AQUOS LINK PLAYBACK SETTING FRONT DISPLAY/LED VERSION USB MEMORY MANAGEMENT SOFTWARE UPDATE SYSTEM RESET 7 During the... updated. 1 Insert the USB memory device with the update file into the BD STORAGE/SERVICE terminal on this player software with update file, select "YES", and press ENTER. NOW CHECKING THE...file, please call 1-800-BE-SHARP. SETTINGS SOFTWARE UPDATE This function allows software updates by inserting a USB memory device with the update file into the BD STORAGE/SERVICE terminal on the USB ...


