BD-HP20U Operation Manual
Page 6
Contents n Introduction DEAR SHARP CUSTOMER 1 IMPORTANT SAFETY INSTRUCTIONS .... 1 Contents 4 What would you like to do with this Player 5 About Discs 6 - 7 About Disc Contents 8 Important Information 9 Getting ...and Indications ........ 23 Using AQUOS LINK 23 BD/DVD/CD Playback 24 - 27 Loading a Disc 24 BD/DVD Video Playback 24 BD/DVD Menus 25 BD-R/-RE/DVD-R/-RW Playback 26 - 27 Audio... 42 Basic Operation for PLAYBACK SETTING 43 FRONT DISPLAY/LED 44 VERSION 44 SYSTEM RESET 44 SOFTWARE UPDATE 45 - 46 r Appendix Troubleshooting 47 - 48 On-screen Error Messages 49 Glossary 50...
Contents n Introduction DEAR SHARP CUSTOMER 1 IMPORTANT SAFETY INSTRUCTIONS .... 1 Contents 4 What would you like to do with this Player 5 About Discs 6 - 7 About Disc Contents 8 Important Information 9 Getting ...and Indications ........ 23 Using AQUOS LINK 23 BD/DVD/CD Playback 24 - 27 Loading a Disc 24 BD/DVD Video Playback 24 BD/DVD Menus 25 BD-R/-RE/DVD-R/-RW Playback 26 - 27 Audio... 42 Basic Operation for PLAYBACK SETTING 43 FRONT DISPLAY/LED 44 VERSION 44 SYSTEM RESET 44 SOFTWARE UPDATE 45 - 46 r Appendix Troubleshooting 47 - 48 On-screen Error Messages 49 Glossary 50...

BD-HP20U Operation Manual
Page 13
Major Components Main Unit (Front) 12 3 4 n Introduction 5 7 6 1 POWER (p. 22) 2 Remote control sensor (p. 20) 3 Disc tray (p. 24) 4 OPEN/CLOSE (p. 24) 5 DVD/CD mode indicator (p. 22) 6 BD mode indicator (p. 22) 8 9 7 ON indicator (p. 22) 8 STANDBY indicator (p. 22) 9 Front panel display (p. 22) Main Unit (Rear) 12 3 9 10 45 6 11 7 8 1 COMPONENT VIDEO OUT ... AUDIO OUT COAXIAL jack (p. 18) 8 DIGITAL AUDIO OUT OPTICAL terminal (p. 18) 9 Cooling fan The cooling fan operates while the power to the Player is on. 10 AC IN terminal (p. 20) 11 SERVICE terminal for software (p. 45) 11
Major Components Main Unit (Front) 12 3 4 n Introduction 5 7 6 1 POWER (p. 22) 2 Remote control sensor (p. 20) 3 Disc tray (p. 24) 4 OPEN/CLOSE (p. 24) 5 DVD/CD mode indicator (p. 22) 6 BD mode indicator (p. 22) 8 9 7 ON indicator (p. 22) 8 STANDBY indicator (p. 22) 9 Front panel display (p. 22) Main Unit (Rear) 12 3 9 10 45 6 11 7 8 1 COMPONENT VIDEO OUT ... AUDIO OUT COAXIAL jack (p. 18) 8 DIGITAL AUDIO OUT OPTICAL terminal (p. 18) 9 Cooling fan The cooling fan operates while the power to the Player is on. 10 AC IN terminal (p. 20) 11 SERVICE terminal for software (p. 45) 11
BD-HP20U Operation Manual
Page 25
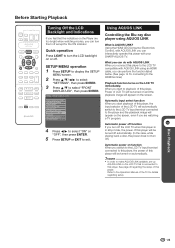
...SPEAKER SETTINGS QUICK START AUTO POWER OFF AQUOS LINK PLAYBACK SETTING FRONT DISPLAY / LED VERSION SOFTWARE UPDATE SYSTEM RESET 4 Press c/d to select "ON" or "OFF", then press ENTER...connect this player to the LCD TV compatible with your SHARP AQUOS TV. Automatic input select function When you start to playback of this player, Power of this player will appear...player with AQUOS LINK using AQUOS LINK What is AQUOS LINK? p Disc Playback 23 Quick operation Press LIGHT to turn the LCD backlight on the Player are watching a TV program. Using AQUOS LINK Controlling the Blu-ray disc player...
...SPEAKER SETTINGS QUICK START AUTO POWER OFF AQUOS LINK PLAYBACK SETTING FRONT DISPLAY / LED VERSION SOFTWARE UPDATE SYSTEM RESET 4 Press c/d to select "ON" or "OFF", then press ENTER...connect this player to the LCD TV compatible with your SHARP AQUOS TV. Automatic input select function When you start to playback of this player, Power of this player will appear...player with AQUOS LINK using AQUOS LINK What is AQUOS LINK? p Disc Playback 23 Quick operation Press LIGHT to turn the LCD backlight on the Player are watching a TV program. Using AQUOS LINK Controlling the Blu-ray disc player...
BD-HP20U Operation Manual
Page 35
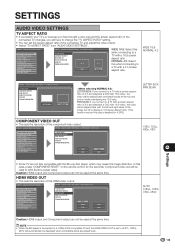
... Select this when connecting to a TV with the Blu-ray disc player, which may cause the image distortion. HDMI VIDEO OUT] AUDIO VIDEO SETTINGS SPEAKER SETTINGS QUICK START AUTO POWER OFF AQUOS LINK PLAYBACK SETTING FRONT DISPLAY / LED VERSION SOFTWARE UPDATE SYSTEM RESET TV ASPECT RATIO COMPONENT VIDEO OUT HDMI... 480i LETTER BOX, PAN SCAN 1080i, 720p, 480p, 480i q Settings • Some TV are played back. 33 NOTE • When the BD player is connected to a 1080p 24Hz compatible TV and the HDMI VIDEO OUT is labelled for five seconds. WIDE 16:9 NORMAL 4:3 MENU [AUDIO...
... Select this when connecting to a TV with the Blu-ray disc player, which may cause the image distortion. HDMI VIDEO OUT] AUDIO VIDEO SETTINGS SPEAKER SETTINGS QUICK START AUTO POWER OFF AQUOS LINK PLAYBACK SETTING FRONT DISPLAY / LED VERSION SOFTWARE UPDATE SYSTEM RESET TV ASPECT RATIO COMPONENT VIDEO OUT HDMI... 480i LETTER BOX, PAN SCAN 1080i, 720p, 480p, 480i q Settings • Some TV are played back. 33 NOTE • When the BD player is connected to a 1080p 24Hz compatible TV and the HDMI VIDEO OUT is labelled for five seconds. WIDE 16:9 NORMAL 4:3 MENU [AUDIO...
BD-HP20U Operation Manual
Page 36
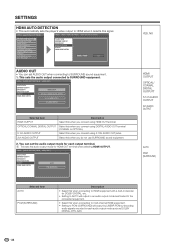
SETTINGS HDMI AUTO DETECTION • This automatically sets the player's video output to SURROUND sound equipment. 1. MENU [AUDIO VIDEO SETTINGS] MENU [AUDIO VIDEO SETTINGS - AUDIO OUT] TV ASPECT RATIO COMPONENT VIDEO OUT HDMI VIDEO OUT ... using HDMI OUT terminal. HDMI AUTO DETECTION] AUDIO VIDEO SETTINGS SPEAKER SETTINGS QUICK START AUTO POWER OFF AQUOS LINK PLAYBACK SETTING FRONT DISPLAY / LED VERSION SOFTWARE UPDATE SYSTEM RESET TV ASPECT RATIO COMPONENT VIDEO OUT HDMI VIDEO OUT HDMI AUTO DETECTION AUDIO OUT DYNAMIC RANGE CONTROL YES NO AUDIO OUT •...
SETTINGS HDMI AUTO DETECTION • This automatically sets the player's video output to SURROUND sound equipment. 1. MENU [AUDIO VIDEO SETTINGS] MENU [AUDIO VIDEO SETTINGS - AUDIO OUT] TV ASPECT RATIO COMPONENT VIDEO OUT HDMI VIDEO OUT ... using HDMI OUT terminal. HDMI AUTO DETECTION] AUDIO VIDEO SETTINGS SPEAKER SETTINGS QUICK START AUTO POWER OFF AQUOS LINK PLAYBACK SETTING FRONT DISPLAY / LED VERSION SOFTWARE UPDATE SYSTEM RESET TV ASPECT RATIO COMPONENT VIDEO OUT HDMI VIDEO OUT HDMI AUTO DETECTION AUDIO OUT DYNAMIC RANGE CONTROL YES NO AUDIO OUT •...
BD-HP20U Operation Manual
Page 37
... 2channel audio signal. MENU [AUDIO VIDEO SETTINGS] AUDIO VIDEO SETTINGS SPEAKER SETTINGS QUICK START AUTO POWER OFF AQUOS LINK PLAYBACK SETTING FRONT DISPLAY / LED VERSION SOFTWARE UPDATE SYSTEM RESET MENU [AUDIO VIDEO SETTINGS - If you adjust the range between the loudest and softest sounds (dynamic range) for DIGITAL AUDIO OUT (COAXIAL...
... 2channel audio signal. MENU [AUDIO VIDEO SETTINGS] AUDIO VIDEO SETTINGS SPEAKER SETTINGS QUICK START AUTO POWER OFF AQUOS LINK PLAYBACK SETTING FRONT DISPLAY / LED VERSION SOFTWARE UPDATE SYSTEM RESET MENU [AUDIO VIDEO SETTINGS - If you adjust the range between the loudest and softest sounds (dynamic range) for DIGITAL AUDIO OUT (COAXIAL...
BD-HP20U Operation Manual
Page 38
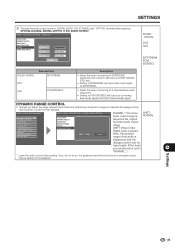
... [AUDIO VIDEO SETTINGS - MENU [AUDIO VIDEO SETTINGS] AUDIO VIDEO SETTINGS SPEAKER SETTINGS QUICK START AUTO POWER OFF AQUOS LINK PLAYBACK SETTING FRONT DISPLAY / LED VERSION SOFTWARE UPDATE SYSTEM RESET 6 Press c/d to select the desired item, then press ENTER.
... [AUDIO VIDEO SETTINGS - MENU [AUDIO VIDEO SETTINGS] AUDIO VIDEO SETTINGS SPEAKER SETTINGS QUICK START AUTO POWER OFF AQUOS LINK PLAYBACK SETTING FRONT DISPLAY / LED VERSION SOFTWARE UPDATE SYSTEM RESET 6 Press c/d to select the desired item, then press ENTER.
BD-HP20U Operation Manual
Page 39
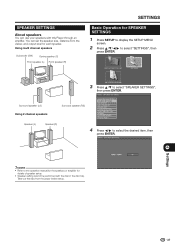
MENU [SPEAKER SETTINGS] AUDIO VIDEO SETTINGS SPEAKER SETTINGS QUICK START AUTO POWER OFF AQUOS LINK PLAYBACK SETTING FRONT DISPLAY / LED VERSION SOFTWARE UPDATE SYSTEM RESET Speaker (L) Speaker (R) 4 Press c/d to the operation manual for the speakers or amplifier for details of speaker ...Refer to select the desired item, then press ENTER. SPEAKER SETTINGS About speakers You can set the speaker size, distance from the player before setup. Take out the disc from the viewer, and output level for SPEAKER SETTINGS 1 Press SETUP to display the SETUP MENU screen. 2 Press a/b/c/d to ...
MENU [SPEAKER SETTINGS] AUDIO VIDEO SETTINGS SPEAKER SETTINGS QUICK START AUTO POWER OFF AQUOS LINK PLAYBACK SETTING FRONT DISPLAY / LED VERSION SOFTWARE UPDATE SYSTEM RESET Speaker (L) Speaker (R) 4 Press c/d to the operation manual for the speakers or amplifier for details of speaker ...Refer to select the desired item, then press ENTER. SPEAKER SETTINGS About speakers You can set the speaker size, distance from the player before setup. Take out the disc from the viewer, and output level for SPEAKER SETTINGS 1 Press SETUP to display the SETUP MENU screen. 2 Press a/b/c/d to ...
BD-HP20U Operation Manual
Page 42
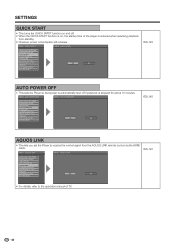
...SETTINGS QUICK START AUTO POWER OFF AQUOS LINK PLAYBACK SETTING FRONT DISPLAY / LED VERSION SOFTWARE UPDATE SYSTEM RESET YES NO YES, NO AQUOS LINK • This lets you set the Player to the operation manual of the player is stopped for about 10 minutes. MENU [QUICK START] MENU [QUICK START]... VIDEO SETTINGS SPEAKER SETTINGS QUICK START AUTO POWER OFF AQUOS LINK PLAYBACK SETTING FRONT DISPLAY / LED VERSION SOFTWARE UPDATE SYSTEM RESET YES NO YES, NO AUTO POWER OFF • This sets the Player so that power is automatically shut off . • When the QUICK START function is on, the...
...SETTINGS QUICK START AUTO POWER OFF AQUOS LINK PLAYBACK SETTING FRONT DISPLAY / LED VERSION SOFTWARE UPDATE SYSTEM RESET YES NO YES, NO AQUOS LINK • This lets you set the Player to the operation manual of the player is stopped for about 10 minutes. MENU [QUICK START] MENU [QUICK START]... VIDEO SETTINGS SPEAKER SETTINGS QUICK START AUTO POWER OFF AQUOS LINK PLAYBACK SETTING FRONT DISPLAY / LED VERSION SOFTWARE UPDATE SYSTEM RESET YES NO YES, NO AUTO POWER OFF • This sets the Player so that power is automatically shut off . • When the QUICK START function is on, the...
BD-HP20U Operation Manual
Page 43
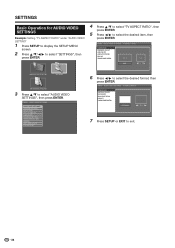
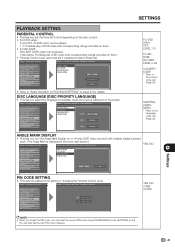
... QUICK START AUTO POWER OFF AQUOS LINK PLAYBACK SETTING FRONT DISPLAY / LED VERSION SOFTWARE UPDATE SYSTEM RESET PARENTAL CONTROL DISC LANGUAGE ANGLE MARK DISPLAY PIN CODE SETTING SUBTITLE ENGLISH AUDIO ENGLISH MENU ENGLISH For DVD video: OFF, LEVEL 1-8 For BD ROM: NO LIMIT. q Settings 41 PARENTAL CONTROL] AUDIO VIDEO SETTINGS SPEAKER SETTINGS QUICK...
... QUICK START AUTO POWER OFF AQUOS LINK PLAYBACK SETTING FRONT DISPLAY / LED VERSION SOFTWARE UPDATE SYSTEM RESET PARENTAL CONTROL DISC LANGUAGE ANGLE MARK DISPLAY PIN CODE SETTING SUBTITLE ENGLISH AUDIO ENGLISH MENU ENGLISH For DVD video: OFF, LEVEL 1-8 For BD ROM: NO LIMIT. q Settings 41 PARENTAL CONTROL] AUDIO VIDEO SETTINGS SPEAKER SETTINGS QUICK...

BD-HP20U Operation Manual
Page 45
...SETUP to display the SETUP MENU screen. 2 Press a/b/c/d to select parental control level for BD-ROM, then press ENTER. Enter the 4-digit number. 3. q Settings 43 Basic Operation for... SPEAKER SETTINGS QUICK START AUTO POWER OFF AQUOS LINK PLAYBACK SETTING FRONT DISPLAY / LED VERSION SOFTWARE UPDATE SYSTEM RESET SETTINGS 6 Press c/d to select "SETTINGS", then press ENTER. MENU [... SETTINGS - Press c/d to select "PLAYBACK SETTING", then press ENTER. PARENTAL CONTROL] PARENTAL CONTROL DISC LANGUAGE ANGLE MARK DISPLAY PIN CODE SETTING LEVEL 3 0 USA 7 Press SETUP or EXIT to ...
...SETUP to display the SETUP MENU screen. 2 Press a/b/c/d to select parental control level for BD-ROM, then press ENTER. Enter the 4-digit number. 3. q Settings 43 Basic Operation for... SPEAKER SETTINGS QUICK START AUTO POWER OFF AQUOS LINK PLAYBACK SETTING FRONT DISPLAY / LED VERSION SOFTWARE UPDATE SYSTEM RESET SETTINGS 6 Press c/d to select "SETTINGS", then press ENTER. MENU [... SETTINGS - Press c/d to select "PLAYBACK SETTING", then press ENTER. PARENTAL CONTROL] PARENTAL CONTROL DISC LANGUAGE ANGLE MARK DISPLAY PIN CODE SETTING LEVEL 3 0 USA 7 Press SETUP or EXIT to ...
BD-HP20U Operation Manual
Page 46
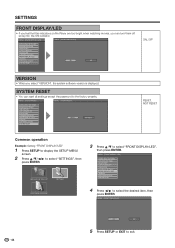
... 44 MENU [SYSTEM RESET] MENU [SYSTEM RESET] AUDIO VIDEO SETTINGS SPEAKER SETTINGS QUICK START AUTO POWER OFF AQUOS LINK PLAYBACK SETTING FRONT DISPLAY / LED VERSION SOFTWARE UPDATE SYSTEM RESET RESET NOT RESET RESET, NOT RESET Common operation Example: Setting "FRONT DISPLAY/LED" 1 Press SETUP to display the SETUP MENU screen. 2... Press a/b/c/d to select "SETTINGS", then press ENTER. SETTINGS FRONT DISPLAY/LED • If you feel that the indicators on the Player are too bright when watching movies, you select "VERSION", the system software version is displayed.
... 44 MENU [SYSTEM RESET] MENU [SYSTEM RESET] AUDIO VIDEO SETTINGS SPEAKER SETTINGS QUICK START AUTO POWER OFF AQUOS LINK PLAYBACK SETTING FRONT DISPLAY / LED VERSION SOFTWARE UPDATE SYSTEM RESET RESET NOT RESET RESET, NOT RESET Common operation Example: Setting "FRONT DISPLAY/LED" 1 Press SETUP to display the SETUP MENU screen. 2... Press a/b/c/d to select "SETTINGS", then press ENTER. SETTINGS FRONT DISPLAY/LED • If you feel that the indicators on the Player are too bright when watching movies, you select "VERSION", the system software version is displayed.
BD-HP20U Operation Manual
Page 47
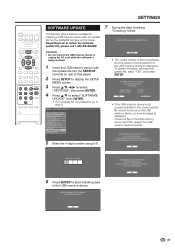
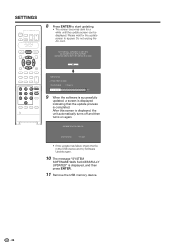
...During the data checking, "Checking" blinks. CHECKING • The current version of this unit software and the version of this player software with update file, select "YES", and press ENTER. SETTINGS SOFTWARE UPDATE This function allows software updates by inserting a USB memory device with the update file into the SERVICE terminal ...the update file on the USB memory device are displayed. OK ENTER 4-DIGIT PIN CODE 6 Press ENTER to obtain the software update file, please call 1-800-BE-SHARP. SOFTWARE UPDATE FILE IS DETECTED IN THE USB MEMORY DEVICE.
...During the data checking, "Checking" blinks. CHECKING • The current version of this unit software and the version of this player software with update file, select "YES", and press ENTER. SETTINGS SOFTWARE UPDATE This function allows software updates by inserting a USB memory device with the update file into the SERVICE terminal ...the update file on the USB memory device are displayed. OK ENTER 4-DIGIT PIN CODE 6 Press ENTER to obtain the software update file, please call 1-800-BE-SHARP. SOFTWARE UPDATE FILE IS DETECTED IN THE USB MEMORY DEVICE.
BD-HP20U Operation Manual
Page 48
... the update screen can be displayed. After this screen is completed. Do not unplug the AC cord. UPDATE VERSION **1234567-2 30% 9 When the software is successfully updated, a screen is displayed indicating that the update process is displayed, the unit automatically turns off and then turns on again. SETTINGS 8... to appear. UPDATE VERSION **1234567 • If the update has failed, check the file in the USB device and try Software Update again. 10 The message "SYSTEM SOFTWARE WAS SUCCESSFULLY UPDATED" is displayed, and then press ENTER . 11 Remove the USB memory device. 46...
... the update screen can be displayed. After this screen is completed. Do not unplug the AC cord. UPDATE VERSION **1234567-2 30% 9 When the software is successfully updated, a screen is displayed indicating that the update process is displayed, the unit automatically turns off and then turns on again. SETTINGS 8... to appear. UPDATE VERSION **1234567 • If the update has failed, check the file in the USB device and try Software Update again. 10 The message "SYSTEM SOFTWARE WAS SUCCESSFULLY UPDATED" is displayed, and then press ENTER . 11 Remove the USB memory device. 46...
