
RK-12S30 Installation Instructions
Page 1
... CUSHION 5 1/4" x 15", 5 mm x 382 mm 1 PCUS-A253WRPZ TINSEB184WRRZ-D92 Printed in use with Sharp SuperSteam Ovens specifying a RK-12S30 Built-In Kit on the rating label on the front of the oven. PLEASE READ THESE INSTRUCTIONS THOROUGHLY BEFORE BEGINNING INSTALLATION! SHORT SCREW (B) - MIDDLE SCREW (C) - LONG * For...need screws appropriate for that wall to install the frame. * Be sure to DISCONNECT THE PLUG of the oven from the electrical outlet before installing the oven and kit. * Because the kits are 120 volts, 15 amps. INSTALLATION INSTRUCTIONS BUILT-IN KIT MODEL ...
... CUSHION 5 1/4" x 15", 5 mm x 382 mm 1 PCUS-A253WRPZ TINSEB184WRRZ-D92 Printed in use with Sharp SuperSteam Ovens specifying a RK-12S30 Built-In Kit on the rating label on the front of the oven. PLEASE READ THESE INSTRUCTIONS THOROUGHLY BEFORE BEGINNING INSTALLATION! SHORT SCREW (B) - MIDDLE SCREW (C) - LONG * For...need screws appropriate for that wall to install the frame. * Be sure to DISCONNECT THE PLUG of the oven from the electrical outlet before installing the oven and kit. * Because the kits are 120 volts, 15 amps. INSTALLATION INSTRUCTIONS BUILT-IN KIT MODEL ...

RK-12S30 Installation Instructions
Page 4
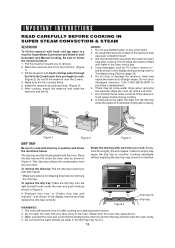
...BOTTOM. 2 Lock them into EXHAUST DUCT BOTTOM by sliding DIVIDE PLATE L/R in the direction of Figure 1. ELECTRICAL SUPPLY At the rear of the oven. It is recommended that the outlet be level for any such requirement. STEP 1: CABINET OR WALL OPENING Provide an opening , provide a 3 ...pronged, polarized, electrical outlet, 120 volt A.C., 15 amp. for optimum oven performance. 19" - 19 1/8" (482 mm - 486 mm) (529301.5/4"mm) 7 7/8" (200 mm) 28" - 28 1/4" (710 mm - 719 mm) CL Figure 1 ...
...BOTTOM. 2 Lock them into EXHAUST DUCT BOTTOM by sliding DIVIDE PLATE L/R in the direction of Figure 1. ELECTRICAL SUPPLY At the rear of the oven. It is recommended that the outlet be level for any such requirement. STEP 1: CABINET OR WALL OPENING Provide an opening , provide a 3 ...pronged, polarized, electrical outlet, 120 volt A.C., 15 amp. for optimum oven performance. 19" - 19 1/8" (482 mm - 486 mm) (529301.5/4"mm) 7 7/8" (200 mm) 28" - 28 1/4" (710 mm - 719 mm) CL Figure 1 ...

RK-12S30 Installation Instructions
Page 5
... install the EXHAUST DUCT BACK. (Save 2 screws to be used at step 4-2.) #1 Projection Figure 3-A Figure 4-A 2 Secure EXHAUST DUCT BACK to the oven with the screws (#1) removed at the 4 corners of the oven onto the projections at step 4-1 and a SCREW (A) as shown in Figure 4-B. #1 SCREW (A) Figure 4-B 5 EXHAUST DUCT BACK STEP 3: EXHAUST DUCT BOTTOM...
... install the EXHAUST DUCT BACK. (Save 2 screws to be used at step 4-2.) #1 Projection Figure 3-A Figure 4-A 2 Secure EXHAUST DUCT BACK to the oven with the screws (#1) removed at the 4 corners of the oven onto the projections at step 4-1 and a SCREW (A) as shown in Figure 4-B. #1 SCREW (A) Figure 4-B 5 EXHAUST DUCT BACK STEP 3: EXHAUST DUCT BOTTOM...

RK-12S30 Installation Instructions
Page 6
...1 Attach EXHAUST DUCT LEFT to inside of EXHAUST DUCT UPPER with 4 SCREWS (A) as shown in Figure 5-A. 2 Place EXHAUST DUCT UPPER over the oven and EXHAUST DUCT BACK, and attach REAR SPACER with 2 SCREWS (A) in Figure 5-B. 3 Tighten together EXHAUST DUCT UPPER and EXHAUST DUCT BACK at ...the left wall of the oven. 2 Tighen with 2 SCREWS (A) as shown in Figure 5-B. EXHAUST DUCT UPPER SCREW (A) EXHAUST DUCT LEFT Figure 6 6 DIVIDE PLATE L SCREW (A) STEP 5: ...
...1 Attach EXHAUST DUCT LEFT to inside of EXHAUST DUCT UPPER with 4 SCREWS (A) as shown in Figure 5-A. 2 Place EXHAUST DUCT UPPER over the oven and EXHAUST DUCT BACK, and attach REAR SPACER with 2 SCREWS (A) in Figure 5-B. 3 Tighten together EXHAUST DUCT UPPER and EXHAUST DUCT BACK at ...the left wall of the oven. 2 Tighen with 2 SCREWS (A) as shown in Figure 5-B. EXHAUST DUCT UPPER SCREW (A) EXHAUST DUCT LEFT Figure 6 6 DIVIDE PLATE L SCREW (A) STEP 5: ...
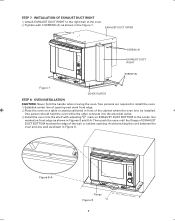
RK-12S30 Installation Instructions
Page 7
...marked on front edge as shown in Figures 8 and 8-A. One person should hold the handle when moving the oven. Two persons are required to install the oven. 1 Establish center line of the oven. 2 Tighten with 4 SCREWS (A) as shown in Figure 8. EXHAUST DUCT UPPER SCREW (A) EXHAUST DUCT RIGHT ...SCREW (A) Figure 7 DIVIDE PLATE R STEP 8: OVEN INSTALLATION CAUTION: Never hold the oven while the other connects it to the electrical outlet. 3 Install the oven into the shelf with adjusting mark on EXHAUST DUCT BOTTOM to the right wall of opening ....
...marked on front edge as shown in Figures 8 and 8-A. One person should hold the handle when moving the oven. Two persons are required to install the oven. 1 Establish center line of the oven. 2 Tighten with 4 SCREWS (A) as shown in Figure 8. EXHAUST DUCT UPPER SCREW (A) EXHAUST DUCT RIGHT ...SCREW (A) Figure 7 DIVIDE PLATE R STEP 8: OVEN INSTALLATION CAUTION: Never hold the oven while the other connects it to the electrical outlet. 3 Install the oven into the shelf with adjusting mark on EXHAUST DUCT BOTTOM to the right wall of opening ....

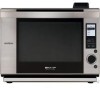
Owners Manual for AX-1200S
Page 1
® SUPER STEAM OVEN OPERATION MANUAL MODEL AX-1200 followed by letter indicating color S= Stainless K= Black CONTENTS ® SHARP ELECTRONICS CORPORATION Sharp Plaza, Mahwah, NJ 07495-1163 • For Customer Assistance ........ TINSEB183WRRZ-D81 Printed in Thailand Inside Front Cover • Limited Warranty 1... • Part Names 11 • Control Panel 12 • Important Instructions 13-15 • Before Operating 16 • Clean the Oven Before First Use 16 • Automatic Cooking 17-25 • Manual Cooking 26-32 • Other Convenient Features 33-35 • ...
® SUPER STEAM OVEN OPERATION MANUAL MODEL AX-1200 followed by letter indicating color S= Stainless K= Black CONTENTS ® SHARP ELECTRONICS CORPORATION Sharp Plaza, Mahwah, NJ 07495-1163 • For Customer Assistance ........ TINSEB183WRRZ-D81 Printed in Thailand Inside Front Cover • Limited Warranty 1... • Part Names 11 • Control Panel 12 • Important Instructions 13-15 • Before Operating 16 • Clean the Oven Before First Use 16 • Automatic Cooking 17-25 • Manual Cooking 26-32 • Other Convenient Features 33-35 • ...
Owners Manual for AX-1200S
Page 2
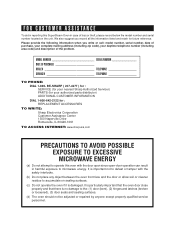
... ACCESSORIES TO WRITE: Sharp Electronics Corporation Customer Assistance Center 1300 Naperville Drive Romeoville, IL 60446-1091 TO ACCESS INTERNET: www.sharpusa.com PRECAUTIONS TO AVOID POSSIBLE EXPOSURE TO EXCESSIVE MICROWAVE ENERGY (a) Do not attempt to operate this SuperSteam Oven in harmful exposure to... anyone except properly qualified service personnel. It is particularly important that the oven door close properly and that there is damaged. BE-SHARP ( 237-4277 ) for : SERVICE (for your nearest Sharp Authorized Servicer) PARTS (for your daytime telephone number (including area code)...
... ACCESSORIES TO WRITE: Sharp Electronics Corporation Customer Assistance Center 1300 Naperville Drive Romeoville, IL 60446-1091 TO ACCESS INTERNET: www.sharpusa.com PRECAUTIONS TO AVOID POSSIBLE EXPOSURE TO EXCESSIVE MICROWAVE ENERGY (a) Do not attempt to operate this SuperSteam Oven in harmful exposure to... anyone except properly qualified service personnel. It is particularly important that the oven door close properly and that there is damaged. BE-SHARP ( 237-4277 ) for : SERVICE (for your nearest Sharp Authorized Servicer) PARTS (for your daytime telephone number (including area code)...
Owners Manual for AX-1200S
Page 3
... negligence, strict liability or otherwise. Your Product Model Number & Description: AX-1200K or AX-1200S Home Use SuperSteam Oven. Be sure to have Proof of the SuperSteam Oven carton, should be free from Warranty Coverage (if any incidental or consequential economic or property damage. Be sure to... have this information available when you access the information in any way responsible for a total of Sharp. We will keep it...
... negligence, strict liability or otherwise. Your Product Model Number & Description: AX-1200K or AX-1200S Home Use SuperSteam Oven. Be sure to have Proof of the SuperSteam Oven carton, should be free from Warranty Coverage (if any incidental or consequential economic or property damage. Be sure to... have this information available when you access the information in any way responsible for a total of Sharp. We will keep it...

Owners Manual for AX-1200S
Page 4
...e. Use extreme care when inserting a spoon or other combustible materials are able to properly grounded outlet. Do not mount unit over a sink. 22. SAVE THESE INSTRUCTIONS 2 are placed inside front cover. 3. To reduce the risk of burns, electric shock, fire, injury to persons or exposure... to persons: a. Install or locate this appliance. It is in this appliance, except a properly installed electric wall oven, a warming drawer or a SHARP Microwave Drawer. for storage purposes. See door surface cleaning instructions on page 4. 4. Do not overcook food. Do not use ...
...e. Use extreme care when inserting a spoon or other combustible materials are able to properly grounded outlet. Do not mount unit over a sink. 22. SAVE THESE INSTRUCTIONS 2 are placed inside front cover. 3. To reduce the risk of burns, electric shock, fire, injury to persons or exposure... to persons: a. Install or locate this appliance. It is in this appliance, except a properly installed electric wall oven, a warming drawer or a SHARP Microwave Drawer. for storage purposes. See door surface cleaning instructions on page 4. 4. Do not overcook food. Do not use ...

Owners Manual for AX-1200S
Page 5
... outside of the power supply. 3 The oven must be touched inadvertently. Oven Cavity Hinges Latches SuperSteam Oven CUTOUT ELECTRIC WALL OVEN / WARMING DRAWER / MICROWAVE DRAWER CUTOUT Illustration 1 Refer to -follow both the electric wall oven/warming drawer/microwave drawer installation instructions and Sharp's Built-in above an electric wall oven, a warming drawer or SHARP Microwave Drawer. Ordering a Built-in...
... outside of the power supply. 3 The oven must be touched inadvertently. Oven Cavity Hinges Latches SuperSteam Oven CUTOUT ELECTRIC WALL OVEN / WARMING DRAWER / MICROWAVE DRAWER CUTOUT Illustration 1 Refer to -follow both the electric wall oven/warming drawer/microwave drawer installation instructions and Sharp's Built-in above an electric wall oven, a warming drawer or SHARP Microwave Drawer. Ordering a Built-in...

Owners Manual for AX-1200S
Page 6
...a 3-wire extension cord that has a 3-blade grounding plug and a 3-slot receptacle that will accept the plug on the SuperSteam Oven. It must be provided. 3-Prong Plug The oven is equipped with a cord having a grounding wire with a 3-prong grounding plug. Be careful not to your radio or ...the extension cord should be any questions about the grounding or electrical instructions, consult a qualified electrician or service person. 2. Neither Sharp nor the dealer can result in a risk of becoming entangled in accordance with the National Electrical Code and local codes and ordinances....
...a 3-wire extension cord that has a 3-blade grounding plug and a 3-slot receptacle that will accept the plug on the SuperSteam Oven. It must be provided. 3-Prong Plug The oven is equipped with a cord having a grounding wire with a 3-prong grounding plug. Be careful not to your radio or ...the extension cord should be any questions about the grounding or electrical instructions, consult a qualified electrician or service person. 2. Neither Sharp nor the dealer can result in a risk of becoming entangled in accordance with the National Electrical Code and local codes and ordinances....
Owners Manual for AX-1200S
Page 7
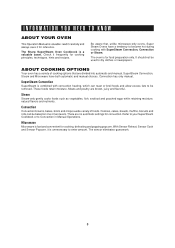
...baked on one or two levels. SuperSteam Convection SuperSteam is for reference. Refer to your SuperSteam Cookbook or to Convection in Manual Operations. ABOUT COOKING OPTIONS Your oven has a variety of foods. The sensor eliminates guesswork. 5 The Sharp SuperSteam Oven Cookbook is fast and convenient for cooking... for cooking, defrosting and popping popcorn. INFORMATION YOU NEED TO KNOW ABOUT YOUR OVEN This Operation Manual is unnecessary to enter amount. The oven is combined with SuperSteam Convection, Convection or Steam. Steam Steam-only gently cooks foods such as vegetables,...
...baked on one or two levels. SuperSteam Convection SuperSteam is for reference. Refer to your SuperSteam Cookbook or to Convection in Manual Operations. ABOUT COOKING OPTIONS Your oven has a variety of foods. The sensor eliminates guesswork. 5 The Sharp SuperSteam Oven Cookbook is fast and convenient for cooking... for cooking, defrosting and popping popcorn. INFORMATION YOU NEED TO KNOW ABOUT YOUR OVEN This Operation Manual is unnecessary to enter amount. The oven is combined with SuperSteam Convection, Convection or Steam. Steam Steam-only gently cooks foods such as vegetables,...
Owners Manual for AX-1200S
Page 8
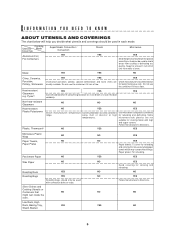
... Utensils - Follow manufacturer's directions. NO YES Follow manufacturer's directions. Mode Coverings Aluminium Foil, Foil Containers SuperSteam Convection / Convection YES Steam YES Microwave YES Small flat pieces of oven. Do not use the container if it can be used in each mode. Care must be taken as it has a flaw. Keep foil at...
... Utensils - Follow manufacturer's directions. NO YES Follow manufacturer's directions. Mode Coverings Aluminium Foil, Foil Containers SuperSteam Convection / Convection YES Steam YES Microwave YES Small flat pieces of oven. Do not use the container if it can be used in each mode. Care must be taken as it has a flaw. Keep foil at...
Owners Manual for AX-1200S
Page 9
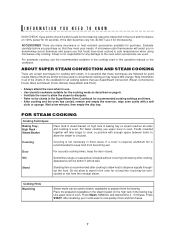
... information in determining correct doneness and assure you that use SuperSteam Convection (Roast, Convenience Foods, Broil) and Steam (Cook, Reheat, Keep Warm and Proof). • Always attend the oven when in the oven and microwave on page 6. • Ventilate the room to allow heat to circulate. Wait...vegetables to cool quickly. Sharp is not responsible for any damage to check if a dish is recommended to the charts in this operation manual or the cookbook. For faster cooking, use the recommended container in the cooking chart in the SuperSteam Oven Cookbook for cooking with ...
... information in determining correct doneness and assure you that use SuperSteam Convection (Roast, Convenience Foods, Broil) and Steam (Cook, Reheat, Keep Warm and Proof). • Always attend the oven when in the oven and microwave on page 6. • Ventilate the room to allow heat to circulate. Wait...vegetables to cool quickly. Sharp is not responsible for any damage to check if a dish is recommended to the charts in this operation manual or the cookbook. For faster cooking, use the recommended container in the cooking chart in the SuperSteam Oven Cookbook for cooking with ...

Owners Manual for AX-1200S
Page 10
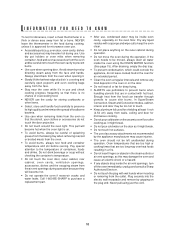
...Cooking time will take longer to overheating and fire. Temperature of Food The initial temperature of cooking time. Be careful when opening the oven door to allow steam to remove food or utensils from all the pieces the same size. Room humidity and the moisture in food ...to prevent overcooking before serving. Seasoning and Flavoring Seasoning or flavoring are cooked thoroughly. * Stir foods from oven and stir, if possible. CAUTION: Always use dry pot holders or oven mitts to dissipate. Size Small foods and small pieces cook faster than foods at least once. * ...
...Cooking time will take longer to overheating and fire. Temperature of Food The initial temperature of cooking time. Be careful when opening the oven door to allow steam to remove food or utensils from all the pieces the same size. Room humidity and the moisture in food ...to prevent overcooking before serving. Seasoning and Flavoring Seasoning or flavoring are cooked thoroughly. * Stir foods from oven and stir, if possible. CAUTION: Always use dry pot holders or oven mitts to dissipate. Size Small foods and small pieces cook faster than foods at least once. * ...

Owners Manual for AX-1200S
Page 11
... in the same room. Check temperature before and after heating and shake thoroughly. The child must be taught all safety precautions. Don't assume that the oven is not a toy. TEMP 145°F (63°C) FOOD ... for "no time should anyone be in chicken or turkey burgers. if not, he...8226; Check foods to see that they are cooked to the United States Department of 7 and 12, the supervising person should stand on the oven door. Young children should be able to ensure that they do not play with a supervising person very near to small dish and heat carefully,...
... in the same room. Check temperature before and after heating and shake thoroughly. The child must be taught all safety precautions. Don't assume that the oven is not a toy. TEMP 145°F (63°C) FOOD ... for "no time should anyone be in chicken or turkey burgers. if not, he...8226; Check foods to see that they are cooked to the United States Department of 7 and 12, the supervising person should stand on the oven door. Young children should be able to ensure that they do not play with a supervising person very near to small dish and heat carefully,...
Owners Manual for AX-1200S
Page 12
...burns, always test food and container temperature and stir before serving. oven door, oven cavity, dishes and accessories) may be left unattended during use . • Accessible parts (e.g. Pay special attention to cause skin burns. In SuperSteam Convection, Steam and Convection modes, cabinet, interior and door may...on . • To avoid burns, always be moved, always drain all water inside the air vent openings, turn off the oven immediately, unplug and consult a Sharp Authorized Servicer. • Do not touch the plug with a sponge and wipe out to prevent burns. • Use care...
...burns, always test food and container temperature and stir before serving. oven door, oven cavity, dishes and accessories) may be left unattended during use . • Accessible parts (e.g. Pay special attention to cause skin burns. In SuperSteam Convection, Steam and Convection modes, cabinet, interior and door may...on . • To avoid burns, always be moved, always drain all water inside the air vent openings, turn off the oven immediately, unplug and consult a Sharp Authorized Servicer. • Do not touch the plug with a sponge and wipe out to prevent burns. • Use care...

Owners Manual for AX-1200S
Page 13
... page 13.) 10 Door gasket 11 Latches 12 Ceramic oven floor 13 Door hinges 14 Steam outlets 15 15 Drip tray lid (See page 13.) 16 16 Drip tray (See page 13.) 5 18 14 6 7 8 9 10 11 ACCESSORIES 17 High rack For SuperSteam Convection, Convection and Steam. Always place on baking tray..., Convection and Steam. Place on high rack in baking tray. 21 Descaling guide (See page 15.) PRINTED MATERIALS included: 20 Operation Manual SuperSteam Oven Cookbook Touch Guide 21 11 Do not use when microwave cooking. Do not use when microwave cooking. 20 Steam basket For Steam. Do not ...
... page 13.) 10 Door gasket 11 Latches 12 Ceramic oven floor 13 Door hinges 14 Steam outlets 15 15 Drip tray lid (See page 13.) 16 16 Drip tray (See page 13.) 5 18 14 6 7 8 9 10 11 ACCESSORIES 17 High rack For SuperSteam Convection, Convection and Steam. Always place on baking tray..., Convection and Steam. Place on high rack in baking tray. 21 Descaling guide (See page 15.) PRINTED MATERIALS included: 20 Operation Manual SuperSteam Oven Cookbook Touch Guide 21 11 Do not use when microwave cooking. Do not use when microwave cooking. 20 Steam basket For Steam. Do not ...
Owners Manual for AX-1200S
Page 15
... fresh cold tap water through the lid to the oven. Fill the reservoir with your face close to the 2 mark each time you to overflow. Call 1-800-BE-SHARP to follow the directions below . 1. Do not block the air holes on page 38. 5. It will cause trouble during cooking, refer.... Failure to empty may cause it to remove. 2. To remove the drip tray: Pull the drip tray toward you cook. Steam from the oven door. Wash the reservoir and lid for SuperSteam Convection and Steam in the display, remove and then replace the drip tray correctly. We recommend that the...
... fresh cold tap water through the lid to the oven. Fill the reservoir with your face close to the 2 mark each time you to overflow. Call 1-800-BE-SHARP to follow the directions below . 1. Do not block the air holes on page 38. 5. It will cause trouble during cooking, refer.... Failure to empty may cause it to remove. 2. To remove the drip tray: Pull the drip tray toward you cook. Steam from the oven door. Wash the reservoir and lid for SuperSteam Convection and Steam in the display, remove and then replace the drip tray correctly. We recommend that the...
Owners Manual for AX-1200S
Page 16
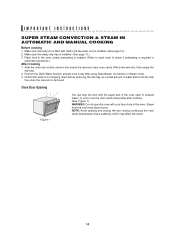
... food in automatic operations.) After Cooking 1. Make sure the empty drip tray is needed. (Refer to each chart to cool or dry the oven cavity temporarily after using SuperSteam Convection or Steam mode. 3. Perform the Drain Water function at least once a day after cooking. (See Figure 1) WARNING: Do not open to exhaust...
... food in automatic operations.) After Cooking 1. Make sure the empty drip tray is needed. (Refer to each chart to cool or dry the oven cavity temporarily after using SuperSteam Convection or Steam mode. 3. Perform the Drain Water function at least once a day after cooking. (See Figure 1) WARNING: Do not open to exhaust...


