Instructions for use
Page 4
...of this button 21 ... you press this control/switch? ... 21 ... you hear acoustic signals or warning signals? ....... 22 Cleaning the Set 840-TV system 23 Cleaning the transmitter and the receiver 23 Cleaning the ear pads 23 If a problem occurs 24 Additional technical information 26 Accessories ... indicator lights up the transmitter 6 Connecting the transmitter to a sound source 7 Connecting the transmitter to the mains 11 Using the Set 840-TV system 12 Switching the transmitter on/off 12 Switching the receiver on/off 13 Adjusting the volume 14 Searching for a sound source ...
...of this button 21 ... you press this control/switch? ... 21 ... you hear acoustic signals or warning signals? ....... 22 Cleaning the Set 840-TV system 23 Cleaning the transmitter and the receiver 23 Cleaning the ear pads 23 If a problem occurs 24 Additional technical information 26 Accessories ... indicator lights up the transmitter 6 Connecting the transmitter to a sound source 7 Connecting the transmitter to the mains 11 Using the Set 840-TV system 12 Switching the transmitter on/off 12 Switching the receiver on/off 13 Adjusting the volume 14 Searching for a sound source ...
Instructions for use
Page 7
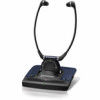
Delivery includes Delivery includes The Set 840-TV system is available as an EU and a US version. TB/Aux-Out) 1 audio adapter for RCA socket (e.g. The following table shows which items are included ... a headphone socket 1 audio adapter (3.5 mm to ¼" (6.3 mm) jack plug) 1 audio adapter for SCART socket 1 MKE 800 TV-N microphone 2 pairs of the Set 840-TV system 1 RR 840 stethoset receiver with BA 300 Lithium-Polymer rechargeable battery 1 TI 840 transmitter with integrated charging compartments 1 NT 13 mains unit with 2 country adapters (EU, UK) EU US 1 country...
Delivery includes Delivery includes The Set 840-TV system is available as an EU and a US version. TB/Aux-Out) 1 audio adapter for RCA socket (e.g. The following table shows which items are included ... a headphone socket 1 audio adapter (3.5 mm to ¼" (6.3 mm) jack plug) 1 audio adapter for SCART socket 1 MKE 800 TV-N microphone 2 pairs of the Set 840-TV system 1 RR 840 stethoset receiver with BA 300 Lithium-Polymer rechargeable battery 1 TI 840 transmitter with integrated charging compartments 1 NT 13 mains unit with 2 country adapters (EU, UK) EU US 1 country...
Instructions for use
Page 9
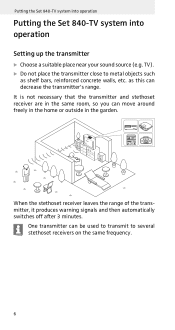
...; Do not place the transmitter close to several stethoset receivers on the same frequency. 6 Putting the Set 840-TV system into operation Putting the Set 840-TV system into operation Setting up the transmitter ̈ Choose a suitable place near your sound source (e.g. When the stethoset receiver leaves the range of the transmitter, it produces warning signals ...
...; Do not place the transmitter close to several stethoset receivers on the same frequency. 6 Putting the Set 840-TV system into operation Putting the Set 840-TV system into operation Setting up the transmitter ̈ Choose a suitable place near your sound source (e.g. When the stethoset receiver leaves the range of the transmitter, it produces warning signals ...
Instructions for use
Page 10
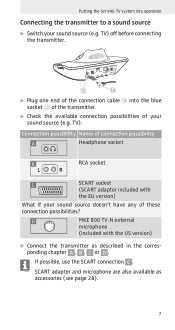
Putting the Set 840-TV system into the blue socket C of the transmitter. ̈ Check the available connection possibilities of these connection possibilities? TV) off before connecting the transmitter. TV): Connection possibility Name of connection possibility A Headphone socket B RCA socket L R C SCART socket ...(SCART adapter included with the US version) ̈ Connect the transmitter as accessories (see page 28). 7 D MKE 800 TV-N external microphone (included with the EU version) What if your sound source doesn't have any of your sound source (e.g. SCART ...
Putting the Set 840-TV system into the blue socket C of the transmitter. ̈ Check the available connection possibilities of these connection possibilities? TV) off before connecting the transmitter. TV): Connection possibility Name of connection possibility A Headphone socket B RCA socket L R C SCART socket ...(SCART adapter included with the US version) ̈ Connect the transmitter as accessories (see page 28). 7 D MKE 800 TV-N external microphone (included with the EU version) What if your sound source doesn't have any of your sound source (e.g. SCART ...
Instructions for use
Page 11
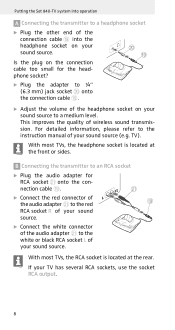
... transmitter to the white or black RCA socket L of wireless sound transmission. Putting the Set 840-TV system into the headphone socket on your sound source. If your sound source (e.g. This improves the quality of your sound source to a headphone socket ̈ ... the audio adapter K to the instruction manual of the headphone socket on the connection cable too small for RCA socket K onto the con- With most TVs, the headphone socket is located at the front or sides. For detailed information, please refer to the red I . ̈ Adjust the volume of your...
... transmitter to the white or black RCA socket L of wireless sound transmission. Putting the Set 840-TV system into the headphone socket on your sound source. If your sound source (e.g. This improves the quality of your sound source to a headphone socket ̈ ... the audio adapter K to the instruction manual of the headphone socket on the connection cable too small for RCA socket K onto the con- With most TVs, the headphone socket is located at the front or sides. For detailed information, please refer to the red I . ̈ Adjust the volume of your...
Instructions for use
Page 12
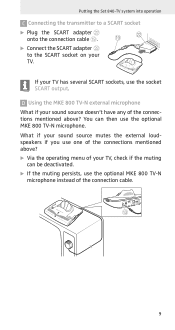
... several SCART sockets, use the optional MKE 800 TV-N microphone. Putting the Set 840-TV system into operation C Connecting the transmitter to a SCART socket ̈ Plug the SCART adapter L onto the connection cable I L ̈ Connect the SCART adapter L to the SCART socket on your TV. You can be deactivated. ̈ If the muting persists, use...
... several SCART sockets, use the optional MKE 800 TV-N microphone. Putting the Set 840-TV system into operation C Connecting the transmitter to a SCART socket ̈ Plug the SCART adapter L onto the connection cable I L ̈ Connect the SCART adapter L to the SCART socket on your TV. You can be deactivated. ̈ If the muting persists, use...

Instructions for use
Page 13
You can change the sound by varying the position of the microphone in front of the loudspeaker of your TV. ̈ Press the microphone onto the Velcro tape. ̈ Connect the jack plug of the microphone to the blue socket C of the loudspeaker. 10 Putting the Set 840-TV system into operation To connect the MKE 800 TV-N microphone: ̈ If possible, adhere the supplied Velcro tape directly in front of the transmitter.
You can change the sound by varying the position of the microphone in front of the loudspeaker of your TV. ̈ Press the microphone onto the Velcro tape. ̈ Connect the jack plug of the microphone to the blue socket C of the loudspeaker. 10 Putting the Set 840-TV system into operation To connect the MKE 800 TV-N microphone: ̈ If possible, adhere the supplied Velcro tape directly in front of the transmitter.
Instructions for use
Page 14
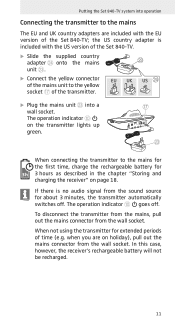
... into a wall socket. The operation indicator 0 goes off . If there is included with the EU version of the Set 840-TV; when you are included with the US version of the Set 840-TV. ̈ Slide the supplied country adapter N onto the mains M unit M. ̈ Connect the yellow connector of the mains unit to the yellow...
... into a wall socket. The operation indicator 0 goes off . If there is included with the EU version of the Set 840-TV; when you are included with the US version of the Set 840-TV. ̈ Slide the supplied country adapter N onto the mains M unit M. ̈ Connect the yellow connector of the mains unit to the yellow...
Instructions for use
Page 15
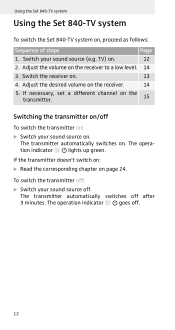
... 3 minutes. Adjust the volume on . 13 4. Adjust the desired volume on . The transmitter automatically switches on the receiver. 14 5. Using the Set 840-TV system Using the Set 840-TV system To switch the Set 840-TV system on page 24. If the transmitter doesn't switch on: ̈ Read the corresponding chapter on , proceed as follows: Sequence of steps...
... 3 minutes. Adjust the volume on . 13 4. Adjust the desired volume on . The transmitter automatically switches on the receiver. 14 5. Using the Set 840-TV system Using the Set 840-TV system To switch the Set 840-TV system on page 24. If the transmitter doesn't switch on: ̈ Read the corresponding chapter on , proceed as follows: Sequence of steps...
Instructions for use
Page 16
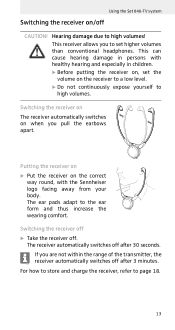
...of the transmitter, the receiver automatically switches off after 3 minutes. Switching the receiver on The receiver automatically switches on when you to set the volume on the receiver to a low level. ̈ Do not continuously expose yourself to high volumes! The receiver automatically ... hearing damage in persons with the Sennheiser logo facing away from your body. Switching the receiver off ̈ Take the receiver off CAUTION! Hearing damage due to high volumes. This receiver allows you pull the earbows apart. Using the Set 840-TV system Switching the receiver on/off ...
...of the transmitter, the receiver automatically switches off after 3 minutes. Switching the receiver on The receiver automatically switches on when you to set the volume on the receiver to a low level. ̈ Do not continuously expose yourself to high volumes! The receiver automatically ... hearing damage in persons with the Sennheiser logo facing away from your body. Switching the receiver off ̈ Take the receiver off CAUTION! Hearing damage due to high volumes. This receiver allows you pull the earbows apart. Using the Set 840-TV system Switching the receiver on/off ...
Instructions for use
Page 17
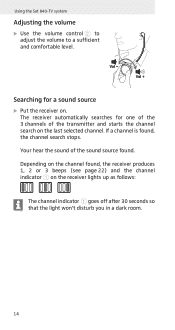
... lights up as follows: The channel indicator 1 goes off after 30 seconds so that the light won't disturb you in a dark room. 14 Using the Set 840-TV system Adjusting the volume ̈ Use the volume control 2 to adjust the volume to a sufficient and comfortable level.
... lights up as follows: The channel indicator 1 goes off after 30 seconds so that the light won't disturb you in a dark room. 14 Using the Set 840-TV system Adjusting the volume ̈ Use the volume control 2 to adjust the volume to a sufficient and comfortable level.
Instructions for use
Page 18
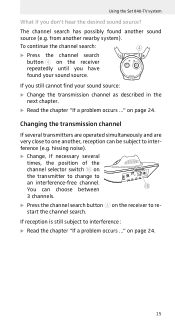
... noise). ̈ Change, if necessary several transmitters are operated simultaneously and are very close to interference : ̈ Read the chapter "If a problem occurs ..." Using the Set 840-TV system What if you still cannot find your sound source. The channel search has possibly found your sound source: ̈ Change the transmission channel as...
... noise). ̈ Change, if necessary several transmitters are operated simultaneously and are very close to interference : ̈ Read the chapter "If a problem occurs ..." Using the Set 840-TV system What if you still cannot find your sound source. The channel search has possibly found your sound source: ̈ Change the transmission channel as...
Instructions for use
Page 19
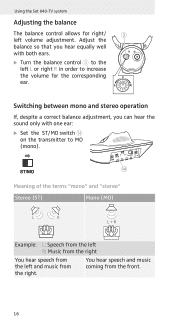
Switching between mono and stereo operation If, despite a correct balance adjustment, you hear equally well with one ear: ̈ Set the ST/MO switch D on the transmitter to increase the volume for right/ 3 left L or right R in order to MO (mono). D Meaning of the terms "... the balance so that you can hear the sound only with both ears. ̈ Turn the balance control 3 to the left volume adjustment. Using the Set 840-TV system Adjusting the balance The balance control allows for the corresponding ear.
Switching between mono and stereo operation If, despite a correct balance adjustment, you hear equally well with one ear: ̈ Set the ST/MO switch D on the transmitter to increase the volume for right/ 3 left L or right R in order to MO (mono). D Meaning of the terms "... the balance so that you can hear the sound only with both ears. ̈ Turn the balance control 3 to the left volume adjustment. Using the Set 840-TV system Adjusting the balance The balance control allows for the corresponding ear.
Instructions for use
Page 20
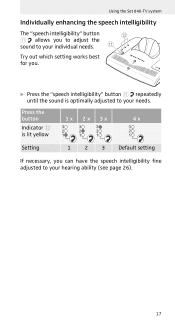
Using the Set 840-TV system Individually enhancing the speech intelligibility The "speech intelligibility" button B A allows you . ̈ Press the "speech intelligibility" button A repeatedly until the sound is lit yellow Setting 1 2 3 Default setting If necessary, you can have the speech intelligibility fine adjusted to your individual needs. A Try out which setting works best for you to adjust the sound to your needs. Press the button 1x 2x 3x 4 x Indicator B is optimally adjusted to your hearing ability (see page 26). 17
Using the Set 840-TV system Individually enhancing the speech intelligibility The "speech intelligibility" button B A allows you . ̈ Press the "speech intelligibility" button A repeatedly until the sound is lit yellow Setting 1 2 3 Default setting If necessary, you can have the speech intelligibility fine adjusted to your individual needs. A Try out which setting works best for you to adjust the sound to your needs. Press the button 1x 2x 3x 4 x Indicator B is optimally adjusted to your hearing ability (see page 26). 17
Instructions for use
Page 21
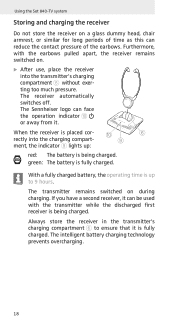
Using the Set 840-TV system Storing and charging the receiver Do not store the receiver on a glass dummy head, chair armrest, or similar for long periods of time as ... exerting too much pressure. The intelligent battery charging technology prevents overcharging. 18 Furthermore, with the transmitter while the discharged first receiver is being charged. The Sennheiser logo can reduce the contact pressure of the earbows. The transmitter remains switched on . ̈ After use, place the receiver into the charging compart- 9 ment...
Using the Set 840-TV system Storing and charging the receiver Do not store the receiver on a glass dummy head, chair armrest, or similar for long periods of time as ... exerting too much pressure. The intelligent battery charging technology prevents overcharging. 18 Furthermore, with the transmitter while the discharged first receiver is being charged. The Sennheiser logo can reduce the contact pressure of the earbows. The transmitter remains switched on . ̈ After use, place the receiver into the charging compart- 9 ment...
Instructions for use
Page 22
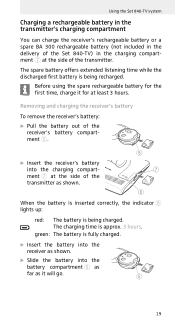
... offers extended listening time while the discharged first battery is approx. 3 hours. green: The battery is being recharged. Using the Set 840-TV system Charging a rechargeable battery in the transmitter's charging compartment You can charge the receiver's rechargeable battery or a spare BA 300 ...rechargeable battery (not included in the delivery of the Set 840-TV) in the charging compartment 7 at the side of the transmitter as shown. 7 8 When the battery is inserted correctly, the indicator...
... offers extended listening time while the discharged first battery is approx. 3 hours. green: The battery is being recharged. Using the Set 840-TV system Charging a rechargeable battery in the transmitter's charging compartment You can charge the receiver's rechargeable battery or a spare BA 300 ...rechargeable battery (not included in the delivery of the Set 840-TV) in the charging compartment 7 at the side of the transmitter as shown. 7 8 When the battery is inserted correctly, the indicator...
Instructions for use
Page 26
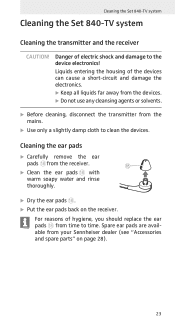
... of electric shock and damage to time. Danger of hygiene, you should replace the ear pads H from your Sennheiser dealer (see "Accessories and spare parts" on the receiver. Cleaning the Set 840-TV system Cleaning the Set 840-TV system Cleaning the transmitter and the receiver CAUTION! Spare ear pads are available from time to the device...
... of electric shock and damage to time. Danger of hygiene, you should replace the ear pads H from your Sennheiser dealer (see "Accessories and spare parts" on the receiver. Cleaning the Set 840-TV system Cleaning the Set 840-TV system Cleaning the transmitter and the receiver CAUTION! Spare ear pads are available from time to the device...
Instructions for use
Page 28
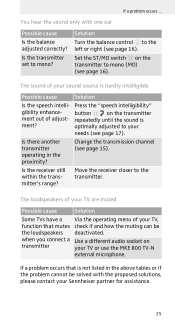
... sound only with the proposed solutions, please contact your Sennheiser partner for assistance. 25 Press the "speech intelligibility" gibility enhance- Is the transmitter set to mono (MO) (see page 17). Change the transmission channel (see page 16). Move the receiver closer to your TV, function that is ment? when you connect a Use a different...
... sound only with the proposed solutions, please contact your Sennheiser partner for assistance. 25 Press the "speech intelligibility" gibility enhance- Is the transmitter set to mono (MO) (see page 17). Change the transmission channel (see page 16). Move the receiver closer to your TV, function that is ment? when you connect a Use a different...
Instructions for use
Page 31
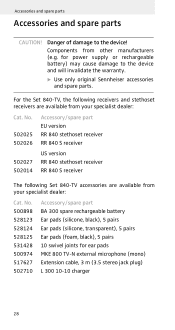
...the device and will invalidate the warranty. ̈ Use only original Sennheiser accessories and spare parts. No. 502025 502026 Accessory/spare part EU version RR 840 stethoset receiver RR 840 S receiver 502027 502014 US version RR 840 stethoset receiver RR 840 S receiver The following receivers and stethoset receivers are available from other... pairs Ear pads (foam, black), 5 pairs 10 swivel joints for power supply or rechargeable battery) may cause damage to the device! For the Set 840-TV, the following Set 840-TV accessories are available from your specialist dealer: Cat.
...the device and will invalidate the warranty. ̈ Use only original Sennheiser accessories and spare parts. No. 502025 502026 Accessory/spare part EU version RR 840 stethoset receiver RR 840 S receiver 502027 502014 US version RR 840 stethoset receiver RR 840 S receiver The following receivers and stethoset receivers are available from other... pairs Ear pads (foam, black), 5 pairs 10 swivel joints for power supply or rechargeable battery) may cause damage to the device! For the Set 840-TV, the following Set 840-TV accessories are available from your specialist dealer: Cat.

Instructions for use
Page 35
... operation, please observe the respective country-specific regulations! 32 This equipment generates, uses and can be determined by Sennheiser electronic Corp. However, there is connected. • Consult the dealer or an experienced radio/TV technician for a Class B digital device, pursuant to Part 15 of the FCC Rules. may not cause harmful interference...
... operation, please observe the respective country-specific regulations! 32 This equipment generates, uses and can be determined by Sennheiser electronic Corp. However, there is connected. • Consult the dealer or an experienced radio/TV technician for a Class B digital device, pursuant to Part 15 of the FCC Rules. may not cause harmful interference...


