RS165 EN (8.6 MB)
Page 1
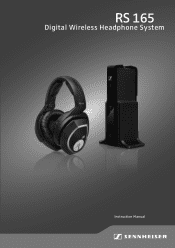
RS 165 Digital Wireless Headphone System Instruction Manual
RS 165 Digital Wireless Headphone System Instruction Manual
RS165 EN (8.6 MB)
Page 3
... Contents Important safety information 2 The RS 165 digital wireless headphone system 4 Package includes 5 Product overview 6 Overview of the HDR 165 headphones 6 Overview of the TR 165 transmitter 7 Overview of the indicators 8 Putting the RS 165 into operation 11 Setting up the ...RS 165 headphone system 19 Switching your wireless headphone system on 19 Adjusting the volume 20 Muting/unmuting the headphones 20 Activating/deactivating the dynamic bass boost 21 Pairing headphones to the transmitter 22 Switching your wireless headphones off 23 Cleaning and maintaining the RS 165...
... Contents Important safety information 2 The RS 165 digital wireless headphone system 4 Package includes 5 Product overview 6 Overview of the HDR 165 headphones 6 Overview of the TR 165 transmitter 7 Overview of the indicators 8 Putting the RS 165 into operation 11 Setting up the ...RS 165 headphone system 19 Switching your wireless headphone system on 19 Adjusting the volume 20 Muting/unmuting the headphones 20 Activating/deactivating the dynamic bass boost 21 Pairing headphones to the transmitter 22 Switching your wireless headphones off 23 Cleaning and maintaining the RS 165...
RS165 EN (8.6 MB)
Page 4
... from high volume levels. Permanent hearing dam- in traffic or when performing skilled jobs). Sennheiser headphones sound exceptionally good at low and medium volume levels. ̈ Keep the headphones at high volume levels for long periods of time. Important safety information Important safety information ... the feet of this product and its attachments/accessories. 2 | RS 165 age may occur when headphones are not going to 104°F. ̈ Use only attachments/accessories/spare parts supplied or recommended by Sennheiser. ̈ Unplug the power supply unit from abuse or misuse ...
... from high volume levels. Permanent hearing dam- in traffic or when performing skilled jobs). Sennheiser headphones sound exceptionally good at low and medium volume levels. ̈ Keep the headphones at high volume levels for long periods of time. Important safety information Important safety information ... the feet of this product and its attachments/accessories. 2 | RS 165 age may occur when headphones are not going to 104°F. ̈ Use only attachments/accessories/spare parts supplied or recommended by Sennheiser. ̈ Unplug the power supply unit from abuse or misuse ...
RS165 EN (8.6 MB)
Page 6
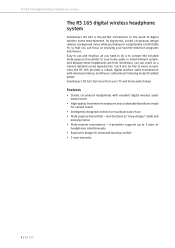
...; Ergonomic design for added power. Sennheiser's RS 165: Get more from Sennheiser, you can focus on a vibrant, detailed sound reproduction. Features • Closed, circumaural headphones with minimum latency, and there is a Bass Boost listening mode for enhanced wearing comfort • 2-year warranty 4 | RS 165 The RS 165 digital wireless headphone system The RS 165 digital wireless headphone system Sennheiser's RS 165 is the perfect introduction to...
...; Ergonomic design for added power. Sennheiser's RS 165: Get more from Sennheiser, you can focus on a vibrant, detailed sound reproduction. Features • Closed, circumaural headphones with minimum latency, and there is a Bass Boost listening mode for enhanced wearing comfort • 2-year warranty 4 | RS 165 The RS 165 digital wireless headphone system The RS 165 digital wireless headphone system Sennheiser's RS 165 is the perfect introduction to...
RS165 EN (8.6 MB)
Page 7
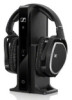
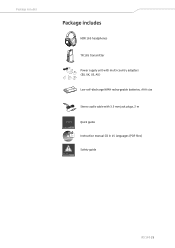
Package includes Package includes HDR 165 headphones TR 165 transmitter BASS Power supply unit with multi-country adapters (EU, UK, US, AU) Low self-discharge NiMH rechargeable batteries, AAA size Stereo audio cable with 3.5 mm jack plugs, 2 m Quick Guide Safety Guide PDF Quick guide Instruction manual CD in 15 languages (PDF files) SafeStayfeGtyuGuididee Safety guide RS 165 | 5
Package includes Package includes HDR 165 headphones TR 165 transmitter BASS Power supply unit with multi-country adapters (EU, UK, US, AU) Low self-discharge NiMH rechargeable batteries, AAA size Stereo audio cable with 3.5 mm jack plugs, 2 m Quick Guide Safety Guide PDF Quick guide Instruction manual CD in 15 languages (PDF files) SafeStayfeGtyuGuididee Safety guide RS 165 | 5

RS165 EN (8.6 MB)
Page 8
Product overview Product overview Overview of the HDR 165 headphones 1 2 3 4 8 5 7 6 1 Headband 2 Charging contacts 3 Ear pads 4 Ear cups/Battery compartments 5 Volume + button 6 Volume - button 7 HDR power button 8 HDR status LED 6 | RS 165
Product overview Product overview Overview of the HDR 165 headphones 1 2 3 4 8 5 7 6 1 Headband 2 Charging contacts 3 Ear pads 4 Ear cups/Battery compartments 5 Volume + button 6 Volume - button 7 HDR power button 8 HDR status LED 6 | RS 165

RS165 EN (8.6 MB)
Page 10
... current operating state. HDR status LED 1s 1s 1s 1s Meaning The headphones are almost empty. The headphones are almost empty. 8 | RS 165 The transmitter and headphones are connected and the rechargeable batteries are switched off. The transmitter and headphones are not using the headphones, the LED indicators automatically dim after approx. 30 seconds to the transmitter...
... current operating state. HDR status LED 1s 1s 1s 1s Meaning The headphones are almost empty. The headphones are almost empty. 8 | RS 165 The transmitter and headphones are connected and the rechargeable batteries are switched off. The transmitter and headphones are not using the headphones, the LED indicators automatically dim after approx. 30 seconds to the transmitter...

RS165 EN (8.6 MB)
Page 11
..., the charge status LED indicates the approximate operating time of the headphones: Charge status LED Operating time Battery capacity up to 4 hours 0 to 25% approx. 4 to 9 hours 25 to 50% approx. 9 to 14 hours 50 to 75% approx. 14 to 18 hours 75 to 100% RS 165 | 9 The rechargeable batteries are fully charged.
..., the charge status LED indicates the approximate operating time of the headphones: Charge status LED Operating time Battery capacity up to 4 hours 0 to 25% approx. 4 to 9 hours 25 to 50% approx. 9 to 14 hours 50 to 75% approx. 14 to 18 hours 75 to 100% RS 165 | 9 The rechargeable batteries are fully charged.

RS165 EN (8.6 MB)
Page 12
Product overview A2 BASS button LED 3 TR status LED 1s Meaning The dynamic bass boost is in standby mode. The transmitter and headphones are connected. 10 | RS 165 The transmitter is deactivated. The dynamic bass boost is connected to the AC wall outlet. Meaning The transmitter is activated.
Product overview A2 BASS button LED 3 TR status LED 1s Meaning The dynamic bass boost is in standby mode. The transmitter and headphones are connected. 10 | RS 165 The transmitter is deactivated. The dynamic bass boost is connected to the AC wall outlet. Meaning The transmitter is activated.

RS165 EN (8.6 MB)
Page 14
... adapters from your local Sennheiser partner. 12 | RS 165 to be ordered 14 separately) You can connect the transmitter to different audio sources, such as a Blu-ray player, a TV or a stereo hi-fi system. You can also refer to the beginner's video guides on how to connect your digital wireless headphone system to a TV...
... adapters from your local Sennheiser partner. 12 | RS 165 to be ordered 14 separately) You can connect the transmitter to different audio sources, such as a Blu-ray player, a TV or a stereo hi-fi system. You can also refer to the beginner's video guides on how to connect your digital wireless headphone system to a TV...

RS165 EN (8.6 MB)
Page 15
Putting the RS 165 into operation A Connection option A: 3.5 mm or 6.3 mm/¼" jack socket (analog) Some TV models mute the loudspeakers when you connect the transmitter to see if ... cable. ̈ Connect the stereo audio cable to the 3.5 mm jack socket of the transmitter and to the headphone socket of your audio source to at least about the medium level. Adjust the volume of the headphone socket on your TV to the headphone socket. Alternatively, connect the TV and the trans- RS 165 | 13
Putting the RS 165 into operation A Connection option A: 3.5 mm or 6.3 mm/¼" jack socket (analog) Some TV models mute the loudspeakers when you connect the transmitter to see if ... cable. ̈ Connect the stereo audio cable to the 3.5 mm jack socket of the transmitter and to the headphone socket of your audio source to at least about the medium level. Adjust the volume of the headphone socket on your TV to the headphone socket. Alternatively, connect the TV and the trans- RS 165 | 13
RS165 EN (8.6 MB)
Page 18
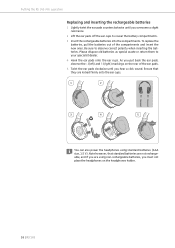
As you put back the ear pads, observe the L (left) and R (right) markings on the headphones holder. 16 | RS 165 Be sure to your specialist dealer. 4 Hook the ear pads onto the ear cups. Note however, that they are using standard batteries (AAA ... 4 5 NEW You can also power the headphones using non-rechargeable batteries, you must not place the headphones on the rear of the compartments and insert the new ones. Please dispose old batteries as special waste or return them to observe correct polarity when inserting the batteries. Putting the RS 165 into the compartments.
As you put back the ear pads, observe the L (left) and R (right) markings on the headphones holder. 16 | RS 165 Be sure to your specialist dealer. 4 Hook the ear pads onto the ear cups. Note however, that they are using standard batteries (AAA ... 4 5 NEW You can also power the headphones using non-rechargeable batteries, you must not place the headphones on the rear of the compartments and insert the new ones. Please dispose old batteries as special waste or return them to observe correct polarity when inserting the batteries. Putting the RS 165 into the compartments.
RS165 EN (8.6 MB)
Page 19
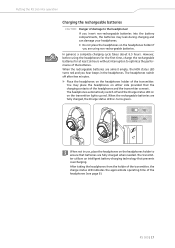
...turns green. 100% When not in the headphones. The transmitter utilizes an intelligent battery charging technology that prevents overcharging. RS 165 | 17 In general, a complete charging cycle takes about 8.5 hours. After taking the headphones from the holder of the transmitter, the ...non-rechargeable batteries into operation Charging the rechargeable batteries CAUTION Danger of the headphones and the transmitter connect. Putting the RS 165 into the battery compartments, the batteries may place the headphones on either side provided that batteries are fully charged when needed.
...turns green. 100% When not in the headphones. The transmitter utilizes an intelligent battery charging technology that prevents overcharging. RS 165 | 17 In general, a complete charging cycle takes about 8.5 hours. After taking the headphones from the holder of the transmitter, the ...non-rechargeable batteries into operation Charging the rechargeable batteries CAUTION Danger of the headphones and the transmitter connect. Putting the RS 165 into the battery compartments, the batteries may place the headphones on either side provided that batteries are fully charged when needed.

RS165 EN (8.6 MB)
Page 20
... an adjustable headband with a snap-in locking mechanism for easy adjustment. ̈ Wear the headphones so that the headband runs over the top of the headband until - Putting the RS 165 into operation Adjusting the headband For good sound quality and best possible wearing comfort, the headband has to be adjusted to ...properly fit your head. Observe the L (left) and R (right) markings on the outer headband when putting the headphones on the head is ensured. 18 | RS 165 a snug fit of the headband on . ̈ Adjust the length of your head.
... an adjustable headband with a snap-in locking mechanism for easy adjustment. ̈ Wear the headphones so that the headband runs over the top of the headband until - Putting the RS 165 into operation Adjusting the headband For good sound quality and best possible wearing comfort, the headband has to be adjusted to ...properly fit your head. Observe the L (left) and R (right) markings on the outer headband when putting the headphones on the head is ensured. 18 | RS 165 a snug fit of the headband on . ̈ Adjust the length of your head.

RS165 EN (8.6 MB)
Page 21
... there is no audio signal received from the transmitter for approx. 2 seconds to high volume levels! The transmitter in standby mode recognizes the active paired headphones and automatically transmits a signal. RS 165 | 19 Listening at least the medium level. 2 Press and hold the HDR power button for more than 5 minutes, the...
... there is no audio signal received from the transmitter for approx. 2 seconds to high volume levels! The transmitter in standby mode recognizes the active paired headphones and automatically transmits a signal. RS 165 | 19 Listening at least the medium level. 2 Press and hold the HDR power button for more than 5 minutes, the...

RS165 EN (8.6 MB)
Page 22
Putting the RS 165 into operation Adjusting the volume ̈ Press the Volume + button or the Volume - When the minimum or maximum volume setting is adjusted to cancel the muting. Vol Vol Muting/unmuting the headphones ̈ Press the HDR power button to save energy. 20 | RS 165 If the headphones are muted for 15 minutes, the headphones switch off automatically to mute the headphones. ̈ Press the HDR power button or any of the Volume +/- button repeatedly until the volume is reached, you hear a beep in the headphones. buttons to a desired level.
Putting the RS 165 into operation Adjusting the volume ̈ Press the Volume + button or the Volume - When the minimum or maximum volume setting is adjusted to cancel the muting. Vol Vol Muting/unmuting the headphones ̈ Press the HDR power button to save energy. 20 | RS 165 If the headphones are muted for 15 minutes, the headphones switch off automatically to mute the headphones. ̈ Press the HDR power button or any of the Volume +/- button repeatedly until the volume is reached, you hear a beep in the headphones. buttons to a desired level.

RS165 EN (8.6 MB)
Page 23
...; Press the BASS button either on and off modes, as indicated by the BASS LED indicator. RS 165 | 21 The bass boost effect switches between on the headphones or the transmitter. Putting the RS 165 into operation Activating/deactivating the dynamic bass boost The dynamic bass boost feature allows you to select 2 different levels of...
...; Press the BASS button either on and off modes, as indicated by the BASS LED indicator. RS 165 | 21 The bass boost effect switches between on the headphones or the transmitter. Putting the RS 165 into operation Activating/deactivating the dynamic bass boost The dynamic bass boost feature allows you to select 2 different levels of...
RS165 EN (8.6 MB)
Page 24
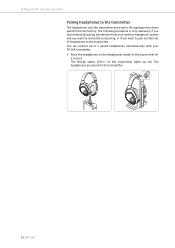
... want to pair another set of the transmitter for a second. You can connect up red. The Charge status LED on the headphones holder of headphones to the transmitter. Putting the RS 165 into operation Pairing headphones to the transmitter The headphones and the transmitter enclosed in this package have cleared all pairing information from the factory.
... want to pair another set of the transmitter for a second. You can connect up red. The Charge status LED on the headphones holder of headphones to the transmitter. Putting the RS 165 into operation Pairing headphones to the transmitter The headphones and the transmitter enclosed in this package have cleared all pairing information from the factory.
RS165 EN (8.6 MB)
Page 25
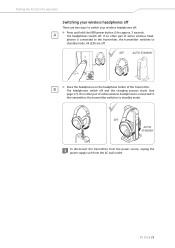
... off . If no other pair of the transmitter. OFF AUTO-STANDBY 2s B ̈ Place the headphones on the headphone holder of active wireless head- STANDBY To disconnect the transmitter from the power source, unplug the power supply unit from the ... (see page 17). OFF AUTO- If no other pair of active wireless headphones is connected to the transmitter, the transmitter switches to standby mode. phones is connected to the transmitter, the transmitter switches to standby mode. RS 165 | 23 The headphones switch off . Putting the RS 165 into operation Switching your wireless...
... off . If no other pair of the transmitter. OFF AUTO-STANDBY 2s B ̈ Place the headphones on the headphone holder of active wireless head- STANDBY To disconnect the transmitter from the power source, unplug the power supply unit from the ... (see page 17). OFF AUTO- If no other pair of active wireless headphones is connected to the transmitter, the transmitter switches to standby mode. phones is connected to the transmitter, the transmitter switches to standby mode. RS 165 | 23 The headphones switch off . Putting the RS 165 into operation Switching your wireless...
RS165 EN (8.6 MB)
Page 26
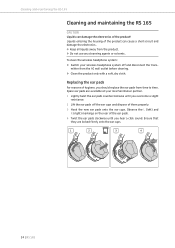
mitter from the AC wall outlet before cleaning. ̈ Clean the product only with a soft, dry cloth. To clean the wireless headphone system: ̈ Switch your local Sennheiser partner. 1 Lightly twist the ear pads counterclockwise until you hear a click sound. Observe the L (left) and R (right) markings... off and disconnect the trans- Spare ear pads are locked firmly onto the ear cups. 1 2 3 4 24 | RS 165 Ensure that they are available at your wireless headphone system off the ear cups and dispose of them properly. 3 Hook the new ear pads onto the ear cups. Replacing ...
mitter from the AC wall outlet before cleaning. ̈ Clean the product only with a soft, dry cloth. To clean the wireless headphone system: ̈ Switch your local Sennheiser partner. 1 Lightly twist the ear pads counterclockwise until you hear a click sound. Observe the L (left) and R (right) markings... off and disconnect the trans- Spare ear pads are locked firmly onto the ear cups. 1 2 3 4 24 | RS 165 Ensure that they are available at your wireless headphone system off the ear cups and dispose of them properly. 3 Hook the new ear pads onto the ear cups. Replacing ...


