
Quick Guide ew 100 G4
Page 2
... +18 dB -24 dB . . . +24 dB Mute Instruction Manual EM 100 SKM 100 short short RF Mute On? SET SK 100 SKM 100-S MIC Menu Advanced SET Advanced Mute Mode AF On/Off SET Mute Mode AF...Easy Setup EM Menu Easy Setup SET Frequency Preset EM, SK, SKM Menu Frequency Preset SET B.Ch: 1.1 Sync 4 SYNC PEAK 40 0 25 10 -10 -20 -30 RF AF Easy Setup Scan New List SET Frequency Preset ...10 cm ≤ 4" OR Easy Setup Bank 1 ... 20 Free: 0 ...12 SET Easy Setup B.Ch: 1. 1...12 Sync 758.200 MHz SET Stored Stored PEAK 40 0 25 10 -10 -20 -30 RF AF OR No frequency 1 Squelch: Middle...
... +18 dB -24 dB . . . +24 dB Mute Instruction Manual EM 100 SKM 100 short short RF Mute On? SET SK 100 SKM 100-S MIC Menu Advanced SET Advanced Mute Mode AF On/Off SET Mute Mode AF...Easy Setup EM Menu Easy Setup SET Frequency Preset EM, SK, SKM Menu Frequency Preset SET B.Ch: 1.1 Sync 4 SYNC PEAK 40 0 25 10 -10 -20 -30 RF AF Easy Setup Scan New List SET Frequency Preset ...10 cm ≤ 4" OR Easy Setup Bank 1 ... 20 Free: 0 ...12 SET Easy Setup B.Ch: 1. 1...12 Sync 758.200 MHz SET Stored Stored PEAK 40 0 25 10 -10 -20 -30 RF AF OR No frequency 1 Squelch: Middle...

Instruction manual ew 100 G4 PDF
Page 60
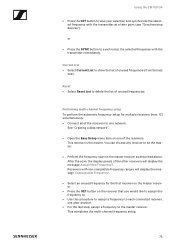
Using the EM 100 G4 Operating elements on the front of the device Product overview for the front of the EM 100 G4 ► 1 Infrared interface with a blue LED • See "Synchronizing devices" 2 Display panel • See "Displays on the EM 100 G4 display panel" 3 UP/DOWN buttons • See "Buttons for navigating through the menu" 4 SYNC button • See "Synchronizing devices" 5 ESC button • See "Buttons for navigating through the menu" 6 SET button • See "Buttons for navigating through the menu" 7 STANDBY button • See "Switching the EM 100 G4 on and off" 59
Using the EM 100 G4 Operating elements on the front of the device Product overview for the front of the EM 100 G4 ► 1 Infrared interface with a blue LED • See "Synchronizing devices" 2 Display panel • See "Displays on the EM 100 G4 display panel" 3 UP/DOWN buttons • See "Buttons for navigating through the menu" 4 SYNC button • See "Synchronizing devices" 5 ESC button • See "Buttons for navigating through the menu" 6 SET button • See "Buttons for navigating through the menu" 7 STANDBY button • See "Switching the EM 100 G4 on and off" 59
Instruction manual ew 100 G4 PDF
Page 74
... the list of the receivers to one after another. ▷ For the last step, assign a frequency to each connected receiver, one network. Using the EM 100 G4 ▷ Press the SET button to save your selection and synchronize the selected frequency with the transmitter immediately. Reset ▷ Select Reset List to be... to assign this frequency to. ▷ Use this procedure to assign a frequency to the master receiver. This receiver is the master. or ▷ Press the SYNC button to show the list of the receivers.
... the list of the receivers to one after another. ▷ For the last step, assign a frequency to each connected receiver, one network. Using the EM 100 G4 ▷ Press the SET button to save your selection and synchronize the selected frequency with the transmitter immediately. Reset ▷ Select Reset List to be... to assign this frequency to. ▷ Use this procedure to assign a frequency to the master receiver. This receiver is the master. or ▷ Press the SYNC button to show the list of the receivers.

Instruction manual ew 100 G4 PDF
Page 122
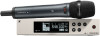
Synchronizing devices Synchronizing devices You can synchronize ew 100 G4 series transmitters and receivers via the receiver's infrared interface. Sync appears in the receiver's display and the blue LED turns blue. ▷ Hold the infra-red interface of the pilot tone on the receiver. The ... of the transmitter (see "Ad- vanced -> Pilot Tone menu item") To synchronize the devices: ▷ Switch the transmitter and the receiver on. ▷ Press the SYNC button on the receiver (see "Operating elements 121
Synchronizing devices Synchronizing devices You can synchronize ew 100 G4 series transmitters and receivers via the receiver's infrared interface. Sync appears in the receiver's display and the blue LED turns blue. ▷ Hold the infra-red interface of the pilot tone on the receiver. The ... of the transmitter (see "Ad- vanced -> Pilot Tone menu item") To synchronize the devices: ▷ Switch the transmitter and the receiver on. ▷ Press the SYNC button on the receiver (see "Operating elements 121
