Instruction manual ew 100 G4 PDF
Page 2
...of the EM 100 G4 22 Connecting/disconnecting the EM 100 G4 to/from the power supply system 23 Creating a data network 24 Setting up a multi-channel system with more than 12 receivers 25 Outputting audio signals 26 Connecting antennas 27 Installing the EM 100 G4 in a rack 28 Mounting a single receiver in ...a rack 29 Mounting two receivers side by side in a rack 30 Installing the SKM 100 G4 31 Inserting and removing the batteries/...
...of the EM 100 G4 22 Connecting/disconnecting the EM 100 G4 to/from the power supply system 23 Creating a data network 24 Setting up a multi-channel system with more than 12 receivers 25 Outputting audio signals 26 Connecting antennas 27 Installing the EM 100 G4 in a rack 28 Mounting a single receiver in ...a rack 29 Mounting two receivers side by side in a rack 30 Installing the SKM 100 G4 31 Inserting and removing the batteries/...
Instruction manual ew 100 G4 PDF
Page 3
... two antenna splitters side by side in a rack 55 Using ew 100 G4 series devices 56 Using the EM 100 G4 58 Operating elements on the front of the device 59 Product overview for the front of the EM 100 G4 59 Switching the EM 100 G4 on and off 60 Muting the audio output 61 Lock-off function... 62 Displays on the EM 100 G4 display panel 63 Buttons for navigating through the menu 63 Home screen 65 Receiver Parameters standard display 65 Soundcheck standard display 66...
... two antenna splitters side by side in a rack 55 Using ew 100 G4 series devices 56 Using the EM 100 G4 58 Operating elements on the front of the device 59 Product overview for the front of the EM 100 G4 59 Switching the EM 100 G4 on and off 60 Muting the audio output 61 Lock-off function... 62 Displays on the EM 100 G4 display panel 63 Buttons for navigating through the menu 63 Home screen 65 Receiver Parameters standard display 65 Soundcheck standard display 66...

Instruction manual ew 100 G4 PDF
Page 9
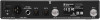
EM 100 G4 rack receiver ► You can find more detailed information about the EM 100 G4 in the following sections: • Installation and Startup: "Installing the EM 100 G4" • Operation: "Using the EM 100 G4" • Technical Data: "EM 100 G4" 8
EM 100 G4 rack receiver ► You can find more detailed information about the EM 100 G4 in the following sections: • Installation and Startup: "Installing the EM 100 G4" • Operation: "Using the EM 100 G4" • Technical Data: "EM 100 G4" 8

Instruction manual ew 100 G4 PDF
Page 15
Article no . 009950 ► L 2015 charger The BA 2015 rechargeable battery can be charged in the L 2015 charger on its own or inside of the bodypack transmitter/bodypack receiver. Accessories Rechargeable battery and charger BA 2015 rechargeable battery The BA 2015 rechargeable battery is designed for use with evolution wireless G4 series handheld transmitters, bodypack transmitters and bodypack receivers. Article no . 009828 ► 14
Article no . 009950 ► L 2015 charger The BA 2015 rechargeable battery can be charged in the L 2015 charger on its own or inside of the bodypack transmitter/bodypack receiver. Accessories Rechargeable battery and charger BA 2015 rechargeable battery The BA 2015 rechargeable battery is designed for use with evolution wireless G4 series handheld transmitters, bodypack transmitters and bodypack receivers. Article no . 009828 ► 14

Instruction manual ew 100 G4 PDF
Page 21
Installing and starting up ew 100 G4 series devices INSTALLATION Installing and starting up ew 100 G4 series devices You can find information about installing and connecting ew 100 G4 series devices in the following sections. • EM 100 G4 rack receiver >> "Installing the EM 100 G4" • SKM 100 G4(-S) handheld transmitter >> "Installing the SKM 100 G4" • SK 100 G4 bodypack transmitter >> "Installing the SK 100 G4" • ASA 214 antenna splitter>> "Installing the ASA 214" You can find information about operating the products under "Using ew 100 G4 series devices". 20
Installing and starting up ew 100 G4 series devices INSTALLATION Installing and starting up ew 100 G4 series devices You can find information about installing and connecting ew 100 G4 series devices in the following sections. • EM 100 G4 rack receiver >> "Installing the EM 100 G4" • SKM 100 G4(-S) handheld transmitter >> "Installing the SKM 100 G4" • SK 100 G4 bodypack transmitter >> "Installing the SK 100 G4" • ASA 214 antenna splitter>> "Installing the ASA 214" You can find information about operating the products under "Using ew 100 G4 series devices". 20

Instruction manual ew 100 G4 PDF
Page 24
It is designed for your receiver and ensures safe operation. To completely disconnect the EM 100 G4 from the power supply system: ▷ Unplug the power supply unit from the wall socket. ▷ Unplug the power supply unit from the power supply ... unit. ▷ Plug the power supply unit into the DC IN socket of the re- To connect the EM 100 G4 to /from the DC IN socket of the receiver. 23 Installing the EM 100 G4 Connecting/disconnecting the EM 100 G4 to the power supply system: ▷ Insert the plug of the power supply unit into the wall socket.
It is designed for your receiver and ensures safe operation. To completely disconnect the EM 100 G4 from the power supply system: ▷ Unplug the power supply unit from the wall socket. ▷ Unplug the power supply unit from the power supply ... unit. ▷ Plug the power supply unit into the DC IN socket of the re- To connect the EM 100 G4 to /from the DC IN socket of the receiver. 23 Installing the EM 100 G4 Connecting/disconnecting the EM 100 G4 to the power supply system: ▷ Insert the plug of the power supply unit into the wall socket.
Instruction manual ew 100 G4 PDF
Page 25
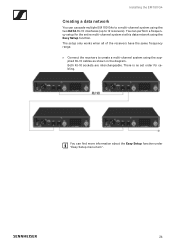
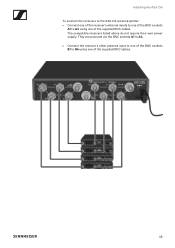
...". 24 Installing the EM 100 G4 Creating a data network You can cascade multiple EM 100 G4s to a multi-channel system using the two DATA RJ-10 interfaces (up to create a multi-channel system using the Easy Setup function. Both RJ-10 sockets are interchangeable. The setup only works when all of the receivers have the same frequency...
...". 24 Installing the EM 100 G4 Creating a data network You can cascade multiple EM 100 G4s to a multi-channel system using the two DATA RJ-10 interfaces (up to create a multi-channel system using the Easy Setup function. Both RJ-10 sockets are interchangeable. The setup only works when all of the receivers have the same frequency...
Instruction manual ew 100 G4 PDF
Page 26
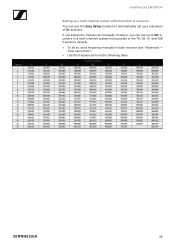
If you assign the frequencies manually, however, you can use up a maximum of 12 receivers. Installing the EM 100 G4 Setting up a multi-channel system with more than 12 receivers You can use the Easy Setup function to automatically set up to 20 receivers in a multi-channel system (not possible in the TH, JB, K+ and 1G8 frequency ranges). ▷ To do so, set a frequency manually in each receiver (see "Advanced -> Tune menu item"). ▷ Use the frequencies from the following table. ► 25
If you assign the frequencies manually, however, you can use up a maximum of 12 receivers. Installing the EM 100 G4 Setting up a multi-channel system with more than 12 receivers You can use the Easy Setup function to automatically set up to 20 receivers in a multi-channel system (not possible in the TH, JB, K+ and 1G8 frequency ranges). ▷ To do so, set a frequency manually in each receiver (see "Advanced -> Tune menu item"). ▷ Use the frequencies from the following table. ► 25

Instruction manual ew 100 G4 PDF
Page 28
If you are using remote antennas and the ASA 214 antenna splitter. Installing the EM 100 G4 Connecting antennas To connect the supplied rod antennas: ▷ Connect the first rod antenna to the ANT I socket on the rear side of the EM 100 G4. ▷ Connect the second rod antenna to the ANT II socket on the rear side of the EM 100 G4. ▷ Gently angle the rod antennas to the left and right as shown in the fig- ure. You can find more than one receiver, we recommend using more information here: • "Installing the ASA 214" • "Using the ASA 214" 27
If you are using remote antennas and the ASA 214 antenna splitter. Installing the EM 100 G4 Connecting antennas To connect the supplied rod antennas: ▷ Connect the first rod antenna to the ANT I socket on the rear side of the EM 100 G4. ▷ Connect the second rod antenna to the ANT II socket on the rear side of the EM 100 G4. ▷ Gently angle the rod antennas to the left and right as shown in the fig- ure. You can find more than one receiver, we recommend using more information here: • "Installing the ASA 214" • "Using the ASA 214" 27

Instruction manual ew 100 G4 PDF
Page 30
... set (optional accessory) and mount the rod antennas on each side of the receiver. ▷ Secure both of the receiver us- To fasten the mounting angle of the GA 3 rack mounting kit: ...receiver with the mounted blanking plate into the 19" rack. ▷ Secure the mounting angle and the blanking plate to the sides of the the mounting angles to the 19" rack. ▷ Align the mounted antennas in a rack, you will need the GA 3 rack mounting kit (optional accessory). Installing the EM 100 G4... Mounting a single receiver in a rack To mount the...
... set (optional accessory) and mount the rod antennas on each side of the receiver. ▷ Secure both of the receiver us- To fasten the mounting angle of the GA 3 rack mounting kit: ...receiver with the mounted blanking plate into the 19" rack. ▷ Secure the mounting angle and the blanking plate to the sides of the the mounting angles to the 19" rack. ▷ Align the mounted antennas in a rack, you will need the GA 3 rack mounting kit (optional accessory). Installing the EM 100 G4... Mounting a single receiver in a rack To mount the...

Instruction manual ew 100 G4 PDF
Page 31
Installing the EM 100 G4 Mounting two receivers side by side in a rack When you mount two receivers side by side, it is only possible to front mount antennas when you use the ASA 214 antenna splitter in combination with the AM 2 front mounting kit and an additional GA 3 rack mounting kit, To mount the receiver using the GA 3 rack mounting kit (optional accessory): ▷ Place both receivers upside down and side by side on an even surface. ▷ Secure the jointing plate to the transmitters using the six recessed head screws (M3x6). ▷ Secure the mounting angle. ► 30
Installing the EM 100 G4 Mounting two receivers side by side in a rack When you mount two receivers side by side, it is only possible to front mount antennas when you use the ASA 214 antenna splitter in combination with the AM 2 front mounting kit and an additional GA 3 rack mounting kit, To mount the receiver using the GA 3 rack mounting kit (optional accessory): ▷ Place both receivers upside down and side by side on an even surface. ▷ Secure the jointing plate to the transmitters using the six recessed head screws (M3x6). ▷ Secure the mounting angle. ► 30

Instruction manual ew 100 G4 PDF
Page 44
...the ASA 214 to/from the power supply system" 4 4 BNC sockets B1 to B4 • RF outputs of diversity branch B for connection to the receiver • See "Connecting receivers to the ASA 214" 5 ANT RF IN A BNC socket • Antenna input of diversity branch A • See "Connecting antennas" 6 4 ...BNC sockets A1 to A4 • RF outputs of diversity branch A for connection to the receiver • Every one of these RF outputs can also provide voltage to a receiver. • See "Connecting receivers to the ASA 214" 7 Strain relief for the cable of the power supply unit • See "...
...the ASA 214 to/from the power supply system" 4 4 BNC sockets B1 to B4 • RF outputs of diversity branch B for connection to the receiver • See "Connecting receivers to the ASA 214" 5 ANT RF IN A BNC socket • Antenna input of diversity branch A • See "Connecting antennas" 6 4 ...BNC sockets A1 to A4 • RF outputs of diversity branch A for connection to the receiver • Every one of these RF outputs can also provide voltage to a receiver. • See "Connecting receivers to the ASA 214" 7 Strain relief for the cable of the power supply unit • See "...

Instruction manual ew 100 G4 PDF
Page 45
... supply unit. ▷ Plug the power supply unit into the wall socket. To connect the ASA 214 antenna splitter to the ASA 214, the connected receivers and any antenna amplifiers used, you will need the NT 1-1 power supply unit. It is designed for your antenna splitter and ensures safe operation. To...
... supply unit. ▷ Plug the power supply unit into the wall socket. To connect the ASA 214 antenna splitter to the ASA 214, the connected receivers and any antenna amplifiers used, you will need the NT 1-1 power supply unit. It is designed for your antenna splitter and ensures safe operation. To...

Instruction manual ew 100 G4 PDF
Page 46
The following receivers are compatible: evolution wireless G4: • EM 100 G4 • EM 300-500 G4 evolution wireless G3: • EM 100 G3 • EM 300 G3 • EM 500 G3 2000 series: • EM 2000 (with its own power supply) • EM 2050 (with power from the ASA 214. Sennheiser receivers of the ew G4 and ew G3 series can connect and operate up to four stationary receivers to the ASA 214. Installing the ASA 214 Connecting receivers to the ASA 214 You can also be supplied with its own power supply) 45
The following receivers are compatible: evolution wireless G4: • EM 100 G4 • EM 300-500 G4 evolution wireless G3: • EM 100 G3 • EM 300 G3 • EM 500 G3 2000 series: • EM 2000 (with its own power supply) • EM 2050 (with power from the ASA 214. Sennheiser receivers of the ew G4 and ew G3 series can connect and operate up to four stationary receivers to the ASA 214. Installing the ASA 214 Connecting receivers to the ASA 214 You can also be supplied with its own power supply) 45
Instruction manual ew 100 G4 PDF
Page 47
They are powered via the BNC sockets A1 to A4. ▷ Connect the receiver's other antenna input to one of the BNC sockets B1 to A4 using one of the supplied BNC cables. 46 Installing the ASA 214 To connect the receivers to the ASA 214 antenna splitter: ▷ Connect one of the receiver's antenna inputs to one of the BNC sockets A1 to B4 using one of the supplied BNC cables. The compatible receivers listed above do not require their own power supply.
They are powered via the BNC sockets A1 to A4. ▷ Connect the receiver's other antenna input to one of the BNC sockets B1 to A4 using one of the supplied BNC cables. 46 Installing the ASA 214 To connect the receivers to the ASA 214 antenna splitter: ▷ Connect one of the receiver's antenna inputs to one of the BNC sockets A1 to B4 using one of the supplied BNC cables. The compatible receivers listed above do not require their own power supply.
Instruction manual ew 100 G4 PDF
Page 57
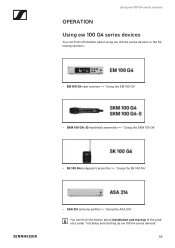
Using ew 100 G4 series devices OPERATION Using ew 100 G4 series devices You can find information about using ew 100 G4 series devices in the following sections. • EM 100 G4 rack receiver >> "Using the EM 100 G4" • SKM 100 G4(-S) handheld transmitter >> "Using the SKM 100 G4" • SK 100 G4 bodypack transmitter >> "Using the SK 100 G4" • ASA 214 antenna splitter>> "Using the ASA 214" You can find information about installation and start up of the products under "Installing and starting up ew 100 G4 series devices". 56
Using ew 100 G4 series devices OPERATION Using ew 100 G4 series devices You can find information about using ew 100 G4 series devices in the following sections. • EM 100 G4 rack receiver >> "Using the EM 100 G4" • SKM 100 G4(-S) handheld transmitter >> "Using the SKM 100 G4" • SK 100 G4 bodypack transmitter >> "Using the SK 100 G4" • ASA 214 antenna splitter>> "Using the ASA 214" You can find information about installation and start up of the products under "Installing and starting up ew 100 G4 series devices". 56
Instruction manual ew 100 G4 PDF
Page 58
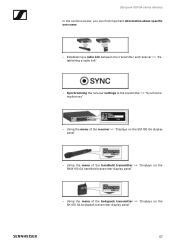
... find important information about specific use cases. • Establishing a radio link between the transmitter and receiver >> "Establishing a radio link" • Synchronizing the receiver settings to the transmitter >> "Synchronizing devices" • Using the menu of the receiver >> "Displays on the EM 100 G4 display panel" • Using the menu of the handheld transmitter >> "Displays on the SKM...
... find important information about specific use cases. • Establishing a radio link between the transmitter and receiver >> "Establishing a radio link" • Synchronizing the receiver settings to the transmitter >> "Synchronizing devices" • Using the menu of the receiver >> "Displays on the EM 100 G4 display panel" • Using the menu of the handheld transmitter >> "Displays on the SKM...

Instruction manual ew 100 G4 PDF
Page 61
.... ► To switch the receiver to standby mode: ▷ If necessary, deactivate the lock-off function (see "Lock-off function"). ▷ Press and hold the STANDBY button until OFF appears on : ▷ Short-press the STANDBY button. Using the EM 100 G4 Switching the EM 100 G4 on and off To switch the receiver on the display panel...
.... ► To switch the receiver to standby mode: ▷ If necessary, deactivate the lock-off function (see "Lock-off function"). ▷ Press and hold the STANDBY button until OFF appears on : ▷ Short-press the STANDBY button. Using the EM 100 G4 Switching the EM 100 G4 on and off To switch the receiver on the display panel...

Instruction manual ew 100 G4 PDF
Page 62
display appears. ▷ Press the SET button. Using the EM 100 G4 Muting the audio output To mute the audio signal of the receiver: ▷ Short-press the STANDBY button in one of the standard displays. The audio signal is no longer muted. ► 61 To cancel the muting: ▷ Short-press the STANDBY button. display appears. ▷ Press the SET button. The audio output is muted. The RX Mute On? The RX Mute Off?
display appears. ▷ Press the SET button. Using the EM 100 G4 Muting the audio output To mute the audio signal of the receiver: ▷ Short-press the STANDBY button in one of the standard displays. The audio signal is no longer muted. ► 61 To cancel the muting: ▷ Short-press the STANDBY button. display appears. ▷ Press the SET button. The audio output is muted. The RX Mute On? The RX Mute Off?

Instruction manual ew 100 G4 PDF
Page 63
... temporarily deactivated. ► When you are in the operating menu >> Lock-off function is deactivated long enough for you will have to turn the receiver off function is shown >> Lock-off and on again in order to work in the Auto lock menu (see "Auto Lock menu item"). The ... of the standard displays is automatically activated after 10 seconds. When you have switched on the lock-off function, you to operate it. Using the EM 100 G4 Lock-off function You can set the automatic lock-off function: ▷ Press the SET button. Locked appears in the display panel. ▷ Press...
... temporarily deactivated. ► When you are in the operating menu >> Lock-off function is deactivated long enough for you will have to turn the receiver off function is shown >> Lock-off and on again in order to work in the Auto lock menu (see "Auto Lock menu item"). The ... of the standard displays is automatically activated after 10 seconds. When you have switched on the lock-off function, you to operate it. Using the EM 100 G4 Lock-off function You can set the automatic lock-off function: ▷ Press the SET button. Locked appears in the display panel. ▷ Press...
