
Instructions for Use
Page 2
Contents Contents Important safety instructions 2 The Tourguide 1039 system 4 Frequency ranges ...4 Features of the EK 1039 receiver 4 Suitable transmitters for your Tourguide application 5 Charger for your Tourguide application 7 Product overview of the menu 15 The buttons ...15 Working ... Cleaning and maintaining the receiver 21 Configuring the transmitters for your Tourguide application 22 Matching the transmitter to clothing 13 Configuring the receiver 14 Calling up/ending the menu 14 Overview of the EK 1039 receiver 8 Putting the receiver into operation 10 Inserting the...
Contents Contents Important safety instructions 2 The Tourguide 1039 system 4 Frequency ranges ...4 Features of the EK 1039 receiver 4 Suitable transmitters for your Tourguide application 5 Charger for your Tourguide application 7 Product overview of the menu 15 The buttons ...15 Working ... Cleaning and maintaining the receiver 21 Configuring the transmitters for your Tourguide application 22 Matching the transmitter to clothing 13 Configuring the receiver 14 Calling up/ending the menu 14 Overview of the EK 1039 receiver 8 Putting the receiver into operation 10 Inserting the...

Instructions for Use
Page 3
...only) that produce heat. • Only use . Always include this instruction manual. Danger of the trade association responsible. Sennheiser, as the manufacturer, is used as radiators, stoves, or other devices (including amplifiers) that you have been subjected ... Tourguide 1039 The EK 1039 receiver is capable of producing sound pressure levels exceeding 85 dB (A). 85 dB (A) is the sound pressure corresponding to qualified service personnel. It is therefore obliged to expressly point out possible health risks arising from use attachments/accessories specified by Sennheiser....
...only) that produce heat. • Only use . Always include this instruction manual. Danger of the trade association responsible. Sennheiser, as the manufacturer, is used as radiators, stoves, or other devices (including amplifiers) that you have been subjected ... Tourguide 1039 The EK 1039 receiver is capable of producing sound pressure levels exceeding 85 dB (A). 85 dB (A) is the sound pressure corresponding to qualified service personnel. It is therefore obliged to expressly point out possible health risks arising from use attachments/accessories specified by Sennheiser....

Instructions for Use
Page 5
...Bw 626-698 MHz C 734-776 MHz Cw 718-790 MHz D 780-822 MHz E 823-865 MHz Dw 790-865 MHz Tourguide 1039 EK 1039 receiver Bw 626-698 MHz Cw 718-790 MHz Dw 790-865 MHz 32 factory-preset frequencies that are not intermodulation-free. In this ... your individual needs. IEM 2000 series incl. The Tourguide 1039 system The Tourguide 1039 system The Tourguide 1039 system consists of the EK 1039 receiver and a suitable transmitter of compatible frequency ranges. The system offers optimum speech transmission for all members of the receiver: • Easy and comfortable use • Channel...
...Bw 626-698 MHz C 734-776 MHz Cw 718-790 MHz D 780-822 MHz E 823-865 MHz Dw 790-865 MHz Tourguide 1039 EK 1039 receiver Bw 626-698 MHz Cw 718-790 MHz Dw 790-865 MHz 32 factory-preset frequencies that are not intermodulation-free. In this ... your individual needs. IEM 2000 series incl. The Tourguide 1039 system The Tourguide 1039 system The Tourguide 1039 system consists of the EK 1039 receiver and a suitable transmitter of compatible frequency ranges. The system offers optimum speech transmission for all members of the receiver: • Easy and comfortable use • Channel...
Instructions for Use
Page 6
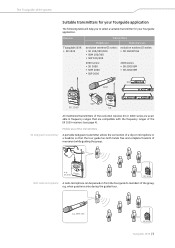
...ranges that the tour guide has both hands free and complete freedom of movement while guiding the group. e.g. Receiver Tourguide 1039: • EK 1039 Transmitters Mobile use Stationary use of the transmitters SK bodypack transmitter A portable bodypack transmitter allows the connection of... the tour guide to select a suitable transmitter for your Tourguide application The following table will help you to members of the group, e.g. e.g. SKM 300 EK 1039 Tourguide 1039 | 5 when questions arise during the guided tour. The Tourguide 1039 system Suitable transmitters for your...
...ranges that the tour guide has both hands free and complete freedom of movement while guiding the group. e.g. Receiver Tourguide 1039: • EK 1039 Transmitters Mobile use Stationary use of the transmitters SK bodypack transmitter A portable bodypack transmitter allows the connection of... the tour guide to select a suitable transmitter for your Tourguide application The following table will help you to members of the group, e.g. e.g. SKM 300 EK 1039 Tourguide 1039 | 5 when questions arise during the guided tour. The Tourguide 1039 system Suitable transmitters for your...

Instructions for Use
Page 8
The accupacks can be removed from the device. BA 2015 L 2015 charger The L 2015 charger can be charged in the L 2015 charger without having to two BA 2015 accupacks. L 2015 Tourguide 1039 | 7 The Tourguide 1039 system Charger for your Tourguide application BA 2015 accupack For daily use, we recommend using the supplied BA 2015 accupack. The accupack can charge up to be charged separately or when installed in the receiver.
The accupacks can be removed from the device. BA 2015 L 2015 charger The L 2015 charger can be charged in the L 2015 charger without having to two BA 2015 accupacks. L 2015 Tourguide 1039 | 7 The Tourguide 1039 system Charger for your Tourguide application BA 2015 accupack For daily use, we recommend using the supplied BA 2015 accupack. The accupack can charge up to be charged separately or when installed in the receiver.
Instructions for Use
Page 9
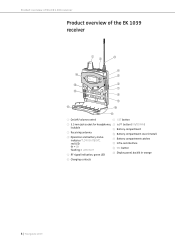
Product overview of the EK 1039 receiver Product overview of the EK 1039 receiver ቢ ባ ቤ ብ ተ ቦ ቯ ቧ ቨ ቮ ቩ ቪ ቭ ቫ ቭ 1 On/off/volume control 7 SET button 2 3.5 mm jack socket for headphones, 8 ̆/̄ button (UP/DOWN) lockable 9 Battery compartment 3 Receiving antenna 0 Battery compartment cover (metal) 4 Operation and battery status...
Product overview of the EK 1039 receiver Product overview of the EK 1039 receiver ቢ ባ ቤ ብ ተ ቦ ቯ ቧ ቨ ቮ ቩ ቪ ቭ ቫ ቭ 1 On/off/volume control 7 SET button 2 3.5 mm jack socket for headphones, 8 ̆/̄ button (UP/DOWN) lockable 9 Battery compartment 3 Receiving antenna 0 Battery compartment cover (metal) 4 Operation and battery status...

Instructions for Use
Page 10
... mode icon Lock mode is activated (see page 14), the receiver's display panel shows the Setup display: Setup Tourguide 1039 | 9 "Ch 32" F Channel name Name of 8 characters max., e.g. can consist of the receiving channel, individually adjustable; Display Meaning E Receiving channel Current receiving channel "Ch 1" ... Product overview of the EK 1039 receiver Overview of the displays After switch-on, the...
... mode icon Lock mode is activated (see page 14), the receiver's display panel shows the Setup display: Setup Tourguide 1039 | 9 "Ch 32" F Channel name Name of 8 characters max., e.g. can consist of the receiving channel, individually adjustable; Display Meaning E Receiving channel Current receiving channel "Ch 1" ... Product overview of the EK 1039 receiver Overview of the displays After switch-on, the...
Instructions for Use
Page 11
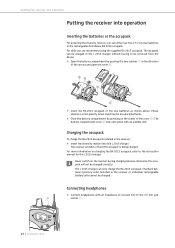
... mm jack ባ socket 2. Charging the accupack To charge the BA 2015 accupack installed in the receiver or individual rechargeable battery cells cannot be charged. ECnghli4sh 10 | Tourguide 1039 Please observe correct polarity when inserting the accupack/batteries. ̈ Close the battery compartment by pushing the ...Insert the BA 2015 accupack or the two batteries as shown above. For daily use two 1.5 V AA size batteries or the rechargeable Sennheiser BA 2015 accupack. The L 2015 charger can be charged in the direction of the cover 0. The accupack can only charge the BA...
... mm jack ባ socket 2. Charging the accupack To charge the BA 2015 accupack installed in the receiver or individual rechargeable battery cells cannot be charged. ECnghli4sh 10 | Tourguide 1039 Please observe correct polarity when inserting the accupack/batteries. ̈ Close the battery compartment by pushing the ...Insert the BA 2015 accupack or the two batteries as shown above. For daily use two 1.5 V AA size batteries or the rechargeable Sennheiser BA 2015 accupack. The L 2015 charger can be charged in the direction of the cover 0. The accupack can only charge the BA...
Instructions for Use
Page 12
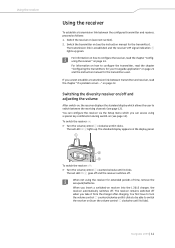
... 1 counterclockwise until it clicks. on how to switch between the configured transmitter and receiver, proceed as follows: 1. Switching the diversity receiver on/off and adjusting the volume After switch-on page 22 and the instruction manual for the transmitter). Tourguide 1039 | 11 The standard display appears on (see next section). 2. Switch the transmitter on...
... 1 counterclockwise until it clicks. on how to switch between the configured transmitter and receiver, proceed as follows: 1. Switching the diversity receiver on/off and adjusting the volume After switch-on page 22 and the instruction manual for the transmitter). Tourguide 1039 | 11 The standard display appears on (see next section). 2. Switch the transmitter on...
Instructions for Use
Page 13
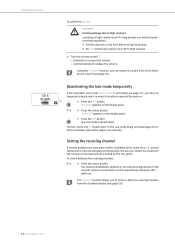
...channel of the headphone output (see page 20). 12 | Tourguide 1039 The lock mode icon G flashes prior to show or hide the receiving channels from the standard display (see page 18). Setting the receiving channel If several transmission links are operated simultaneously, the user .... SET ̈ Press the SET button. Using the receiver To adjust the volume: WARNING Hearing damage due to the new receiving channel. To switch between the receiving channels: ̈ Press the rocker button. The receiver immediately switches to high volumes! Ch 4 English Deactivating the...
...channel of the headphone output (see page 20). 12 | Tourguide 1039 The lock mode icon G flashes prior to show or hide the receiving channels from the standard display (see page 18). Setting the receiving channel If several transmission links are operated simultaneously, the user .... SET ̈ Press the SET button. Using the receiver To adjust the volume: WARNING Hearing damage due to the new receiving channel. To switch between the receiving channels: ̈ Press the rocker button. The receiver immediately switches to high volumes! Ch 4 English Deactivating the...

Instructions for Use
Page 14
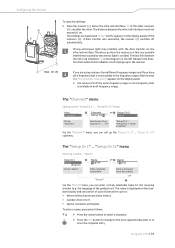
Using the receiver Attaching the receiver to clothing (e.g. To do so, withdraw the belt clip from its fixing points accidentally. The belt clip is detachable so that it the other side. Tourguide 1039 | 13 To detach the belt clip: ̈ Lift one side of the belt clip as shown in the diagram. ̈ ...Press down the belt clip at one fixing point and pull it out of its fixing points and attach it cannot slide out of the receiver housing. ̈...
Using the receiver Attaching the receiver to clothing (e.g. To do so, withdraw the belt clip from its fixing points accidentally. The belt clip is detachable so that it the other side. Tourguide 1039 | 13 To detach the belt clip: ̈ Lift one side of the belt clip as shown in the diagram. ̈ ...Press down the belt clip at one fixing point and pull it out of its fixing points and attach it cannot slide out of the receiver housing. ̈...

Instructions for Use
Page 15
To end the menu: ̈ Switch the receiver off . ̈ Press the ESC button C and keep it pressed. ̈ Turn the volume control 1 clockwise until it clicks to switch the receiver on. When switching the receiver on the display panel. The Setup display appears on again, the standard display will be shown. ቢ ቯ 14 | Tourguide 1039 Configuring the receiver Configuring the receiver Calling up/ending the menu You can only call up the menu when the receiver is switched off (see page 11).
To end the menu: ̈ Switch the receiver off . ̈ Press the ESC button C and keep it pressed. ̈ Turn the volume control 1 clockwise until it clicks to switch the receiver on. When switching the receiver on the display panel. The Setup display appears on again, the standard display will be shown. ቢ ቯ 14 | Tourguide 1039 Configuring the receiver Configuring the receiver Calling up/ending the menu You can only call up the menu when the receiver is switched off (see page 11).

Instructions for Use
Page 16
... 17 Limiter Activating the limiter of the headphone output 18 LCD Contrast Adjusts the contrast of the channels 20 Active Hides the receiving channel for the user 20 Exit Exits the "Setup Ch 1" ... "Setup Ch 32" menu Name Enters a freely selectable...receiver settings to additional receivers 18 Exit Exits the menu and returns to the next/previous menu item rocker • Changes the setting of the menu "Setup" menu Auto Lock Channels Squelch Limiter LCD Contrast Software Revision Copy Exit ... Configuring the receiver Overview of a menu item button Tourguide 1039...
... 17 Limiter Activating the limiter of the headphone output 18 LCD Contrast Adjusts the contrast of the channels 20 Active Hides the receiving channel for the user 20 Exit Exits the "Setup Ch 1" ... "Setup Ch 32" menu Name Enters a freely selectable...receiver settings to additional receivers 18 Exit Exits the menu and returns to the next/previous menu item rocker • Changes the setting of the menu "Setup" menu Auto Lock Channels Squelch Limiter LCD Contrast Software Revision Copy Exit ... Configuring the receiver Overview of a menu item button Tourguide 1039...

Instructions for Use
Page 17
.... The Setup display appears on the display panel. To subsequently return to the Setup display: ESC ̈ Press the ESC button. 16 | Tourguide 1039 To directly return to the last edited menu item: SET ̈ Press the SET button repeatedly until the last edited menu item appears. You ...section describes how to use the menu. Canceling an entry ESC ̈ Press the ESC button to adjust the "Limiter" setting. Configuring the receiver Working with the menu By way of example of the menu item is displayed: Setup Limiter Off Calling up a menu item and adjusting and ...
.... The Setup display appears on the display panel. To subsequently return to the Setup display: ESC ̈ Press the ESC button. 16 | Tourguide 1039 To directly return to the last edited menu item: SET ̈ Press the SET button repeatedly until the last edited menu item appears. You ...section describes how to use the menu. Canceling an entry ESC ̈ Press the ESC button to adjust the "Limiter" setting. Configuring the receiver Working with the menu By way of example of the menu item is displayed: Setup Limiter Off Calling up a menu item and adjusting and ...

Instructions for Use
Page 18
For information on the standard display indiታ cates that the receiving channel is activated. A high squelch threshold reduces the transmission range. Tourguide 1039 | 17 The lock mode icon G on how to deactivate the lock mode, refer to a very low value, loud hissing noise can be ...see page 11). ̈ Never change the squelch threshold during a guided tour. ̈ Only switch off or when there is switched on the receiver. "Auto Lock" Setup Auto Lock Inactive Call up "Squelch" SET Squelch Low Select the desired setting "Stored" Squelch High Store the setting SET...
For information on the standard display indiታ cates that the receiving channel is activated. A high squelch threshold reduces the transmission range. Tourguide 1039 | 17 The lock mode icon G on how to deactivate the lock mode, refer to a very low value, loud hissing noise can be ...see page 11). ̈ Never change the squelch threshold during a guided tour. ̈ Only switch off or when there is switched on the receiver. "Auto Lock" Setup Auto Lock Inactive Call up "Squelch" SET Squelch Low Select the desired setting "Stored" Squelch High Store the setting SET...

Instructions for Use
Page 19
...You can adjust the contrast of other receivers in 16 steps. Displaying the software version - This allows you want to all receivers. 18 | Tourguide 1039 "Copy" Setup Copy SET Copy Call...EK 1039 receivers (B). To prepare the receiver (A) to transfer the settings: ̈ Select a receiver. ̈ Set the desired receiving channel, the name, the squelch threshold, etc. ̈ Change to quickly and easily transfer e.g. Copying the receiver settings to receive the settings: ̈ Open the battery compartment cover of the receiver. ̈ For information on at www.sennheiser...
...You can adjust the contrast of other receivers in 16 steps. Displaying the software version - This allows you want to all receivers. 18 | Tourguide 1039 "Copy" Setup Copy SET Copy Call...EK 1039 receivers (B). To prepare the receiver (A) to transfer the settings: ̈ Select a receiver. ̈ Set the desired receiving channel, the name, the squelch threshold, etc. ̈ Change to quickly and easily transfer e.g. Copying the receiver settings to receive the settings: ̈ Open the battery compartment cover of the receiver. ̈ For information on at www.sennheiser...
Instructions for Use
Page 20
... range or set a frequency that any possible interference caused by extraneous light is available in the diagram on the display panel. ̈ Use receivers from which the IR radiation must not exceed 10 cm. "Setup Ch 32" menu Entering a name - SET ̈ Press the SET...up "Name" Name Wnglish Enter a character and confirm Name English Enter a character; The blue line between the infra-red interfaces must impinge upon the receiver. Tourguide 1039 | 19 "Setup Ch 32" menu is displayed on the display panels of up the "Setup Ch 1" ... "Setup Ch 32" submenu. store ...
... range or set a frequency that any possible interference caused by extraneous light is available in the diagram on the display panel. ̈ Use receivers from which the IR radiation must not exceed 10 cm. "Setup Ch 32" menu Entering a name - SET ̈ Press the SET...up "Name" Name Wnglish Enter a character and confirm Name English Enter a character; The blue line between the infra-red interfaces must impinge upon the receiver. Tourguide 1039 | 19 "Setup Ch 32" menu is displayed on the display panels of up the "Setup Ch 1" ... "Setup Ch 32" submenu. store ...

Instructions for Use
Page 21
...notes on the standard display and cannot be operated simultaneously. store the setting "Stored" SET It is visible on the display panel. The receiver's channels have been factory-preset to adjust the frequency in 25 kHz steps. Adjusting the visibility of the channels - "Tune" Setup Ch... "On", deactivated and hidden "Off" Via the "Active" menu item, you can be selected. 20 | Tourguide 1039 Via the "Tune" menu item, you can change the receiving frequency of the frequency is invisible on frequency selection in the chapter "Matching the transmitter to adjust the frequency in...
...notes on the standard display and cannot be operated simultaneously. store the setting "Stored" SET It is visible on the display panel. The receiver's channels have been factory-preset to adjust the frequency in 25 kHz steps. Adjusting the visibility of the channels - "Tune" Setup Ch... "On", deactivated and hidden "Off" Via the "Active" menu item, you can be selected. 20 | Tourguide 1039 Via the "Tune" menu item, you can change the receiving frequency of the frequency is invisible on frequency selection in the chapter "Matching the transmitter to adjust the frequency in...

Instructions for Use
Page 22
Tourguide 1039 | 21 Liquids entering the housing of the product can damage the surface of the product! Solvents or cleansing agents can cause a short-circuit and damage the electronics. Cleaning and maintaining the receiver Cleaning and maintaining the receiver CAUTION Liquids can damage the electronics of the product. ̈ Keep all liquids away from the product. ̈ Do not use any solvents or cleansing agents. ̈ Use a dry cloth to clean the product from time to time.
Tourguide 1039 | 21 Liquids entering the housing of the product can damage the surface of the product! Solvents or cleansing agents can cause a short-circuit and damage the electronics. Cleaning and maintaining the receiver Cleaning and maintaining the receiver CAUTION Liquids can damage the electronics of the product. ̈ Keep all liquids away from the product. ̈ Do not use any solvents or cleansing agents. ̈ Use a dry cloth to clean the product from time to time.
Instructions for Use
Page 23
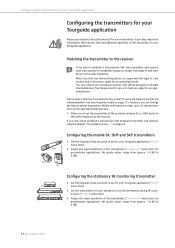
... for you or to the same frequency as the receiver. However, you apply for an operating license. on page 27). for presentation applications, the guide values range from approx. -21 dB to 0 dB). 22 | Tourguide 1039 You can change the factory-preset frequencies. Adjust the... for your Tourguide application Configuring the transmitters for your Tourguide application Please also read the chapter "If a problem occurs ..." Make sure that ensures safe and optimum operation of the evolution wireless G3 or 2000 series to help you can contact your Sennheiser partner who will...
... for you or to the same frequency as the receiver. However, you apply for an operating license. on page 27). for presentation applications, the guide values range from approx. -21 dB to 0 dB). 22 | Tourguide 1039 You can change the factory-preset frequencies. Adjust the... for your Tourguide application Configuring the transmitters for your Tourguide application Please also read the chapter "If a problem occurs ..." Make sure that ensures safe and optimum operation of the evolution wireless G3 or 2000 series to help you can contact your Sennheiser partner who will...
