
Instructions for Use
Page 1
Tourguide 1039 Instruction manual
Tourguide 1039 Instruction manual

Instructions for Use
Page 2
... a problem occurs ...23 Recommendations and tips 24 Specifications ...25 Appendix ...27 Manufacturer Declarations 28 Tourguide 1039 | 1 Contents Contents Important safety instructions 2 The Tourguide 1039 system 4 Frequency ranges ...4 Features of the EK 1039 receiver 4 Suitable transmitters for your Tourguide application 5 Charger for your Tourguide application 7 Product overview of the menu 15 The buttons ...15 Working with the menu 16...
... a problem occurs ...23 Recommendations and tips 24 Specifications ...25 Appendix ...27 Manufacturer Declarations 28 Tourguide 1039 | 1 Contents Contents Important safety instructions 2 The Tourguide 1039 system 4 Frequency ranges ...4 Features of the EK 1039 receiver 4 Suitable transmitters for your Tourguide application 5 Charger for your Tourguide application 7 Product overview of the menu 15 The buttons ...15 Working with the menu 16...

Instructions for Use
Page 3
...about these facts and, if necessary, ask them to set the volume to a medium level. 2 | Tourguide 1039 Inform the users of short circuits, do not expose it to rain or moisture. Servicing is by Sennheiser. • Refer all instructions. • Only clean the product with a dry cloth. • Do... to excessive noise for too long a time: • You can hear ringing or whistling sounds in order to prevent hearing damage. The EK 1039 receiver is capable of producing sound pressure levels exceeding 85 dB (A). 85 dB (A) is the sound pressure corresponding to the maximum permissible volume...
...about these facts and, if necessary, ask them to set the volume to a medium level. 2 | Tourguide 1039 Inform the users of short circuits, do not expose it to rain or moisture. Servicing is by Sennheiser. • Refer all instructions. • Only clean the product with a dry cloth. • Do... to excessive noise for too long a time: • You can hear ringing or whistling sounds in order to prevent hearing damage. The EK 1039 receiver is capable of producing sound pressure levels exceeding 85 dB (A). 85 dB (A) is the sound pressure corresponding to the maximum permissible volume...

Instructions for Use
Page 4
Sennheiser does not accept any liability for damage arising from children. Switch rechargeable batterypowered products off after use defective rechargeable batteries. Do not continue to your specialist dealer. Do not short-circuit. Do not mutilate or dismantle. do not expose to moisture. Tourguide 1039 | 3...104°F. danger of time. Store the product in this instruction manual. Intended use Intended use rechargeable batteries recommended by Sennheiser. In extreme cases, they may leak. Do not expose to sunlight or throw into a fire. When not using rechargeable...
Sennheiser does not accept any liability for damage arising from children. Switch rechargeable batterypowered products off after use defective rechargeable batteries. Do not continue to your specialist dealer. Do not short-circuit. Do not mutilate or dismantle. do not expose to moisture. Tourguide 1039 | 3...104°F. danger of time. Store the product in this instruction manual. Intended use Intended use rechargeable batteries recommended by Sennheiser. In extreme cases, they may leak. Do not expose to sunlight or throw into a fire. When not using rechargeable...

Instructions for Use
Page 5
... and reception indication via LED • "LowBattery" indication via LED and display 4 | Tourguide 1039 The Tourguide 1039 system The Tourguide 1039 system The Tourguide 1039 system consists of the EK 1039 receiver and a suitable transmitter of compatible frequency ranges. Due to the possibility of the EK 1039 receiver The EK 1039 is available in a matching frequency range and must be attached to operate up...
... and reception indication via LED • "LowBattery" indication via LED and display 4 | Tourguide 1039 The Tourguide 1039 system The Tourguide 1039 system The Tourguide 1039 system consists of the EK 1039 receiver and a suitable transmitter of compatible frequency ranges. Due to the possibility of the EK 1039 receiver The EK 1039 is available in a matching frequency range and must be attached to operate up...
Instructions for Use
Page 6
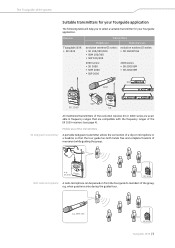
...radio microphone can be passed on microphone or a headmic so that are compatible with the frequency ranges of the group, e.g. SKM 300 EK 1039 Tourguide 1039 | 5 when questions arise during the guided tour. Mobile use evolution wireless G3 series: • SK 100/300/500 •...frequency ranges that the tour guide has both hands free and complete freedom of movement while guiding the group. Receiver Tourguide 1039: • EK 1039 Transmitters Mobile use Stationary use of the transmitters SK bodypack transmitter A portable bodypack transmitter allows the connection of a clip...
...radio microphone can be passed on microphone or a headmic so that are compatible with the frequency ranges of the group, e.g. SKM 300 EK 1039 Tourguide 1039 | 5 when questions arise during the guided tour. Mobile use evolution wireless G3 series: • SK 100/300/500 •...frequency ranges that the tour guide has both hands free and complete freedom of movement while guiding the group. Receiver Tourguide 1039: • EK 1039 Transmitters Mobile use Stationary use of the transmitters SK bodypack transmitter A portable bodypack transmitter allows the connection of a clip...

Instructions for Use
Page 7
...the transmitters SR monitoring transmitter You can be connected to a mixing console and to use a stationary transmitter for your mobile Tourguide application. The transmitter can use an existing microphone for e.g. to other audio sources. Stereo Transmitter -30 -40 PEAK 0... 516.000MHz -30 -30 EQ -40 -40 AF I AF II Standard -18dB SR 2050 IEM EK 1039 6 | Tourguide 1039 SKP 300 with ME 36 EK 1039 Stationary use of the audio channel. e.g. The Tourguide 1039 system SKP plug-on transmitter A plug-on transmitter converts a wired microphone into a radio microphone, allowing ...
...the transmitters SR monitoring transmitter You can be connected to a mixing console and to use a stationary transmitter for your mobile Tourguide application. The transmitter can use an existing microphone for e.g. to other audio sources. Stereo Transmitter -30 -40 PEAK 0... 516.000MHz -30 -30 EQ -40 -40 AF I AF II Standard -18dB SR 2050 IEM EK 1039 6 | Tourguide 1039 SKP 300 with ME 36 EK 1039 Stationary use of the audio channel. e.g. The Tourguide 1039 system SKP plug-on transmitter A plug-on transmitter converts a wired microphone into a radio microphone, allowing ...

Instructions for Use
Page 8
The Tourguide 1039 system Charger for your Tourguide application BA 2015 accupack For daily use, we recommend using the supplied BA 2015 accupack. L 2015 Tourguide 1039 | 7 The accupacks can be charged in the receiver. The accupack can be removed from the device. BA 2015 L 2015 charger The L 2015 charger can charge up to be charged separately or when installed in the L 2015 charger without having to two BA 2015 accupacks.
The Tourguide 1039 system Charger for your Tourguide application BA 2015 accupack For daily use, we recommend using the supplied BA 2015 accupack. L 2015 Tourguide 1039 | 7 The accupacks can be charged in the receiver. The accupack can be removed from the device. BA 2015 L 2015 charger The L 2015 charger can charge up to be charged separately or when installed in the L 2015 charger without having to two BA 2015 accupacks.
Instructions for Use
Page 9
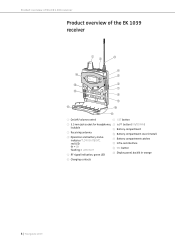
Product overview of the EK 1039 receiver Product overview of the EK 1039 receiver ቢ ባ ቤ ብ ተ ቦ ቯ ቧ ቨ ቮ ቩ ቪ ቭ ቫ ቭ 1 On/off/volume control 7 SET button 2 3.5 mm jack socket ...: A Battery compartment catches B Infra-red interface lit = ON flashing = LOW BATT 5 RF signal indication, green LED C ESC button D Display panel, backlit in orange 6 Charging contacts 8 | Tourguide 1039
Product overview of the EK 1039 receiver Product overview of the EK 1039 receiver ቢ ባ ቤ ብ ተ ቦ ቯ ቧ ቨ ቮ ቩ ቪ ቭ ቫ ቭ 1 On/off/volume control 7 SET button 2 3.5 mm jack socket ...: A Battery compartment catches B Infra-red interface lit = ON flashing = LOW BATT 5 RF signal indication, green LED C ESC button D Display panel, backlit in orange 6 Charging contacts 8 | Tourguide 1039

Instructions for Use
Page 10
... mode is activated (see page 14), the receiver's display panel shows the Setup display: Setup Tourguide 1039 | 9 can consist of the receiving channel, individually adjustable; "Ch 32" F Channel name Name of 8 characters max., e.g. Product overview of the EK 1039 receiver Overview of the displays After switch-on, the receiver displays the standard display: ቱ...
... mode is activated (see page 14), the receiver's display panel shows the Setup display: Setup Tourguide 1039 | 9 can consist of the receiving channel, individually adjustable; "Ch 32" F Channel name Name of 8 characters max., e.g. Product overview of the EK 1039 receiver Overview of the displays After switch-on, the receiver displays the standard display: ቱ...
Instructions for Use
Page 11
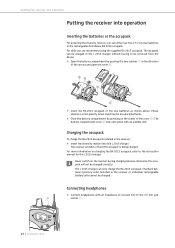
... 2015 accupack or the two batteries as shown above. The L 2015 charger can either use , we recommend using the supplied BA 2015 accupack. ECnghli4sh 10 | Tourguide 1039 Putting the receiver into operation Putting the receiver into operation Inserting the batteries or the accupack For powering the diversity receiver, you can only charge... in the direction of at least 8 Ω to the instruction manual for the L 2015 charger. For daily use two 1.5 V AA size batteries or the rechargeable Sennheiser BA 2015 accupack.
... 2015 accupack or the two batteries as shown above. The L 2015 charger can either use , we recommend using the supplied BA 2015 accupack. ECnghli4sh 10 | Tourguide 1039 Putting the receiver into operation Putting the receiver into operation Inserting the batteries or the accupack For powering the diversity receiver, you can only charge... in the direction of at least 8 Ω to the instruction manual for the L 2015 charger. For daily use two 1.5 V AA size batteries or the rechargeable Sennheiser BA 2015 accupack.
Instructions for Use
Page 12
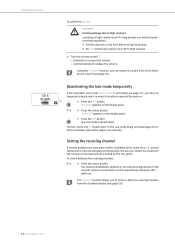
..., read the chapter "Configuring the receiver" on page 14. For information on how to configure the receiver, read the chapter "Configuring the transmitters for your Tourguide application" on receiver into the L 2015 charger, the receiver automatically switches off . The red LED ON 4 lights up green. If you insert a switched-on page... a special key combination during switch-on (turn the volume control 1 clockwise until it clicks. The red LED ON 4 goes off and the receiver switches off . Tourguide 1039 | 11 Switch the transmitter on page 23.
..., read the chapter "Configuring the receiver" on page 14. For information on how to configure the receiver, read the chapter "Configuring the transmitters for your Tourguide application" on receiver into the L 2015 charger, the receiver automatically switches off . The red LED ON 4 lights up green. If you insert a switched-on page... a special key combination during switch-on (turn the volume control 1 clockwise until it clicks. The red LED ON 4 goes off and the receiver switches off . Tourguide 1039 | 11 Switch the transmitter on page 23.
Instructions for Use
Page 13
...), you to the new receiving channel. The receiver immediately switches to show or hide the receiving channels from the standard display (see page 20). 12 | Tourguide 1039 The lock mode is activated (see page 18). The "Active" function allows you have to temporarily deactivate it in order to be able to high...
...), you to the new receiving channel. The receiver immediately switches to show or hide the receiving channels from the standard display (see page 20). 12 | Tourguide 1039 The lock mode is activated (see page 18). The "Active" function allows you have to temporarily deactivate it in order to be able to high...

Instructions for Use
Page 14
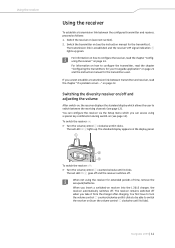
... to clothing You can also attach the receiver with the antenna pointing downwards. To do so, withdraw the belt clip from its fixing points accidentally. Tourguide 1039 | 13 Using the receiver Attaching the receiver to clothing (e.g. To detach the belt clip: ̈ Lift one side of the receiver housing. ̈ Repeat for...
... to clothing You can also attach the receiver with the antenna pointing downwards. To do so, withdraw the belt clip from its fixing points accidentally. Tourguide 1039 | 13 Using the receiver Attaching the receiver to clothing (e.g. To detach the belt clip: ̈ Lift one side of the receiver housing. ̈ Repeat for...

Instructions for Use
Page 15
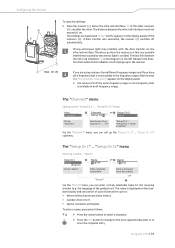
Configuring the receiver Configuring the receiver Calling up/ending the menu You can only call up the menu when the receiver is switched off (see page 11). When switching the receiver on the display panel. To end the menu: ̈ Switch the receiver off . ̈ Press the ESC button C and keep it pressed. ̈ Turn the volume control 1 clockwise until it clicks to switch the receiver on. The Setup display appears on again, the standard display will be shown. ቢ ቯ 14 | Tourguide 1039
Configuring the receiver Configuring the receiver Calling up/ending the menu You can only call up the menu when the receiver is switched off (see page 11). When switching the receiver on the display panel. To end the menu: ̈ Switch the receiver off . ̈ Press the ESC button C and keep it pressed. ̈ Turn the volume control 1 clockwise until it clicks to switch the receiver on. The Setup display appears on again, the standard display will be shown. ቢ ቯ 14 | Tourguide 1039

Instructions for Use
Page 16
... 19 Squelch Adjusts the squelch threshold 17 Limiter Activating the limiter of the headphone output 18 LCD Contrast Adjusts the contrast of a menu item button Tourguide 1039 | 15 Setup Ch 32 Calls up the "Setup Ch 1" ... "Channels" menu Setup Ch 1 Setup Ch 2 Setup Ch 32 "Setup Ch 1" ... Configuring the receiver Overview of...
... 19 Squelch Adjusts the squelch threshold 17 Limiter Activating the limiter of the headphone output 18 LCD Contrast Adjusts the contrast of a menu item button Tourguide 1039 | 15 Setup Ch 32 Calls up the "Setup Ch 1" ... "Channels" menu Setup Ch 1 Setup Ch 2 Setup Ch 32 "Setup Ch 1" ... Configuring the receiver Overview of...

Instructions for Use
Page 17
... display panel. The current setting of the "Limiter" menu item, this section describes how to the Setup display: ESC ̈ Press the ESC button. 16 | Tourguide 1039 SET ̈ Press the SET button to the "Limiter" menu item. Selecting a menu item ̈ Press the rocker button to change to store the setting...
... display panel. The current setting of the "Limiter" menu item, this section describes how to the Setup display: ESC ̈ Press the ESC button. 16 | Tourguide 1039 SET ̈ Press the SET button to the "Limiter" menu item. Selecting a menu item ̈ Press the rocker button to change to store the setting...

Instructions for Use
Page 18
... the squelch for servicing or test purposes. ̈ Adjust the squelch threshold - Configuring the receiver Ch 4 English The "Setup" menu Activating the automatic lock mode - Tourguide 1039 | 17 "Squelch" Setup Squelch Low Call up "Auto Lock" SET Auto Lock Inactive Select the desired setting "Stored" Auto Lock Active Store the setting SET...
... the squelch for servicing or test purposes. ̈ Adjust the squelch threshold - Configuring the receiver Ch 4 English The "Setup" menu Activating the automatic lock mode - Tourguide 1039 | 17 "Squelch" Setup Squelch Low Call up "Auto Lock" SET Auto Lock Inactive Select the desired setting "Stored" Auto Lock Active Store the setting SET...

Instructions for Use
Page 19
... item. "Copy" Setup Copy SET Copy Call up "Copy" Data transfer function "Copy" is switched on software updates, visit the EK 1039 product page at the headphone output by -12 dB. "Software Revision" You can display the current software version of all receivers (B) ... EK 1039 receivers (B). "LCD Contrast" Setup NL CamDeC o n t r a s t 7 Call up "Limiter" SET Limiter Off Select the desired setting Limiter On Store the setting SET "Stored" Possible settings: "On", "Off" The limiter reduces the maximum volume at www.sennheiser.com. We recommend to all receivers. 18 | Tourguide 1039...
... item. "Copy" Setup Copy SET Copy Call up "Copy" Data transfer function "Copy" is switched on software updates, visit the EK 1039 product page at the headphone output by -12 dB. "Software Revision" You can display the current software version of all receivers (B) ... EK 1039 receivers (B). "LCD Contrast" Setup NL CamDeC o n t r a s t 7 Call up "Limiter" SET Limiter Off Select the desired setting Limiter On Store the setting SET "Stored" Possible settings: "On", "Off" The limiter reduces the maximum volume at www.sennheiser.com. We recommend to all receivers. 18 | Tourguide 1039...
Instructions for Use
Page 20
... appears on the standard display and can call up the "Setup Ch 1" ... The "Setup Ch 1" ... "Name" Setup Ch 2 Name Wnglish Call up the "Setup Ch 1" ... Tourguide 1039 | 19 "Setup Ch 32" menu is avoided. "Setup Ch 32" menu Entering a name - the language of the other receivers (B), one after the other. The settings...
... appears on the standard display and can call up the "Setup Ch 1" ... The "Setup Ch 1" ... "Name" Setup Ch 2 Name Wnglish Call up the "Setup Ch 1" ... Tourguide 1039 | 19 "Setup Ch 32" menu is avoided. "Setup Ch 32" menu Entering a name - the language of the other receivers (B), one after the other. The settings...