
Manual
Page 3
ENEnGgLliIsShH CONTENTS Page FEATURES ...4 DISPLAY AND CROWNS/BUTTONS 5 DATE SETTING ...6 TIME SETTING ...7 ALARM ...8 STOPWATCH ...11 TACHYMETER ...14 ADJUSTING THE HAND POSITION 16 RESETTING THE BUILT-IN IC 17 BATTERY LIFE INDICATOR 18 BATTERY CHANGE ...18 TO PRESERVE THE QUALITY OF YOUR WATCH 19 SPECIFICATIONS ...23 3
ENEnGgLliIsShH CONTENTS Page FEATURES ...4 DISPLAY AND CROWNS/BUTTONS 5 DATE SETTING ...6 TIME SETTING ...7 ALARM ...8 STOPWATCH ...11 TACHYMETER ...14 ADJUSTING THE HAND POSITION 16 RESETTING THE BUILT-IN IC 17 BATTERY LIFE INDICATOR 18 BATTERY CHANGE ...18 TO PRESERVE THE QUALITY OF YOUR WATCH 19 SPECIFICATIONS ...23 3
Manual
Page 4
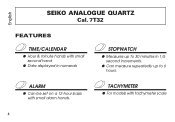
TACHYMETER q For models with small alarm hands. ALARM q Can be set on a 12-hour basis with tachymeter scale 4 English SEIKO ANALOGUE QUARTZ Cal. 7T32 FEATURES TIME/CALENDAR q Hour & minute hands with small second hand q Date displayed in numerals STOPWATCH q Measures up to 30 minutes in 1/5 second increments. q Can measure repeatedly up to 6 hours.
TACHYMETER q For models with small alarm hands. ALARM q Can be set on a 12-hour basis with tachymeter scale 4 English SEIKO ANALOGUE QUARTZ Cal. 7T32 FEATURES TIME/CALENDAR q Hour & minute hands with small second hand q Date displayed in numerals STOPWATCH q Measures up to 30 minutes in 1/5 second increments. q Can measure repeatedly up to 6 hours.
Manual
Page 6
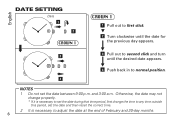
English DATE SETTING Date 1 « 1 2 CROWN 1 ¬ 3 « « 4 CROWN 1 1 Pull out to first click. ˝ 2 Turn clockwise until the date for the previous day appears. ˝ 3 Pull ... months. 6 Otherwise, the date may not change properly. * If it is necessary to set the date during that time period, first change the time to any time outside this period, set the date between 9:00 p.m. NOTES 1 Do not set the date and then reset the correct time. 2 It is necessary to normal position...
English DATE SETTING Date 1 « 1 2 CROWN 1 ¬ 3 « « 4 CROWN 1 1 Pull out to first click. ˝ 2 Turn clockwise until the date for the previous day appears. ˝ 3 Pull ... months. 6 Otherwise, the date may not change properly. * If it is necessary to set the date during that time period, first change the time to any time outside this period, set the date between 9:00 p.m. NOTES 1 Do not set the date and then reset the correct time. 2 It is necessary to normal position...
Manual
Page 7
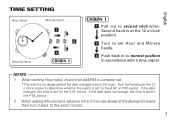
... the P.M. If the date does not change, the time is set for the A.M. or P.M. period. NOTES 1 When setting Hour hand, check that the date changes once in 24 hours. period. period. 2 When setting Minute hand, advance it 4 to 5 minutes ahead of the desired time and then turn it back to normal .... Turn the hands past the 12 o'clock marker to determine whether the watch is so designed that AM/PM is correctly set. * The watch is set for the A.M. English 15 TIME SETTING 45 Hour hand 60 30 Second hand « Minute hand 1 « 2 3 CROWN 1 CROWN 1 1 Pull out to second click when ...
... the P.M. If the date does not change, the time is set for the A.M. or P.M. period. NOTES 1 When setting Hour hand, check that the date changes once in 24 hours. period. period. 2 When setting Minute hand, advance it 4 to 5 minutes ahead of the desired time and then turn it back to normal .... Turn the hands past the 12 o'clock marker to determine whether the watch is so designed that AM/PM is correctly set. * The watch is set for the A.M. English 15 TIME SETTING 45 Hour hand 60 30 Second hand « Minute hand 1 « 2 3 CROWN 1 CROWN 1 1 Pull out to second click when ...
Manual
Page 8
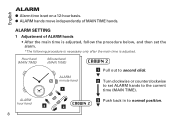
... alarm. *The following procedure is necessary only after the main time is adjusted, follow the procedure below, and then set on a 12-hour basis. q ALARM hands move independently of ALARM hands • After the main time is adjusted. Hour hand (MAIN TIME) Minute hand (MAIN ... 2 ALARM hour hand 3 2 8 11 12 1 ALARM 76 5 3 8 9 10 4 « ALARM minute hand «1 CROWN 2 2 1 Pull out to second click. ˝ 2 Turn clockwise or counterclockwise to set ALARM hands to the current time (MAIN TIME). ˝ 3 Push back in to normal position. ˝
... alarm. *The following procedure is necessary only after the main time is adjusted, follow the procedure below, and then set on a 12-hour basis. q ALARM hands move independently of ALARM hands • After the main time is adjusted. Hour hand (MAIN TIME) Minute hand (MAIN ... 2 ALARM hour hand 3 2 8 11 12 1 ALARM 76 5 3 8 9 10 4 « ALARM minute hand «1 CROWN 2 2 1 Pull out to second click. ˝ 2 Turn clockwise or counterclockwise to set ALARM hands to the current time (MAIN TIME). ˝ 3 Push back in to normal position. ˝
Manual
Page 9
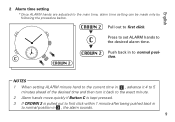
NOTES 1 When setting ALARM minute hand to the current time in 2 , advance it 4 to 5 minutes ahead of the desired time and then turn it back to the exact ... 1 minute after being pushed back in to normal position in to first click. Press to set ALARM hands to the main time, alarm time setting can be made only by following the procedure below. English 3 2 8 2 Alarm time setting *Once ALARM hands are adjusted to the desired alarm time. Push back in 3 , the alarm...
NOTES 1 When setting ALARM minute hand to the current time in 2 , advance it 4 to 5 minutes ahead of the desired time and then turn it back to the exact ... 1 minute after being pushed back in to normal position in to first click. Press to set ALARM hands to the main time, alarm time setting can be made only by following the procedure below. English 3 2 8 2 Alarm time setting *Once ALARM hands are adjusted to the desired alarm time. Push back in 3 , the alarm...
Manual
Page 10
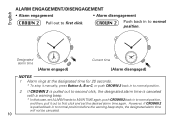
... 2 back in to normal position. 2 If CROWN 2 is pulled out to second click, the designated alarm time is pushed back in to first click and set ALARM hands to MAIN TIME again, push CROWN 2 back in to first click. Designated alarm time 11 12 1 ALARM 76 5 « [Alarm engaged] 3 2 8 3 2 8 Current time... ENGAGEMENT/DISENGAGEMENT • Alarm engagement • Alarm disengagement CROWN 2 Pull out to normal position. However, if CROWN 2 is canceled with a warning beep. * In that case, set the desired alarm time again.
... 2 back in to normal position. 2 If CROWN 2 is pulled out to second click, the designated alarm time is pushed back in to first click and set ALARM hands to MAIN TIME again, push CROWN 2 back in to first click. Designated alarm time 11 12 1 ALARM 76 5 « [Alarm engaged] 3 2 8 3 2 8 Current time... ENGAGEMENT/DISENGAGEMENT • Alarm engagement • Alarm disengagement CROWN 2 Pull out to normal position. However, if CROWN 2 is canceled with a warning beep. * In that case, set the desired alarm time again.
Manual
Page 11
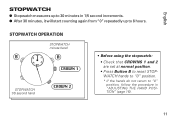
CROWN 1 STOPWATCH 1/5 second hand CROWN 2 • Before using the stopwatch: • Check that CROWNS 1 and 2 are set at normal position. • Press Button B to reset STOPWATCH hands to "0" position. * If the hands do not return to 30 minutes in "ADJUSTING THE HAND POSITION" (page 16). 11 English 5 20 STOPWATCH q Stopwatch measures up to 6 hours. q After 30 minutes, it will start counting again from "0" repeatedly up to "0" position, follow the procedure in 1/5 second increments. STOPWATCH OPERATION STOPWATCH minute hand B 30 A 25 10 MIN.
CROWN 1 STOPWATCH 1/5 second hand CROWN 2 • Before using the stopwatch: • Check that CROWNS 1 and 2 are set at normal position. • Press Button B to reset STOPWATCH hands to "0" position. * If the hands do not return to 30 minutes in "ADJUSTING THE HAND POSITION" (page 16). 11 English 5 20 STOPWATCH q Stopwatch measures up to 6 hours. q After 30 minutes, it will start counting again from "0" repeatedly up to "0" position, follow the procedure in 1/5 second increments. STOPWATCH OPERATION STOPWATCH minute hand B 30 A 25 10 MIN.

Manual
Page 16
... is replaced with a new one, follow the procedure below. NOTES 1 Hands move quickly if the respective buttons are kept pressed. 2 After adjusting the hand position, set the main time. 16 Press repeatedly to reset STOPWATCH minute hand to the 12 o'clock position.
... is replaced with a new one, follow the procedure below. NOTES 1 Hands move quickly if the respective buttons are kept pressed. 2 After adjusting the hand position, set the main time. 16 Press repeatedly to reset STOPWATCH minute hand to the 12 o'clock position.
Manual
Page 17
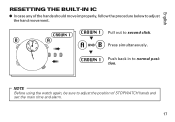
English 5 20 RESETTING THE BUILT-IN IC q In case any of STOPWATCH hands and set the main time and alarm. 17 CROWN 1 CROWN 1 Pull out to normal position. NOTE Before using the watch again, be sure to adjust the position of the hands should move improperly, follow the procedure below to adjust the hand movement. B 30 A ˝ 25 10 MIN. « A B AND Press simultaneously. ˝ « CROWN 1 Push back in to second click.
English 5 20 RESETTING THE BUILT-IN IC q In case any of STOPWATCH hands and set the main time and alarm. 17 CROWN 1 CROWN 1 Pull out to normal position. NOTE Before using the watch again, be sure to adjust the position of the hands should move improperly, follow the procedure below to adjust the hand movement. B 30 A ˝ 25 10 MIN. « A B AND Press simultaneously. ˝ « CROWN 1 Push back in to second click.
Manual
Page 23
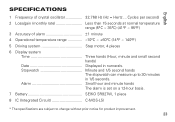
... The stopwatch can measure up to change without prior notice for product improvement. 23 Alarm Small hour and minute hands The alarm is set on a 12-hour basis. 7 Battery SEIKO SR927W, 1 piece 8 IC (Integrated Circuit C-MOS-LSI * The specifications are subject to 30 minutes in numerals. Cycles per second) 2 Loss/gain (monthly...
... The stopwatch can measure up to change without prior notice for product improvement. 23 Alarm Small hour and minute hands The alarm is set on a 12-hour basis. 7 Battery SEIKO SR927W, 1 piece 8 IC (Integrated Circuit C-MOS-LSI * The specifications are subject to 30 minutes in numerals. Cycles per second) 2 Loss/gain (monthly...


