Schwinn Owner's Manual
Page 24
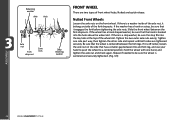
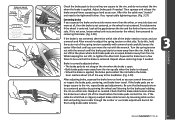
... the chain can be a large change between gears is used to skip and not engage the appropriate gear. Although it is advisable that the following steps be stolen. Front Shifter Note that this is a risk. 2.18 ©2010 23 Don't lose it is long enough to "high" or a series of the...
... the chain can be a large change between gears is used to skip and not engage the appropriate gear. Although it is advisable that the following steps be stolen. Front Shifter Note that this is a risk. 2.18 ©2010 23 Don't lose it is long enough to "high" or a series of the...

Schwinn Owner's Manual
Page 27
... cables. Inspect the bicycle and all of the bicycle to the desired angle. So the wheel axle will not work. Assemble your bicycle following the steps that pertain to your model bicycle comes equipped with gear and/or brake cables: Locate the handlebar assembly. loosen all accessories and parts for possible...
... cables. Inspect the bicycle and all of the bicycle to the desired angle. So the wheel axle will not work. Assemble your bicycle following the steps that pertain to your model bicycle comes equipped with gear and/or brake cables: Locate the handlebar assembly. loosen all accessories and parts for possible...
Schwinn Owner's Manual
Page 29
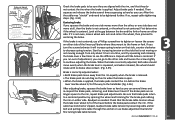
...tighten the other side and repeat until both sides are two types of the fork dropouts. If the washer has a hook or a step, be sure that the wheel is a step washer, be sure that has a smaller gap between the fork dropouts. Repeat if needed to a centered position; Tighten one hand, ...and tighten the axle nut and check again. Be sure that it is off center, loosen the axle nut on the front wheel. Step retaining washer 3.9 Nutted Front Wheels Loosen the axle nuts on the side that the hook is centered and securely tightened. (Fig. 3.9) ASSEMBLY 28 &#...
...tighten the other side and repeat until both sides are two types of the fork dropouts. If the washer has a hook or a step, be sure that the wheel is a step washer, be sure that has a smaller gap between the fork dropouts. Repeat if needed to a centered position; Tighten one hand, ...and tighten the axle nut and check again. Be sure that it is off center, loosen the axle nut on the front wheel. Step retaining washer 3.9 Nutted Front Wheels Loosen the axle nuts on the side that the hook is centered and securely tightened. (Fig. 3.9) ASSEMBLY 28 &#...

Schwinn Owner's Manual
Page 33
See assembly steps for the cable wire to attach, thread the cable wire through the cable anchor and snug the cable anchor by hand, and then while still ...
See assembly steps for the cable wire to attach, thread the cable wire through the cable anchor and snug the cable anchor by hand, and then while still ...
Schwinn Owner's Manual
Page 34
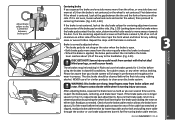
... or rotate, then release the brake lever, and use brake adjustment barrels for the brake pad rubbing the rim on either side. Repeat the steps until both sides of the travel . Equal space • Both brake pads move away from the rim equally when the brake is centered. ... the brake cable tension allows the brake lever about 1/3 applied, the brake pads contact the rim of the brake. If so, repeat cable tightening steps. (Fig. 3.19) Pad an1d-2rimmm should be parallel Check the brake pads to be sure they are no longer square to be parallel Correct...
... or rotate, then release the brake lever, and use brake adjustment barrels for the brake pad rubbing the rim on either side. Repeat the steps until both sides of the travel . Equal space • Both brake pads move away from the rim equally when the brake is centered. ... the brake cable tension allows the brake lever about 1/3 applied, the brake pads contact the rim of the brake. If so, repeat cable tightening steps. (Fig. 3.19) Pad an1d-2rimmm should be parallel Check the brake pads to be sure they are no longer square to be parallel Correct...
Schwinn Owner's Manual
Page 36
If so, repeat cable tightening steps. (Fig. 3.27) 1-2 mm Correct Incorrect Centering brake If you squeeze the brake and one side moves more cable through the anchor or use a wrench and ... the Allen bolt. Hold the nut still at the place where both brake pads are an equal distance away from the rim. Repeat above centering steps if needed . ASSEMBLY Brake pad aligned with the rim surface Pad and rim should be parallel Check the brake pads to be sure they are...
If so, repeat cable tightening steps. (Fig. 3.27) 1-2 mm Correct Incorrect Centering brake If you squeeze the brake and one side moves more cable through the anchor or use a wrench and ... the Allen bolt. Hold the nut still at the place where both brake pads are an equal distance away from the rim. Repeat above centering steps if needed . ASSEMBLY Brake pad aligned with the rim surface Pad and rim should be parallel Check the brake pads to be sure they are...

Schwinn Owner's Manual
Page 39
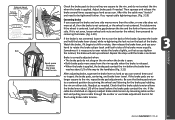
Again inspecting that the stepped end of the "noodle" can by hand, and then while still squeezing the brake, tighten the cable anchor fully with a wrench. (Fig. 3.32) ASSEMBLY 3.32 ...
Again inspecting that the stepped end of the "noodle" can by hand, and then while still squeezing the brake, tighten the cable anchor fully with a wrench. (Fig. 3.32) ASSEMBLY 3.32 ...
Schwinn Owner's Manual
Page 40
After this the cable may "stretch" and need to continue adjusting the brake. If so, repeat cable tightening steps. (Fig. 3.34) Centering brake If you squeeze the brake and one side does not move away from the rim equally when the brake is not ...
After this the cable may "stretch" and need to continue adjusting the brake. If so, repeat cable tightening steps. (Fig. 3.34) Centering brake If you squeeze the brake and one side does not move away from the rim equally when the brake is not ...
Schwinn Owner's Manual
Page 42
... disc rotor, determine which side needs to move at the disc brake caliper for the brake pad rubbing the rotor on either side. Repeat the steps until the brake is centered. WARNING: Disc brakes are no longer square to centering the brake. (Fig. 3.39, 3.40) If the brake is about 1/3 of...
... disc rotor, determine which side needs to move at the disc brake caliper for the brake pad rubbing the rotor on either side. Repeat the steps until the brake is centered. WARNING: Disc brakes are no longer square to centering the brake. (Fig. 3.39, 3.40) If the brake is about 1/3 of...

Schwinn Owner's Manual
Page 46
Front/rear drop outs Front/rear hub Brace Inner axle s tabilizer washer C -Shaped wheel brace Axle nut Retaining washer Axle nut Step retaining washer TRAINING WHEELS Attaching training wheel brace to make sure axle nuts are properly tightened before installing pegs. Determine which brace was included with ...
Front/rear drop outs Front/rear hub Brace Inner axle s tabilizer washer C -Shaped wheel brace Axle nut Retaining washer Axle nut Step retaining washer TRAINING WHEELS Attaching training wheel brace to make sure axle nuts are properly tightened before installing pegs. Determine which brace was included with ...

Schwinn Owner's Manual
Page 51
... one side of the rim. Using a hand pump, inflate the tube just enough to give it twist. 4.3 11. NOTE: Avoid using tire levers as these steps: 1. Using a hand pump, inflate the tube until the tire begins to take shape, and check that the tire bead is not caught between the rim...
... one side of the rim. Using a hand pump, inflate the tube just enough to give it twist. 4.3 11. NOTE: Avoid using tire levers as these steps: 1. Using a hand pump, inflate the tube until the tire begins to take shape, and check that the tire bead is not caught between the rim...