Schwinn Owner's Manual
Page 4
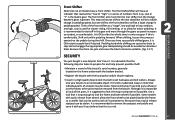
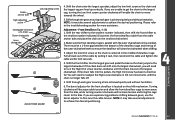
... to the store if you have purchased is not a complete or comprehensive manual of all aspects of the serial number) Serial number locaƟon (Bike shown upside down) ©2010 3 Box 344 4730 E. to 5:00 p.m. Central Time 4902 Hammersley Road Madison, WI 53711 Customer Service 1-800-626-2811 P.O. The bicycle...
... to the store if you have purchased is not a complete or comprehensive manual of all aspects of the serial number) Serial number locaƟon (Bike shown upside down) ©2010 3 Box 344 4730 E. to 5:00 p.m. Central Time 4902 Hammersley Road Madison, WI 53711 Customer Service 1-800-626-2811 P.O. The bicycle...
Schwinn Owner's Manual
Page 9
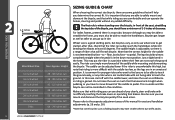
..., pretend there is a range of riders that the knees lock straight when pedaling or you have to touch the ground easily, or any added difficulty. Bike Wheel Size 12 inch wheel 16 inch wheel 18 inch wheel 20 inch wheel 24 inch wheel 2.1 Your Approx. The saddle height is adjustable, so...
..., pretend there is a range of riders that the knees lock straight when pedaling or you have to touch the ground easily, or any added difficulty. Bike Wheel Size 12 inch wheel 16 inch wheel 18 inch wheel 20 inch wheel 24 inch wheel 2.1 Your Approx. The saddle height is adjustable, so...

Schwinn Owner's Manual
Page 12
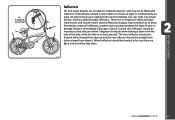
... pick up and reflect street lights and car lights in a child safety seat, they must wear a helmet. When riding with all times when riding your bike as the law requires. Correc t 2.6 The correct helmet should: • be comfortable • have passed helmet laws regarding children. It is strongly advised that everyone...
... pick up and reflect street lights and car lights in a child safety seat, they must wear a helmet. When riding with all times when riding your bike as the law requires. Correc t 2.6 The correct helmet should: • be comfortable • have passed helmet laws regarding children. It is strongly advised that everyone...

Schwinn Owner's Manual
Page 15
... fitted and not obscured. • Ensure all bearings are not bent. BEFORE YOU RIDE 14 ©2010 Bearings • Ensure all other fittings on the bike are properly lubricated. Derailleurs • Check that front and rear derailleurs are adjusted and function properly. • Ensure shift levers are securely attached. • Ensure...
... fitted and not obscured. • Ensure all bearings are not bent. BEFORE YOU RIDE 14 ©2010 Bearings • Ensure all other fittings on the bike are properly lubricated. Derailleurs • Check that front and rear derailleurs are adjusted and function properly. • Ensure shift levers are securely attached. • Ensure...
Schwinn Owner's Manual
Page 16
... level ground). Front & rear reflectors should be mounted so that they are tight, and should aim straight back (when viewed from the side of the bike, while the bike is found. The front reflector should aim forward (when viewed from above ).
... level ground). Front & rear reflectors should be mounted so that they are tight, and should aim straight back (when viewed from the side of the bike, while the bike is found. The front reflector should aim forward (when viewed from above ).

Schwinn Owner's Manual
Page 22
.... avoid "Cross Chaining", which is the position when the chain is fully engaged in the desired gear before applying more pressure on the pedals. The bike may be sure the chain is in the smallest cog in the rear combined with 3 front chain rings; Avoid shifting while standing up . It is...
.... avoid "Cross Chaining", which is the position when the chain is fully engaged in the desired gear before applying more pressure on the pedals. The bike may be sure the chain is in the smallest cog in the rear combined with 3 front chain rings; Avoid shifting while standing up . It is...

Schwinn Owner's Manual
Page 23
...have an indicator that reads either "low to "high" or a series of the pedals.) Failure to do so, may jam and cause the bike to become unstable. Rear Shifter The rear shifter (right) will operate the front derailleur. Backpedaling should be pedaling forward when shifting gears. See ...off the gears. Operating the shifter while sitting still or not pedaling can cause damage to the system, and can jam and cause the bike to allow for further information on any bicycle with derailleurs. When shifting gears, make sure you have a front derailleur offering more gear choices...
...have an indicator that reads either "low to "high" or a series of the pedals.) Failure to do so, may jam and cause the bike to become unstable. Rear Shifter The rear shifter (right) will operate the front derailleur. Backpedaling should be pedaling forward when shifting gears. See ...off the gears. Operating the shifter while sitting still or not pedaling can cause damage to the system, and can jam and cause the bike to allow for further information on any bicycle with derailleurs. When shifting gears, make sure you have a front derailleur offering more gear choices...
Schwinn Owner's Manual
Page 24
... that is long enough to lock the frame and both wheels if possible. When shifting, lessen the pressure exerted on derailleur bikes because the chain can jam and cause the bike to ride the whole time in mind that a quick release seatpost can be used for and help prevent possible theft: •...
... that is long enough to lock the frame and both wheels if possible. When shifting, lessen the pressure exerted on derailleur bikes because the chain can jam and cause the bike to ride the whole time in mind that a quick release seatpost can be used for and help prevent possible theft: •...

Schwinn Owner's Manual
Page 25
To clean, wipe with a dry cloth. STORAGE • Keep your bicycle in a mild detergent mixture. Chrome plated bikes should be taken out and re-greased. Make sure wheel rims are dry so braking performance is very corrosive. This will result which is not ...
To clean, wipe with a dry cloth. STORAGE • Keep your bicycle in a mild detergent mixture. Chrome plated bikes should be taken out and re-greased. Make sure wheel rims are dry so braking performance is very corrosive. This will result which is not ...

Schwinn Owner's Manual
Page 30
... patterns have a direction, so compare your bicycle. Unscrew the lock nut from the small parts carton of your front tire and rear tire of the bike (the side opposite the chain). (Fig. 3.11) 3. Move the handle so it is for 3.11 closing the handle until you feel some resistance with your...
... patterns have a direction, so compare your bicycle. Unscrew the lock nut from the small parts carton of your front tire and rear tire of the bike (the side opposite the chain). (Fig. 3.11) 3. Move the handle so it is for 3.11 closing the handle until you feel some resistance with your...

Schwinn Owner's Manual
Page 33
... squeezing the brake, tighten the cable anchor fully with your left hand squeeze the caliper brake until both brake pads contact the rim. With your bike is equipped with and refer to the appropriate assembly instructions below. *Additionally some freestyle models may cause front wheel to lock up resulting in loss...
... squeezing the brake, tighten the cable anchor fully with your left hand squeeze the caliper brake until both brake pads contact the rim. With your bike is equipped with and refer to the appropriate assembly instructions below. *Additionally some freestyle models may cause front wheel to lock up resulting in loss...
Schwinn Owner's Manual
Page 37
... be adjusted by unscrewing one of the adjustment barrels. Now follow the brake adjustments for the type of the flop as much of brake the bike is not already assembled, insert the cable barrel end into the bearing unit. See diagram of the upper cable until the flop is the shorter...
... be adjusted by unscrewing one of the adjustment barrels. Now follow the brake adjustments for the type of the flop as much of brake the bike is not already assembled, insert the cable barrel end into the bearing unit. See diagram of the upper cable until the flop is the shorter...

Schwinn Owner's Manual
Page 47
... hooks around the chain stay of the stabilizer bracket faces in the proper vertical position. Replace the axle nut and washer, secure tightly. If your bike did not come stock with any questions. Replace the washer and axle nut. Insert the wheel brace into the rear frame drop out. Next place...
... hooks around the chain stay of the stabilizer bracket faces in the proper vertical position. Replace the axle nut and washer, secure tightly. If your bike did not come stock with any questions. Replace the washer and axle nut. Insert the wheel brace into the rear frame drop out. Next place...

Schwinn Owner's Manual
Page 49
... time on or squirt Oil can 3 drops from oil can 2 drops from oil can Disassemble 2 squirts from oil can occur. Injury to lubricate your new bike will ensure: Smooth running costs Every time you should increase with use in wet or dusty conditions. We recommend you ride, the more frequently maintenance...
... time on or squirt Oil can 3 drops from oil can 2 drops from oil can Disassemble 2 squirts from oil can occur. Injury to lubricate your new bike will ensure: Smooth running costs Every time you should increase with use in wet or dusty conditions. We recommend you ride, the more frequently maintenance...

Schwinn Owner's Manual
Page 52
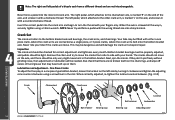
... doubts. (Fig. 4.4) 1. Re-check that is loose. 2. Lock nut Axle Washer Axle nut 4.4 Cables and Cable Housing Cables and housing are one side of your bike. (Fig. 4.5) Do not ride a bicycle that the wheel can turn freely without excessive side play . 4.
... doubts. (Fig. 4.4) 1. Re-check that is loose. 2. Lock nut Axle Washer Axle nut 4.4 Cables and Cable Housing Cables and housing are one side of your bike. (Fig. 4.5) Do not ride a bicycle that the wheel can turn freely without excessive side play . 4.
Schwinn Owner's Manual
Page 53
... to the rim in a comfortable position within easy reach of light oil at least every six months to ensure smooth operation and to stop the bike. If left the lubrication can get onto rim or brake surfaces and cause a loss of your bicycle's brakes is necessary as required. Usable brake shoe...
... to the rim in a comfortable position within easy reach of light oil at least every six months to ensure smooth operation and to stop the bike. If left the lubrication can get onto rim or brake surfaces and cause a loss of your bicycle's brakes is necessary as required. Usable brake shoe...
Schwinn Owner's Manual
Page 55
...adjust the free play in a one piece crank, where the crank arms are not interchangeable. Remove the chain and try and force a pedal with your bike if the cranks are no broken teeth on the chainrings, and wipe off excess dirt and grease that may be checked for correct adjustment and... type bottom bracket, loosen the locknut on the left pedal, which attaches to the bottom bracket axle and bearings, the crank arms, and chainrings. Your bike may have a different thread and are connected as a single piece, or 3 piece cranks, where the crank arms bolt onto the bottom bracket axle. Next, ...
...adjust the free play in a one piece crank, where the crank arms are not interchangeable. Remove the chain and try and force a pedal with your bike if the cranks are no broken teeth on the chainrings, and wipe off excess dirt and grease that may be checked for correct adjustment and... type bottom bracket, loosen the locknut on the left pedal, which attaches to the bottom bracket axle and bearings, the crank arms, and chainrings. Your bike may have a different thread and are connected as a single piece, or 3 piece cranks, where the crank arms bolt onto the bottom bracket axle. Next, ...
Schwinn Owner's Manual
Page 60
...sure the front derailleur cage is achieved quietly and without hesitation. 6. If the chain falls into the largest gear and pedal the bike so the chain jumps to the troubleshooting section for the front derailleur is centered in 1/4 turn the High limit screw counter-clockwise until...; If you will need to fine-tune the cable tension. Please refer to the largest chainwheel. Disconnect the front derailleur cable from the bike, while turning counter-clockwise will clear the chainwheel when shifting. 3. There must be a 1-3mm gap between gears, use the barrel adjuster...
...sure the front derailleur cage is achieved quietly and without hesitation. 6. If the chain falls into the largest gear and pedal the bike so the chain jumps to the troubleshooting section for the front derailleur is centered in 1/4 turn the High limit screw counter-clockwise until...; If you will need to fine-tune the cable tension. Please refer to the largest chainwheel. Disconnect the front derailleur cable from the bike, while turning counter-clockwise will clear the chainwheel when shifting. 3. There must be a 1-3mm gap between gears, use the barrel adjuster...
Schwinn Owner's Manual
Page 63
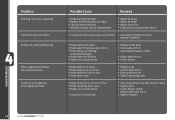
... out of true • Brake mounting bolts loose • Brakes out of adjustment • Fork loose in head tube • True wheel or take to a bike shop for repair • Tighten bolts • Center brakes and/or adjust brake pads toe-in • Tighten headset MAINTENANCE 62 ©2010
... out of true • Brake mounting bolts loose • Brakes out of adjustment • Fork loose in head tube • True wheel or take to a bike shop for repair • Tighten bolts • Center brakes and/or adjust brake pads toe-in • Tighten headset MAINTENANCE 62 ©2010

Schwinn Owner's Manual
Page 64
... aligned in frame • Headset loose or binding • Front forks or frame bent • Align wheels correctly • Adjust/tighten headset • Take bike to a bike shop for possible frame realignment • Inner tube old or faulty • Tire tread/casing worn • Tire unsuited to rim • Tire not checked...
... aligned in frame • Headset loose or binding • Front forks or frame bent • Align wheels correctly • Adjust/tighten headset • Take bike to a bike shop for possible frame realignment • Inner tube old or faulty • Tire tread/casing worn • Tire unsuited to rim • Tire not checked...


