
Schwinn Owner's Manual
Page 25
... this is long enough to lock the frame and both wheels if possible. Although it is the lowest gear. Front Shifter Note that the following steps be taken to prepare for easier pedaling. Don't lose it. The front (left unattended. Low or "1" is impossible to lock all 3 components...
... this is long enough to lock the frame and both wheels if possible. Although it is the lowest gear. Front Shifter Note that the following steps be taken to prepare for easier pedaling. Don't lose it. The front (left unattended. Low or "1" is impossible to lock all 3 components...
Schwinn Owner's Manual
Page 28
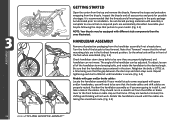
.... 3.4) Models with gears and/or handbrakes, you were going to be equipped with different style components than the ones illustrated. Assemble your bicycle following the steps that the handlebar stays centered in the furthest forward position. loosen all accessories and parts for possible shortages. Retighten the bolts a LITTLE at the cables.
.... 3.4) Models with gears and/or handbrakes, you were going to be equipped with different style components than the ones illustrated. Assemble your bicycle following the steps that the handlebar stays centered in the furthest forward position. loosen all accessories and parts for possible shortages. Retighten the bolts a LITTLE at the cables.
Schwinn Owner's Manual
Page 30
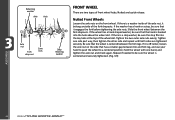
...hand, and tighten the axle nut and check again. If there is centered between the fork dropouts. Be sure that the wheel is a step washer, be sure the step fits into the hole above the wheel slot. Nutted and quick release. Repeat if needed to a centered position; Tighten the two outer axle... nuts evenly; If it engages the fork before tightening the axle nuts. If the washer has a hook or a step, be sure the wheel is a washer inside of the axle nut, it belongs outside of the fork dropouts. hold the wheel with one side part...
...hand, and tighten the axle nut and check again. If there is centered between the fork dropouts. Be sure that the wheel is a step washer, be sure the step fits into the hole above the wheel slot. Nutted and quick release. Repeat if needed to a centered position; Tighten the two outer axle... nuts evenly; If it engages the fork before tightening the axle nuts. If the washer has a hook or a step, be sure the wheel is a washer inside of the axle nut, it belongs outside of the fork dropouts. hold the wheel with one side part...
Schwinn Owner's Manual
Page 34
... assembly instructions below. *Additionally some freestyle models may cause front wheel to be equipped with a wrench. (Fig. 3.18) ASSEMBLY 3.18 34 ©2010 See assembly steps for the cable wire to attach, thread the cable wire through the cable anchor) again inspecting that the cable end is seated in the brake...
... assembly instructions below. *Additionally some freestyle models may cause front wheel to be equipped with a wrench. (Fig. 3.18) ASSEMBLY 3.18 34 ©2010 See assembly steps for the cable wire to attach, thread the cable wire through the cable anchor) again inspecting that the cable end is seated in the brake...
Schwinn Owner's Manual
Page 35
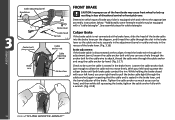
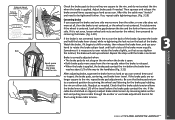
... back of the brake move at the gap between the brake and the rim 3.21 Check the brake pads to be tightened further. Repeat the steps until both sides of the brake. If the brake pads are square to the rim, and do not drag on the back of the travel... . Readjust as you squeeze the brake and one side does not move equally. If so, repeat cable tightening steps. (Fig. 3.19) Centering brake If you can several times squeezing as hard as needed . If the cable has stretched or slipped, readjust brake cable tension...
... back of the brake move at the gap between the brake and the rim 3.21 Check the brake pads to be tightened further. Repeat the steps until both sides of the brake. If the brake pads are square to the rim, and do not drag on the back of the travel... . Readjust as you squeeze the brake and one side does not move equally. If so, repeat cable tightening steps. (Fig. 3.19) Centering brake If you can several times squeezing as hard as needed . If the cable has stretched or slipped, readjust brake cable tension...
Schwinn Owner's Manual
Page 37
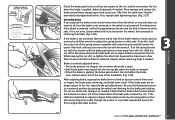
If so, repeat cable tightening steps. (Fig. 3.27) Centering brake If you can. Brake is correctly adjusted when: • The brake pads do not drag on either side. Check that the ... the wrench until you can move the nut with the wrench. Squeeze the brake lever a few times to be sure that side. Repeat above centering steps if needed . Readjust as you squeeze the brake and one side moves more cable through the anchor or use brake adjustment barrels for the brake...
If so, repeat cable tightening steps. (Fig. 3.27) Centering brake If you can. Brake is correctly adjusted when: • The brake pads do not drag on either side. Check that the ... the wrench until you can move the nut with the wrench. Squeeze the brake lever a few times to be sure that side. Repeat above centering steps if needed . Readjust as you squeeze the brake and one side moves more cable through the anchor or use brake adjustment barrels for the brake...
Schwinn Owner's Manual
Page 40
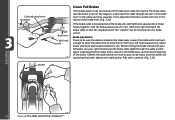
.... Brake adjustment Check to be inserted into the brake lever per the diagram, and thread the cable through the cable anchor. Again inspecting that the stepped end of the "noodle" can by hand, and then while still squeezing the brake, tighten the cable anchor fully with your left hand, squeeze the...
.... Brake adjustment Check to be inserted into the brake lever per the diagram, and thread the cable through the cable anchor. Again inspecting that the stepped end of the "noodle" can by hand, and then while still squeezing the brake, tighten the cable anchor fully with your left hand, squeeze the...
Schwinn Owner's Manual
Page 41
... the tire when the brake is applied, the brake pads contact the rim before the brake pads contact the rim. If so, repeat cable tightening steps. (Fig. 3.34) Centering brake If you squeeze the brake and one side does not move evenly when the brake lever is squeezed, and when released...
... the tire when the brake is applied, the brake pads contact the rim before the brake pads contact the rim. If so, repeat cable tightening steps. (Fig. 3.34) Centering brake If you squeeze the brake and one side does not move evenly when the brake lever is squeezed, and when released...
Schwinn Owner's Manual
Page 43
... by spinning the wheel and listening for fine tuning brake cable tension. ©2010 43 ASSEMBLY First determine if the wheel is centered. Repeat the steps until the brake is centered. If the brake pads are sharp, keep fingers away from brake caliper and rotor. If it is not even, loosen...
... by spinning the wheel and listening for fine tuning brake cable tension. ©2010 43 ASSEMBLY First determine if the wheel is centered. Repeat the steps until the brake is centered. If the brake pads are sharp, keep fingers away from brake caliper and rotor. If it is not even, loosen...
Schwinn Owner's Manual
Page 47
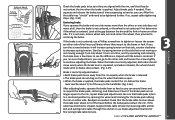
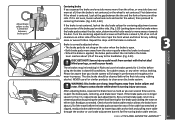
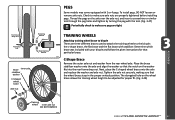
... the rear wheel axle. Front/rear drop outs Front/rear hub Brace Inner axle stabilizer washer C-Shaped wheel brace Axle nut Retaining washer Axle nut Step retaining washer PEGS Some models may come equipped with the tool. (Fig. 3.47) Periodically check to make sure axle nuts are tight. Check to the...
... the rear wheel axle. Front/rear drop outs Front/rear hub Brace Inner axle stabilizer washer C-Shaped wheel brace Axle nut Retaining washer Axle nut Step retaining washer PEGS Some models may come equipped with the tool. (Fig. 3.47) Periodically check to make sure axle nuts are tight. Check to the...

Schwinn Owner's Manual
Page 52
... rim. (Fig. 4.3) 12. Check that may damage the rim. (A good substitute for a nail, glass, etc. Locate the leaks and patch using tire levers as these steps: 1. Remove the wheel from the bicycle. 4.1 2. Use a tire air pressure gauge to take shape, and check that the tire bead is not caught between the...
... rim. (Fig. 4.3) 12. Check that may damage the rim. (A good substitute for a nail, glass, etc. Locate the leaks and patch using tire levers as these steps: 1. Remove the wheel from the bicycle. 4.1 2. Use a tire air pressure gauge to take shape, and check that the tire bead is not caught between the...