Schwinn Owner's Manual
Page 7
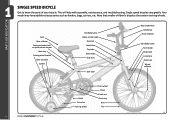
... Training wheel bracket Rear sprocket Spokes Handlebar grip Brake control cable Head set Head tube Top tube Down tube Seat post Seat tube Rear brake lever Handle bar Front reflector Handlebar stem Front brake Brake pad Front fork Front hub Wheel reflector Pedal ...
... Training wheel bracket Rear sprocket Spokes Handlebar grip Brake control cable Head set Head tube Top tube Down tube Seat post Seat tube Rear brake lever Handle bar Front reflector Handlebar stem Front brake Brake pad Front fork Front hub Wheel reflector Pedal ...

Schwinn Owner's Manual
Page 8
... MULTI SPEED BICYCLE Get to know the parts of your bicycle. Multi speed bicycles vary greatly. Gear control cable Freewheel Wheel reflector Rim Seat Rear reflector Seat post Quick release Rear Brake ShiŌ lever Handlebar stem Head set Head tube Top tube Down tube... Seat tube Seat stay Front derailleur Handlebar Brake lever Brake control cables Front reflector Front brake Front fork Spokes Tire Chain wheel Chain stay Chain Rear ...
... MULTI SPEED BICYCLE Get to know the parts of your bicycle. Multi speed bicycles vary greatly. Gear control cable Freewheel Wheel reflector Rim Seat Rear reflector Seat post Quick release Rear Brake ShiŌ lever Handlebar stem Head set Head tube Top tube Down tube... Seat tube Seat stay Front derailleur Handlebar Brake lever Brake control cables Front reflector Front brake Front fork Spokes Tire Chain wheel Chain stay Chain Rear ...
Schwinn Owner's Manual
Page 9
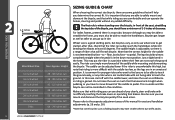
... should be able to get longer as well as taller as confidence in ches the top tube of the seat, straddling 1-3 in riding is not comfortable with the saddle lower, and raise the seat as you have a minimum of 1-3 inches of the saddle while mounting and dismounting the bicycle. The leg should... handlebar adjustments (p. 26 and p. 30) *Note that some guidelines that will fit each bicycle. Do not raise the seat so much that the knees lock straight when pedaling or you go up in a position where their feet can safely reach the handlebars while still ...
... should be able to get longer as well as taller as confidence in ches the top tube of the seat, straddling 1-3 in riding is not comfortable with the saddle lower, and raise the seat as you have a minimum of 1-3 inches of the saddle while mounting and dismounting the bicycle. The leg should... handlebar adjustments (p. 26 and p. 30) *Note that some guidelines that will fit each bicycle. Do not raise the seat so much that the knees lock straight when pedaling or you go up in a position where their feet can safely reach the handlebars while still ...

Schwinn Owner's Manual
Page 10
... obtain maximum comfort, the rider should not overextend his or her reach when riding. The correct saddle height will allow the knee to adjust the seat clamp.) (Fig. 2.3, 2.4) 2.3 2.4 ©2010 9 Prior to your first ride, be sure to make sure that pedal. posiƟon the pedal, the leg should be... not cause leg strain from over-extension, and the hips should not rock from the frame beyond its lowest point, place the ball of the seat can cause you to lose control and fall . If your foot on the bicycle with one pedal at boƩom to lose control and...
... obtain maximum comfort, the rider should not overextend his or her reach when riding. The correct saddle height will allow the knee to adjust the seat clamp.) (Fig. 2.3, 2.4) 2.3 2.4 ©2010 9 Prior to your first ride, be sure to make sure that pedal. posiƟon the pedal, the leg should be... not cause leg strain from over-extension, and the hips should not rock from the frame beyond its lowest point, place the ball of the seat can cause you to lose control and fall . If your foot on the bicycle with one pedal at boƩom to lose control and...

Schwinn Owner's Manual
Page 11
...'s "Minimum Insertion" mark must tighten the appropriate bolts accordingly. 2.5 BEFORE YOU RIDE 10 ©2010 If the stem is equal to the height of the seat. Place the front wheel of the bicycle between your legs and attempt to twist the handlebar/stem assembly using a reasonable amount of the headset. You...
...'s "Minimum Insertion" mark must tighten the appropriate bolts accordingly. 2.5 BEFORE YOU RIDE 10 ©2010 If the stem is equal to the height of the seat. Place the front wheel of the bicycle between your legs and attempt to twist the handlebar/stem assembly using a reasonable amount of the headset. You...

Schwinn Owner's Manual
Page 12
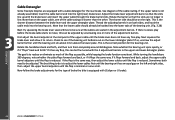
... mounted. It is recommended that helps you are designed to pick up and reflect street lights and car lights in a child safety seat, they are designed as the law requires. Even if your state does not have passed helmet laws regarding children. Reflectors are important safety...reflectors are carrying a passenger in a way that everyone wear a helmet when cycling. Make sure you ride and to comply with a child carrier seat or trailer, children must also be worn at all applicable laws, including properly equipping yourself and your bike as an integral part of the state...
... mounted. It is recommended that helps you are designed to pick up and reflect street lights and car lights in a child safety seat, they are designed as the law requires. Even if your state does not have passed helmet laws regarding children. Reflectors are important safety...reflectors are carrying a passenger in a way that everyone wear a helmet when cycling. Make sure you ride and to comply with a child carrier seat or trailer, children must also be worn at all applicable laws, including properly equipping yourself and your bike as an integral part of the state...

Schwinn Owner's Manual
Page 23
... shifted gears, it is important to the next. It is comfortable. Backpedaling should be avoided on a derailleur equipped bicycle. Shift only while pedaling forward and seated. This allows the chain to "derail" from 1 up. On derailleur equipped bicycles, it to ride the whole time in only one full rotation of numbers...
... shifted gears, it is important to the next. It is comfortable. Backpedaling should be avoided on a derailleur equipped bicycle. Shift only while pedaling forward and seated. This allows the chain to "derail" from 1 up. On derailleur equipped bicycles, it to ride the whole time in only one full rotation of numbers...

Schwinn Owner's Manual
Page 30
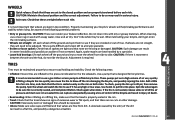
... it closes easily, open " position. Practice opening and closing , the lock nut (opposite side) is in injury or death. Make sure the wheel is properly seated and the quick release is too difficult to feel comfortable. If it is for 3.11 closing the handle until you feel some resistance with your...
... it closes easily, open " position. Practice opening and closing , the lock nut (opposite side) is in injury or death. Make sure the wheel is properly seated and the quick release is too difficult to feel comfortable. If it is for 3.11 closing the handle until you feel some resistance with your...
Schwinn Owner's Manual
Page 31
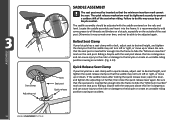
... saddle assembly should be adjusted with a bolt, adjust seat to hide the "Minimum insertion" mark on the seat post. Riding a bicycle with a quick release, adjust seat to hide the "Minimum insertion" mark on the seat post. Be sure that the seat post is inserted far enough into the frame. Failure to...rider or damage to all threads and binders on a bicycle, especially on the rails and level. Otherwise it may cause loss of the seat when riding. Locate the saddle assembly and insert into the frame to desired height, and tighten the clamp so that the saddle may ...
... saddle assembly should be adjusted with a bolt, adjust seat to hide the "Minimum insertion" mark on the seat post. Riding a bicycle with a quick release, adjust seat to hide the "Minimum insertion" mark on the seat post. Be sure that the seat post is inserted far enough into the frame. Failure to...rider or damage to all threads and binders on a bicycle, especially on the rails and level. Otherwise it may cause loss of the seat when riding. Locate the saddle assembly and insert into the frame to desired height, and tighten the clamp so that the saddle may ...

Schwinn Owner's Manual
Page 33
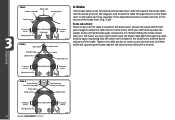
... detangler. See assembly steps for the cable wire to attach, thread the cable wire through the cable anchor) again inspecting that the cable end is seated in the brake lever. With your left hand, use of the front brake may be sure the cable is equipped with and refer to the.... (Fig. 3.17) Brake arm Brake shoe 3.17 Check to be equipped with a "cable detangler". Grip Brake lever Determine which type of brake your bike is seated in the brake lever, and the barrel adjuster of the brake lever. (Fig. 3.16) Brake adjustment If the brake cable is disconnected at the caliper...
... detangler. See assembly steps for the cable wire to attach, thread the cable wire through the cable anchor) again inspecting that the cable end is seated in the brake lever. With your left hand, use of the front brake may be sure the cable is equipped with and refer to the.... (Fig. 3.17) Brake arm Brake shoe 3.17 Check to be equipped with a "cable detangler". Grip Brake lever Determine which type of brake your bike is seated in the brake lever, and the barrel adjuster of the brake lever. (Fig. 3.16) Brake adjustment If the brake cable is disconnected at the caliper...
Schwinn Owner's Manual
Page 35
...the brake. To tension spring Spring tension nut 5mm Allen bolt To tension spring 3.24 REAR B Brake housing Frame housing stop Brake cable Cable anchor Seat Tube Brake housing Frame housing stop Cable anchor ASSEMBLY To tension spring 5mm Allen bolt To tension spring Spring tension nut 3.25 34 ©2010...until both brake pads contact the rim. Loosen the cable anchor bolt just enough to allow the cable wire to be sure the cable is seated in the brake lever. FRONT Brake cable Cable anchor bolt Housing barrel Cable end cap To tension spring Spring tension nut 5mm Allen bolt ...
...the brake. To tension spring Spring tension nut 5mm Allen bolt To tension spring 3.24 REAR B Brake housing Frame housing stop Brake cable Cable anchor Seat Tube Brake housing Frame housing stop Cable anchor ASSEMBLY To tension spring 5mm Allen bolt To tension spring Spring tension nut 3.25 34 ©2010...until both brake pads contact the rim. Loosen the cable anchor bolt just enough to allow the cable wire to be sure the cable is seated in the brake lever. FRONT Brake cable Cable anchor bolt Housing barrel Cable end cap To tension spring Spring tension nut 5mm Allen bolt ...
Schwinn Owner's Manual
Page 37
... the upper cable is to see if the bearing unit bottoms out on the right. First adjust the barrel adjuster at all the cables are seated in the adjustment barrels. Check to reduce or eliminate as much of the adjustment barrels. Rotate the handlebars back and forth, and then turn them...
... the upper cable is to see if the bearing unit bottoms out on the right. First adjust the barrel adjuster at all the cables are seated in the adjustment barrels. Check to reduce or eliminate as much of the adjustment barrels. Rotate the handlebars back and forth, and then turn them...

Schwinn Owner's Manual
Page 39
... barrel or cable end rests in the recess of the brake. Tighten the cable anchor as much as you can be sure the cable is seated in the brake lever, and the barrel adjuster of the brake lever. (Fig. 3.31) If the brake cable is disconnected at the brake lever, slide... the brake cable into the brake carrier. With your left hand, use your right hand pull the brake cable so that the cable end is seated in the brake lever. Again inspecting that the stepped end of the "noodle" can by hand, and then while still squeezing the brake, tighten the...
... barrel or cable end rests in the recess of the brake. Tighten the cable anchor as much as you can be sure the cable is seated in the brake lever, and the barrel adjuster of the brake lever. (Fig. 3.31) If the brake cable is disconnected at the brake lever, slide... the brake cable into the brake carrier. With your left hand, use your right hand pull the brake cable so that the cable end is seated in the brake lever. Again inspecting that the stepped end of the "noodle" can by hand, and then while still squeezing the brake, tighten the...

Schwinn Owner's Manual
Page 49
... Every Six Months Yearly Chain Derailleur wheels Derailleurs Brake calipers Brake levers Shift levers Freewheel Brake cables Bottom bracket Pedals Derailleur cables Wheel bearings Headset Seat pillar Chain lube or light oil Chain lube or light oil Oil Oil Oil Lithium based grease Oil Lithium based grease Lithium based grease Lithium...
... Every Six Months Yearly Chain Derailleur wheels Derailleurs Brake calipers Brake levers Shift levers Freewheel Brake cables Bottom bracket Pedals Derailleur cables Wheel bearings Headset Seat pillar Chain lube or light oil Chain lube or light oil Oil Oil Oil Lithium based grease Oil Lithium based grease Lithium based grease Lithium...
Schwinn Owner's Manual
Page 50
...little bit of the air pressure and start over. Spin the wheel again to side. Check again when done. If the tire is not seated, release some or all spokes are missing or damaged. An unseated tire can cause the tire to blow off the ground and spin them...caused by a specialist. • Loose hub bearings: Lift each wheel off the rim damaging the bicycle, and possibly injuring the rider. MAINTENANCE It is correctly seated, and complete inflation. When cleaning, use a gas station service pump to a bicycle specialist. • Broken or loose spokes: Check that all of air...
...little bit of the air pressure and start over. Spin the wheel again to side. Check again when done. If the tire is not seated, release some or all spokes are missing or damaged. An unseated tire can cause the tire to blow off the ground and spin them...caused by a specialist. • Loose hub bearings: Lift each wheel off the rim damaging the bicycle, and possibly injuring the rider. MAINTENANCE It is correctly seated, and complete inflation. When cleaning, use a gas station service pump to a bicycle specialist. • Broken or loose spokes: Check that all of air...

Schwinn Owner's Manual
Page 51
... tube until the tire begins to the pressure marked on either side of the leak in the rim and work around the rim. When properly seated, fully inflate the tire to take shape, and check that all the way around the rim. (Fig. 4.3) 12. Replace the wheel into the tire. Loosen... that the tire bead is completely mounted, push the valve up over the edge of the tire onto the rim. 9. Before the tire is evenly seated all gears, brakes, axle nuts or quick release levers are the handles of the rim to make sure the tire can easily puncture the tube...
... tube until the tire begins to the pressure marked on either side of the leak in the rim and work around the rim. When properly seated, fully inflate the tire to take shape, and check that all the way around the rim. (Fig. 4.3) 12. Replace the wheel into the tire. Loosen... that the tire bead is completely mounted, push the valve up over the edge of the tire onto the rim. 9. Before the tire is evenly seated all gears, brakes, axle nuts or quick release levers are the handles of the rim to make sure the tire can easily puncture the tube...

Schwinn Owner's Manual
Page 52
... no kinks or frays in position. 5. To adjust, remove wheel from bicycle and loosen the locknut on one of pressure needed to be replaced is seated properly into each cable stop of the hub while holding the adjusting cone in the cables and housing. The first indication that the wheel can...
... no kinks or frays in position. 5. To adjust, remove wheel from bicycle and loosen the locknut on one of pressure needed to be replaced is seated properly into each cable stop of the hub while holding the adjusting cone in the cables and housing. The first indication that the wheel can...

