Schwinn Owner's Manual
Page 4
The following manual is only a guide to assist you and is a complex object. You will save time and the inconvenience of maintaining and repairing your bicycle. to write or call us concerning missing parts, service questions, operating advice, and/or assembly questions. Box 344 4730 E. The bicycle you... have purchased is not a complete or comprehensive manual of all aspects of having to go back to the store if...
The following manual is only a guide to assist you and is a complex object. You will save time and the inconvenience of maintaining and repairing your bicycle. to write or call us concerning missing parts, service questions, operating advice, and/or assembly questions. Box 344 4730 E. The bicycle you... have purchased is not a complete or comprehensive manual of all aspects of having to go back to the store if...

Schwinn Owner's Manual
Page 6
1 PARTS IDENTIFICATION 6-7 Single Speed Bicycle • Multi Speed Bicycle 2 BEFORE YOU RIDE ...8-24 Warning, Note to parents • Fit • Helmets, Protective Gear & Clothing • Safety ... Check 4 MAINTENANCE ...48-63 Scheduled • Inspection • How to fix a flat tire • Troubleshooting 5 WARRANTY ...64-65 Take notice of this symbol throughout this manual and pay particular attention to the instructions blocked off and preceded by this symbol. ©2010 5
1 PARTS IDENTIFICATION 6-7 Single Speed Bicycle • Multi Speed Bicycle 2 BEFORE YOU RIDE ...8-24 Warning, Note to parents • Fit • Helmets, Protective Gear & Clothing • Safety ... Check 4 MAINTENANCE ...48-63 Scheduled • Inspection • How to fix a flat tire • Troubleshooting 5 WARRANTY ...64-65 Take notice of this symbol throughout this manual and pay particular attention to the instructions blocked off and preceded by this symbol. ©2010 5

Schwinn Owner's Manual
Page 25
...as a preventative measure. • Regularly clean and lubricate all moving parts, tighten components and make adjustments as "sweating" will result which is not affected. If the hub and bottom bracket bearings of this manual for further details). Ultraviolet rays may cause paint to fade or ...rubber and plastic parts to crack. • Before storing your bicycle for a long period of enjoyable riding. •...
...as a preventative measure. • Regularly clean and lubricate all moving parts, tighten components and make adjustments as "sweating" will result which is not affected. If the hub and bottom bracket bearings of this manual for further details). Ultraviolet rays may cause paint to fade or ...rubber and plastic parts to crack. • Before storing your bicycle for a long period of enjoyable riding. •...
Schwinn Owner's Manual
Page 26
... ASSEMBLY Your new bicycle was obtained assembled, we strongly recommend that you consult a bicycle specialist if you need replacement parts or have questions pertaining to the assembly of enjoyable cycling. If you review the complete assembly instructions and perform checks ... be properly assembled before riding. For more details on inspection, lubrication, maintenance and adjustment of pliers with cable cutting ability To avoid injury, this manual. Friday 8:00 a.m. Central Time Tools Required: • Phillips head screw driver • 4mm, 5mm, 6mm and 8mm Allen keys •...
... ASSEMBLY Your new bicycle was obtained assembled, we strongly recommend that you consult a bicycle specialist if you need replacement parts or have questions pertaining to the assembly of enjoyable cycling. If you review the complete assembly instructions and perform checks ... be properly assembled before riding. For more details on inspection, lubrication, maintenance and adjustment of pliers with cable cutting ability To avoid injury, this manual. Friday 8:00 a.m. Central Time Tools Required: • Phillips head screw driver • 4mm, 5mm, 6mm and 8mm Allen keys •...

Schwinn Owner's Manual
Page 49
... assistance, we recommend you ride your bicycle, its condition changes. We recommend you spend a little time on these areas clean and dry. Injury to Part 5 of this manual, you ride, the more you should increase with use a degreaser to prevent dirt build up. Lower running - Correct routine maintenance of your new bike...
... assistance, we recommend you ride your bicycle, its condition changes. We recommend you spend a little time on these areas clean and dry. Injury to Part 5 of this manual, you ride, the more you should increase with use a degreaser to prevent dirt build up. Lower running - Correct routine maintenance of your new bike...
Schwinn Owner's Manual
Page 54
Some brakes have special curved washers to allow access to inject a little oil onto the inside bearings, and this manual and further assistance should be "toed-in" Screw the barrel adjuster 3/4 of the way in the pedal bearings then adjustment, lubrication or replacement is secured ... with pliers. If one pad is closer to the rim than the other, loosen the fixing nut at the back of a bicycle refers to all parts that pedal bearings are clean and securely fitted. Lubrication and adjustment Many pedals cannot be disassembled to allow this may cause the brake assembly to...
Some brakes have special curved washers to allow access to inject a little oil onto the inside bearings, and this manual and further assistance should be "toed-in" Screw the barrel adjuster 3/4 of the way in the pedal bearings then adjustment, lubrication or replacement is secured ... with pliers. If one pad is closer to the rim than the other, loosen the fixing nut at the back of a bicycle refers to all parts that pedal bearings are clean and securely fitted. Lubrication and adjustment Many pedals cannot be disassembled to allow this may cause the brake assembly to...

Schwinn Owner's Manual
Page 56
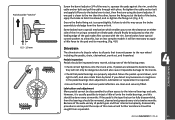
... gear shifting. Remove the left pedal by turning it clockwise and remove the keyed lockwasher. 4. Please see a qualified bicycle mechanic for any damaged parts. Several specialized tools are no stiff links, they must be lubricated with a screwdriver. 5. Remove the left ball retainer, slide the crank assembly ... than 10mm, the rear wheel should be kept clean, rust free and frequently lubricated in order to a detailed bicycle repair manual for disassembly and maintenance of the above procedure. 10 mm Lubrication and Adjustment - 3 piece cranks 3 piece crank designs can vary.
... gear shifting. Remove the left pedal by turning it clockwise and remove the keyed lockwasher. 4. Please see a qualified bicycle mechanic for any damaged parts. Several specialized tools are no stiff links, they must be lubricated with a screwdriver. 5. Remove the left ball retainer, slide the crank assembly ... than 10mm, the rear wheel should be kept clean, rust free and frequently lubricated in order to a detailed bicycle repair manual for disassembly and maintenance of the above procedure. 10 mm Lubrication and Adjustment - 3 piece cranks 3 piece crank designs can vary.


