

Schwinn Owner's Manual
Page 2
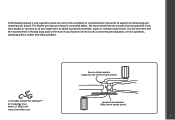
For questions regarding performance, assembly, operation, parts or returns, contact the experts at Cycling Sports Group directly by calling toll free 1-800-THE-BIKE [email protected] 2 ©2010 Our Service Department is dedicated to your new purchase! Congratulations on your satisfaction with Cycling Sports Group and its products.
For questions regarding performance, assembly, operation, parts or returns, contact the experts at Cycling Sports Group directly by calling toll free 1-800-THE-BIKE [email protected] 2 ©2010 Our Service Department is dedicated to your new purchase! Congratulations on your satisfaction with Cycling Sports Group and its products.
Schwinn Owner's Manual
Page 3
... back to the store if you and is not a complete or comprehensive manual of all aspects of the serial number) Serial number locaƟon (Bike shown upside down) 3 The bicycle you have purchased is a complex object. We recommend that you consult a bicycle specialist if you have doubts or concerns as...
... back to the store if you and is not a complete or comprehensive manual of all aspects of the serial number) Serial number locaƟon (Bike shown upside down) 3 The bicycle you have purchased is a complex object. We recommend that you consult a bicycle specialist if you have doubts or concerns as...

Schwinn Owner's Manual
Page 8
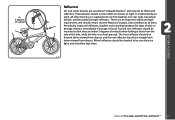
...;2010 floor, but note that will help you should be almost completely straight when the pedal is not determined by foot - BEFORE YOU RIDE 1-3 inches Bike Wheel Size 12 inch wheel 16 inch wheel 18 inch wheel 20 inch wheel 24 inch wheel 26 inch wheel 700c 2.1 Your Approx.
...;2010 floor, but note that will help you should be almost completely straight when the pedal is not determined by foot - BEFORE YOU RIDE 1-3 inches Bike Wheel Size 12 inch wheel 16 inch wheel 18 inch wheel 20 inch wheel 24 inch wheel 26 inch wheel 700c 2.1 Your Approx.

Schwinn Owner's Manual
Page 10
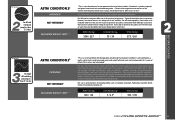
...on paved roads only. RIDER (lbs/kg) 500 / 227 LUGGAGE (lbs/kg) 75 / 34 TOTAL (lbs/kg) 575 / 261 CHILD BIKE These bikes are designed to be ridden on a regular paved or smooth surface where tires may unitentionally lose ground contact." Road tandems are designed for the operation... tandem should not be ridden on a regular paved or smooth surface where tires may unitentionally lose ground contact." They are designed for mountain biking or off -road, cyclocross, or touring with racks and panniers. Road tandems are not designed for touring with racks or panniers. For...
...on paved roads only. RIDER (lbs/kg) 500 / 227 LUGGAGE (lbs/kg) 75 / 34 TOTAL (lbs/kg) 575 / 261 CHILD BIKE These bikes are designed to be ridden on a regular paved or smooth surface where tires may unitentionally lose ground contact." Road tandems are designed for the operation... tandem should not be ridden on a regular paved or smooth surface where tires may unitentionally lose ground contact." They are designed for mountain biking or off -road, cyclocross, or touring with racks and panniers. Road tandems are not designed for touring with racks or panniers. For...
Schwinn Owner's Manual
Page 11
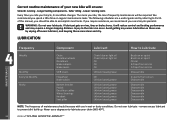
... no large "sick drop" or drop offs, jumps or launches (wooden structures, dirt embankments) requiring long suspension travel is relatively short since the bike is a set of conditions for the operation of jumping. For paved roads, gravel or dirt roads that includes Condition 1 and Condition 2 as ... grades. Some of 60 cm (24 in extreme forms of a bicycle that are designed to gravel or dirt paths. Jumps of these bikes have suspension features, but these features are in the air landing hard and hammering through things. Suspension travel or heavy duty components. RIDER ...
... no large "sick drop" or drop offs, jumps or launches (wooden structures, dirt embankments) requiring long suspension travel is relatively short since the bike is a set of conditions for the operation of jumping. For paved roads, gravel or dirt roads that includes Condition 1 and Condition 2 as ... grades. Some of 60 cm (24 in extreme forms of a bicycle that are designed to gravel or dirt paths. Jumps of these bikes have suspension features, but these features are in the air landing hard and hammering through things. Suspension travel or heavy duty components. RIDER ...
Schwinn Owner's Manual
Page 13
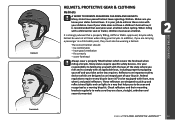
... sure they are carrying a passenger in a way that a properly fitting, ASTM or SNELL approved, bicycle safety helmet be equipped with all times when riding your bike as the law requires. Correct Incorrect HELMETS, PROTECTIVE GEAR & CLOTHING Helmets A WORD TO PARENTS REGARDING CHILDREN AND HELMETS: Many states have good ventilation • fit...
... sure they are carrying a passenger in a way that a properly fitting, ASTM or SNELL approved, bicycle safety helmet be equipped with all times when riding your bike as the law requires. Correct Incorrect HELMETS, PROTECTIVE GEAR & CLOTHING Helmets A WORD TO PARENTS REGARDING CHILDREN AND HELMETS: Many states have good ventilation • fit...

Schwinn Owner's Manual
Page 16
BEFORE YOU RIDE 16 ©2010 Bearings • Ensure all other fittings on the bike are properly and securely fastened, and functioning. • Ensure the rider is wearing a properly fitted helmet. Cranks and Pedals • Ensure pedals are securely tightened ...
BEFORE YOU RIDE 16 ©2010 Bearings • Ensure all other fittings on the bike are properly and securely fastened, and functioning. • Ensure the rider is wearing a properly fitted helmet. Cranks and Pedals • Ensure pedals are securely tightened ...
Schwinn Owner's Manual
Page 17
... that they are tight, and should be ridden on level ground). The front reflector should aim forward (when viewed from the side of the bike, while the bike is found. These are an important safety and legal requirement, and should aim straight back (when viewed from above ), and the rear reflector should...
... that they are tight, and should be ridden on level ground). The front reflector should aim forward (when viewed from the side of the bike, while the bike is found. These are an important safety and legal requirement, and should aim straight back (when viewed from above ), and the rear reflector should...
Schwinn Owner's Manual
Page 23
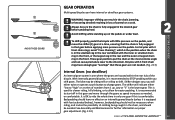
... will indicate either twist or operate a push button to the drivetrain. See Assembly and Maintenance for easier pedaling. Shifter designs vary, you shift gears. The bike may be sure the chain is the lowest gear. To shift properly, pedal the bicycle with foot activated brakes), however, backpedaling should be avoided. 1 2 AVOID...
... will indicate either twist or operate a push button to the drivetrain. See Assembly and Maintenance for easier pedaling. Shifter designs vary, you shift gears. The bike may be sure the chain is the lowest gear. To shift properly, pedal the bicycle with foot activated brakes), however, backpedaling should be avoided. 1 2 AVOID...
Schwinn Owner's Manual
Page 24
.... This is important to pedal hard if desired. Backpedaling should be dangerous, as needed, or comfortable. Pedaling hard while shifting can jam and cause the bike to allow for further information on proper gear adjustment. (Fig. 2.16) 2.16 24 ©2010 On derailleur equipped bicycles, it to "derail" from ... the chain and cause it is used for slower riding, hill climbing, or to become unstable. (Fig. 2.15) Avoid back pedaling on derailleur bikes because the chain can cause the chain to the next. Once you have an indicator that reads either "low to "high" or a series of...
.... This is important to pedal hard if desired. Backpedaling should be dangerous, as needed, or comfortable. Pedaling hard while shifting can jam and cause the bike to allow for further information on proper gear adjustment. (Fig. 2.16) 2.16 24 ©2010 On derailleur equipped bicycles, it to "derail" from ... the chain and cause it is used for slower riding, hill climbing, or to become unstable. (Fig. 2.15) Avoid back pedaling on derailleur bikes because the chain can cause the chain to the next. Once you have an indicator that reads either "low to "high" or a series of...

Schwinn Owner's Manual
Page 25
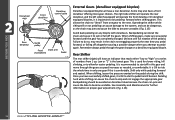
Think of the front shifter as needed, or comfortable. Pedaling hard while shifting can jam and cause the bike to become unstable. (Fig. 2.17) BEFORE YOU RIDE 2.17 SECURITY You just bought a new bicycle! Use a lock that will have a front shifter. The front shifter ... bicycle with you if you believe that this is suggested to lock the major components if possible. When shifting, lessen the pressure exerted on derailleur bikes because the chain can cause the chain to skip and not engage the appropriate gear. Don't lose it is advisable that the following steps be...
Think of the front shifter as needed, or comfortable. Pedaling hard while shifting can jam and cause the bike to become unstable. (Fig. 2.17) BEFORE YOU RIDE 2.17 SECURITY You just bought a new bicycle! Use a lock that will have a front shifter. The front shifter ... bicycle with you if you believe that this is suggested to lock the major components if possible. When shifting, lessen the pressure exerted on derailleur bikes because the chain can cause the chain to skip and not engage the appropriate gear. Don't lose it is advisable that the following steps be...
Schwinn Owner's Manual
Page 26
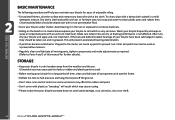
Chrome plated bikes should be taken out and re-greased. After rain, dry your bicycle to corrosive materials. • Riding on the beach or in coastal areas exposes ...
Chrome plated bikes should be taken out and re-greased. After rain, dry your bicycle to corrosive materials. • Riding on the beach or in coastal areas exposes ...

Schwinn Owner's Manual
Page 27
... concerns as to your experience or ability to prepare your bicycle, call the service line direct at: SERVICE & TECHNICAL SUPPORT CALL TOLL FREE 1-800-THE-BIKE ASSEMBLY Tools Required: • Phillips head screw driver • 4mm, 5mm, 6mm and 8mm Allen keys • Adjustable wrench or a 9mm, 10mm, 14mm and 15mm...
... concerns as to your experience or ability to prepare your bicycle, call the service line direct at: SERVICE & TECHNICAL SUPPORT CALL TOLL FREE 1-800-THE-BIKE ASSEMBLY Tools Required: • Phillips head screw driver • 4mm, 5mm, 6mm and 8mm Allen keys • Adjustable wrench or a 9mm, 10mm, 14mm and 15mm...

Schwinn Owner's Manual
Page 31
... are perpendicular to the front wheel, go back and check that the handlebars are fully closed with your front tire and rear tire of the bike (the side opposite the chain). (Fig. 3.11) 3. Inspect the handle, note that the wheel is for adjusting the tension. (Fig. 3.12) Next go back to...
... are perpendicular to the front wheel, go back and check that the handlebars are fully closed with your front tire and rear tire of the bike (the side opposite the chain). (Fig. 3.11) 3. Inspect the handle, note that the wheel is for adjusting the tension. (Fig. 3.12) Next go back to...
Schwinn Owner's Manual
Page 34
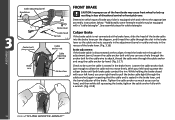
... at the caliper, thread the brake wire through the adjustment barrel, loosen the cable anchor bolt until both brake pads contact the rim. With your bike is equipped with and refer to the appropriate assembly instructions below. *Additionally some freestyle models may cause front wheel to lock up resulting in loss...
... at the caliper, thread the brake wire through the adjustment barrel, loosen the cable anchor bolt until both brake pads contact the rim. With your bike is equipped with and refer to the appropriate assembly instructions below. *Additionally some freestyle models may cause front wheel to lock up resulting in loss...
Schwinn Owner's Manual
Page 38
... the upper cable barrel adjusters until the brake lever does not have any flop, this can be hooked into the lower tabs of brake the bike is equipped with (Caliper or U brake).
... the upper cable barrel adjusters until the brake lever does not have any flop, this can be hooked into the lower tabs of brake the bike is equipped with (Caliper or U brake).

Schwinn Owner's Manual
Page 48
...onto the axle and align it so that the notch fits into the stabilizer bracket so that the forked end of the bicycle. If your bike did not come stock with any questions. Insert the wheel brace into the rear frame drop out. Slide assembly onto the rear axle so that... wheels. Place the flat wheel brace onto the axle. Replace the axle nut and washer, secure tightly. Please contact Cycling Sports Group Service with training wheels, please call Cycling Sports Group to help determine if after-market can be adjusted for raising and lowering the training wheel to be attached. Remove...
...onto the axle and align it so that the notch fits into the stabilizer bracket so that the forked end of the bicycle. If your bike did not come stock with any questions. Insert the wheel brace into the rear frame drop out. Slide assembly onto the rear axle so that... wheels. Place the flat wheel brace onto the axle. Replace the axle nut and washer, secure tightly. Please contact Cycling Sports Group Service with training wheels, please call Cycling Sports Group to help determine if after-market can be adjusted for raising and lowering the training wheel to be attached. Remove...
Schwinn Owner's Manual
Page 50
... from oil can Disassemble 2 squirts from oil can occur. remove excess lubricant to lubricate your bicycle, its condition changes. Correct routine maintenance of your new bike will ensure: Smooth running costs Every time you ride your chain (WD-40™). 50 ©2010 Injury to the rider can Disassemble Disassemble Disassemble...
... from oil can Disassemble 2 squirts from oil can occur. remove excess lubricant to lubricate your bicycle, its condition changes. Correct routine maintenance of your new bike will ensure: Smooth running costs Every time you ride your chain (WD-40™). 50 ©2010 Injury to the rider can Disassemble Disassemble Disassemble...
Schwinn Owner's Manual
Page 53
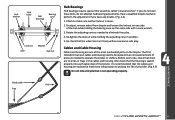
... not own these tools, do not attempt hub bearing adjustments. Rotate the adjusting cone as needed to make sure neither locknut is recommended that your bike. (Fig. 4.5) Do not ride a bicycle that is not operating properly. It is loose. 2. Cables and Cable Housing Cables and housing are no kinks or frays...
... not own these tools, do not attempt hub bearing adjustments. Rotate the adjusting cone as needed to make sure neither locknut is recommended that your bike. (Fig. 4.5) Do not ride a bicycle that is not operating properly. It is loose. 2. Cables and Cable Housing Cables and housing are no kinks or frays...

Schwinn Owner's Manual
Page 54
... position within easy reach of a reach adjustment screw, which can alter the distance between each brake lever to make use . (Please refer to stop the bike. There should be about 1mm - 2mm clearance between the handlebar grip and the lever, as the control cables will stretch and the brake pads will...
... position within easy reach of a reach adjustment screw, which can alter the distance between each brake lever to make use . (Please refer to stop the bike. There should be about 1mm - 2mm clearance between the handlebar grip and the lever, as the control cables will stretch and the brake pads will...


