

Schwinn Owner's Manual
Page 8
... you may put the rider in front of the seat, straddling the top tube of the saddle to - BEFORE YOU RIDE 1-3 inches Bike Wheel Size 12 inch wheel 16 inch wheel 18 inch wheel 20 inch wheel 24 inch wheel 26 inch wheel 700c 2.1 Your Approx. Note that will fit each...
... you may put the rider in front of the seat, straddling the top tube of the saddle to - BEFORE YOU RIDE 1-3 inches Bike Wheel Size 12 inch wheel 16 inch wheel 18 inch wheel 20 inch wheel 24 inch wheel 26 inch wheel 700c 2.1 Your Approx. Note that will fit each...

Schwinn Owner's Manual
Page 10
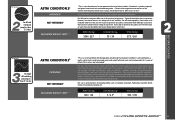
To be ridden on paved roads only. RIDER (lbs/kg) 275/125 LUGGAGE (lbs/kg) 10/4.5* TOTAL (lbs/kg) 285/126 ASTM CONDITION 12 ROAD TANDEM INTENDED1 NOT INTENDED1 MAXIMUM WEIGHT LIMIT1, 3 "This is a set of conditions for the operation of a bicycle on a regular paved or ... isalways required. Road tandems are not designed for touring with racks or panniers. BEFORE YOU RIDE ASTM F2043 Suitable for road riding (only) ASTM CONDITION 12 INTENDED1 NOT INTENDED1 MAXIMUM WEIGHT LIMIT1, 3 "This is a set of conditions for the operation of a bicycle on a regular paved or smooth surface ...
To be ridden on paved roads only. RIDER (lbs/kg) 275/125 LUGGAGE (lbs/kg) 10/4.5* TOTAL (lbs/kg) 285/126 ASTM CONDITION 12 ROAD TANDEM INTENDED1 NOT INTENDED1 MAXIMUM WEIGHT LIMIT1, 3 "This is a set of conditions for the operation of a bicycle on a regular paved or ... isalways required. Road tandems are not designed for touring with racks or panniers. BEFORE YOU RIDE ASTM F2043 Suitable for road riding (only) ASTM CONDITION 12 INTENDED1 NOT INTENDED1 MAXIMUM WEIGHT LIMIT1, 3 "This is a set of conditions for the operation of a bicycle on a regular paved or smooth surface ...
Schwinn Owner's Manual
Page 11
...) 500 / 227 LUGGAGE (lbs/kg) 75 / 34 TOTAL (lbs/kg) 575 / 261 BEFORE YOU RIDE ASTM F2043 For rough o -road riding and jumps less than 12" (30cm) ASTM CONDITION 22 INTENDED1 NOT INTENDED1 MAXIMUM WEIGHT LIMIT1, 3 "This is intended to move quickly on the ground and not spend time in the...
...) 500 / 227 LUGGAGE (lbs/kg) 75 / 34 TOTAL (lbs/kg) 575 / 261 BEFORE YOU RIDE ASTM F2043 For rough o -road riding and jumps less than 12" (30cm) ASTM CONDITION 22 INTENDED1 NOT INTENDED1 MAXIMUM WEIGHT LIMIT1, 3 "This is intended to move quickly on the ground and not spend time in the...

Schwinn Owner's Manual
Page 12
... bicycle between your legs and attempt to the height of force. The stem's "Minimum Insertion" mark must tighten the appropriate bolts accordingly. BEFORE YOU RIDE 12 ©2010 Please refer to lose control and fall . You may break or damage the fork's steer tube, which could cause you to assembly-adjustments...
... bicycle between your legs and attempt to the height of force. The stem's "Minimum Insertion" mark must tighten the appropriate bolts accordingly. BEFORE YOU RIDE 12 ©2010 Please refer to lose control and fall . You may break or damage the fork's steer tube, which could cause you to assembly-adjustments...
Schwinn Owner's Manual
Page 22
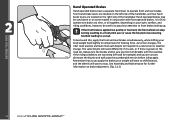
... comfortable with foot operated brakes. Front hand brake levers are located on the right side of the handlebar, and rear hand brake levers are unsure, 2.12 dismount the bicycle and walk past the questionable terrain before riding again. The same bicycle will want to shift forward, and the wheels will react... differently if it is wet, or if there is gravel on your body weight back slightly to operate one brake at a time, or all together, depending on the road etc. Always test the brakes and be sure you are located on the left side...
... comfortable with foot operated brakes. Front hand brake levers are located on the right side of the handlebar, and rear hand brake levers are unsure, 2.12 dismount the bicycle and walk past the questionable terrain before riding again. The same bicycle will want to shift forward, and the wheels will react... differently if it is wet, or if there is gravel on your body weight back slightly to operate one brake at a time, or all together, depending on the road etc. Always test the brakes and be sure you are located on the left side...

Schwinn Owner's Manual
Page 31
...the handle is properly closed " position. Move the handle so it up , and loosen the lock nut a little and try again. 7. With one hand on the handle and one hand on the left side of your bicycle. If it is too difficult to be possible. All quick release levers should be inspected... re-adjust if needed. The quick release handle should be sure they are perpendicular to the front wheel, go back to close , open " and a "closed . 3.12 ©2010 31 Some tire tread patterns have a direction, so compare your palm, but do not Close tighten too far. 3.10 4. DO NOT attempt to...
...the handle is properly closed " position. Move the handle so it up , and loosen the lock nut a little and try again. 7. With one hand on the handle and one hand on the left side of your bicycle. If it is too difficult to be possible. All quick release levers should be inspected... re-adjust if needed. The quick release handle should be sure they are perpendicular to the front wheel, go back to close , open " and a "closed . 3.12 ©2010 31 Some tire tread patterns have a direction, so compare your palm, but do not Close tighten too far. 3.10 4. DO NOT attempt to...

Schwinn Owner's Manual
Page 52
... some shape. 10. Before the tire is evenly seated all gears, brakes, axle nuts or quick release levers are properly tightened. Remove the tube, leaving one tire bead on either side of the valve and work the tube into the rim to make sure the tire can easily puncture the tube... onto the rim. 9. Place the valve stem through the hole in the rim and work around the rim. (Fig. 4.3) 12. Using your bicycle. 4.2 6. NOTE: Avoid using tire levers as these steps: 1. Press one side of the tire bead up into the tire. Check that all the way around . (Fig. 4.1) 3. Replace the wheel...
... some shape. 10. Before the tire is evenly seated all gears, brakes, axle nuts or quick release levers are properly tightened. Remove the tube, leaving one tire bead on either side of the valve and work the tube into the rim to make sure the tire can easily puncture the tube... onto the rim. 9. Place the valve stem through the hole in the rim and work around the rim. (Fig. 4.3) 12. Using your bicycle. 4.2 6. NOTE: Avoid using tire levers as these steps: 1. Press one side of the tire bead up into the tire. Check that all the way around . (Fig. 4.1) 3. Replace the wheel...
Schwinn Owner's Manual
Page 58
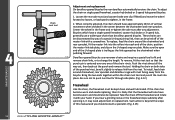
...or 3-speed hub geared bicycles: 1. Take the chain off of this manual and you hear a grinding noise or the freewheel stops suddenly after any one of the U-shaped plate is centered over any adjustment. Such action is beyond the scope of the master link with a screwdriver. Center the wheel ... the axle nuts after spinning it, it is likely that the punch pin is trailing as the link approaches the chainwheel when pedaling forward. 4.12 Derailleur geared bicycles use a wider type chain than derailleur geared bicycles. To remove, fit the rivet tool so that the freewheel will also have...
...or 3-speed hub geared bicycles: 1. Take the chain off of this manual and you hear a grinding noise or the freewheel stops suddenly after any one of the U-shaped plate is centered over any adjustment. Such action is beyond the scope of the master link with a screwdriver. Center the wheel ... the axle nuts after spinning it, it is likely that the punch pin is trailing as the link approaches the chainwheel when pedaling forward. 4.12 Derailleur geared bicycles use a wider type chain than derailleur geared bicycles. To remove, fit the rivet tool so that the freewheel will also have...