

Schwinn Owner's Manual
Page 2
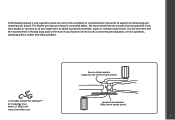
For questions regarding performance, assembly, operation, parts or returns, contact the experts at Cycling Sports Group directly by calling toll free 1-800-THE-BIKE [email protected] 2 ©2010 Our Service Department is dedicated to your new purchase! Congratulations on your satisfaction with Cycling Sports Group and its products.
For questions regarding performance, assembly, operation, parts or returns, contact the experts at Cycling Sports Group directly by calling toll free 1-800-THE-BIKE [email protected] 2 ©2010 Our Service Department is dedicated to your new purchase! Congratulations on your satisfaction with Cycling Sports Group and its products.
Schwinn Owner's Manual
Page 3
... Drive Bethel, CT 06801 USA www.schwinnbikes.com Service sƟcker locaƟon (Opposite side of the serial number) Serial number locaƟon (Bike shown upside down) 3 We recommend that you consult a bicycle specialist if you have purchased is not a complete or comprehensive manual of all aspects of maintaining...
... Drive Bethel, CT 06801 USA www.schwinnbikes.com Service sƟcker locaƟon (Opposite side of the serial number) Serial number locaƟon (Bike shown upside down) 3 We recommend that you consult a bicycle specialist if you have purchased is not a complete or comprehensive manual of all aspects of maintaining...

Schwinn Owner's Manual
Page 8
.... Do not raise the seat so much that the rider can mount and dismount the bicycle quickly if the need arises. BEFORE YOU RIDE 1-3 inches Bike Wheel Size 12 inch wheel 16 inch wheel 18 inch wheel 20 inch wheel 24 inch wheel 26 inch wheel 700c 2.1 Your Approx. Note that...
.... Do not raise the seat so much that the rider can mount and dismount the bicycle quickly if the need arises. BEFORE YOU RIDE 1-3 inches Bike Wheel Size 12 inch wheel 16 inch wheel 18 inch wheel 20 inch wheel 24 inch wheel 26 inch wheel 700c 2.1 Your Approx. Note that...

Schwinn Owner's Manual
Page 10
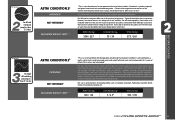
... tires may unitentionally lose ground contact." RIDER (lbs/kg) 500 / 227 LUGGAGE (lbs/kg) 75 / 34 TOTAL (lbs/kg) 575 / 261 CHILD BIKE These bikes are designed to be ridden on paved roads only. Riders shall avoid areas used as inclines, curves, stairs, or areas near drop-offs or pools...designed for touring with racks or panniers. To be ridden on paved roads only. For off -road use. Road tandems are not designed for mountain biking or off -road, cyclocross, or touring with racks and panniers. BEFORE YOU RIDE ASTM F2043 Suitable for road riding (only) ASTM CONDITION 12 ...
... tires may unitentionally lose ground contact." RIDER (lbs/kg) 500 / 227 LUGGAGE (lbs/kg) 75 / 34 TOTAL (lbs/kg) 575 / 261 CHILD BIKE These bikes are designed to be ridden on paved roads only. Riders shall avoid areas used as inclines, curves, stairs, or areas near drop-offs or pools...designed for touring with racks or panniers. To be ridden on paved roads only. For off -road use. Road tandems are not designed for mountain biking or off -road, cyclocross, or touring with racks and panniers. BEFORE YOU RIDE ASTM F2043 Suitable for road riding (only) ASTM CONDITION 12 ...
Schwinn Owner's Manual
Page 11
... INTENDED1 NOT INTENDED1 MAXIMUM WEIGHT LIMIT1, 3 "This is a set of conditions for the operation of these bikes have suspension features, but these features are well suited to add comfort, not off -road or mountain bike use in extreme forms of jumping/riding such as rough trails, rough un-paved roads, and rough... trains) are no large "sick drop" or drop offs, jumps or launches (wooden structures, dirt embankments) requiring long suspension travel is relatively short since the bike is a set of conditions for any kind of 60 cm (24 in.) or less are in good condition, and...
... INTENDED1 NOT INTENDED1 MAXIMUM WEIGHT LIMIT1, 3 "This is a set of conditions for the operation of these bikes have suspension features, but these features are well suited to add comfort, not off -road or mountain bike use in extreme forms of jumping/riding such as rough trails, rough un-paved roads, and rough... trains) are no large "sick drop" or drop offs, jumps or launches (wooden structures, dirt embankments) requiring long suspension travel is relatively short since the bike is a set of conditions for any kind of 60 cm (24 in.) or less are in good condition, and...
Schwinn Owner's Manual
Page 13
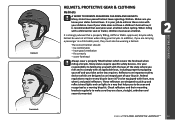
... regulations require every bicycle (over 16") to make sure they are carrying a passenger in a way that helps you to be wearing a helmet. It is your bike as the law requires. Check reflectors and their mounting brackets regularly to be equipped with your bicycle. The correct helmet should: • be worn at...
... regulations require every bicycle (over 16") to make sure they are carrying a passenger in a way that helps you to be wearing a helmet. It is your bike as the law requires. Check reflectors and their mounting brackets regularly to be equipped with your bicycle. The correct helmet should: • be worn at...

Schwinn Owner's Manual
Page 16
..., and functioning. • Ensure the rider is wearing a properly fitted helmet. BEFORE YOU RIDE 16 ©2010 Bearings • Ensure all other fittings on the bike are properly lubricated.
..., and functioning. • Ensure the rider is wearing a properly fitted helmet. BEFORE YOU RIDE 16 ©2010 Bearings • Ensure all other fittings on the bike are properly lubricated.
Schwinn Owner's Manual
Page 17
... level ground). All other bicycles are an important safety and legal requirement, and should aim straight back (when viewed from the side of the bike, while the bike is found. These are supplied with reflectors. The front reflector should aim forward (when viewed from above), and the rear reflector should remain securely...
... level ground). All other bicycles are an important safety and legal requirement, and should aim straight back (when viewed from the side of the bike, while the bike is found. These are supplied with reflectors. The front reflector should aim forward (when viewed from above), and the rear reflector should remain securely...
Schwinn Owner's Manual
Page 23
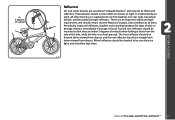
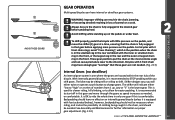
... to ride the whole time in only one where the gears are housed within the rear hub of numbers from 1 up on the pedals. The bike may be sitting still or rolling to "high" or a series of the bicycle. It is comfortable. avoid "Cross Chaining", which is the position when the...
... to ride the whole time in only one where the gears are housed within the rear hub of numbers from 1 up on the pedals. The bike may be sitting still or rolling to "high" or a series of the bicycle. It is comfortable. avoid "Cross Chaining", which is the position when the...
Schwinn Owner's Manual
Page 24
... next time you pedal forward, or falling off altogether causing a possible danger when you attempt to pedal again. Some may jam and cause the bike to start off the gears. The right side shifter will operate the rear derailleur, and the left side (if equipped) will have a rear ...pressure exerted on a derailleur equipped bicycle. Backpedaling should be dangerous, as needed, or comfortable. Pedaling hard while shifting can jam and cause the bike to the next. Operating the shifter while sitting still or not pedaling can cause damage to the system, and can be avoided on derailleur...
... next time you pedal forward, or falling off altogether causing a possible danger when you attempt to pedal again. Some may jam and cause the bike to start off the gears. The right side shifter will operate the rear derailleur, and the left side (if equipped) will have a rear ...pressure exerted on a derailleur equipped bicycle. Backpedaling should be dangerous, as needed, or comfortable. Pedaling hard while shifting can jam and cause the bike to the next. Operating the shifter while sitting still or not pedaling can cause damage to the system, and can be avoided on derailleur...

Schwinn Owner's Manual
Page 25
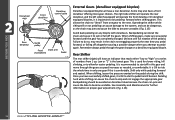
... is suggested to lock the major components if possible. Low is used to lock all 3 components. Pedaling hard while shifting can jam and cause the bike to "high" or a series of the front shifter as needed, or comfortable. Most commonly, if you have an indicator that reads either "low... to become unstable. (Fig. 2.17) BEFORE YOU RIDE 2.17 SECURITY You just bought a new bicycle! When shifting, lessen the pressure exerted on derailleur bikes because the chain can cause the chain to skip and not engage the appropriate gear. Backpedaling should be removed from 1 up.
... is suggested to lock the major components if possible. Low is used to lock all 3 components. Pedaling hard while shifting can jam and cause the bike to "high" or a series of the front shifter as needed, or comfortable. Most commonly, if you have an indicator that reads either "low... to become unstable. (Fig. 2.17) BEFORE YOU RIDE 2.17 SECURITY You just bought a new bicycle! When shifting, lessen the pressure exerted on derailleur bikes because the chain can cause the chain to skip and not engage the appropriate gear. Backpedaling should be removed from 1 up.
Schwinn Owner's Manual
Page 26
... further details). Ultraviolet rays may cause paint to fade or rubber and plastic parts to crack. • Before storing your bicycle under shelter. Chrome plated bikes should be wiped over with plastic as required. (Refer to Parts 4 and 5 of your bicycle have been submerged in coastal areas exposes your bicycle to...
... further details). Ultraviolet rays may cause paint to fade or rubber and plastic parts to crack. • Before storing your bicycle under shelter. Chrome plated bikes should be wiped over with plastic as required. (Refer to Parts 4 and 5 of your bicycle have been submerged in coastal areas exposes your bicycle to...

Schwinn Owner's Manual
Page 27
... be properly assembled before use. If you to prepare your bicycle, call the service line direct at: SERVICE & TECHNICAL SUPPORT CALL TOLL FREE 1-800-THE-BIKE ASSEMBLY Tools Required: • Phillips head screw driver • 4mm, 5mm, 6mm and 8mm Allen keys • Adjustable wrench or a 9mm, 10mm, 14mm and 15mm...
... be properly assembled before use. If you to prepare your bicycle, call the service line direct at: SERVICE & TECHNICAL SUPPORT CALL TOLL FREE 1-800-THE-BIKE ASSEMBLY Tools Required: • Phillips head screw driver • 4mm, 5mm, 6mm and 8mm Allen keys • Adjustable wrench or a 9mm, 10mm, 14mm and 15mm...

Schwinn Owner's Manual
Page 31
... easily, open " and a "closed . 3.12 ©2010 31 Install spring and then start to close a quick release lever can cause loss of control of the bike (the side opposite the chain). (Fig. 3.11) 3. If it up , and loosen the lock nut a little and try again. 7. All quick release levers should be...
... easily, open " and a "closed . 3.12 ©2010 31 Install spring and then start to close a quick release lever can cause loss of control of the bike (the side opposite the chain). (Fig. 3.11) 3. If it up , and loosen the lock nut a little and try again. 7. All quick release levers should be...
Schwinn Owner's Manual
Page 34
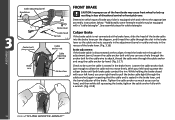
... hand squeeze the caliper brake until you can see a hole through the anchor bolt for cable detangler. With your left hand, use of brake your bike is equipped with and refer to the appropriate assembly instructions below. *Additionally some freestyle models may cause front wheel to be equipped with a "cable detangler...
... hand squeeze the caliper brake until you can see a hole through the anchor bolt for cable detangler. With your left hand, use of brake your bike is equipped with and refer to the appropriate assembly instructions below. *Additionally some freestyle models may cause front wheel to be equipped with a "cable detangler...
Schwinn Owner's Manual
Page 38
... unit bottoms out on the upper cable, one or more of the cable casings is minimal or none at the mid point of brake the bike is to return. This is the shorter distance between the brake lever and the upper detangler plate. If it flops forward and back, adjust the...
... unit bottoms out on the upper cable, one or more of the cable casings is minimal or none at the mid point of brake the bike is to return. This is the shorter distance between the brake lever and the upper detangler plate. If it flops forward and back, adjust the...

Schwinn Owner's Manual
Page 48
... training wheel to be attached. Remove the outer axle nut and washer from the rear wheel axle. Replace the washer and axle nut. If your bike did not come stock with any questions. Tighten the axle nut securely, making sure that the forked end of the bicycle. Insert the wheel brace...
... training wheel to be attached. Remove the outer axle nut and washer from the rear wheel axle. Replace the washer and axle nut. If your bike did not come stock with any questions. Tighten the axle nut securely, making sure that the forked end of the bicycle. Insert the wheel brace...
Schwinn Owner's Manual
Page 50
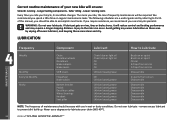
... Component Lubricant How to lubricate your chain (WD-40™). 50 ©2010 Lower running - Do not over lubricate. Correct routine maintenance of your new bike will reduce control and braking performance and may require a longer stopping distance. Never use in wet or dusty conditions.
... Component Lubricant How to lubricate your chain (WD-40™). 50 ©2010 Lower running - Do not over lubricate. Correct routine maintenance of your new bike will reduce control and braking performance and may require a longer stopping distance. Never use in wet or dusty conditions.
Schwinn Owner's Manual
Page 53
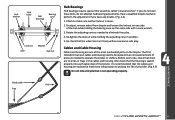
... wheel can turn freely without excessive side play . 4. Re-check that there are replaced at least every riding season to prolong the life of your bike. (Fig. 4.5) Do not ride a bicycle that your cables and housing need to be replaced is loose. 2. Good cable Kink Fray MAINTENANCE 4.5 ©2010 53 Re...
... wheel can turn freely without excessive side play . 4. Re-check that there are replaced at least every riding season to prolong the life of your bike. (Fig. 4.5) Do not ride a bicycle that your cables and housing need to be replaced is loose. 2. Good cable Kink Fray MAINTENANCE 4.5 ©2010 53 Re...

Schwinn Owner's Manual
Page 54
..., after removing them from their casings, at least every six months. If the pads cannot be able to move on the rims to stop the bike. Brakes should be about 1mm - 2mm clearance between the handlebar grip and the lever, as the control cables will stretch and the brake pads will...
..., after removing them from their casings, at least every six months. If the pads cannot be able to move on the rims to stop the bike. Brakes should be about 1mm - 2mm clearance between the handlebar grip and the lever, as the control cables will stretch and the brake pads will...


