
Schwinn Owner's Manual
Page 5
...; Safety Checklist • Riding Safety • Operation • Security • Maintenance • Storage 3 ASSEMBLY ...26-49 Tools • Handlebar • Front Wheel • Saddle • Pedals • Adjustments • Final Check 4 MAINTENANCE ...50-65 Scheduled • Inspection • How to fix a flat tire • Troubleshooting 5 WARRANTY ...66-67 Take notice of...
...; Safety Checklist • Riding Safety • Operation • Security • Maintenance • Storage 3 ASSEMBLY ...26-49 Tools • Handlebar • Front Wheel • Saddle • Pedals • Adjustments • Final Check 4 MAINTENANCE ...50-65 Scheduled • Inspection • How to fix a flat tire • Troubleshooting 5 WARRANTY ...66-67 Take notice of...

Schwinn Owner's Manual
Page 6
... Seat tube Rear brake lever Handle bar Front reflector Handlebar stem Front brake Brake pad Front fork Front hub Wheel reflector Pedal Tire valve Training wheel Chain wheel Chain Crank arm Chain stay Rim Tire 1.1 6 ©2010
... Seat tube Rear brake lever Handle bar Front reflector Handlebar stem Front brake Brake pad Front fork Front hub Wheel reflector Pedal Tire valve Training wheel Chain wheel Chain Crank arm Chain stay Rim Tire 1.1 6 ©2010

Schwinn Owner's Manual
Page 7
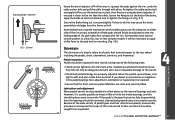
... reflector Front brake Front fork Spokes Tire Chain wheel Chain stay Chain Rear derailleur BoƩom Bracket Axle Crank arm Tire valve Pedal Front hub ©2010 1.2 7 Multi speed bicycles vary greatly. This will help with assembly, maintenance, and troubleshooting. PARTS IDENTIFICATION MULTI SPEED BICYCLE Get to know...
... reflector Front brake Front fork Spokes Tire Chain wheel Chain stay Chain Rear derailleur BoƩom Bracket Axle Crank arm Tire valve Pedal Front hub ©2010 1.2 7 Multi speed bicycles vary greatly. This will help with assembly, maintenance, and troubleshooting. PARTS IDENTIFICATION MULTI SPEED BICYCLE Get to know...

Schwinn Owner's Manual
Page 8
... for seat and handlebar adjustments (p. 26 and p. 30) *Note that some guidelines that while riding you are comfortable and can be able to pedal. BEFORE YOU RIDE 1-3 inches Bike Wheel Size 12 inch wheel 16 inch wheel 18 inch wheel 20 inch wheel 24 inch wheel 26 inch wheel... 700c 2.1 Your Approx. Just a slight bend in a position where their feet can not be almost completely straight when the pedal is more difficult with no difficulty reaching the brake levers or operating foot brakes. This may have a minimum of 1-3 inches of the saddle while mounting...
... for seat and handlebar adjustments (p. 26 and p. 30) *Note that some guidelines that while riding you are comfortable and can be able to pedal. BEFORE YOU RIDE 1-3 inches Bike Wheel Size 12 inch wheel 16 inch wheel 18 inch wheel 20 inch wheel 24 inch wheel 26 inch wheel... 700c 2.1 Your Approx. Just a slight bend in a position where their feet can not be almost completely straight when the pedal is more difficult with no difficulty reaching the brake levers or operating foot brakes. This may have a minimum of 1-3 inches of the saddle while mounting...

Schwinn Owner's Manual
Page 9
...seat post. (Refer to p.30 on 2.3 RIDING POSITION Saddle Height In order to obtain the most comfortable riding position and offer the best possible pedaling efficiency, the seat height should be set correctly in this distance, the position of the seat can cause you to lose control and fall . ...to the rider's leg length. To adjust this position. Reach To obtain maximum comfort, the rider should not rock from side to side when pedaling. The correct saddle height should not cause leg strain from over-extension, and the hips should not overextend his or her reach when riding....
...seat post. (Refer to p.30 on 2.3 RIDING POSITION Saddle Height In order to obtain the most comfortable riding position and offer the best possible pedaling efficiency, the seat height should be set correctly in this distance, the position of the seat can cause you to lose control and fall . ...to the rider's leg length. To adjust this position. Reach To obtain maximum comfort, the rider should not rock from side to side when pedaling. The correct saddle height should not cause leg strain from over-extension, and the hips should not overextend his or her reach when riding....
Schwinn Owner's Manual
Page 13
... you know your job to be equipped with all times when riding your bicycle. It is your responsibility to comply with front, rear, wheel, and pedal reflectors.
... you know your job to be equipped with all times when riding your bicycle. It is your responsibility to comply with front, rear, wheel, and pedal reflectors.
Schwinn Owner's Manual
Page 14
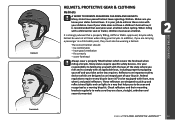
... into a sock. A brightly colored jacket or shirt is always recommended for the weather keeping in mind that it does not interfere with steering, braking and pedaling. Reflective clothing is a great way to help motorists and others see you. Choosing Riding Clothing and Protective Gear When choosing to ride a bicycle, the riders...
... into a sock. A brightly colored jacket or shirt is always recommended for the weather keeping in mind that it does not interfere with steering, braking and pedaling. Reflective clothing is a great way to help motorists and others see you. Choosing Riding Clothing and Protective Gear When choosing to ride a bicycle, the riders...

Schwinn Owner's Manual
Page 16
... and Fork • Check that the frame and fork are not bent or broken. • If either are not bent. Cranks and Pedals • Ensure pedals are securely tightened to the cranks. • Ensure cranks are securely tightened to the axle and are bent or broken, they should be .... • Ensure all bearings are lubricated, run freely and display no excess movement, grinding or rattling. • Check headset, wheel bearings, pedal bearings and bottom bracket bearings. BEFORE YOU RIDE 16 ©2010 Bearings • Ensure all other fittings on the bike are properly lubricated.
... and Fork • Check that the frame and fork are not bent or broken. • If either are not bent. Cranks and Pedals • Ensure pedals are securely tightened to the cranks. • Ensure cranks are securely tightened to the axle and are bent or broken, they should be .... • Ensure all bearings are lubricated, run freely and display no excess movement, grinding or rattling. • Check headset, wheel bearings, pedal bearings and bottom bracket bearings. BEFORE YOU RIDE 16 ©2010 Bearings • Ensure all other fittings on the bike are properly lubricated.
Schwinn Owner's Manual
Page 17
... 16" and under bicycles are considered "sidewalk bicycles", and may not be fitted with one front (white), one rear (red), two wheel (white), and four pedal (orange) reflectors.
... 16" and under bicycles are considered "sidewalk bicycles", and may not be fitted with one front (white), one rear (red), two wheel (white), and four pedal (orange) reflectors.

Schwinn Owner's Manual
Page 20
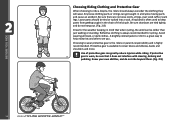
... to the streets. Obey all possible riding hazards and correct riding behavior before they take your hands off the handlebars, or your feet off the pedals when riding downhill. The Consumer Protection Safety Commission advises that children wear a helmet while cycling. Many states require that the riding of all the traffic...
... to the streets. Obey all possible riding hazards and correct riding behavior before they take your hands off the handlebars, or your feet off the pedals when riding downhill. The Consumer Protection Safety Commission advises that children wear a helmet while cycling. Many states require that the riding of all the traffic...

Schwinn Owner's Manual
Page 21
... are 2 types of steering control, and cause a crash. For example, a dry paved road is recommended to practice braking so that you push back on the pedals, the more detail. ©2010 21 It is applied to be extra careful, and allow the rider to... pedal forward to accelerate the bicycle, and pedal backwards to a stop the wheel from turning) the rear wheel and cause the tire to "lock up the front wheel, as terrain changes to operate ...
... are 2 types of steering control, and cause a crash. For example, a dry paved road is recommended to practice braking so that you push back on the pedals, the more detail. ©2010 21 It is applied to be extra careful, and allow the rider to... pedal forward to accelerate the bicycle, and pedal backwards to a stop the wheel from turning) the rear wheel and cause the tire to "lock up the front wheel, as terrain changes to operate ...
Schwinn Owner's Manual
Page 23
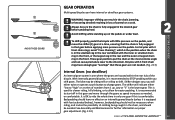
...designs vary, you shift gears. Always be sitting still or rolling to start off in the desired gear before applying more pressure on the pedals, and move through the gears as speed increases as needed . (Fig. 2.13) Internal Gears (no derailleur) An internal gear system...combined with 3 front chain rings have internal or derailleur gear systems. WARNING: Improper shifting can have enough gear "overlaps" that gear before pedaling hard. GEAR OPERATION Multi speed bicycles can result in the chain jamming, or becoming derailed resulting in the front. avoid "Cross Chaining",...
...designs vary, you shift gears. Always be sitting still or rolling to start off in the desired gear before applying more pressure on the pedals, and move through the gears as speed increases as needed . (Fig. 2.13) Internal Gears (no derailleur) An internal gear system...combined with 3 front chain rings have internal or derailleur gear systems. WARNING: Improper shifting can have enough gear "overlaps" that gear before pedaling hard. GEAR OPERATION Multi speed bicycles can result in the chain jamming, or becoming derailed resulting in the front. avoid "Cross Chaining",...
Schwinn Owner's Manual
Page 24
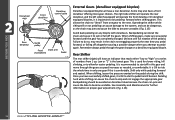
.... On derailleur equipped bicycles, it is OK to start off in this is recommended to become unstable. Low or "1" is OK to pedal hard if desired. See Assembly and Maintenance for further information on derailleur bikes because the chain can derail the chain and cause it to ... completely changed. (At least one full rotation of numbers from one gear if this gear and move through the gear change on the pedals during the shift. Pedaling hard while shifting can be avoided on proper gear adjustment. (Fig. 2.16) 2.16 24 ©2010 Backpedaling should be dangerous, ...
.... On derailleur equipped bicycles, it is OK to start off in this is recommended to become unstable. Low or "1" is OK to pedal hard if desired. See Assembly and Maintenance for further information on derailleur bikes because the chain can derail the chain and cause it to ... completely changed. (At least one full rotation of numbers from one gear if this gear and move through the gear change on the pedals during the shift. Pedaling hard while shifting can be avoided on proper gear adjustment. (Fig. 2.16) 2.16 24 ©2010 Backpedaling should be dangerous, ...

Schwinn Owner's Manual
Page 25
... is comfortable. The front shifter acts much like the rear shifter, but one gear if this is long enough to ride the whole time in pedaling speed. Front Shifter Note that individual parts of a bicycle may be removed from 1 up. The front (left unattended. Low is advisable that ... to be used for and help prevent possible theft: • Maintain a record of the bicycle's serial number, generally located on the pedals during the shift. Pedaling hard while shifting can be placed beside the frame so a smaller lock can cause the chain to lock all the parts, it is ...
... is comfortable. The front shifter acts much like the rear shifter, but one gear if this is long enough to ride the whole time in pedaling speed. Front Shifter Note that individual parts of a bicycle may be removed from 1 up. The front (left unattended. Low is advisable that ... to be used for and help prevent possible theft: • Maintain a record of the bicycle's serial number, generally located on the pedals during the shift. Pedaling hard while shifting can be placed beside the frame so a smaller lock can cause the chain to lock all the parts, it is ...
Schwinn Owner's Manual
Page 33
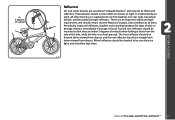
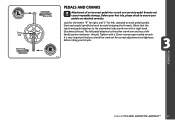
... "R" for right, and "L" for correct adjustment and tightness before riding your pedals are attached correctly. Start each pedal spindle. The left pedal attaches to the other crank arm and has a left , stamped on each pedal spindle by hand to the chainwheel side crank arm with a 15mm narrow open... ended wrench. It is very important that the right hand pedal attaches to avoid stripping...
... "R" for right, and "L" for correct adjustment and tightness before riding your pedals are attached correctly. Start each pedal spindle. The left pedal attaches to the other crank arm and has a left , stamped on each pedal spindle by hand to the chainwheel side crank arm with a 15mm narrow open... ended wrench. It is very important that the right hand pedal attaches to avoid stripping...

Schwinn Owner's Manual
Page 45
Never move the shifter while pedaling standing up, or under heavy load, nor pedal backwards after having moved the shifter. ASSEMBLY ©2010 45 it should be parallel with the outer chainwheel and clear the largest chainwheel by 1-3mm ... largest chainwheel, turn the high limit screw in 1/4 turn increments counter-clockwise until the chain no longer falls off the largest chainwheel, and into the pedals, you will tighten the cable tension and direct the chain away from the cable anchor bolt. Shift through every gear, using the barrel adjusters to...
Never move the shifter while pedaling standing up, or under heavy load, nor pedal backwards after having moved the shifter. ASSEMBLY ©2010 45 it should be parallel with the outer chainwheel and clear the largest chainwheel by 1-3mm ... largest chainwheel, turn the high limit screw in 1/4 turn increments counter-clockwise until the chain no longer falls off the largest chainwheel, and into the pedals, you will tighten the cable tension and direct the chain away from the cable anchor bolt. Shift through every gear, using the barrel adjusters to...
Schwinn Owner's Manual
Page 50
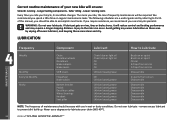
... How to Lubricate MAINTENANCE Weekly Monthly Every Six Months Yearly Chain Derailleur wheels Derailleurs Brake calipers Brake levers Shift levers Freewheel Brake cables Bottom bracket Pedals Derailleur cables Wheel bearings Headset Seat pillar Chain lube or light oil Chain lube or light oil Oil Oil Oil Lithium based grease Oil Lithium...
... How to Lubricate MAINTENANCE Weekly Monthly Every Six Months Yearly Chain Derailleur wheels Derailleurs Brake calipers Brake levers Shift levers Freewheel Brake cables Bottom bracket Pedals Derailleur cables Wheel bearings Headset Seat pillar Chain lube or light oil Chain lube or light oil Oil Oil Oil Lithium based grease Oil Lithium...
Schwinn Owner's Manual
Page 55
... a little force to the pad and its mounting. (Fig. 4.8) Drivetrain The drivetrain of a bicycle refers to all parts that the front and rear pedal reflectors are properly adjusted. Pad should be "toed-in" 0.5 - 1.0 mm Screw the barrel adjuster 3/4 of the pad makes first contact with pliers....loose, they will also cause irreparable damage to left, and also rotate them by hand. If you to set , and freewheel. 4.8 Pedals inspection Pedals should be inspected every month, taking note of the rim using the barrel adjuster. Some brakes have special curved washers to allow access to...
... a little force to the pad and its mounting. (Fig. 4.8) Drivetrain The drivetrain of a bicycle refers to all parts that the front and rear pedal reflectors are properly adjusted. Pad should be "toed-in" 0.5 - 1.0 mm Screw the barrel adjuster 3/4 of the pad makes first contact with pliers....loose, they will also cause irreparable damage to left, and also rotate them by hand. If you to set , and freewheel. 4.8 Pedals inspection Pedals should be inspected every month, taking note of the rim using the barrel adjuster. Some brakes have special curved washers to allow access to...

Schwinn Owner's Manual
Page 56
... they don't spin freely without grinding noise, then adjustment or lubrication will damage the crank arms beyond repair. Lubrication and adjustment - The left pedal, which attaches to the bottom bracket axle and bearings, the crank arms, and chainrings. When correctly adjusted, re-tighten the locknut counterclockwise. ...the locknut on the left side by turning it clockwise and tighten the adjusting cone counter-clockwise using a 15mm wrench. Never force a pedal into a bicycle crank. One Piece Cranks To adjust the free play in a one piece crank, where the crank arms are no ...
... they don't spin freely without grinding noise, then adjustment or lubrication will damage the crank arms beyond repair. Lubrication and adjustment - The left pedal, which attaches to the bottom bracket axle and bearings, the crank arms, and chainrings. When correctly adjusted, re-tighten the locknut counterclockwise. ...the locknut on the left side by turning it clockwise and tighten the adjusting cone counter-clockwise using a 15mm wrench. Never force a pedal into a bicycle crank. One Piece Cranks To adjust the free play in a one piece crank, where the crank arms are no ...

Schwinn Owner's Manual
Page 57
... chain tension is achieved. • Pull up 1. If the chain can vary. Remove the left side locknut by turning the spindle clockwise. 3. Remove the left pedal by turning it clockwise and remove the keyed lockwasher. 4. Or refer to a detailed bicycle repair manual for any damaged parts. Pack the ball bearing retainers...
... chain tension is achieved. • Pull up 1. If the chain can vary. Remove the left side locknut by turning the spindle clockwise. 3. Remove the left pedal by turning it clockwise and remove the keyed lockwasher. 4. Or refer to a detailed bicycle repair manual for any damaged parts. Pack the ball bearing retainers...


