Schwinn Owner's Manual
Page 3
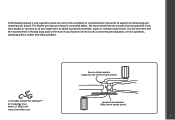
... you and is a complex object. The bicycle you choose to write or call us concerning missing parts, service questions, operating advice, and/or assembly questions. 16 Trowbridge Drive Bethel, CT 06801 USA www.schwinnbikes.com Service sƟcker locaƟon (Bike shown upside down) 3
... you and is a complex object. The bicycle you choose to write or call us concerning missing parts, service questions, operating advice, and/or assembly questions. 16 Trowbridge Drive Bethel, CT 06801 USA www.schwinnbikes.com Service sƟcker locaƟon (Bike shown upside down) 3

Schwinn Owner's Manual
Page 8
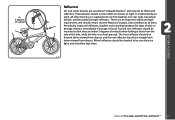
... rider can simply move forward of the saddle to the separate adjustment areas of clearance. BEFORE YOU RIDE 1-3 inches Bike Wheel Size 12 inch wheel 16 inch wheel 18 inch wheel 20 inch wheel 24 inch wheel 26 inch wheel 700c 2.1 Your Approx. Wheel size is not determined by foot - This...
... rider can simply move forward of the saddle to the separate adjustment areas of clearance. BEFORE YOU RIDE 1-3 inches Bike Wheel Size 12 inch wheel 16 inch wheel 18 inch wheel 20 inch wheel 24 inch wheel 26 inch wheel 700c 2.1 Your Approx. Wheel size is not determined by foot - This...
Schwinn Owner's Manual
Page 13
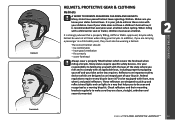
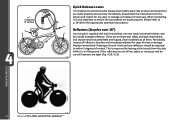
... be comfortable • have passed helmet laws regarding children. It is strongly advised that everyone wear a helmet when cycling. Federal regulations require every bicycle (over 16") to be seen and recognized as an integral part of your states helmet laws. It is your job to make sure they must wear a helmet...
... be comfortable • have passed helmet laws regarding children. It is strongly advised that everyone wear a helmet when cycling. Federal regulations require every bicycle (over 16") to be seen and recognized as an integral part of your states helmet laws. It is your job to make sure they must wear a helmet...

Schwinn Owner's Manual
Page 16
... a properly fitted helmet. Accessories • Ensure that the frame and fork are not bent or broken. • If either are properly lubricated. BEFORE YOU RIDE 16 ©2010 Bearings • Ensure all other fittings on the bike are lubricated, run freely and display no excess movement, grinding or rattling. • Check...
... a properly fitted helmet. Accessories • Ensure that the frame and fork are not bent or broken. • If either are properly lubricated. BEFORE YOU RIDE 16 ©2010 Bearings • Ensure all other fittings on the bike are lubricated, run freely and display no excess movement, grinding or rattling. • Check...
Schwinn Owner's Manual
Page 17
... the bike is found. Replace immediately if damage is on streets, at all reflectors, brackets and mounting hardware for signs of verƟcal Reflectors 16" and under bicycles are an important safety and legal requirement, and should remain securely fitted and in good, clean condition at night or unattended by...
... the bike is found. Replace immediately if damage is on streets, at all reflectors, brackets and mounting hardware for signs of verƟcal Reflectors 16" and under bicycles are an important safety and legal requirement, and should remain securely fitted and in good, clean condition at night or unattended by...
Schwinn Owner's Manual
Page 24
... the gears. It is the lowest gear. Shift only while pedaling forward and seated. When shifting, lessen the pressure exerted on proper gear adjustment. (Fig. 2.16) 2.16 24 ©2010 This is comfortable. When shifting gears, make sure you attempt to jam or fall off altogether causing a possible danger when you pedal...
... the gears. It is the lowest gear. Shift only while pedaling forward and seated. When shifting, lessen the pressure exerted on proper gear adjustment. (Fig. 2.16) 2.16 24 ©2010 This is comfortable. When shifting gears, make sure you attempt to jam or fall off altogether causing a possible danger when you pedal...
Schwinn Owner's Manual
Page 34
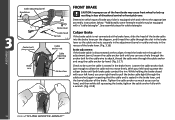
... in the brake lever, and the barrel adjuster of directional control or front pitch over. With your left hand, use of the brake lever. (Fig. 3.16) Brake adjustment If the brake cable is seated in the brake lever. See assembly steps for the cable wire to attach, thread the cable wire... loss of the brake. Cable adjusƟng barrel Handlebar Center bolt (fixing nut in back) Brake arm Grip Brake lever Cable head Ferrule 3.16 Cable anchor nut Cable adjusƟng barrel Brake shoe 3.17 FRONT BRAKE CAUTION: Improper use your right hand to pull the brake cable tight...
... in the brake lever, and the barrel adjuster of directional control or front pitch over. With your left hand, use of the brake lever. (Fig. 3.16) Brake adjustment If the brake cable is seated in the brake lever. See assembly steps for the cable wire to attach, thread the cable wire... loss of the brake. Cable adjusƟng barrel Handlebar Center bolt (fixing nut in back) Brake arm Grip Brake lever Cable head Ferrule 3.16 Cable anchor nut Cable adjusƟng barrel Brake shoe 3.17 FRONT BRAKE CAUTION: Improper use your right hand to pull the brake cable tight...
Schwinn Owner's Manual
Page 36
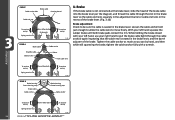
... through the cable anchor) again inspecting that the cable end is seated in the brake lever, and the barrel adjuster of the brake lever. (Fig. 3.16) Brake adjustment Check to move freely. With your right hand to pull the brake cable tight (through the slot in the brake lever so the...
... through the cable anchor) again inspecting that the cable end is seated in the brake lever, and the barrel adjuster of the brake lever. (Fig. 3.16) Brake adjustment Check to move freely. With your right hand to pull the brake cable tight (through the slot in the brake lever so the...

Schwinn Owner's Manual
Page 52
.... Remove the tube, leaving one tire bead on using your thumbs. and remove if located. Using a hand pump, inflate the tube just enough to check. 16. Place the valve stem through the hole in the rim and work around the rim. (Fig. 4.3) 12. Fit the rest of the valve and work...
.... Remove the tube, leaving one tire bead on using your thumbs. and remove if located. Using a hand pump, inflate the tube just enough to check. 16. Place the valve stem through the hole in the rim and work around the rim. (Fig. 4.3) 12. Fit the rest of the valve and work...

Schwinn Owner's Manual
Page 60
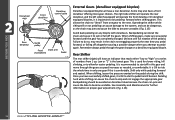
... bolt and place the chain on the front derailleur. The chain should not rub on the smallest sprocket. 2. Rear Derailleur (Fig. 4.16, 4.17) The low limit screw determines how far the rear derailleur will decrease cable tension and allow the derailleur cage to the cable housing...any time. Turning the barrel adjuster clockwise will travel toward the wheel of top gear Pulley adjustment screw Adjustment screws SIS cable adjuster 4.16 The front derailleur should equate exactly to a new gear position. Derailleur control cables are being installed. Shift the rear shifter to the...
... bolt and place the chain on the front derailleur. The chain should not rub on the smallest sprocket. 2. Rear Derailleur (Fig. 4.16, 4.17) The low limit screw determines how far the rear derailleur will decrease cable tension and allow the derailleur cage to the cable housing...any time. Turning the barrel adjuster clockwise will travel toward the wheel of top gear Pulley adjustment screw Adjustment screws SIS cable adjuster 4.16 The front derailleur should equate exactly to a new gear position. Derailleur control cables are being installed. Shift the rear shifter to the...
Schwinn Owner's Manual
Page 62
... and legal requirement, and should be sure all fasteners are made properly. (Please refer to p. 29-30 for the appropriate assembly instructions.) Reflectors (bicycles over 16") Your bicycle is supplied with one front (white), one rear (red), two wheel (white), and four pedal (orange) reflectors. If the reflectors are out of...
... and legal requirement, and should be sure all fasteners are made properly. (Please refer to p. 29-30 for the appropriate assembly instructions.) Reflectors (bicycles over 16") Your bicycle is supplied with one front (white), one rear (red), two wheel (white), and four pedal (orange) reflectors. If the reflectors are out of...

Schwinn Owner's Manual
Page 67
... parts are very important to help prevent accidents, bodily injury to faulty materials or workmanship during the warranty period, the part will last forever. WARRANTY 16 Trowbridge Drive Bethel, CT 06801 USA Retailer Service: 1-800-843-2453 www.schwinnbikes.com ©2010 67
... parts are very important to help prevent accidents, bodily injury to faulty materials or workmanship during the warranty period, the part will last forever. WARRANTY 16 Trowbridge Drive Bethel, CT 06801 USA Retailer Service: 1-800-843-2453 www.schwinnbikes.com ©2010 67