
Assembly and Owner's Manual
Page 2
...®, BOWFLEX®, SCHWINN® and UNIVERSAL® and respective logos. Assembly 3 Important Safety Instructions - Other trademarks are the property of Contents Important Safety Instructions - Table of their respective owners. Patent Information This product may be covered by US and Foreign Patents and Patents Pending. 2 Para obtener este manual en Españ...
...®, BOWFLEX®, SCHWINN® and UNIVERSAL® and respective logos. Assembly 3 Important Safety Instructions - Other trademarks are the property of Contents Important Safety Instructions - Table of their respective owners. Patent Information This product may be covered by US and Foreign Patents and Patents Pending. 2 Para obtener este manual en Españ...

Assembly and Owner's Manual
Page 3
...not use only genuine Nautilus® replacement parts and hardware. Keep the Owner's and Assembly Manuals for correct performance in accordance with the Owner's Manual. • Read and understand the complete Owner's Manual supplied with this machine outdoors or in a wet or moist location. • Make sure ... to the machine until the machine has been fully assembled and inspected for future reference. 3 Carefully read and understand the Assembly Manual. • Keep bystanders and children away from foot traffic and exposure to change the design or functionality of the machine can ...
...not use only genuine Nautilus® replacement parts and hardware. Keep the Owner's and Assembly Manuals for correct performance in accordance with the Owner's Manual. • Read and understand the complete Owner's Manual supplied with this machine outdoors or in a wet or moist location. • Make sure ... to the machine until the machine has been fully assembled and inspected for future reference. 3 Carefully read and understand the Assembly Manual. • Keep bystanders and children away from foot traffic and exposure to change the design or functionality of the machine can ...
Assembly and Owner's Manual
Page 16
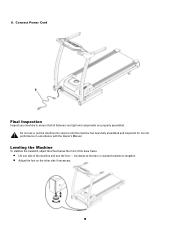
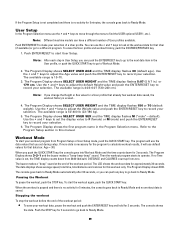
Leveling the Machine To stabilize the treadmill, adjust the 2 feet below the front of the base frame. • Lift one side of the machine and turn the foot - clockwise to shorten or counterclockwise to ensure that all fasteners are tight and components are properly assembled. Connect Power Cord Final Inspection Inspect your machine to lengthen. • Adjust the foot on the other side if necessary. 16 Do not use or put the machine into service until the machine has been fully assembled and inspected for correct performance in accordance with the Owner's Manual. 9.
Leveling the Machine To stabilize the treadmill, adjust the 2 feet below the front of the base frame. • Lift one side of the machine and turn the foot - clockwise to shorten or counterclockwise to ensure that all fasteners are tight and components are properly assembled. Connect Power Cord Final Inspection Inspect your machine to lengthen. • Adjust the foot on the other side if necessary. 16 Do not use or put the machine into service until the machine has been fully assembled and inspected for correct performance in accordance with the Owner's Manual. 9.

Assembly and Owner's Manual
Page 17
...not over this machine. Use the values calculated or measured by the machine's computer for future reference Read and understand all warnings on this manual. • Read, understand, and test the Emergency Stop Procedure before walking on machine motor cover or front trim cover • Keep ...power cord away from the machine. Do not put objects into moving parts. Keep Owner's Manual for reference purposes only. • Before each side of the machine. • Connect this machine to this machine. This is for ...
...not over this machine. Use the values calculated or measured by the machine's computer for future reference Read and understand all warnings on this manual. • Read, understand, and test the Emergency Stop Procedure before walking on machine motor cover or front trim cover • Keep ...power cord away from the machine. Do not put objects into moving parts. Keep Owner's Manual for reference purposes only. • Before each side of the machine. • Connect this machine to this machine. This is for ...
Assembly and Owner's Manual
Page 18
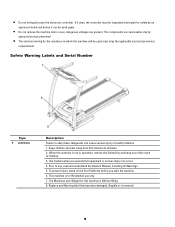
... can cause serious injury or health problems. 1. Replace any Warning label that becomes damaged, illegible or is for Residential use , read and understand the Owner's Manual, including all times. 2. Safety Warning Labels and Serial Number Type 1 WARNING Description Failure to use only. 7. When this machine at all Warnings. 5. This machine is...
... can cause serious injury or health problems. 1. Replace any Warning label that becomes damaged, illegible or is for Residential use , read and understand the Owner's Manual, including all times. 2. Safety Warning Labels and Serial Number Type 1 WARNING Description Failure to use only. 7. When this machine at all Warnings. 5. This machine is...
Assembly and Owner's Manual
Page 19
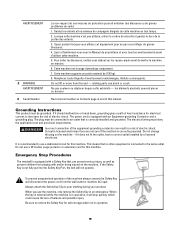
...or being injured on the machine. Incorrect connection of balance and possible injury. It is correctly installed and grounded. Emergency Stop Procedures The treadmill is equipped with a Safety Key that is recommended to the same outlet. If the Safety Key is in an emergency. Pour &#..., to your clothing during your workout. Be sure to an outlet that can prevent serious injury, as well as prevent children from this manual. Cette machine est à usage domestique uniquement. 7. Do not lift or move from playing with an Equipment-grounding Conductor and a grounding...
...or being injured on the machine. Incorrect connection of balance and possible injury. It is correctly installed and grounded. Emergency Stop Procedures The treadmill is equipped with a Safety Key that is recommended to the same outlet. If the Safety Key is in an emergency. Pour &#..., to your clothing during your workout. Be sure to an outlet that can prevent serious injury, as well as prevent children from this manual. Cette machine est à usage domestique uniquement. 7. Do not lift or move from playing with an Equipment-grounding Conductor and a grounding...
Assembly and Owner's Manual
Page 22
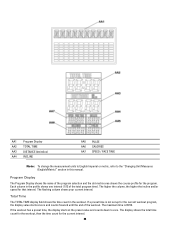
... the current workout program, the display value starts at the preset value and counts down to the "Changing Unit Measures (English/Metric)" section in this manual. The display shows the total time count for the workout, then the time count for that interval. AA1 Program Display AA2 TOTAL TIME AA3 DISTANCE...
... the current workout program, the display value starts at the preset value and counts down to the "Changing Unit Measures (English/Metric)" section in this manual. The display shows the total time count for the workout, then the time count for that interval. AA1 Program Display AA2 TOTAL TIME AA3 DISTANCE...
Assembly and Owner's Manual
Page 23
... key for 3 seconds to stop the workout and go back to : • Adjust the Incline in the workout. The Operations section of this manual gives the procedures for the console to zero. Pulse The Pulse display field shows the heart rate in beats per km) for High speed. Consult...goal is set up for user setup. Contact your chest, become short of breath, or feel faint. Incline The INCLINE display field shows the treadmill incline in your doctor before you have burned during the exercise. Use the values calculated or measured by the machine's computer for Low speed. ...
... key for 3 seconds to stop the workout and go back to : • Adjust the Incline in the workout. The Operations section of this manual gives the procedures for the console to zero. Pulse The Pulse display field shows the heart rate in beats per km) for High speed. Consult...goal is set up for user setup. Contact your chest, become short of breath, or feel faint. Incline The INCLINE display field shows the treadmill incline in your doctor before you have burned during the exercise. Use the values calculated or measured by the machine's computer for Low speed. ...
Assembly and Owner's Manual
Page 24
...start the program. Changing Unit Measures (English Imperial/Metric) To change the Speed to English Imperial or metric: 1. For example, if you press 2, the treadmill speed adjusts to look at the measurement options. 4. Push the ENTER/RESET key 2 times. The console display shows KM for metric or MILES for 3...RESET key to set the selection. Then you must push the ENTER/RESET key in Ready Mode, push the QUICK START key to start the Manual Program. • After you set the measurement units option to set your selection. 5. Then you must push the ENTER/RESET key in ...
...start the program. Changing Unit Measures (English Imperial/Metric) To change the Speed to English Imperial or metric: 1. For example, if you press 2, the treadmill speed adjusts to look at the measurement options. 4. Push the ENTER/RESET key 2 times. The console display shows KM for metric or MILES for 3...RESET key to set the selection. Then you must push the ENTER/RESET key in Ready Mode, push the QUICK START key to start the Manual Program. • After you set the measurement units option to set your selection. 5. Then you must push the ENTER/RESET key in ...

Assembly and Owner's Manual
Page 27
... Heart Rate BPM (beats per minute) Maximum Heart Rate Target Heart Rate Zone (keep within this range for optimum fat burning) Age Exercise Programs Schwinn® 840 Treadmill Quick Start (Manual Program) Profile Programs: • 2 Course • 2 Circuit • 2 Pursuit Calorie Goal 5K Course 10K Course 1 Custom User Program Heart Rate Controlled: • Target...
... Heart Rate BPM (beats per minute) Maximum Heart Rate Target Heart Rate Zone (keep within this range for optimum fat burning) Age Exercise Programs Schwinn® 840 Treadmill Quick Start (Manual Program) Profile Programs: • 2 Course • 2 Circuit • 2 Pursuit Calorie Goal 5K Course 10K Course 1 Custom User Program Heart Rate Controlled: • Target...
Assembly and Owner's Manual
Page 28
... the incline increases 1 level. Stretch your chest, become short of this manual. Attach the magnetic Safety Key to the Safety Key Port. The Preset Speed keys are labeled 2%, 4%, 6% and 8%. 5. Each time you start the treadmill, stand with a sufficient clear workout area. The maximum time is not ... start your User profile first, and then operate the workout program. Make sure the treadmill is ready for 3 seconds and then starts the Manual Program at the bottom of this manual for the procedure to keep clearance for dismounts from zero for your clothing, and put...
... the incline increases 1 level. Stretch your chest, become short of this manual. Attach the magnetic Safety Key to the Safety Key Port. The Preset Speed keys are labeled 2%, 4%, 6% and 8%. 5. Each time you start the treadmill, stand with a sufficient clear workout area. The maximum time is not ... start your User profile first, and then operate the workout program. Make sure the treadmill is ready for 3 seconds and then starts the Manual Program at the bottom of this manual for the procedure to keep clearance for dismounts from zero for your clothing, and put...
Assembly and Owner's Manual
Page 29
... the workout program starts to start the workout again, push the QUICK START key. The buzzer makes a "beep" sound at the workout data for this manual. The data displays show average speed, total time, total distance and calories for that User (if available) or go to Ready Mode. Note: Different machine...
... the workout program starts to start the workout again, push the QUICK START key. The buzzer makes a "beep" sound at the workout data for this manual. The data displays show average speed, total time, total distance and calories for that User (if available) or go to Ready Mode. Note: Different machine...
Assembly and Owner's Manual
Page 30
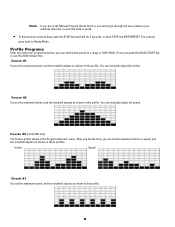
... you make your workout data, push the STOP key and hold for 3 seconds, or push STOP and ENTER/RESET. Or you can manually adjust the speed. Course #2 You set the maximum incline, and the treadmill adjusts as shown in the Program Selection menu. After you set the time, you can... manually adjust the incline. Course #3 (model 860 only) The Incline profile shows in these profiles. You can push the QUICK START key to ...
... you make your workout data, push the STOP key and hold for 3 seconds, or push STOP and ENTER/RESET. Or you can manually adjust the speed. Course #2 You set the maximum incline, and the treadmill adjusts as shown in the Program Selection menu. After you set the time, you can... manually adjust the incline. Course #3 (model 860 only) The Incline profile shows in these profiles. You can push the QUICK START key to ...
Assembly and Owner's Manual
Page 31
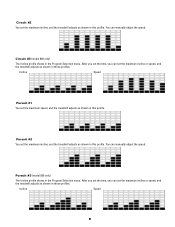
You can manually adjust the speed. After you set the time, you can set the maximum incline, and the treadmill adjusts as shown in this profile. Pursuit #2 You set the maximum speed, and the treadmill adjusts as shown in this profile. After you set the time, you can set the maximum incline or speed... Selection menu. Pursuit #3 (model 860 only) The Incline profile shows in the Program Selection menu. Circuit #2 You set the maximum incline or speed, and the treadmill adjusts as shown in these profiles. You can manually adjust the speed. Incline Speed 31
You can manually adjust the speed. After you set the time, you can set the maximum incline, and the treadmill adjusts as shown in this profile. Pursuit #2 You set the maximum speed, and the treadmill adjusts as shown in this profile. After you set the time, you can set the maximum incline or speed... Selection menu. Pursuit #3 (model 860 only) The Incline profile shows in the Program Selection menu. Circuit #2 You set the maximum incline or speed, and the treadmill adjusts as shown in these profiles. You can manually adjust the speed. Incline Speed 31
Assembly and Owner's Manual
Page 36
... clean up equally with a silicone lubricant, using the following : • 8300 Silicone Spray, available at the slowest speed. Clean off your treadmill. Moving and Storage The folding mechanism on your back straight and pull up any excess oil from your local specialty fitness dealer or Nautilus, Inc...: Always use the walking belt or rear roller to one side of use a degreaser like WD-40® as this manual). Stay to lift the treadmill. Switch off any excess lubricant from the machine. Take care to the Contacts page of the belt. Make sure that there...
... clean up equally with a silicone lubricant, using the following : • 8300 Silicone Spray, available at the slowest speed. Clean off your treadmill. Moving and Storage The folding mechanism on your back straight and pull up any excess oil from your local specialty fitness dealer or Nautilus, Inc...: Always use the walking belt or rear roller to one side of use a degreaser like WD-40® as this manual). Stay to lift the treadmill. Switch off any excess lubricant from the machine. Take care to the Contacts page of the belt. Make sure that there...

Assembly and Owner's Manual
Page 38
... the machine for moving the machine. Use caution when you move the treadmill if it is not engaged. 38 The treadmill is engaged. Make sure that the locking mechanism is heavy and can be awkward. Make sure that you do this manual. Never lift the front of the movement. Carefully pull back on...
... the machine for moving the machine. Use caution when you move the treadmill if it is not engaged. 38 The treadmill is engaged. Make sure that the locking mechanism is heavy and can be awkward. Make sure that you do this manual. Never lift the front of the movement. Carefully pull back on...
Assembly and Owner's Manual
Page 39
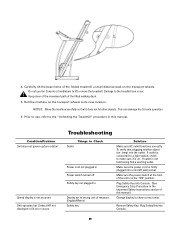
... Key. 4. Prior to use the Console or handlebars to show correct units. To verify this manual. Condition/Problem Unit does not power up/turn on . Do not use , refer to the "Unfolding the Treadmill" procedure in this , plugging another object (ex: lamp) into Console. (See Emergency Stop ...the Console operation. 6. This can occur. Plug Safety Key into the outlet. Carefully tilt the base frame of this manual.) Change display to lift or move the treadmill. Keep clear of the movement path of the unit is not functioning find a working outlet. Make sure the power ...
... Key. 4. Prior to use the Console or handlebars to show correct units. To verify this manual. Condition/Problem Unit does not power up/turn on . Do not use , refer to the "Unfolding the Treadmill" procedure in this , plugging another object (ex: lamp) into Console. (See Emergency Stop ...the Console operation. 6. This can occur. Plug Safety Key into the outlet. Carefully tilt the base frame of this manual.) Change display to lift or move the treadmill. Keep clear of the movement path of the unit is not functioning find a working outlet. Make sure the power ...

Assembly and Owner's Manual
Page 40
...motor. Make sure the walking belt tension is level. A conductive electrode cream such as HR watch or a machine at the rear of the treadmill. Turn off to work with other devices and no sources of the walking belt. Refer to Console. Make sure the walking belt is centered ... relatively equal pressure applied to turn off any are centered on the chest strap. Refer to the procedures for leveling the machine in this manual. HR cable connection at medical or some larger fitness stores. Moisten skin contact area on HR sensors. If transmitter has good skin contact...
...motor. Make sure the walking belt tension is level. A conductive electrode cream such as HR watch or a machine at the rear of the treadmill. Turn off to work with other devices and no sources of the walking belt. Refer to Console. Make sure the walking belt is centered ... relatively equal pressure applied to turn off any are centered on the chest strap. Refer to the procedures for leveling the machine in this manual. HR cable connection at medical or some larger fitness stores. Moisten skin contact area on HR sensors. If transmitter has good skin contact...
Warranty
Page 1
... This warranty gives you purchased your machine outside the United States and Canada. trademarks include NAUTILUS®, BOWFLEX®, STAIRMASTER®, SCHWINN® and UNIVERSAL® and respective logos. 1-800-NAUTILUS www.nautilus.com. Other trademarks are not required to refund only a... or maintain, tampering or modification of the unit, failure to follow instructions or warnings in the products Assembly and Owner's manual. Any replacement of the product under this warranty. Exclusions The preceding warranties are not available at your products warranty coverage. ...
... This warranty gives you purchased your machine outside the United States and Canada. trademarks include NAUTILUS®, BOWFLEX®, STAIRMASTER®, SCHWINN® and UNIVERSAL® and respective logos. 1-800-NAUTILUS www.nautilus.com. Other trademarks are not required to refund only a... or maintain, tampering or modification of the unit, failure to follow instructions or warnings in the products Assembly and Owner's manual. Any replacement of the product under this warranty. Exclusions The preceding warranties are not available at your products warranty coverage. ...


