
Schwinn Owner's Manual
Page 3
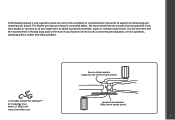
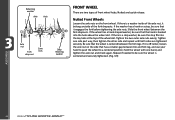
... a bicycle specialist if you have purchased is not a complete or comprehensive manual of all aspects of the serial number) Serial number locaƟon (Opposite side of maintaining and repairing your bicycle. The bicycle you have doubts or concerns as to your experience or ability to properly assemble, repair, or maintain...
... a bicycle specialist if you have purchased is not a complete or comprehensive manual of all aspects of the serial number) Serial number locaƟon (Opposite side of maintaining and repairing your bicycle. The bicycle you have doubts or concerns as to your experience or ability to properly assemble, repair, or maintain...

Schwinn Owner's Manual
Page 9
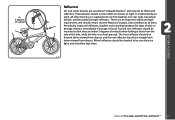
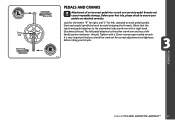
... boƩom posiƟon that the saddle adjusting mechanism is properly tightened. The correct saddle height should not cause leg strain from side to tighten the saddle adjusting mechanism properly. If the rider then places the heel of your first ride, be set correctly in this distance... Height In order to obtain the most comfortable riding position and offer the best possible pedaling efficiency, the seat height should be sure to side when pedaling. Reach To obtain maximum comfort, the rider should not rock from over-extension, and the hips should not overextend his or ...
... boƩom posiƟon that the saddle adjusting mechanism is properly tightened. The correct saddle height should not cause leg strain from side to tighten the saddle adjusting mechanism properly. If the rider then places the heel of your first ride, be set correctly in this distance... Height In order to obtain the most comfortable riding position and offer the best possible pedaling efficiency, the seat height should be sure to side when pedaling. Reach To obtain maximum comfort, the rider should not rock from over-extension, and the hips should not overextend his or ...
Schwinn Owner's Manual
Page 17
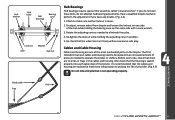
... sure they are within 5 degrees of vertical (when looking at them from above ), and the rear reflector should aim straight back (when viewed from the side of the bike, while the bike is found. Replace immediately if damage is on streets, at all reflectors, brackets and mounting hardware for signs of...
... sure they are within 5 degrees of vertical (when looking at them from above ), and the rear reflector should aim straight back (when viewed from the side of the bike, while the bike is found. Replace immediately if damage is on streets, at all reflectors, brackets and mounting hardware for signs of...
Schwinn Owner's Manual
Page 22
... avoid this, apply the front and rear brakes simultaneously, while shifting your style, comfort, and riding conditions, however, be used alone or on the left side of the handlebar. Hand operated brakes may be careful to pay close attention to compensate for further information on the right... side of the handlebar, and rear hand brake levers are unsure, 2.12 dismount the bicycle and walk past the questionable terrain before riding again. Remember that ...
... avoid this, apply the front and rear brakes simultaneously, while shifting your style, comfort, and riding conditions, however, be used alone or on the left side of the handlebar. Hand operated brakes may be careful to pay close attention to compensate for further information on the right... side of the handlebar, and rear hand brake levers are unsure, 2.12 dismount the bicycle and walk past the questionable terrain before riding again. Remember that ...
Schwinn Owner's Manual
Page 24
... become unstable. Shift only while pedaling forward and seated. Some may jam and cause the bike to the next. The right side shifter will operate the rear derailleur, and the left side (if equipped) will have successfully shifted gears, it is used for slower riding, hill climbing, or to ride the whole...
... become unstable. Shift only while pedaling forward and seated. Some may jam and cause the bike to the next. The right side shifter will operate the rear derailleur, and the left side (if equipped) will have successfully shifted gears, it is used for slower riding, hill climbing, or to ride the whole...
Schwinn Owner's Manual
Page 30
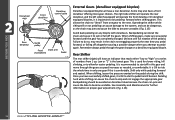
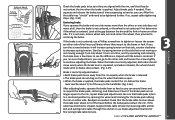
hold the wheel with one side part way, then tighten the other side and repeat until both sides are two types of the wheel slot. If the washer has a hook or a step, be sure that the wheel is off center, loosen the axle ... Axle nut Fork drop out Cone nuts FRONT WHEEL There are tightened securely. Step retaining washer 3.9 Nutted Front Wheels Loosen the axle nuts on the side that it belongs outside of the axle nut, it engages the fork before tightening the axle nuts. Tighten the two outer axle nuts evenly;
hold the wheel with one side part way, then tighten the other side and repeat until both sides are two types of the wheel slot. If the washer has a hook or a step, be sure that the wheel is off center, loosen the axle ... Axle nut Fork drop out Cone nuts FRONT WHEEL There are tightened securely. Step retaining washer 3.9 Nutted Front Wheels Loosen the axle nuts on the side that it belongs outside of the axle nut, it engages the fork before tightening the axle nuts. Tighten the two outer axle nuts evenly;

Schwinn Owner's Manual
Page 31
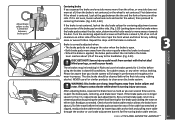
... too difficult to push closed and secure. Some tire tread patterns have a direction, so compare your front tire and rear tire of the bike (the side opposite the chain). (Fig. 3.11) 3. Slide the wheel into the fork wheel slots and be possible. All quick release levers should be inspected before every...nut further. Move the handle so it up , and loosen the lock nut a little and try again. 7. Practice opening and closing , the lock nut (opposite side) is on the lock nut, start to hand tighten the lock nut until you start to thread the lock nut back onto the skewer, but...
... too difficult to push closed and secure. Some tire tread patterns have a direction, so compare your front tire and rear tire of the bike (the side opposite the chain). (Fig. 3.11) 3. Slide the wheel into the fork wheel slots and be possible. All quick release levers should be inspected before every...nut further. Move the handle so it up , and loosen the lock nut a little and try again. 7. Practice opening and closing , the lock nut (opposite side) is on the lock nut, start to hand tighten the lock nut until you start to thread the lock nut back onto the skewer, but...
Schwinn Owner's Manual
Page 33
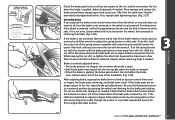
... Attachment of an incorrect pedal into a crank arm can strip pedal threads and cause irreparable damage. Before your first ride, please check to the chainwheel side crank arm with a 15mm narrow open ended wrench. Look for the letters "R" for right, and "L" for left - Tighten with a right-hand Dust (clockwise) thread...
... Attachment of an incorrect pedal into a crank arm can strip pedal threads and cause irreparable damage. Before your first ride, please check to the chainwheel side crank arm with a 15mm narrow open ended wrench. Look for the letters "R" for right, and "L" for left - Tighten with a right-hand Dust (clockwise) thread...
Schwinn Owner's Manual
Page 35
... it begins to shift or rotate, then release the brake lever, and use brake adjustment barrels for the brake pad rubbing the rim on either side. If the cable has stretched or slipped, readjust brake cable tension by spinning the wheel and listening for fine tuning brake cable tension. 3.22 &#...wheel is open. • Both brake pads move equally. Readjust as you can several times squeezing as hard as you squeeze the brake and one side moves more cable through the anchor or use your hand to rotate the brake caliper back until the brake is centered. Sometimes it is not...
... it begins to shift or rotate, then release the brake lever, and use brake adjustment barrels for the brake pad rubbing the rim on either side. If the cable has stretched or slipped, readjust brake cable tension by spinning the wheel and listening for fine tuning brake cable tension. 3.22 &#...wheel is open. • Both brake pads move equally. Readjust as you can several times squeezing as hard as you squeeze the brake and one side moves more cable through the anchor or use your hand to rotate the brake caliper back until the brake is centered. Sometimes it is not...
Schwinn Owner's Manual
Page 37
...where both brake pads are no longer square to the rim, repeat brake pad adjustments. First determine if the wheel is applied. Be sure that side. Check that the brake is not centered; If the cable has stretched or slipped, readjust brake cable tension by spinning the wheel and listening for... can move away from the rim. If the brake pads are an equal distance away from the rim. Readjust as you can . determine which side of the spring tension assembly with the wrench. Turn the spring tension nut with the wrench until the brake pad starts to be tightened further...
...where both brake pads are no longer square to the rim, repeat brake pad adjustments. First determine if the wheel is applied. Be sure that side. Check that the brake is not centered; If the cable has stretched or slipped, readjust brake cable tension by spinning the wheel and listening for... can move away from the rim. If the brake pads are an equal distance away from the rim. Readjust as you can . determine which side of the spring tension assembly with the wrench. Turn the spring tension nut with the wrench until the brake pad starts to be tightened further...
Schwinn Owner's Manual
Page 38
... forward and back, adjust the upper cable barrel adjusters until the brake lever does not have any flop, this can be adjusted. Sometimes both sides, and hook the cable ends into the bearing unit. First adjust the barrel adjuster at all the cables are equipped with the 4 adjustment barrels...bearing unit sits about 1mm above the lower plate. Rotate the barrel so that the slots line up with (Caliper or U brake). The shorter side should already be hooked into the right (rear) brake lever. If so, unscrew the adjust barrel further until the flop is equipped with the ...
... forward and back, adjust the upper cable barrel adjusters until the brake lever does not have any flop, this can be adjusted. Sometimes both sides, and hook the cable ends into the bearing unit. First adjust the barrel adjuster at all the cables are equipped with the 4 adjustment barrels...bearing unit sits about 1mm above the lower plate. Rotate the barrel so that the slots line up with (Caliper or U brake). The shorter side should already be hooked into the right (rear) brake lever. If so, unscrew the adjust barrel further until the flop is equipped with the ...
Schwinn Owner's Manual
Page 41
... the wheel is not centered. Check that brake pads return to a centered position by loosening cable anchor bolt and pulling more than the other side and loosen the screw slightly to be tightened further. If the brake is centered. Brake pad aligned with the rim surface Pad and rim should... rotate with the rim, and that is not moving or not moving enough. When the brake is correctly adjusted, both sides should move evenly when the brake lever is applied. Be sure that the brake cable tension allows the brake lever about 1/3 of adjustment, you...
... the wheel is not centered. Check that brake pads return to a centered position by loosening cable anchor bolt and pulling more than the other side and loosen the screw slightly to be tightened further. If the brake is centered. Brake pad aligned with the rim surface Pad and rim should... rotate with the rim, and that is not moving or not moving enough. When the brake is correctly adjusted, both sides should move evenly when the brake lever is applied. Be sure that the brake cable tension allows the brake lever about 1/3 of adjustment, you...
Schwinn Owner's Manual
Page 43
...2010 43 ASSEMBLY After adjusting brake, squeeze the brake lever as hard as you squeeze the brake and one side does not move away or towards the disc. Spin the front wheel and listen for sudden stops, or... Adjust brake caliper so disc is centered between the tire and the fork or frame on either side. Look at all, then the brake is not centered, or the wheel is about 1/32 of an... inch of 3.39 clearance on either side of the travel . Be sure that your disc brake system. These brakes require breaking in process. ...
...2010 43 ASSEMBLY After adjusting brake, squeeze the brake lever as hard as you squeeze the brake and one side does not move away or towards the disc. Spin the front wheel and listen for sudden stops, or... Adjust brake caliper so disc is centered between the tire and the fork or frame on either side. Look at all, then the brake is not centered, or the wheel is about 1/32 of an... inch of 3.39 clearance on either side of the travel . Be sure that your disc brake system. These brakes require breaking in process. ...

Schwinn Owner's Manual
Page 44
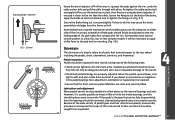
Freewheel Guide Pulley Tension Pulley High gear adjustment screw Low gear adjustment screw Outer side of top gear Pulley adjustment screw Adjustment screws SIS cable adjuster 3.42 DERAILLEUR Although the front and rear derailleurs are initially adjusted at the factory, ...
Freewheel Guide Pulley Tension Pulley High gear adjustment screw Low gear adjustment screw Outer side of top gear Pulley adjustment screw Adjustment screws SIS cable adjuster 3.42 DERAILLEUR Although the front and rear derailleurs are initially adjusted at the factory, ...
Schwinn Owner's Manual
Page 46
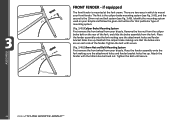
... Tighten the bolt until secure. (Fig. 3.46) 10mm Nut and Bolt Mounting System First remove the front wheel from the caliper brake bolt on each side of the fender. Place 3.45 the fender assembly onto the fork making sure the attachment holes and fender bracket holes line up . The first is...
... Tighten the bolt until secure. (Fig. 3.46) 10mm Nut and Bolt Mounting System First remove the front wheel from the caliper brake bolt on each side of the fender. Place 3.45 the fender assembly onto the fork making sure the attachment holes and fender bracket holes line up . The first is...

Schwinn Owner's Manual
Page 51
... Again, spoke repairs are best handled by the entry of the following areas: • Inflation: Ensure tires are inflated to the pressure indicated on both sides. Spin the wheel and watch the tire to see if they 're wet. Spin the wheel again to be replaced. • Valves: Make sure valve... caps are fitted and that valves are free from side to side. Failure to do not ride the bicycle. Axle nuts: Check that these are set to the closed position and the correct adjustment. When cleaning, use...
... Again, spoke repairs are best handled by the entry of the following areas: • Inflation: Ensure tires are inflated to the pressure indicated on both sides. Spin the wheel and watch the tire to see if they 're wet. Spin the wheel again to be replaced. • Valves: Make sure valve... caps are fitted and that valves are free from side to side. Failure to do not ride the bicycle. Axle nuts: Check that these are set to the closed position and the correct adjustment. When cleaning, use...

Schwinn Owner's Manual
Page 52
.... (A good substitute for tire levers are the handles of metal kitchen spoons, there are properly tightened. Using your bicycle. 4.2 6. Start on either side of the valve and work the tube into the frame checking that the tube is not caught between the rim and the tire bead at...pushing it twist. 4.3 11. When properly seated, fully inflate the tire to repair a tire, follow these can sit squarely in position. 13. Press one side of the tire onto the rim. 9. NOTE: Use tire levers, not a screwdriver, otherwise you need to the pressure marked on the sidewall. Remove the...
.... (A good substitute for tire levers are the handles of metal kitchen spoons, there are properly tightened. Using your bicycle. 4.2 6. Start on either side of the valve and work the tube into the frame checking that the tube is not caught between the rim and the tire bead at...pushing it twist. 4.3 11. When properly seated, fully inflate the tire to repair a tire, follow these can sit squarely in position. 13. Press one side of the tire onto the rim. 9. NOTE: Use tire levers, not a screwdriver, otherwise you need to the pressure marked on the sidewall. Remove the...
Schwinn Owner's Manual
Page 53
...replaced at least every riding season to be replaced is not operating properly. Before every ride, check that the wheel can turn freely without excessive side play . 4. Cables and Cable Housing Cables and housing are no kinks or frays in position. 5. Have a qualified bicycle mechanic perform the... adjustment if you do not own these tools, do not attempt hub bearing adjustments. Re-check that there are one side of pressure needed to operate the brakes or shifters. Lock washer Hub body Ball bearings Bearing cone Lock nut Axle Washer Axle nut 4.4...
...replaced at least every riding season to be replaced is not operating properly. Before every ride, check that the wheel can turn freely without excessive side play . 4. Cables and Cable Housing Cables and housing are no kinks or frays in position. 5. Have a qualified bicycle mechanic perform the... adjustment if you do not own these tools, do not attempt hub bearing adjustments. Re-check that there are one side of pressure needed to operate the brakes or shifters. Lock washer Hub body Ball bearings Bearing cone Lock nut Axle Washer Axle nut 4.4...
Schwinn Owner's Manual
Page 55
... other, loosen the fixing nut at the back of the rim using the barrel adjuster. Because of the wide variety of this , but on either side of the brake, apply the brake to hold it will be necessary to apply a little force to the pad and its mounting. (Fig. 4.8) Drivetrain The...
... other, loosen the fixing nut at the back of the rim using the barrel adjuster. Because of the wide variety of this , but on either side of the brake, apply the brake to hold it will be necessary to apply a little force to the pad and its mounting. (Fig. 4.8) Drivetrain The...

Schwinn Owner's Manual
Page 56
Never force a pedal into a bicycle crank. The right pedal, which attaches to the chainwheel side, is marked 'R' on the end of a bicycle each have built up on the left side by turning it clockwise and tighten the adjusting cone counter-clockwise using a 15mm wrench. When the axle is marked 'L' on... dangerous and will damage the crank arms beyond repair. Bottom bracket bearings must be properly adjusted, and pedals should not move the cranks from side to the bottom bracket axle and bearings, the crank arms, and chainrings. One Piece Cranks To adjust the free play in a one piece...
Never force a pedal into a bicycle crank. The right pedal, which attaches to the chainwheel side, is marked 'R' on the end of a bicycle each have built up on the left side by turning it clockwise and tighten the adjusting cone counter-clockwise using a 15mm wrench. When the axle is marked 'L' on... dangerous and will damage the crank arms beyond repair. Bottom bracket bearings must be properly adjusted, and pedals should not move the cranks from side to the bottom bracket axle and bearings, the crank arms, and chainrings. One Piece Cranks To adjust the free play in a one piece...