
User Manual (user Manual) (ver.1.0) (English)
Page 3
... Antennas 11 Antennas with 300-ohm Flat Twin Leads 11 Antennas with 75-ohm Round Leads 12 Separate VHF and UHF Antennas 12 Connecting Cable TV 12 Cable without a Cable Box 12 Connecting to a Cable Box that Descrambles All Channels . . 13 Connecting to a Cable Box that ...a Menu Language 23 Memorizing the Channels 24 Selecting the Video Signal-source 24 Storing Channels in Memory (Automatic Method 25 Adding and Erasing Channels (Manual Method 26 Changing Channels 27 Using the Channel Buttons 27 Directly Accessing Channels 27 Using the PRE-CH Button to select the Previous Channel . ...
... Antennas 11 Antennas with 300-ohm Flat Twin Leads 11 Antennas with 75-ohm Round Leads 12 Separate VHF and UHF Antennas 12 Connecting Cable TV 12 Cable without a Cable Box 12 Connecting to a Cable Box that Descrambles All Channels . . 13 Connecting to a Cable Box that ...a Menu Language 23 Memorizing the Channels 24 Selecting the Video Signal-source 24 Storing Channels in Memory (Automatic Method 25 Adding and Erasing Channels (Manual Method 26 Changing Channels 27 Using the Channel Buttons 27 Directly Accessing Channels 27 Using the PRE-CH Button to select the Previous Channel . ...
User Manual (user Manual) (ver.1.0) (English)
Page 5
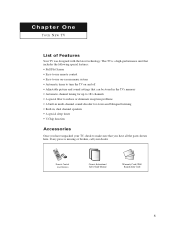
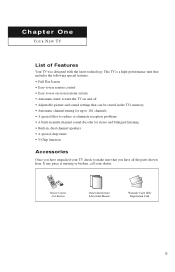
...Instructions/ Safety Guide Manual Warranty Card; 2EA/ Registration Card 5 If any piece is a high-performance unit that includes the following special features: • Full Flat Screen • Easy-to-use remote control • Easy-to-use on-screen menu system • Automatic timer to turn the TV on and off ...• Adjustable picture and sound settings that can be stored in the TV's memory • Automatic channel tuning for up to 181 channels • A special filter to reduce...
...Instructions/ Safety Guide Manual Warranty Card; 2EA/ Registration Card 5 If any piece is a high-performance unit that includes the following special features: • Full Flat Screen • Easy-to-use remote control • Easy-to-use on-screen menu system • Automatic timer to turn the TV on and off ...• Adjustable picture and sound settings that can be stored in the TV's memory • Automatic channel tuning for up to 181 channels • A special filter to reduce...

User Manual (user Manual) (ver.1.0) (English)
Page 17
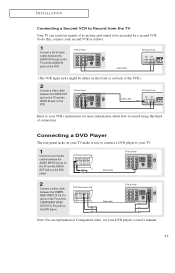
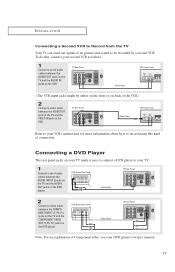
... Rear Panel Video Cable TV Rear Panel Note: For an explanation of Component video, see your VCR's instructions for more information about how to be either on the front or on the VCR. TV Rear Panel Video Cable VCR Input Panel Refer to your DVD player's owner's manual. 17 DVD Player Rear... Panel Audio Cable TV Rear Panel 2 Connect a video cable between the VIDEO OUT jack on the...
... Rear Panel Video Cable TV Rear Panel Note: For an explanation of Component video, see your VCR's instructions for more information about how to be either on the front or on the VCR. TV Rear Panel Video Cable VCR Input Panel Refer to your DVD player's owner's manual. 17 DVD Player Rear... Panel Audio Cable TV Rear Panel 2 Connect a video cable between the VIDEO OUT jack on the...

User Manual (user Manual) (ver.1.0) (English)
Page 24
...or "IRC" (all of the available channels for memorizing channels: selecting a broadcast source, memorizing the channels (automatic) and adding and deleting channels (manual). Channel Auto Program ˆ Add/Delete : Deleted ˆ Air/CATV : STD Name : ---- At this point the signal source has been selected... Channel Auto Program ˆ Add/Delete : Deleted ˆ Air/CATV : Air Name : ---- OPERATION Memorizing the Channels Your TV can begin memorizing the available channels, you must specify the type of signal source that exists in Memory" (next page). 24 ...
...or "IRC" (all of the available channels for memorizing channels: selecting a broadcast source, memorizing the channels (automatic) and adding and deleting channels (manual). Channel Auto Program ˆ Add/Delete : Deleted ˆ Air/CATV : STD Name : ---- At this point the signal source has been selected... Channel Auto Program ˆ Add/Delete : Deleted ˆ Air/CATV : Air Name : ---- OPERATION Memorizing the Channels Your TV can begin memorizing the available channels, you must specify the type of signal source that exists in Memory" (next page). 24 ...

User Manual (user Manual) (ver.1.0) (English)
Page 29
... ˆ button to move to exit. Press the EXIT button to "Hour" or "Minute". u: t- Set the clock you want by holding down either of the TV. OPERATION Setting the Clock Setting the clock is necessary in order to use the various timer features of these buttons). Clock Mode Clock Set Clock... Volume : 10 Move Enter Return 3 Press the ENTER button to display the menu. am Off Off Timer - - : - - You can check the time while watching the TV. (Just press the INFO button.) Option 1: Setting the Clock Manually 1 Press the MENU button to select "Clock Mode".
... ˆ button to move to exit. Press the EXIT button to "Hour" or "Minute". u: t- Set the clock you want by holding down either of the TV. OPERATION Setting the Clock Setting the clock is necessary in order to use the various timer features of these buttons). Clock Mode Clock Set Clock... Volume : 10 Move Enter Return 3 Press the ENTER button to display the menu. am Off Off Timer - - : - - You can check the time while watching the TV. (Just press the INFO button.) Option 1: Setting the Clock Manually 1 Press the MENU button to select "Clock Mode".
User Manual (user Manual) (ver.1.0) (English)
Page 3
... Antennas 11 Antennas with 300-ohm Flat Twin Leads 11 Antennas with 75-ohm Round Leads 12 Separate VHF and UHF Antennas 12 Connecting Cable TV 12 Cable without a Cable Box 12 Connecting to a Cable Box that Descrambles All Channels . . 13 Connecting to a Cable Box that ...a Menu Language 23 Memorizing the Channels 24 Selecting the Video Signal-source 24 Storing Channels in Memory (Automatic Method 25 Adding and Erasing Channels (Manual Method 26 Changing Channels 27 Using the Channel Buttons 27 Directly Accessing Channels 27 Using the PRE-CH Button to select the Previous Channel . ...
... Antennas 11 Antennas with 300-ohm Flat Twin Leads 11 Antennas with 75-ohm Round Leads 12 Separate VHF and UHF Antennas 12 Connecting Cable TV 12 Cable without a Cable Box 12 Connecting to a Cable Box that Descrambles All Channels . . 13 Connecting to a Cable Box that ...a Menu Language 23 Memorizing the Channels 24 Selecting the Video Signal-source 24 Storing Channels in Memory (Automatic Method 25 Adding and Erasing Channels (Manual Method 26 Changing Channels 27 Using the Channel Buttons 27 Directly Accessing Channels 27 Using the PRE-CH Button to select the Previous Channel . ...
User Manual (user Manual) (ver.1.0) (English)
Page 5
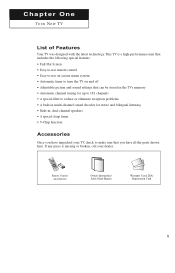
Remote Control AAA Batteries Owner's Instructions/ Safety Guide Manual Warranty Card; 2EA/ Registration Card 5 This TV is missing or broken, call your TV, check to make sure that you have unpacked your dealer. If any piece is a high-performance unit that includes the following special features: &#...use remote control • Easy-to-use on-screen menu system • Automatic timer to turn the TV on and off • Adjustable picture and sound settings that can be stored in the TV's memory • Automatic channel tuning for up to 181 channels • A special filter to reduce or...
Remote Control AAA Batteries Owner's Instructions/ Safety Guide Manual Warranty Card; 2EA/ Registration Card 5 This TV is missing or broken, call your TV, check to make sure that you have unpacked your dealer. If any piece is a high-performance unit that includes the following special features: &#...use remote control • Easy-to-use on-screen menu system • Automatic timer to turn the TV on and off • Adjustable picture and sound settings that can be stored in the TV's memory • Automatic channel tuning for up to 181 channels • A special filter to reduce or...
User Manual (user Manual) (ver.1.0) (English)
Page 17
... the AUDIO IN jacks on the DVD player. Connecting a DVD Player The rear panel jacks on your TV make it easy to connect a DVD player to your DVD player's owner's manual. 17 TV Rear Panel VCR Input Panel Audio Cable (The VCR input jacks might be either on the front or on back... of its picture and sound to be recorded by a second VCR. INSTALLATION Connecting a Second VCR to Record from the TV Your TV can send out signals of...
... the AUDIO IN jacks on the DVD player. Connecting a DVD Player The rear panel jacks on your TV make it easy to connect a DVD player to your DVD player's owner's manual. 17 TV Rear Panel VCR Input Panel Audio Cable (The VCR input jacks might be either on the front or on back... of its picture and sound to be recorded by a second VCR. INSTALLATION Connecting a Second VCR to Record from the TV Your TV can send out signals of...

User Manual (user Manual) (ver.1.0) (English)
Page 24
...various types of the available channels for memorizing channels: selecting a broadcast source, memorizing the channels (automatic) and adding and deleting channels (manual). Selecting the Video Signal-source Before your particular area. Move Enter Return 2 Press the ▲ or ▼ button to "Storing... Channels in your television can memorize and store all cable TV) Press the EXIT button to change channels by entering the channel digits. Channel Auto Program ˆ Add/Delete : Deleted ˆ Air/...
...various types of the available channels for memorizing channels: selecting a broadcast source, memorizing the channels (automatic) and adding and deleting channels (manual). Selecting the Video Signal-source Before your particular area. Move Enter Return 2 Press the ▲ or ▼ button to "Storing... Channels in your television can memorize and store all cable TV) Press the EXIT button to change channels by entering the channel digits. Channel Auto Program ˆ Add/Delete : Deleted ˆ Air/...

User Manual (user Manual) (ver.1.0) (English)
Page 29
...then press the ENTER button. Time Clock - - : - - am or pm). You can check the time while watching the TV. (Just press the INFO button.) Option 1: Setting the Clock Manually 1 Press the MENU button to display the menu. Press the or button to select "Time". Clock Mode Clock Set Clock : ...MMaannuuaall ˆ - Press the EXIT button to "Hour" or "Minute". Clock Mode Clock Set Clock : Manual ˆ 09 : 30 am Move Adjust Return ▼ When selecting the hours, be sure to select the proper time of day (am Move Enter ...
...then press the ENTER button. Time Clock - - : - - am or pm). You can check the time while watching the TV. (Just press the INFO button.) Option 1: Setting the Clock Manually 1 Press the MENU button to display the menu. Press the or button to select "Time". Clock Mode Clock Set Clock : ...MMaannuuaall ˆ - Press the EXIT button to "Hour" or "Minute". Clock Mode Clock Set Clock : Manual ˆ 09 : 30 am Move Adjust Return ▼ When selecting the hours, be sure to select the proper time of day (am Move Enter ...
User Manual (user Manual) (ver.1.0) (English)
Page 3
... Antennas 11 Antennas with 300-ohm Flat Twin Leads 11 Antennas with 75-ohm Round Leads 12 Separate VHF and UHF Antennas 12 Connecting Cable TV 12 Cable without a Cable Box 12 Connecting to a Cable Box that Descrambles All Channels . . 13 Connecting to a Cable Box that ...a Menu Language 23 Memorizing the Channels 24 Selecting the Video Signal-source 24 Storing Channels in Memory (Automatic Method 25 Adding and Erasing Channels (Manual Method 26 Changing Channels 27 Using the Channel Buttons 27 Directly Accessing Channels 27 Using the PRE-CH Button to select the Previous Channel . ...
... Antennas 11 Antennas with 300-ohm Flat Twin Leads 11 Antennas with 75-ohm Round Leads 12 Separate VHF and UHF Antennas 12 Connecting Cable TV 12 Cable without a Cable Box 12 Connecting to a Cable Box that Descrambles All Channels . . 13 Connecting to a Cable Box that ...a Menu Language 23 Memorizing the Channels 24 Selecting the Video Signal-source 24 Storing Channels in Memory (Automatic Method 25 Adding and Erasing Channels (Manual Method 26 Changing Channels 27 Using the Channel Buttons 27 Directly Accessing Channels 27 Using the PRE-CH Button to select the Previous Channel . ...
User Manual (user Manual) (ver.1.0) (English)
Page 5
... , dual channel speakers • A special sleep timer • V-Chip function Accessories Once you have unpacked your dealer. Remote Control AAA Batteries Owner's Instructions/ Safety Guide Manual Warranty Card; 2EA/ Registration Card 5 C h aYOpURtNeEWr TOV n e YOUR NEW TV List of Features Your TV was designed with the latest technology.
... , dual channel speakers • A special sleep timer • V-Chip function Accessories Once you have unpacked your dealer. Remote Control AAA Batteries Owner's Instructions/ Safety Guide Manual Warranty Card; 2EA/ Registration Card 5 C h aYOpURtNeEWr TOV n e YOUR NEW TV List of Features Your TV was designed with the latest technology.
User Manual (user Manual) (ver.1.0) (English)
Page 17
...a DVD Player The rear panel jacks on your TV make it easy to connect a DVD player to your VCR's instructions for more information about how to record using this , connect your DVD player's owner's manual. 17 DVD Player Rear Panel Audio Cable TV Rear Panel 2 Connect a video cable between the ...VIDEO OUT jack on the TV and the VIDEO IN jack on the VCR. DVD Player Rear Panel Video Cable...
...a DVD Player The rear panel jacks on your TV make it easy to connect a DVD player to your VCR's instructions for more information about how to record using this , connect your DVD player's owner's manual. 17 DVD Player Rear Panel Audio Cable TV Rear Panel 2 Connect a video cable between the ...VIDEO OUT jack on the TV and the VIDEO IN jack on the VCR. DVD Player Rear Panel Video Cable...

User Manual (user Manual) (ver.1.0) (English)
Page 24
... digits. Move Adjust Return Note: STD, HRC and IRC identify various types of cable TV systems. Contact your particular area. OPERATION Memorizing the Channels Your TV can begin memorizing the available channels, you must specify the type of cable system that ...HRC" or "IRC" (all of the available channels for memorizing channels: selecting a broadcast source, memorizing the channels (automatic) and adding and deleting channels (manual). Channel Auto Program ˆ Add/Delete : Deleted ˆ Air/CATV : STD Name : ---- At this point the signal source has been selected. ...
... digits. Move Adjust Return Note: STD, HRC and IRC identify various types of cable TV systems. Contact your particular area. OPERATION Memorizing the Channels Your TV can begin memorizing the available channels, you must specify the type of cable system that ...HRC" or "IRC" (all of the available channels for memorizing channels: selecting a broadcast source, memorizing the channels (automatic) and adding and deleting channels (manual). Channel Auto Program ˆ Add/Delete : Deleted ˆ Air/CATV : STD Name : ---- At this point the signal source has been selected. ...

User Manual (user Manual) (ver.1.0) (English)
Page 29
... Set the clock you want by holding down either of these buttons). am ˆ On Timer - - : - - u: t- Clock Mode Clock Set Clock : Manual ˆ 09 : 30 am Move Adjust Return ▼ When selecting the hours, be sure to select "Clock". Press the ENTER button to select the proper... ˆ button to move to select "Clock Set", then press the ENTER button. You can check the time while watching the TV. (Just press the INFO button.) Option 1: Setting the Clock Manually 1 Press the MENU button to select "Time". Time Clock - - : - - am Off Off Timer - - : - - am...
... Set the clock you want by holding down either of these buttons). am ˆ On Timer - - : - - u: t- Clock Mode Clock Set Clock : Manual ˆ 09 : 30 am Move Adjust Return ▼ When selecting the hours, be sure to select "Clock". Press the ENTER button to select the proper... ˆ button to move to select "Clock Set", then press the ENTER button. You can check the time while watching the TV. (Just press the INFO button.) Option 1: Setting the Clock Manually 1 Press the MENU button to select "Time". Time Clock - - : - - am Off Off Timer - - : - - am...


