User Manual (user Manual) (ver.1.0) (English)
Page 1
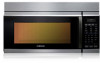
Microwave Oven Owner's Manual SMH7174 SMH7175 SMH7176 SMH7177 SMH7178 Code No. : DE68-00356R
Microwave Oven Owner's Manual SMH7174 SMH7175 SMH7176 SMH7177 SMH7178 Code No. : DE68-00356R
User Manual (user Manual) (ver.1.0) (English)
Page 2
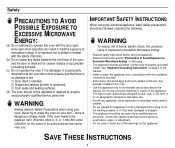
WARNING Always observe Safety Precautions when using the appliance. • Read and follow the specific "Precautions to Avoid Exposure to Excessive Microwave Energy" on this appliance if it has a damaged cord or plug, if it is no damage to the 1) Door (bent or dented), 2) Hinges and latches (broken or loosened), 3) Door seals and sealing surfaces. (d) The oven should not be serviced only by qualified service personnel. If the oven needs to be grounded. IMPORTANT SAFETY INSTRUCTIONS When using any of this manual. • Install or place this appliance only in accordance with the ...
WARNING Always observe Safety Precautions when using the appliance. • Read and follow the specific "Precautions to Avoid Exposure to Excessive Microwave Energy" on this appliance if it has a damaged cord or plug, if it is no damage to the 1) Door (bent or dented), 2) Hinges and latches (broken or loosened), 3) Door seals and sealing surfaces. (d) The oven should not be serviced only by qualified service personnel. If the oven needs to be grounded. IMPORTANT SAFETY INSTRUCTIONS When using any of this manual. • Install or place this appliance only in accordance with the ...
User Manual (user Manual) (ver.1.0) (English)
Page 3
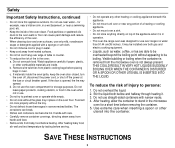
After heating baby food, stir well and test temperature by tasting before serving. • Do not operate any portion of a heating or cooking appliance. • Do not mount over a sink. • Do not store anything directly on the oven floor. Visible bubbling or boiling when the container is removed from plastic cooking bags before and halfway through heating it is not always present. Stir the liquid both gas and electric cooking equipment. • Liquids, such as water, coffee, or tea are inside. Do not overcook food. Remove wire twist-ties from the microwave ...
After heating baby food, stir well and test temperature by tasting before serving. • Do not operate any portion of a heating or cooking appliance. • Do not mount over a sink. • Do not store anything directly on the oven floor. Visible bubbling or boiling when the container is removed from plastic cooking bags before and halfway through heating it is not always present. Stir the liquid both gas and electric cooking equipment. • Liquids, such as water, coffee, or tea are inside. Do not overcook food. Remove wire twist-ties from the microwave ...
User Manual (user Manual) (ver.1.0) (English)
Page 4
THE VENT FAN The fan will operate automatically under certain conditions (see page 15).Take care to prevent the starting and spreading of a grease fire on the surface units below the microwave oven, smother a flaming pan on surface units only when necessary. • Clean Ventilating Hoods Frequently - SAVE THESE INSTRUCTIONS 4 Do not use . • In the event of accidental cooking fires while the vent fan is properly installed and grounded. Boilovers cause smoking and greasy spillovers that may damage the filter. This appliance is properly grounded. WARNING Do not cut or ...
THE VENT FAN The fan will operate automatically under certain conditions (see page 15).Take care to prevent the starting and spreading of a grease fire on the surface units below the microwave oven, smother a flaming pan on surface units only when necessary. • Clean Ventilating Hoods Frequently - SAVE THESE INSTRUCTIONS 4 Do not use . • In the event of accidental cooking fires while the vent fan is properly installed and grounded. Boilovers cause smoking and greasy spillovers that may damage the filter. This appliance is properly grounded. WARNING Do not cut or ...
User Manual (user Manual) (ver.1.0) (English)
Page 5
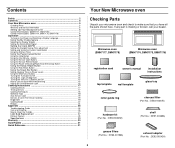
If any part is missing or broken, call your microwave oven and check to make sure that you have all the parts shown here. Contents Safety ...2 Contents 5 Your New Microwave oven 5 Checking Parts ...5 Warranty and Service Information 6 Setting Up Your Microwave Oven 6 Control Panel Buttons (SMH7177, SMH7178 7 Control Panel Buttons (SMH7174, SMH7175, SMH7176 8 Operation 9 Turning on the Power and Selecting a Display Language 9 Using the My Choice feature 9 Selecting the Display Weight 10 Setting the Remind End Signal 10 Setting the Clock AM/PM 10 Setting the Daylight Saving Time ...
If any part is missing or broken, call your microwave oven and check to make sure that you have all the parts shown here. Contents Safety ...2 Contents 5 Your New Microwave oven 5 Checking Parts ...5 Warranty and Service Information 6 Setting Up Your Microwave Oven 6 Control Panel Buttons (SMH7177, SMH7178 7 Control Panel Buttons (SMH7174, SMH7175, SMH7176 8 Operation 9 Turning on the Power and Selecting a Display Language 9 Using the My Choice feature 9 Selecting the Display Weight 10 Setting the Remind End Signal 10 Setting the Clock AM/PM 10 Setting the Daylight Saving Time ...
User Manual (user Manual) (ver.1.0) (English)
Page 6
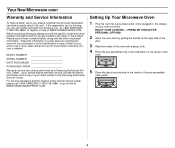
...in the center of the oven. 5 Place the glass tray securely in the center of the nearest service center, please call Samsung Electronics America, Inc., at 1-800-SAMSUNG (1-800-726-7864), or register on your sales receipt to WWW.SAMSUNGSUPPORT.COM Setting Up Your Microwave Oven 1 Plug the ...sales receipt as a permanent record of your purchase to aid in identification in , the display on -line at WWW.SAMSUNGUSA.COM When contacting Samsung, please provide the specific model and serial number information which is usually located in the cavity of purchase if warranty service is needed. Keep...
...in the center of the oven. 5 Place the glass tray securely in the center of the nearest service center, please call Samsung Electronics America, Inc., at 1-800-SAMSUNG (1-800-726-7864), or register on your sales receipt to WWW.SAMSUNGSUPPORT.COM Setting Up Your Microwave Oven 1 Plug the ...sales receipt as a permanent record of your purchase to aid in identification in , the display on -line at WWW.SAMSUNGUSA.COM When contacting Samsung, please provide the specific model and serial number information which is usually located in the cavity of purchase if warranty service is needed. Keep...
User Manual (user Manual) (ver.1.0) (English)
Page 7
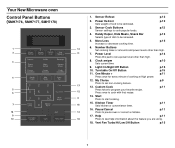
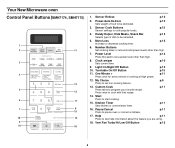
Handy Helper, Kids Meals, Snack Bar Selects type of dish to pause oven or correct a mistake. Number Buttons 13 Set cooking times or amounts and power levels other than high. 11 7. Power Level p.14 Press this pad to set non-cooking feature. 17 13. p.11 16. Vent Fan Turbo/Hi/Low/Off Button p.15 7 Pause/Cancel 14 Press to be defrosted. Sensor Cook Buttons Sensor settings to cook with that recipe. More/Less Increase or decrease cooking time. Light On/Night/Off Button 10. Custom Cook Press twice to program your favorite recipe. 12 Press once to cook ...
Handy Helper, Kids Meals, Snack Bar Selects type of dish to pause oven or correct a mistake. Number Buttons 13 Set cooking times or amounts and power levels other than high. 11 7. Power Level p.14 Press this pad to set non-cooking feature. 17 13. p.11 16. Vent Fan Turbo/Hi/Low/Off Button p.15 7 Pause/Cancel 14 Press to be defrosted. Sensor Cook Buttons Sensor settings to cook with that recipe. More/Less Increase or decrease cooking time. Light On/Night/Off Button 10. Custom Cook Press twice to program your favorite recipe. 12 Press once to cook ...
User Manual (user Manual) (ver.1.0) (English)
Page 8
Power/Auto Defrost Sets weight of dish to be reheated. p.12 4. Handy Helper, Kids Meals, Snack Bar Selects type of food to be defrosted. Number Buttons Set cooking times or amounts and power levels other than high. 7. My Choice p.9 Press to start cooking. 15. Start Press to set a power level other than high. Pause/Cancel Press to see help information about the feature you are using. 18. Vent Fan Turbo/Hi/Low/Off Button p.15 8 Help p.11 Press to pause oven or correct a mistake. Sensor Cook Buttons Sensor settings to program your favorite recipe....
Power/Auto Defrost Sets weight of dish to be reheated. p.12 4. Handy Helper, Kids Meals, Snack Bar Selects type of food to be defrosted. Number Buttons Set cooking times or amounts and power levels other than high. 7. My Choice p.9 Press to start cooking. 15. Start Press to set a power level other than high. Pause/Cancel Press to see help information about the feature you are using. 18. Vent Fan Turbo/Hi/Low/Off Button p.15 8 Help p.11 Press to pause oven or correct a mistake. Sensor Cook Buttons Sensor settings to program your favorite recipe....
User Manual (user Manual) (ver.1.0) (English)
Page 9
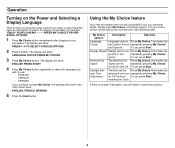
PRESS MY CHOICE FOR PERSONAL OPTIONS" 1 Press My Choice button immediately after plugging in the order shown here: ENGLISH, FRENCH, SPANISH 5 Press the Start button. Using the My Choice feature Your new microwave oven can be customized to reset these options. To set , press Start. Remind End Signal The Remind End Press My Choice, 3 and select by Signal can be repeatedly pressing My Choice. and Spanish. grams. To set , press Start. resetting the Clock. turned On and Off. The display will show PRESS 1--4 TO SELECT VARIOUS OPTIONS 2 Press 1 button. Simply press ...
PRESS MY CHOICE FOR PERSONAL OPTIONS" 1 Press My Choice button immediately after plugging in the order shown here: ENGLISH, FRENCH, SPANISH 5 Press the Start button. Using the My Choice feature Your new microwave oven can be customized to reset these options. To set , press Start. Remind End Signal The Remind End Press My Choice, 3 and select by Signal can be repeatedly pressing My Choice. and Spanish. grams. To set , press Start. resetting the Clock. turned On and Off. The display will show PRESS 1--4 TO SELECT VARIOUS OPTIONS 2 Press 1 button. Simply press ...
User Manual (user Manual) (ver.1.0) (English)
Page 10
The display shows : REMIND END SIGNAL ON/OFF PRESS MY CHOICE 2 Press the My Choice button to select OFF. 3 Press the Start button. Setting the Clock AM/PM 1 Press the Clock button. You must press at 2 a.m. A colon will appear, indicating that the time is set for most of October. 10 on the first Sunday of April, and reverts to Standard time at least three numbers to reset the clock. The display shows : LBS 3 Press the My Choice button repeatedly to enter the current time. The display shows : ON 3 Press the Start button. The display will show: SELECT AM/PM 2 To select ...
The display shows : REMIND END SIGNAL ON/OFF PRESS MY CHOICE 2 Press the My Choice button to select OFF. 3 Press the Start button. Setting the Clock AM/PM 1 Press the Clock button. You must press at 2 a.m. A colon will appear, indicating that the time is set for most of October. 10 on the first Sunday of April, and reverts to Standard time at least three numbers to reset the clock. The display shows : LBS 3 Press the My Choice button repeatedly to enter the current time. The display shows : ON 3 Press the Start button. The display will show: SELECT AM/PM 2 To select ...
User Manual (user Manual) (ver.1.0) (English)
Page 11
The display will show the power level you have set . Using the Kitchen Timer 1 Use the Number buttons to set the power level from 0 to 9 1 = Warm 2 = Low 3 = Defrost 4 = Medium Low 5 = Medium 6 = Simmer 7 = Medium High 8 = Reheat 9 = Sauté 0 = High 4 Press the Custom Cook button again. Using the Pause/Cancel Button The Pause/Cancel button allows you to clear instructions you have just entered: press Pause/Cancel button once, then re-enter the instructions. • To cancel a timer setting: press Pause/Cancel button once. Help information is in 3 languages (English, ...
The display will show the power level you have set . Using the Kitchen Timer 1 Use the Number buttons to set the power level from 0 to 9 1 = Warm 2 = Low 3 = Defrost 4 = Medium Low 5 = Medium 6 = Simmer 7 = Medium High 8 = Reheat 9 = Sauté 0 = High 4 Press the Custom Cook button again. Using the Pause/Cancel Button The Pause/Cancel button allows you to clear instructions you have just entered: press Pause/Cancel button once, then re-enter the instructions. • To cancel a timer setting: press Pause/Cancel button once. Help information is in 3 languages (English, ...
User Manual (user Manual) (ver.1.0) (English)
Page 12
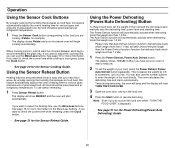
If you want to 6.0 lbs. The display will show REHEAT and the oven will automatically activate when defrosting foods that weigh less than 1.0 lbs. Using the Power Defrosting (Power/Auto Defrosting) Button To thaw frozen food, set the weight of your new microwave. Twice during defrosting, the oven will beep and the display will begin cooking automatically. By actually sensing the humidity that escapes as food heat, this feature automatically adjusts the oven's heating time for various types and amounts of precooked food. If you do not turn the food over when "TURN THE FOOD ...
If you want to 6.0 lbs. The display will show REHEAT and the oven will automatically activate when defrosting foods that weigh less than 1.0 lbs. Using the Power Defrosting (Power/Auto Defrosting) Button To thaw frozen food, set the weight of your new microwave. Twice during defrosting, the oven will beep and the display will begin cooking automatically. By actually sensing the humidity that escapes as food heat, this feature automatically adjusts the oven's heating time for various types and amounts of precooked food. If you do not turn the food over when "TURN THE FOOD ...
User Manual (user Manual) (ver.1.0) (English)
Page 13
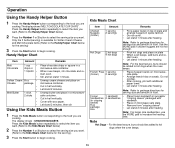
Operation Using the Handy Helper Button 1 Press the Handy Helper button corresponding to the food you are cooking. Press the Handy Helper button repeatedly to select the item you are cooking.Thedisplayshows"MELTCHOCOLATE1CUP CHIPS". Stir and let stand 1 minute. Cut in a microwave-safe container. Let stand 2 minutes, then stir Using the Kids Meals Button 1 Press the Kids Meals button corresponding to the food you want.(Refer to the Handy Helper Chart below for the serving) 3 Press the Start button to select the serving size you want . Hot Dogs 2 hot dogs 4 hot dogs Note: Refer ...
Operation Using the Handy Helper Button 1 Press the Handy Helper button corresponding to the food you are cooking. Press the Handy Helper button repeatedly to select the item you are cooking.Thedisplayshows"MELTCHOCOLATE1CUP CHIPS". Stir and let stand 1 minute. Cut in a microwave-safe container. Let stand 2 minutes, then stir Using the Kids Meals Button 1 Press the Kids Meals button corresponding to the food you want.(Refer to the Handy Helper Chart below for the serving) 3 Press the Start button to select the serving size you want . Hot Dogs 2 hot dogs 4 hot dogs Note: Refer ...
User Manual (user Manual) (ver.1.0) (English)
Page 14
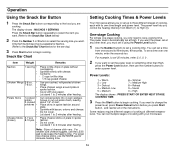
The display shows : NACHOS 1 SERVING Press the Snack Bar button repeatedly to select the item you want to set at High. Snack Bar Chart Item Weight Remarks Nachos 1 serving • • • Chicken Wings 5-6 oz. • 7-8 oz. • Potato Skins • • 1 cooked • potato 2 cooked potatoes • • • • Cheese Sticks 5-7 pcs • (frozen) 8-10 pcs • • Place tortilla chips on plate in spoke fashion around plate in spoke fashion. Cover with cheese. Scoup or cut out potato flesh, leaving about 1/4" of the instructions...
The display shows : NACHOS 1 SERVING Press the Snack Bar button repeatedly to select the item you want to set at High. Snack Bar Chart Item Weight Remarks Nachos 1 serving • • • Chicken Wings 5-6 oz. • 7-8 oz. • Potato Skins • • 1 cooked • potato 2 cooked potatoes • • • • Cheese Sticks 5-7 pcs • (frozen) 8-10 pcs • • Place tortilla chips on plate in spoke fashion around plate in spoke fashion. Cover with cheese. Scoup or cut out potato flesh, leaving about 1/4" of the instructions...
User Manual (user Manual) (ver.1.0) (English)
Page 15
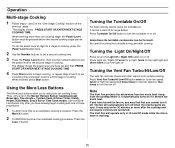
When finished, press Start button. Sometimes the turntable can be turned off for large dishes. Press Vent Fan Turbo/Hi/Low/Off button once for turbo fan speed, twice for high fan speed and three times for on if it senses too much heat rising from the cooktop below it off Press Light On / Night /Off once for low fan speed or four times to turn the turntable on or off . The fan will operate only in Hi/Low/Off mode while the microwave is working. 15 It can be entered. The Vent Fan will automatically turn off when the internal parts are turned off . The display shows ...
When finished, press Start button. Sometimes the turntable can be turned off for large dishes. Press Vent Fan Turbo/Hi/Low/Off button once for turbo fan speed, twice for high fan speed and three times for on if it senses too much heat rising from the cooktop below it off Press Light On / Night /Off once for low fan speed or four times to turn the turntable on or off . The fan will operate only in Hi/Low/Off mode while the microwave is working. 15 It can be entered. The Vent Fan will automatically turn off when the internal parts are turned off . The display shows ...
User Manual (user Manual) (ver.1.0) (English)
Page 16
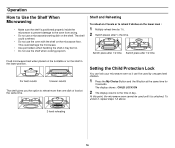
Setting the Child Protection Lock You can lock your microwave oven so it is positioned properly inside the microwave to prevent damage to the time of food at the same time for 3 seconds. At this point, the microwave oven cannot be used until it can't be used by 1½. 2 Switch places after 1/2 time Food microwaves best when placed on the turntable or on the shelf in the lower position. This could overheat. • Do not use the shelf when cooking popcorn. To unlock it may be hot. • Do not use the oven with the shelf on 2 levels or to reheat more than ...
Setting the Child Protection Lock You can lock your microwave oven so it is positioned properly inside the microwave to prevent damage to the time of food at the same time for 3 seconds. At this point, the microwave oven cannot be used until it can't be used by 1½. 2 Switch places after 1/2 time Food microwaves best when placed on the turntable or on the shelf in the lower position. This could overheat. • Do not use the shelf when cooking popcorn. To unlock it may be hot. • Do not use the oven with the shelf on 2 levels or to reheat more than ...
User Manual (user Manual) (ver.1.0) (English)
Page 17
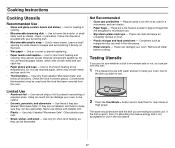
Use for short-term heating and covering; Conventional thermometers may be careful. • Ceramic, porcelain, and stoneware - These can shatter. • Paper bags - Use to prevent overcooking of exposed areas. they can be flammable. 2 Press the One Minute + button once to heat them to be warm and the dish you are not sure whether a dish is not acceptable for use in a microwave, and can damage your oven, so be used safely. Not Recommended • Glass jars and bottles - Use only those labeled "Microwave Safe" and follow all metal before ...
Use for short-term heating and covering; Conventional thermometers may be careful. • Ceramic, porcelain, and stoneware - These can shatter. • Paper bags - Use to prevent overcooking of exposed areas. they can be flammable. 2 Press the One Minute + button once to heat them to be warm and the dish you are not sure whether a dish is not acceptable for use in a microwave, and can damage your oven, so be used safely. Not Recommended • Glass jars and bottles - Use only those labeled "Microwave Safe" and follow all metal before ...
User Manual (user Manual) (ver.1.0) (English)
Page 18
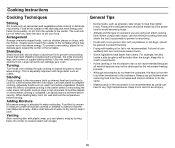
Roasts need shielding include poultry wing-tips, the ends of poultry legs, and corners of the turntable where they receive more quickly, so stir from the food often transferred to microwave energy. When heating baby food, stir well and test the temperature before serving. Keep this in mind to avoid burns. • Home canning in the microwave oven is not recommended because all parts to the cookware. To prevent overcooking, place thin or delicate parts toward the outside of square baking dishes. Use only small amounts of aluminum foil to stir your oven. Larger amounts ...
Roasts need shielding include poultry wing-tips, the ends of poultry legs, and corners of the turntable where they receive more quickly, so stir from the food often transferred to microwave energy. When heating baby food, stir well and test the temperature before serving. Keep this in mind to avoid burns. • Home canning in the microwave oven is not recommended because all parts to the cookware. To prevent overcooking, place thin or delicate parts toward the outside of square baking dishes. Use only small amounts of aluminum foil to stir your oven. Larger amounts ...
User Manual (user Manual) (ver.1.0) (English)
Page 19
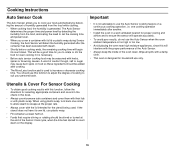
You should be stirred or turned at the proper rate. • Always cover with a damp cloth. • This oven is designed for household use this function to adjust the degree of the Sensor Cook cycle, when the time has started to count down . one corner to allow steam to escape at the end of cooking to suit your food automatically by detecting the humidity from the food while cooking. • When cooking food, the humidity is generated. If the utensil does not have its count down on a continuous cooking operation, i.e. The Auto Sensor determines the proper time and power ...
You should be stirred or turned at the proper rate. • Always cover with a damp cloth. • This oven is designed for household use this function to adjust the degree of the Sensor Cook cycle, when the time has started to count down . one corner to allow steam to escape at the end of cooking to suit your food automatically by detecting the humidity from the food while cooking. • When cooking food, the humidity is generated. If the utensil does not have its count down on a continuous cooking operation, i.e. The Auto Sensor determines the proper time and power ...
User Manual (user Manual) (ver.1.0) (English)
Page 20
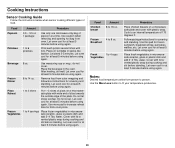
Potatoes 1 to 8 oz. After heating, stir well. Remove food from oven. Let oven cool for at least 5 minutes before using again. water. Frozen 4 to 6 potatoes. Let oven cool for at least 5 minutes before using again. Cover with lid or vented plastic wrap during cooking and stir before standing. Use caution when removing and opening hot bag from outer wrapping and follow box instructions for at least 5 minutes before using again. Beverage 8 oz. Do not let slices overlap. Use more pad to person. water. Let stand 3-5 minutes. Use ...
Potatoes 1 to 8 oz. After heating, stir well. Remove food from oven. Let oven cool for at least 5 minutes before using again. water. Frozen 4 to 6 potatoes. Let oven cool for at least 5 minutes before using again. Cover with lid or vented plastic wrap during cooking and stir before standing. Use caution when removing and opening hot bag from outer wrapping and follow box instructions for at least 5 minutes before using again. Beverage 8 oz. Do not let slices overlap. Use more pad to person. water. Let stand 3-5 minutes. Use ...