

User Manual
Page 2
Table of contents Special features Getting started Front and back views Assemble your device Charge the battery Wear the Watch Start using your device Lock or unlock your device Galaxy Wearable app Navigation Watch screen Change the watch face 6 Status panel 20 7 Notifications 24 8 Enter text 26 9 Water lock mode 30 Theater mode 31 9 Goodnight mode 31 11 Apps 32 14 Using apps 33 14 15 Access apps 33 17 Open apps 33 18 Auto open apps 33 18 Recent apps 33 2 WEA_Watch_EN_UM_TN_RGE_080318_FINAL
Table of contents Special features Getting started Front and back views Assemble your device Charge the battery Wear the Watch Start using your device Lock or unlock your device Galaxy Wearable app Navigation Watch screen Change the watch face 6 Status panel 20 7 Notifications 24 8 Enter text 26 9 Water lock mode 30 Theater mode 31 9 Goodnight mode 31 11 Apps 32 14 Using apps 33 14 15 Access apps 33 17 Open apps 33 18 Auto open apps 33 18 Recent apps 33 2 WEA_Watch_EN_UM_TN_RGE_080318_FINAL
User Manual
Page 4
NFC Connection alerts Airplane mode Data usage Location Connect to a new phone Sounds and vibration Sound mode Vibrate with sound Volume Vibration intensity Long vibration Ringtone Ringtone vibration Notification sound 77 Notification vibration 83 78 Touch sounds 83 78 Do not disturb 84 79 Display 84 79 Watch faces 84 80 Adjust screen brightness 85 80 Set the screen timeout 85 80 Show last app 85 81 Background style 86 81 Font 86 82 Touch sensitivity 86 82 Device maintenance 87 82 Date and time 87 83 Power saving mode 88 83 Watch only mode 88 4
NFC Connection alerts Airplane mode Data usage Location Connect to a new phone Sounds and vibration Sound mode Vibrate with sound Volume Vibration intensity Long vibration Ringtone Ringtone vibration Notification sound 77 Notification vibration 83 78 Touch sounds 83 78 Do not disturb 84 79 Display 84 79 Watch faces 84 80 Adjust screen brightness 85 80 Set the screen timeout 85 80 Show last app 85 81 Background style 86 81 Font 86 82 Touch sensitivity 86 82 Device maintenance 87 82 Date and time 87 83 Power saving mode 88 83 Watch only mode 88 4
User Manual
Page 5
...security Set a screen lock Security update service Remote security Watch connection Accessibility Text to speech Other settings Custom shortcut Wake-up gesture Watch info Getting help Videos 89 Smart Simulator 96 89 Tips and Tricks 96 90 Samsung Care 96 90 Legal 97 91 Intellectual property 98 ...91 Open source software 98 92 Disclaimer of software 100 93 Samsung Knox 100 93 Maintaining water...
...security Set a screen lock Security update service Remote security Watch connection Accessibility Text to speech Other settings Custom shortcut Wake-up gesture Watch info Getting help Videos 89 Smart Simulator 96 89 Tips and Tricks 96 90 Samsung Care 96 90 Legal 97 91 Intellectual property 98 ...91 Open source software 98 92 Disclaimer of software 100 93 Samsung Knox 100 93 Maintaining water...
User Manual
Page 9
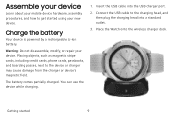
... device while charging. 1. Getting started using your device. The battery comes partially charged. Warning: Do not disassemble, modify, or repair your new device. Place the Watch onto the wireless charger dock. Assemble your device Learn about your mobile device hardware, assembly procedures, and how to get started 9 Insert the USB cable...
... device while charging. 1. Getting started using your device. The battery comes partially charged. Warning: Do not disassemble, modify, or repair your new device. Place the Watch onto the wireless charger dock. Assemble your device Learn about your mobile device hardware, assembly procedures, and how to get started 9 Insert the USB cable...
User Manual
Page 11
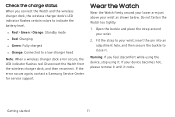
...then reconnect. Do not fasten the Watch too tightly. 1. Getting started 11 If the error occurs again, contact a Samsung Service Center for service support. Fit the strap to your wrist. 2. If your wrist as shown below. Wear the Watch Wear the Watch firmly around your wrist, insert the ... the buckle to indicate the battery level. l Red > Green > Orange: Standby mode l Red: Charging. Warning: If you connect the Watch and the wireless charger dock, the wireless charger dock's LED indicator flashes certain colors to close it. Check the charge status When you feel ...
...then reconnect. Do not fasten the Watch too tightly. 1. Getting started 11 If the error occurs again, contact a Samsung Service Center for service support. Fit the strap to your wrist. 2. If your wrist as shown below. Wear the Watch Wear the Watch firmly around your wrist, insert the ... the buckle to indicate the battery level. l Red > Green > Orange: Standby mode l Red: Charging. Warning: If you connect the Watch and the wireless charger dock, the wireless charger dock's LED indicator flashes certain colors to close it. Check the charge status When you feel ...

User Manual
Page 12
l If you have sensitive skin or fasten the Watch too tightly, you experience skin irritation when wearing the device, stop wearing the device and consult a physician. 12 l Do not expose the straps to very wet conditions. Wet straps can cause skin irritations. If you may experience discomfort when wearing the Watch for prolonged periods. Getting started Strap tips and precautions l Some people may feel some discomfort. Dry the straps first.
l If you have sensitive skin or fasten the Watch too tightly, you experience skin irritation when wearing the device, stop wearing the device and consult a physician. 12 l Do not expose the straps to very wet conditions. Wet straps can cause skin irritations. If you may experience discomfort when wearing the Watch for prolonged periods. Getting started Strap tips and precautions l Some people may feel some discomfort. Dry the straps first.

User Manual
Page 13
Replace the strap Detach the strap from the Watch. To replace the strap: u Insert one . To remove the strap: u Slide the strap's spring bar inwards and pull the strap away from the Watch to replace it with a new one end of the spring bar into the lug, slide the spring bar inwards, and connect the new strap. Getting started 13
Replace the strap Detach the strap from the Watch. To replace the strap: u Insert one . To remove the strap: u Slide the strap's spring bar inwards and pull the strap away from the Watch to replace it with a new one end of the spring bar into the lug, slide the spring bar inwards, and connect the new strap. Getting started 13

User Manual
Page 14
Tap Power off . The default Screen lock on page 90. To choose a secure screen lock, see Set a screen lock on your device is None. Your Watch locks when you remove it from your device on . Getting started 14 To turn the device on: u Press and hold the Power button. 2. Press and ...hold the Power button until the device turns on or off . To unlock the Watch: u Press the Power button or Back button. Start using your device The instructions below explain how to secure your device. To turn the device off...
Tap Power off . The default Screen lock on page 90. To choose a secure screen lock, see Set a screen lock on your device is None. Your Watch locks when you remove it from your device on . Getting started 14 To turn the device on: u Press and hold the Power button. 2. Press and ...hold the Power button until the device turns on or off . To unlock the Watch: u Press the Power button or Back button. Start using your device The instructions below explain how to secure your device. To turn the device off...
User Manual
Page 15
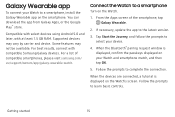
Compatible with select devices using Android 5.0 and later, with compatible Samsung Galaxy devices. Connect the Watch to a smartphone Turn on the Watch's screen. Getting started 15 Supported devices may not be available. If necessary, update the app to complete the .... For a list of the smartphone, tap Galaxy Wearable. 2. From the Apps screen of compatible smartphones, please visit samsung.com/ us/support/owners/app/galaxy-wearable-watch. Tap Start the Journey, and follow the prompts to learn basic controls. When the Bluetooth® pairing request window...
Compatible with select devices using Android 5.0 and later, with compatible Samsung Galaxy devices. Connect the Watch to a smartphone Turn on the Watch's screen. Getting started 15 Supported devices may not be available. If necessary, update the app to complete the .... For a list of the smartphone, tap Galaxy Wearable. 2. From the Apps screen of compatible smartphones, please visit samsung.com/ us/support/owners/app/galaxy-wearable-watch. Tap Start the Journey, and follow the prompts to learn basic controls. When the Bluetooth® pairing request window...

User Manual
Page 16
Note: You must connect the Watch to Wi-Fi and sign in to your Samsung account on your Watch. Back up any important data stored on your smartphone as follows: 1. •From the Apps screen of the smartphone, tap Galaxy Wearable > Settings tab. 2. Getting ...started 16 Make sure you back up your smartphone. Tap About watch > Back up and restore > Back...
Note: You must connect the Watch to Wi-Fi and sign in to your Samsung account on your Watch. Back up any important data stored on your smartphone as follows: 1. •From the Apps screen of the smartphone, tap Galaxy Wearable > Settings tab. 2. Getting ...started 16 Make sure you back up your smartphone. Tap About watch > Back up and restore > Back...

User Manual
Page 17
..., or press a button. Drag Touch and hold items to view panels. Tap Lightly tap the screen to zoom in and out. Getting started 17 The Watch disconnects from the pad of the smartphone, tap Galaxy Wearable. 2. Tap More options > Disconnect, and then confirm when prompted. From the Apps screen of your...
..., or press a button. Drag Touch and hold items to view panels. Tap Lightly tap the screen to zoom in and out. Getting started 17 The Watch disconnects from the pad of the smartphone, tap Galaxy Wearable. 2. Tap More options > Disconnect, and then confirm when prompted. From the Apps screen of your...
User Manual
Page 18
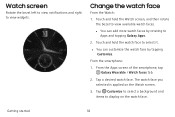
...smartphone, tap Galaxy Wearable > Watch faces tab. 2. Tap Customize to select a background and items to select it. Change the watch face to display on the Watch screen. 3. Tap a desired watch faces. The watch face you selected is applied on the watch face by rotating to view ...widgets. l You can customize the watch face. Touch and hold the watch face From the Watch: 1. Getting started 18 Watch screen...
...smartphone, tap Galaxy Wearable > Watch faces tab. 2. Tap Customize to select a background and items to select it. Change the watch face to display on the Watch screen. 3. Tap a desired watch faces. The watch face you selected is applied on the watch face by rotating to view ...widgets. l You can customize the watch face. Touch and hold the watch face From the Watch: 1. Getting started 18 Watch screen...

User Manual
Page 20
Airplane mode Power saving mode Watch always on Brightness •100%·*· @4 ~ e 0 0 (l- Cted using B\U Indicator icons Ringtone volume Do not disturb Settings Theater mode Getting started Devices and software are constantly evolving -the illustrations you see here are for reference only. 20 e.\'§)-S- CJ @ Co,;l}f' . Status panel To open the Status panel: u On the Watch screen, swipe down from the top of the screen.
Airplane mode Power saving mode Watch always on Brightness •100%·*· @4 ~ e 0 0 (l- Cted using B\U Indicator icons Ringtone volume Do not disturb Settings Theater mode Getting started Devices and software are constantly evolving -the illustrations you see here are for reference only. 20 e.\'§)-S- CJ @ Co,;l}f' . Status panel To open the Status panel: u On the Watch screen, swipe down from the top of the screen.

User Manual
Page 21
Airplane mode Airplane mode disconnects your device from the top of the screen to save battery power by limiting the Watch's functions. 1. Ok to confirm. On the Watch screen, swipe down from the top of the screen in the Status bar. Tap Power saving, and then tap Ok to Getting started 21 Indicator.... 2. Tap Airplane mode, and then tap confirm. Status Bar Indicator icons display at the top of the screen to open the status panel. 2. On the Watch screen, swipe down from all networks and turns off connectivity features, such as Bluetooth and Wi-Fi. 1.
Airplane mode Airplane mode disconnects your device from the top of the screen to save battery power by limiting the Watch's functions. 1. Ok to confirm. On the Watch screen, swipe down from the top of the screen in the Status bar. Tap Power saving, and then tap Ok to Getting started 21 Indicator.... 2. Tap Airplane mode, and then tap confirm. Status Bar Indicator icons display at the top of the screen to open the status panel. 2. On the Watch screen, swipe down from all networks and turns off connectivity features, such as Bluetooth and Wi-Fi. 1.

User Manual
Page 22
... notification, except for alarms, is turned off. 1. Tap Brightness and adjust the level by rotating the bezel. Tap Watch always on, and then tap ✓ Ok to confirm. On the Watch screen, swipe down from the top of the screen to open the status panel. 2. Getting started 22 Do not ...disturb mode You can adjust the Watch's display brightness to suit the environment. 1. On the Watch screen, swipe down from the top of time. 3. Tap ✓ Ok to confirm. On the Watch screen, swipe down from the top of the screen to open the status...
... notification, except for alarms, is turned off. 1. Tap Brightness and adjust the level by rotating the bezel. Tap Watch always on, and then tap ✓ Ok to confirm. On the Watch screen, swipe down from the top of the screen to open the status panel. 2. Getting started 22 Do not ...disturb mode You can adjust the Watch's display brightness to suit the environment. 1. On the Watch screen, swipe down from the top of time. 3. Tap ✓ Ok to confirm. On the Watch screen, swipe down from the top of the screen to open the status...

User Manual
Page 23
... Settings. 2. Tap Advanced > Edit quick settings. • Tap Remove to remove a quick setting. 0 • Tap Add to change its order. Getting started 23 On the Watch screen, swipe down from the top of the screen to open the status panel. 2. Play music You can play music saved on the Status panel...
... Settings. 2. Tap Advanced > Edit quick settings. • Tap Remove to remove a quick setting. 0 • Tap Add to change its order. Getting started 23 On the Watch screen, swipe down from the top of the screen to open the status panel. 2. Play music You can play music saved on the Status panel...

User Manual
Page 24
... the bezel left to view notifications. 2. Tap the notification to view details. Getting started 24 From the Watch screen, rotate the bezel left to view notifications. 2. From the Watch screen, rotate the bezel left . 2. Tap the number at the bottom of notifications from the app that... you receive a notification, information about the notification, such as its type, is displayed on the screen while the Watch is vibrating. 1. Rotate the bezel left to view notifications. 2. Block notifications To block notifications from your smartphone. Notifications Stay up to...
... the bezel left to view notifications. 2. Tap the notification to view details. Getting started 24 From the Watch screen, rotate the bezel left to view notifications. 2. From the Watch screen, rotate the bezel left . 2. Tap the number at the bottom of notifications from the app that... you receive a notification, information about the notification, such as its type, is displayed on the screen while the Watch is vibrating. 1. Rotate the bezel left to view notifications. 2. Block notifications To block notifications from your smartphone. Notifications Stay up to...
User Manual
Page 25
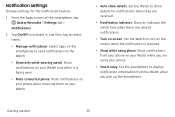
..., and then tap to select items: • Manage notifications: Select apps on the smartphone to send notifications to the Watch. • Show only while wearing watch face when there are using your phone. • Smart relay: Set the smartphone to show details for the notification feature... •1. Notification settings Change settings for notifications when they are received. • Notification indicator: Show an indicator the watch : Show notifications on your Watch only while it is being worn. • Mute connected phone: Mute notifications on your phone while receiving them on your...
..., and then tap to select items: • Manage notifications: Select apps on the smartphone to send notifications to the Watch. • Show only while wearing watch face when there are using your phone. • Smart relay: Set the smartphone to show details for the notification feature... •1. Notification settings Change settings for notifications when they are received. • Notification indicator: Show an indicator the watch : Show notifications on your Watch only while it is being worn. • Mute connected phone: Mute notifications on your phone while receiving them on your...
User Manual
Page 29
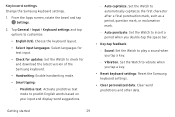
... based on your input and display word suggestions. - Sound: Set the Watch to insert a period when you tap a key. - Vibration: Set the Watch to check for updates: Set the Watch to vibrate when you tap a key. • Reset keyboard settings: Reset the Samsung keyboard settings. • Clear personalized data: Clear word predictions and other...
... based on your input and display word suggestions. - Sound: Set the Watch to insert a period when you tap a key. - Vibration: Set the Watch to check for updates: Set the Watch to vibrate when you tap a key. • Reset keyboard settings: Reset the Samsung keyboard settings. • Clear personalized data: Clear word predictions and other...

User Manual
Page 30
... bezel and tap Settings. 2. While in the water. Exit water lock mode u Press and hold the Home button to turn off : l Touchscreen l Wake-up gestures l Watch always on 1. u 1. Getting started 30 Water lock mode You can use Water lock mode to confirm. Tap Advanced > Water lock mode. 3. Tap Advanced > Water lock... use the eject water features to help clear out water from the speaker. Tap Eject water to make sounds to help eject water from your Watch.
... bezel and tap Settings. 2. While in the water. Exit water lock mode u Press and hold the Home button to turn off : l Touchscreen l Wake-up gestures l Watch always on 1. u 1. Getting started 30 Water lock mode You can use Water lock mode to confirm. Tap Advanced > Water lock mode. 3. Tap Advanced > Water lock... use the eject water features to help clear out water from the speaker. Tap Eject water to make sounds to help eject water from your Watch.
