
User Manual
Page 2
Table of contents Special features Getting started Front and back views Assemble your device Charge the battery Wear the Watch Start using your device Lock or unlock your device Galaxy Wearable app Navigation Watch screen Change the watch face 6 Status panel 20 7 Notifications 24 8 Enter text 26 9 Water lock mode 30 Theater mode 31 9 Goodnight mode 31 11 Apps 32 14 Using apps 33 14 15 Access apps 33 17 Open apps 33 18 Auto open apps 33 18 Recent apps 33 2 WEA_Watch_EN_UM_TN_RGE_080318_FINAL
Table of contents Special features Getting started Front and back views Assemble your device Charge the battery Wear the Watch Start using your device Lock or unlock your device Galaxy Wearable app Navigation Watch screen Change the watch face 6 Status panel 20 7 Notifications 24 8 Enter text 26 9 Water lock mode 30 Theater mode 31 9 Goodnight mode 31 11 Apps 32 14 Using apps 33 14 15 Access apps 33 17 Open apps 33 18 Auto open apps 33 18 Recent apps 33 2 WEA_Watch_EN_UM_TN_RGE_080318_FINAL
User Manual
Page 3
Sort apps App permissions Hide apps Uninstall apps Samsung apps Messages Phone Contacts Email Samsung Health Galaxy Apps PPT Controller Samsung Flow Find My Phone Reminder 34 Music app 60 34 Gallery 62 35 Weather 65 35 Alarm 66 35 World clock 67 35 Calendar 68 39 Bixby 69 42 Alti-Barometer 71 44 News Briefing 72 45 Settings 73 54 How to use Settings 74 55 Connections 74 57 Bluetooth 74 58 Mobile networks 75 59 Wi-Fi 75 3
Sort apps App permissions Hide apps Uninstall apps Samsung apps Messages Phone Contacts Email Samsung Health Galaxy Apps PPT Controller Samsung Flow Find My Phone Reminder 34 Music app 60 34 Gallery 62 35 Weather 65 35 Alarm 66 35 World clock 67 35 Calendar 68 39 Bixby 69 42 Alti-Barometer 71 44 News Briefing 72 45 Settings 73 54 How to use Settings 74 55 Connections 74 57 Bluetooth 74 58 Mobile networks 75 59 Wi-Fi 75 3
User Manual
Page 4
NFC Connection alerts Airplane mode Data usage Location Connect to a new phone Sounds and vibration Sound mode Vibrate with sound Volume Vibration intensity Long vibration Ringtone Ringtone vibration Notification sound 77 Notification vibration 83 78 Touch sounds 83 78 Do not disturb 84 79 Display 84 79 Watch faces 84 80 Adjust screen brightness 85 80 Set the screen timeout 85 80 Show last app 85 81 Background style 86 81 Font 86 82 Touch sensitivity 86 82 Device maintenance 87 82 Date and time 87 83 Power saving mode 88 83 Watch only mode 88 4
NFC Connection alerts Airplane mode Data usage Location Connect to a new phone Sounds and vibration Sound mode Vibrate with sound Volume Vibration intensity Long vibration Ringtone Ringtone vibration Notification sound 77 Notification vibration 83 78 Touch sounds 83 78 Do not disturb 84 79 Display 84 79 Watch faces 84 80 Adjust screen brightness 85 80 Set the screen timeout 85 80 Show last app 85 81 Background style 86 81 Font 86 82 Touch sensitivity 86 82 Device maintenance 87 82 Date and time 87 83 Power saving mode 88 83 Watch only mode 88 4
User Manual
Page 5
... Text to speech Other settings Custom shortcut Wake-up gesture Watch info Getting help Videos 89 Smart Simulator 96 89 Tips and Tricks 96 90 Samsung Care 96 90 Legal 97 91 Intellectual property 98 91 Open source software 98 92 Disclaimer of software 100 93...
... Text to speech Other settings Custom shortcut Wake-up gesture Watch info Getting help Videos 89 Smart Simulator 96 89 Tips and Tricks 96 90 Samsung Care 96 90 Legal 97 91 Intellectual property 98 91 Open source software 98 92 Disclaimer of software 100 93...

User Manual
Page 6
Special features Work out in the water Use Water lock mode when you exercise in the water. See Water lock mode on page 100. Water and dust resistances This device is rated 5ATM, and passed military specification (MIL-STD-810G) testing. See Maintaining water and dust resistance on page 30.
Special features Work out in the water Use Water lock mode when you exercise in the water. See Water lock mode on page 100. Water and dust resistances This device is rated 5ATM, and passed military specification (MIL-STD-810G) testing. See Maintaining water and dust resistance on page 30.

User Manual
Page 8
Front and back views Bezel Touchscreen Heart rate sensor Getting started Devices and software are constantly evolving -the illustrations you see here are for reference only. 8
Front and back views Bezel Touchscreen Heart rate sensor Getting started Devices and software are constantly evolving -the illustrations you see here are for reference only. 8
User Manual
Page 9
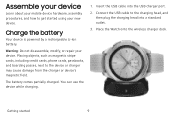
Placing objects, such as magnetic stripe cards, including credit cards, phone cards, passbooks, and boarding passes, next to the device or charger may cause damage from the charger or device's magnetic field. Charge the battery Your device is powered by a rechargeable Li-Ion battery. Connect the USB cable to the charging head, and then plug the charging head into the USB charger port. 2. Assemble your device Learn about your mobile device hardware, assembly procedures, and how to get started 9 The battery comes partially charged. Getting started using your device. Insert the ...
Placing objects, such as magnetic stripe cards, including credit cards, phone cards, passbooks, and boarding passes, next to the device or charger may cause damage from the charger or device's magnetic field. Charge the battery Your device is powered by a rechargeable Li-Ion battery. Connect the USB cable to the charging head, and then plug the charging head into the USB charger port. 2. Assemble your device Learn about your mobile device hardware, assembly procedures, and how to get started 9 The battery comes partially charged. Getting started using your device. Insert the ...

User Manual
Page 10
... the device and close any running apps. 2. Note: Prevent the USB charger port and the small end of operation. Using other accessories may cause damage. Samsung accessories are approved by Samsung. Caution: Use only charging devices that are designed for the device to maximize battery life.
... the device and close any running apps. 2. Note: Prevent the USB charger port and the small end of operation. Using other accessories may cause damage. Samsung accessories are approved by Samsung. Caution: Use only charging devices that are designed for the device to maximize battery life.
User Manual
Page 11
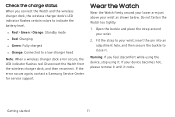
Check the charge status When you feel discomfort while using the device, stop using it. If the error occurs again, contact a Samsung Service Center for service support. Fit the strap to close it cools. If your wrist, insert the pin into an adjustment hole, and then secure ...
Check the charge status When you feel discomfort while using the device, stop using it. If the error occurs again, contact a Samsung Service Center for service support. Fit the strap to close it cools. If your wrist, insert the pin into an adjustment hole, and then secure ...

User Manual
Page 12
Getting started Strap tips and precautions l Some people may feel some discomfort. If you may experience discomfort when wearing the Watch for prolonged periods. l Do not expose the straps to very wet conditions. l If you have sensitive skin or fasten the Watch too tightly, you experience skin irritation when wearing the device, stop wearing the device and consult a physician. 12 Dry the straps first. Wet straps can cause skin irritations.
Getting started Strap tips and precautions l Some people may feel some discomfort. If you may experience discomfort when wearing the Watch for prolonged periods. l Do not expose the straps to very wet conditions. l If you have sensitive skin or fasten the Watch too tightly, you experience skin irritation when wearing the device, stop wearing the device and consult a physician. 12 Dry the straps first. Wet straps can cause skin irritations.

User Manual
Page 13
To replace the strap: u Insert one . Getting started 13 Replace the strap Detach the strap from the Watch. To remove the strap: u Slide the strap's spring bar inwards and pull the strap away from the Watch to replace it with a new one end of the spring bar into the lug, slide the spring bar inwards, and connect the new strap.
To replace the strap: u Insert one . Getting started 13 Replace the strap Detach the strap from the Watch. To remove the strap: u Slide the strap's spring bar inwards and pull the strap away from the Watch to replace it with a new one end of the spring bar into the lug, slide the spring bar inwards, and connect the new strap.

User Manual
Page 14
Tap Power off : 1. To unlock the Watch: u Press the Power button or Back button. The default Screen lock on or off. Lock or unlock your device Use the screen lock features to turn your wrist or when the screen times out while you remove it . To turn the device on: u Press and hold the Power button. 2. Getting started 14 To turn the device off . Your Watch locks when you are wearing it from your device on your device. To choose a secure screen lock, see Set a screen lock on . Start using your device The instructions below explain how to secure your device is ...
Tap Power off : 1. To unlock the Watch: u Press the Power button or Back button. The default Screen lock on or off. Lock or unlock your device Use the screen lock features to turn your wrist or when the screen times out while you remove it . To turn the device on: u Press and hold the Power button. 2. Getting started 14 To turn the device off . Your Watch locks when you are wearing it from your device on your device. To choose a secure screen lock, see Set a screen lock on . Start using your device The instructions below explain how to secure your device is ...
User Manual
Page 15
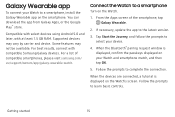
From the Apps screen of compatible smartphones, please visit samsung.com/ us/support/owners/app/galaxy-wearable-watch. When the Bluetooth® pairing request window is displayed on your Watch and smartphone match, and then ..., update the app to select your device. 4. Some features may vary by carrier and device. Compatible with select devices using Android 5.0 and later, with compatible Samsung Galaxy devices. Tap Start the Journey, and follow the prompts to the latest version. 3. For best results, connect with at least 1.5 GB RAM. You can...
From the Apps screen of compatible smartphones, please visit samsung.com/ us/support/owners/app/galaxy-wearable-watch. When the Bluetooth® pairing request window is displayed on your Watch and smartphone match, and then ..., update the app to select your device. 4. Some features may vary by carrier and device. Compatible with select devices using Android 5.0 and later, with compatible Samsung Galaxy devices. Tap Start the Journey, and follow the prompts to the latest version. 3. For best results, connect with at least 1.5 GB RAM. You can...

User Manual
Page 16
With this connection, you back up any important data stored on your Samsung account on your smartphone. Tap About watch > Back up and restore > Back up your Watch's data on the smartphone to another smartphone, the Watch automatically ...
With this connection, you back up any important data stored on your Samsung account on your smartphone. Tap About watch > Back up and restore > Back up your Watch's data on the smartphone to another smartphone, the Watch automatically ...

User Manual
Page 17
Navigation Please note that a touchscreen responds best to a new location. Using excessive force or a metallic object on the touchscreen may damage the tempered glass surface and void the warranty. Tap Lightly tap the screen to view panels. Swipe Lightly drag your finger vertically or horizontally across the screen to launch an app, select a menu item, or press a button. Double-tap Lightly tap an image twice to access edit mode or view available options. Getting started 17 From the Apps screen of your smartphone. The Watch disconnects from the pad of the smartphone, tap ...
Navigation Please note that a touchscreen responds best to a new location. Using excessive force or a metallic object on the touchscreen may damage the tempered glass surface and void the warranty. Tap Lightly tap the screen to view panels. Swipe Lightly drag your finger vertically or horizontally across the screen to launch an app, select a menu item, or press a button. Double-tap Lightly tap an image twice to access edit mode or view available options. Getting started 17 From the Apps screen of your smartphone. The Watch disconnects from the pad of the smartphone, tap ...
User Manual
Page 18
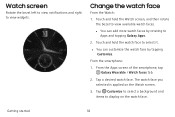
From the smartphone: •1. Touch and hold the watch face From the Watch: 1. The watch faces. Tap a desired watch faces by tapping Customize. l You can customize the watch face. Touch and hold the Watch screen, and then rotate the bezel to select it. Change the watch face to view available watch face you selected is applied on the watch face by rotating to view widgets. Getting started 18 From the Apps screen of the smartphone, tap Galaxy Wearable > Watch faces tab. 2. l You can add more watch face. Watch screen Rotate the bezel left to view ...
From the smartphone: •1. Touch and hold the watch face From the Watch: 1. The watch faces. Tap a desired watch faces by tapping Customize. l You can customize the watch face. Touch and hold the Watch screen, and then rotate the bezel to select it. Change the watch face to view available watch face you selected is applied on the watch face by rotating to view widgets. Getting started 18 From the Apps screen of the smartphone, tap Galaxy Wearable > Watch faces tab. 2. l You can add more watch face. Watch screen Rotate the bezel left to view ...

User Manual
Page 19
Add Widgets To add more widgets on the Home screen: 1. Move Widgets u Touch and hold a widget, and then tap Delete. Remove Widgets u Touch and hold a widget and then drag it to the end of the Widget screens, and tap Add widget. 2. Select a widget. The selected widget is displayed in a new panel. Widgets You can add widgets to provide information and convenient access. Widgets are small apps that offer limited functionality to the Home screens. Rotate the bezel to the desired location. Getting started 19
Add Widgets To add more widgets on the Home screen: 1. Move Widgets u Touch and hold a widget, and then tap Delete. Remove Widgets u Touch and hold a widget and then drag it to the end of the Widget screens, and tap Add widget. 2. Select a widget. The selected widget is displayed in a new panel. Widgets You can add widgets to provide information and convenient access. Widgets are small apps that offer limited functionality to the Home screens. Rotate the bezel to the desired location. Getting started 19

User Manual
Page 20
CJ @ Co,;l}f' . Cted using B\U Indicator icons Ringtone volume Do not disturb Settings Theater mode Getting started Devices and software are constantly evolving -the illustrations you see here are for reference only. 20 Airplane mode Power saving mode Watch always on Brightness •100%·*· @4 ~ e 0 0 (l- e.\'§)-S- Status panel To open the Status panel: u On the Watch screen, swipe down from the top of the screen.
CJ @ Co,;l}f' . Cted using B\U Indicator icons Ringtone volume Do not disturb Settings Theater mode Getting started Devices and software are constantly evolving -the illustrations you see here are for reference only. 20 Airplane mode Power saving mode Watch always on Brightness •100%·*· @4 ~ e 0 0 (l- e.\'§)-S- Status panel To open the Status panel: u On the Watch screen, swipe down from the top of the screen.

User Manual
Page 21
On the Watch screen, swipe down from the top of the screen to Getting started 21 Tap Power saving, and then tap Ok to open the status panel. 2. Ok to open the status panel. 2. Airplane mode Airplane mode disconnects your device from the top of the screen in the Status bar. Tap Airplane mode, and then tap confirm. Status Bar Indicator icons display at the top of the screen to confirm. On the Watch screen, swipe down from all networks and turns off connectivity features, such as Bluetooth and Wi-Fi. 1. Indicator icons Battery full Bluetooth connected Bluetooth ...
On the Watch screen, swipe down from the top of the screen to Getting started 21 Tap Power saving, and then tap Ok to open the status panel. 2. Ok to open the status panel. 2. Airplane mode Airplane mode disconnects your device from the top of the screen in the Status bar. Tap Airplane mode, and then tap confirm. Status Bar Indicator icons display at the top of the screen to confirm. On the Watch screen, swipe down from all networks and turns off connectivity features, such as Bluetooth and Wi-Fi. 1. Indicator icons Battery full Bluetooth connected Bluetooth ...

User Manual
Page 22
Tap ✓ Ok to suit the environment. 1. Adjust the brightness You can set the Watch not to open the status panel. 2. Getting started 22 Watch Always On Set the Watch to open the status panel. 2. On the Watch screen, swipe down from the top of the screen to vibrate and turn off the screen when a notification, except for alarms, is turned off. 1. On the Watch screen, swipe down from the top of time. 3. Tap Do not disturb, and select a length of the screen to confirm. Tap Brightness and adjust the level by rotating the bezel. Tap Watch always on, and then tap &#...
Tap ✓ Ok to suit the environment. 1. Adjust the brightness You can set the Watch not to open the status panel. 2. Getting started 22 Watch Always On Set the Watch to open the status panel. 2. On the Watch screen, swipe down from the top of the screen to vibrate and turn off the screen when a notification, except for alarms, is turned off. 1. On the Watch screen, swipe down from the top of time. 3. Tap Do not disturb, and select a length of the screen to confirm. Tap Brightness and adjust the level by rotating the bezel. Tap Watch always on, and then tap &#...
