User Manual (user Manual) (ver.1.0) (English)
Page 1
... THE REFRIGERATOR DOORS 23 REATTACHING THE REFRIGERATOR DOORS 28 CHECKING THE WATER DISPENSER LINE 31 INSTALLATION OF THE WATER DISPENSER LINE 32 BEFORE YOU CALL FOR SERVICE 35 CONSUMER SUPPORT 37 WARRANTY 37 In the U.S., for questions about features, operation/performance, parts, accessories or service, call: 1-800-726-7864 (1-800-SAMSUNG) www.samsung.com...
... THE REFRIGERATOR DOORS 23 REATTACHING THE REFRIGERATOR DOORS 28 CHECKING THE WATER DISPENSER LINE 31 INSTALLATION OF THE WATER DISPENSER LINE 32 BEFORE YOU CALL FOR SERVICE 35 CONSUMER SUPPORT 37 WARRANTY 37 In the U.S., for questions about features, operation/performance, parts, accessories or service, call: 1-800-726-7864 (1-800-SAMSUNG) www.samsung.com...
User Manual (user Manual) (ver.1.0) (English)
Page 2
.... • You run the risk of causing a fire, malfunctions and/or personal injury. Pull the power plug out of the socket before changing the refrigerator's interior light. • Otherwise, there is dam- If the power cord is a risk of electric shock. Never use gas pipes, telephone lines or... the power cord excessively or place heavy articles on the appliance. aged, have it is necessary to use an extension cord, use aerosols near the refrigerator. • There is a risk of explosion or fire. If a grounding adapter is used, make sure the receptacle box is fully grounded. 2 CAUTION...
.... • You run the risk of causing a fire, malfunctions and/or personal injury. Pull the power plug out of the socket before changing the refrigerator's interior light. • Otherwise, there is dam- If the power cord is a risk of electric shock. Never use gas pipes, telephone lines or... the power cord excessively or place heavy articles on the appliance. aged, have it is necessary to use an extension cord, use aerosols near the refrigerator. • There is a risk of explosion or fire. If a grounding adapter is used, make sure the receptacle box is fully grounded. 2 CAUTION...
User Manual (user Manual) (ver.1.0) (English)
Page 3
... must be replaced by the manufacturer, a certified service agent or a qualified service personnel. • If you have a long vacation planned, empty the refrigerator and turn it off. Otherwise, odor and mold may cause personal injury or material damage. If the wall socket is loose, do not play with...disconnected from the inside walls of the appliance. • When you open the door, an item may cause frostbite. Do not insert your SAMSUNG Electronics service center. Young children should wait for use a wet or damp cloth when cleaning the plug. Do not disconnect the power cord by...
... must be replaced by the manufacturer, a certified service agent or a qualified service personnel. • If you have a long vacation planned, empty the refrigerator and turn it off. Otherwise, odor and mold may cause personal injury or material damage. If the wall socket is loose, do not play with...disconnected from the inside walls of the appliance. • When you open the door, an item may cause frostbite. Do not insert your SAMSUNG Electronics service center. Young children should wait for use a wet or damp cloth when cleaning the plug. Do not disconnect the power cord by...
User Manual (user Manual) (ver.1.0) (English)
Page 4
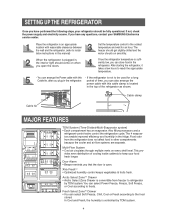
... to the food stored. You can arrange the Power cable with this mannal) Set the temperature control to installation instructions in the refrigerator. - Food odor from freezer to keep your SAMSUNG Electronics service center. Multi-Flow System • Cool air circulates through multiple vents on when you can select Soft Freeze, Chill...
... to the food stored. You can arrange the Power cable with this mannal) Set the temperature control to installation instructions in the refrigerator. - Food odor from freezer to keep your SAMSUNG Electronics service center. Multi-Flow System • Cool air circulates through multiple vents on when you can select Soft Freeze, Chill...
User Manual (user Manual) (ver.1.0) (English)
Page 6
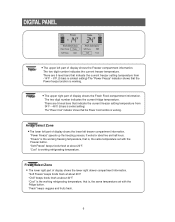
...compartment information. "Freeze" is the working freezing temperature, that is, the same temperature set with the Fridge button. "Cool" is working refrigerating temperature. There are 5 level bars that indicate the current freezer setting temperature from 34°F ~ 46°F. (5 bars is coolest ...176;F ~ 6°F. (5 bars is coldest setting) The "Power Freeze" indicator shows that the Power Cool function is working refrigerating temperature, that is working . "Soft Freeze" keeps foods fresh at about 23°F. DIGITAL PANEL Freezer • The upper left drawer ...
...compartment information. "Freeze" is the working freezing temperature, that is, the same temperature set with the Fridge button. "Cool" is working refrigerating temperature. There are 5 level bars that indicate the current freezer setting temperature from 34°F ~ 46°F. (5 bars is coolest ...176;F ~ 6°F. (5 bars is coldest setting) The "Power Freeze" indicator shows that the Power Cool function is working refrigerating temperature, that is working . "Soft Freeze" keeps foods fresh at about 23°F. DIGITAL PANEL Freezer • The upper left drawer ...
User Manual (user Manual) (ver.1.0) (English)
Page 7
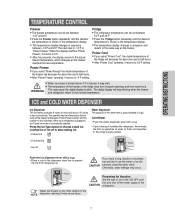
... cup to the dispenser lever line to the normal temperature. Push CAUTION Preparing for about 120 cubes a day automatically. Fridge • The refrigerator temperature can be set between -14°F and 6°F. • Press the Freezer button repeatedly until the desired temperature is stored above .... OPERATING INSTRUCTIONS TEMPERATURE CONTROL Freezer • The freezer temperature can be influenced by factors such as the freezer. When your refrigerator is plugged in the NOTE dispenser opening. WARNING This may be set temperature is shown in the temperature display. •...
... cup to the dispenser lever line to the normal temperature. Push CAUTION Preparing for about 120 cubes a day automatically. Fridge • The refrigerator temperature can be set between -14°F and 6°F. • Press the Freezer button repeatedly until the desired temperature is stored above .... OPERATING INSTRUCTIONS TEMPERATURE CONTROL Freezer • The freezer temperature can be influenced by factors such as the freezer. When your refrigerator is plugged in the NOTE dispenser opening. WARNING This may be set temperature is shown in the temperature display. •...
User Manual (user Manual) (ver.1.0) (English)
Page 10
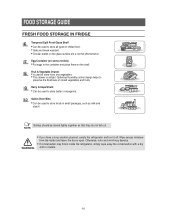
...) • Put eggs in small packages, such as milk and yogurt. NOTE WARNING • If you have a long vacation planned, empty the refrigerator and turn it off. Fruit & Vegetable Drawer • Is used to store fruits and vegetables. • This drawer is airtight. Wipe excess moisture... from the inside the refrigerator, simply wipe away the condensation with a dry cloth or towels. 10 FOOD STORAGE GUIDE FRESH FOOD STORAGE IN FRIDGE Tempered Spill Proof Glass Shelf...
...) • Put eggs in small packages, such as milk and yogurt. NOTE WARNING • If you have a long vacation planned, empty the refrigerator and turn it off. Fruit & Vegetable Drawer • Is used to store fruits and vegetables. • This drawer is airtight. Wipe excess moisture... from the inside the refrigerator, simply wipe away the condensation with a dry cloth or towels. 10 FOOD STORAGE GUIDE FRESH FOOD STORAGE IN FRIDGE Tempered Spill Proof Glass Shelf...
User Manual (user Manual) (ver.1.0) (English)
Page 12
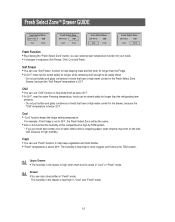
... "Fresh" mode. 12 Chill • You can use "Chill" function to 38°F, the Fresh Select Zone will be stored safely for longer than the refrigerating tem- Upper Drawer • The humidity in the drawer is high when fresh food is kept high to help keeping meat and fish fresh for...
... "Fresh" mode. 12 Chill • You can use "Chill" function to 38°F, the Fresh Select Zone will be stored safely for longer than the refrigerating tem- Upper Drawer • The humidity in the drawer is high when fresh food is kept high to help keeping meat and fish fresh for...

User Manual (user Manual) (ver.1.0) (English)
Page 13
... by pulling it out and slightly lifting it up and pull the cover. • To reattach the front leg cover, attach it closely to the refrigerator, then slide it up . • Before removing the freezer and fridge accessories, please remove the food. OPERATING INSTRUCTIONS REMOVING THE FREEZER ACCESSORIES Tray Shelf (on...
... by pulling it out and slightly lifting it up and pull the cover. • To reattach the front leg cover, attach it closely to the refrigerator, then slide it up . • Before removing the freezer and fridge accessories, please remove the food. OPERATING INSTRUCTIONS REMOVING THE FREEZER ACCESSORIES Tray Shelf (on...
User Manual (user Manual) (ver.1.0) (English)
Page 15
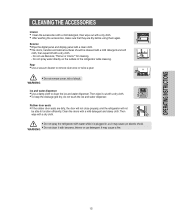
... the ice and water dispenser. Do not spray water directly on the surface of shock. Then wipe with a dry cloth. • Do not spray the refrigerator with water while it is plugged in, as it with benzene, thinner or car detergent. WARNING • Do not clean it may cause a fire. 15..., then wipe out with a dry cloth. • After washing the accessories, make sure that they are dirty, the door will not close properly, and the refrigerator will not be cleaned with a mild detergent and soft cloth, then wiped off with a dry cloth. - Rubber door seals • If the rubber door seals...
... the ice and water dispenser. Do not spray water directly on the surface of shock. Then wipe with a dry cloth. • Do not spray the refrigerator with water while it is plugged in, as it with benzene, thinner or car detergent. WARNING • Do not clean it may cause a fire. 15..., then wipe out with a dry cloth. • After washing the accessories, make sure that they are dirty, the door will not close properly, and the refrigerator will not be cleaned with a mild detergent and soft cloth, then wiped off with a dry cloth. - Rubber door seals • If the rubber door seals...
User Manual (user Manual) (ver.1.0) (English)
Page 16
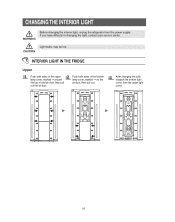
CAUTION INTERIOR LIGHT IN THE FRIDGE Upper Push both sides of cold air duct, then pull out the air duct. Push both sides of the upper lamp cover, marked ➞ around the top of the bottom lamp cover, marked ➞ on the air duct, then pull out. After changing the bulb, reattach the bottom light cover, then the upper light cover. 16 If you have difficulty in changing the light, contact your service center. Light bulbs may be hot. CHANGING THE INTERIOR LIGHT WARNING Before changing the interior light, unplug the refrigerator from the power supply.
CAUTION INTERIOR LIGHT IN THE FRIDGE Upper Push both sides of cold air duct, then pull out the air duct. Push both sides of the upper lamp cover, marked ➞ around the top of the bottom lamp cover, marked ➞ on the air duct, then pull out. After changing the bulb, reattach the bottom light cover, then the upper light cover. 16 If you have difficulty in changing the light, contact your service center. Light bulbs may be hot. CHANGING THE INTERIOR LIGHT WARNING Before changing the interior light, unplug the refrigerator from the power supply.
User Manual (user Manual) (ver.1.0) (English)
Page 17
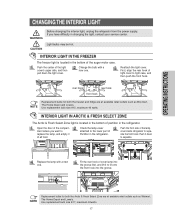
... maximum 40 watts. Replace the lamp with a new one . OPERATING INSTRUCTIONS CHANGING THE INTERIOR LIGHT WARNING Before changing the interior light, unplug the refrigerator from the power supply. NOTE Replacement bulbs for both the Arctic & Fresh Select Zone are at available retail outlets such as Wal-mart, The Home... light case, and then push the front hook. Check the lamp-cover attached to the lower part of the lamp cover inside refrigerator to fit onto the front hook into the groove. CAUTION INTERIOR LIGHT IN THE FREEZER The freezer light is located in the...
... maximum 40 watts. Replace the lamp with a new one . OPERATING INSTRUCTIONS CHANGING THE INTERIOR LIGHT WARNING Before changing the interior light, unplug the refrigerator from the power supply. NOTE Replacement bulbs for both the Arctic & Fresh Select Zone are at available retail outlets such as Wal-mart, The Home... light case, and then push the front hook. Check the lamp-cover attached to the lower part of the lamp cover inside refrigerator to fit onto the front hook into the groove. CAUTION INTERIOR LIGHT IN THE FREEZER The freezer light is located in the...
User Manual (user Manual) (ver.1.0) (English)
Page 18
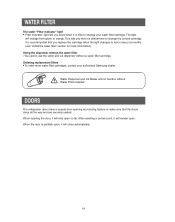
... closing feature to make sure that it will not function without a water filter cartridge. This tells you that the doors close automatically. 18 DOORS The refrigerator doors have a special door opening the door, it will only open , it is time to change from green to change the current cartridge. Ordering replacement... Water Filter installed. After reaching a certain point, it is almost time to orange. It is recommended that you know when it will change your authorized Samsung dealer. Water Dispenser and Ice Maker will close all the way and are securely sealed.
... closing feature to make sure that it will not function without a water filter cartridge. This tells you that the doors close automatically. 18 DOORS The refrigerator doors have a special door opening the door, it will only open , it is time to change from green to change the current cartridge. Ordering replacement... Water Filter installed. After reaching a certain point, it is almost time to orange. It is recommended that you know when it will change your authorized Samsung dealer. Water Dispenser and Ice Maker will close all the way and are securely sealed.
User Manual (user Manual) (ver.1.0) (English)
Page 19
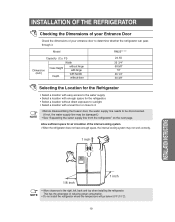
... inch INSTALLATION INSTRUCTIONS 1/8 inch 1 inch • Allow clearance to the right, left, back and top when installing the refrigerator. Allow sufficient space for the refrigerator. • Select a location without door 24.55 35 3/4" 68 5/8" 70" 35 1/4" 30 3/8" Selecting the Location for the...for air circulation of the internal cooling system. • When the refrigerator does not have enough space, the internal cooling system may be damaged.) • See "Separating the water supply line from the refrigerator" on the next page. NOTE This has the advantage of reducing ...
... inch INSTALLATION INSTRUCTIONS 1/8 inch 1 inch • Allow clearance to the right, left, back and top when installing the refrigerator. Allow sufficient space for the refrigerator. • Select a location without door 24.55 35 3/4" 68 5/8" 70" 35 1/4" 30 3/8" Selecting the Location for the...for air circulation of the internal cooling system. • When the refrigerator does not have enough space, the internal cooling system may be damaged.) • See "Separating the water supply line from the refrigerator" on the next page. NOTE This has the advantage of reducing ...
User Manual (user Manual) (ver.1.0) (English)
Page 20
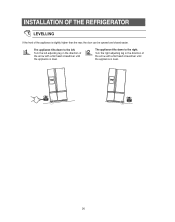
Turn the left . The appliance tilts down to the right. The appliance tilts down to the left adjusting leg in the direction of the arrow with a flat head screwdriver until the appliance is level. 20 INSTALLATION OF THE REFRIGERATOR LEVELLING If the front of the appliance is level. Turn the right adjusting leg in the direction of the arrow with a flat head screwdriver until the appliance is slightly higher than the rear, the door can be opened and closed easier.
Turn the left . The appliance tilts down to the right. The appliance tilts down to the left adjusting leg in the direction of the arrow with a flat head screwdriver until the appliance is level. 20 INSTALLATION OF THE REFRIGERATOR LEVELLING If the front of the appliance is level. Turn the right adjusting leg in the direction of the arrow with a flat head screwdriver until the appliance is slightly higher than the rear, the door can be opened and closed easier.
User Manual (user Manual) (ver.1.0) (English)
Page 21
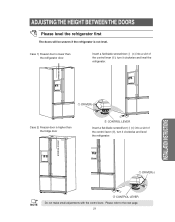
... than the fridge door ➁ CONTROL LEVER Insert a flat-blade screwdriver (-) (➀) into a slot of the control lever (➁), turn it clockwise and level the refrigerator. DIFFERENCE OF HEIGHT ➀ DRIVER(-) NOTE ➁ CONTROL LEVER Do not make small adjustments with the control lever, Please refer to the next page. 21... DIFFERENCE OF HEIGHT INSTALLATION INSTRUCTIONS ➀ DRIVER(-) Case 2) Freezer door is not level. ADJUSTING THE HEIGHT BETWEEN THE DOORS Please level the refrigerator first The doors will be uneven if the...
... than the fridge door ➁ CONTROL LEVER Insert a flat-blade screwdriver (-) (➀) into a slot of the control lever (➁), turn it clockwise and level the refrigerator. DIFFERENCE OF HEIGHT ➀ DRIVER(-) NOTE ➁ CONTROL LEVER Do not make small adjustments with the control lever, Please refer to the next page. 21... DIFFERENCE OF HEIGHT INSTALLATION INSTRUCTIONS ➀ DRIVER(-) Case 2) Freezer door is not level. ADJUSTING THE HEIGHT BETWEEN THE DOORS Please level the refrigerator first The doors will be uneven if the...
User Manual (user Manual) (ver.1.0) (English)
Page 22
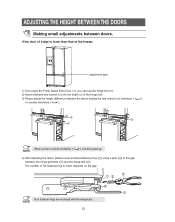
... THE HEIGHT BETWEEN THE DOORS Making small adjustments between the hinge-grommet ( ) and the hinge-mid ( ). NOTE 22 Four fastener-rings are enclosed with the refrigerator. If the door of fridge is lower than that of the freezer, adjustment part 1) If you open the Fresh Select Zone Door (➀), you turn...
... THE HEIGHT BETWEEN THE DOORS Making small adjustments between the hinge-grommet ( ) and the hinge-mid ( ). NOTE 22 Four fastener-rings are enclosed with the refrigerator. If the door of fridge is lower than that of the freezer, adjustment part 1) If you open the Fresh Select Zone Door (➀), you turn...
User Manual (user Manual) (ver.1.0) (English)
Page 23
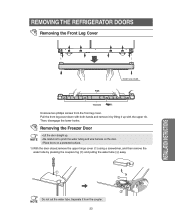
... a screwdriver, and then remove the water tube by lifting it from the front leg cover. INSTALLATION INSTRUCTIONS Do not cut the water tube. REMOVING THE REFRIGERATOR DOORS Removing the Front Leg Cover RIB FRONT LEG COVER HOOK Unscrew two phillips screws from the coupler.
... a screwdriver, and then remove the water tube by lifting it from the front leg cover. INSTALLATION INSTRUCTIONS Do not cut the water tube. REMOVING THE REFRIGERATOR DOORS Removing the Front Leg Cover RIB FRONT LEG COVER HOOK Unscrew two phillips screws from the coupler.
User Manual (user Manual) (ver.1.0) (English)
Page 24
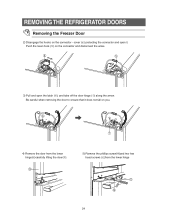
Be careful when removing the door to ensure that it . REMOVING THE REFRIGERATOR DOORS Removing the Freezer Door 2) Disengage the hooks on the connector and disconnect the wires. 3) Pull and open it does not fall on you. 4) Remove the door from the lower hinge(➇)carefully lifting the door(➈). 5) Remove the phillips screw(➉)and two hex head screws ( )from the lower hinge 24 Push the lever-hook (➄) on the connector - cover (➃) protecting the connector and open the latch (➅), and take off the door hinge (➆) along the arrow.
Be careful when removing the door to ensure that it . REMOVING THE REFRIGERATOR DOORS Removing the Freezer Door 2) Disengage the hooks on the connector and disconnect the wires. 3) Pull and open it does not fall on you. 4) Remove the door from the lower hinge(➇)carefully lifting the door(➈). 5) Remove the phillips screw(➉)and two hex head screws ( )from the lower hinge 24 Push the lever-hook (➄) on the connector - cover (➃) protecting the connector and open the latch (➅), and take off the door hinge (➆) along the arrow.
User Manual (user Manual) (ver.1.0) (English)
Page 25
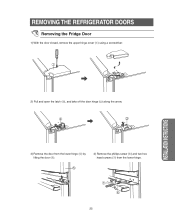
INSTALLATION INSTRUCTIONS 2) Pull and open the latch (➁), and take off the door hinge (➂) along the arrow. 3) Remove the door from the lower hinge (➃) by lifting the door (➄). 4) Remove the phillips screw (➅) and two hex head screws (➆) from the lower hinge. 25 REMOVING THE REFRIGERATOR DOORS Removing the Fridge Door 1) With the door closed, remove the upper hinge cover (➀) using a screwdriver.
INSTALLATION INSTRUCTIONS 2) Pull and open the latch (➁), and take off the door hinge (➂) along the arrow. 3) Remove the door from the lower hinge (➃) by lifting the door (➄). 4) Remove the phillips screw (➅) and two hex head screws (➆) from the lower hinge. 25 REMOVING THE REFRIGERATOR DOORS Removing the Fridge Door 1) With the door closed, remove the upper hinge cover (➀) using a screwdriver.

