User Manual Ver.1.0 (English, French)
Page 2
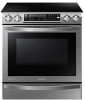
...of the range bottom. e) Failure to do so can result in burns or serious injuries. You can tip the range and be secured by a properly installed Anti-Tip device. English - 2 Manual Users_NE58H9970WS_AA_AC_DG68-00550A-00_EN.indd 2 19/05/2014 18:21:16 b) Verify the anti-tip device has been properly... engaged at the right or left ) of the range bottom. AFTER THE RANGE HAS BEEN INSTALLED, CONFIRM THAT THE ANTI-TIP DEVICE HAS BEEN PROPERLY INSTALLED AND VERIFY THAT THE ANTITIP DEVICE IS PROPERLY ENGAGED. Refer to children or adults. d) Do not operate the range without the anti-tip device ...
...of the range bottom. e) Failure to do so can result in burns or serious injuries. You can tip the range and be secured by a properly installed Anti-Tip device. English - 2 Manual Users_NE58H9970WS_AA_AC_DG68-00550A-00_EN.indd 2 19/05/2014 18:21:16 b) Verify the anti-tip device has been properly... engaged at the right or left ) of the range bottom. AFTER THE RANGE HAS BEEN INSTALLED, CONFIRM THAT THE ANTI-TIP DEVICE HAS BEEN PROPERLY INSTALLED AND VERIFY THAT THE ANTITIP DEVICE IS PROPERLY ENGAGED. Refer to children or adults. d) Do not operate the range without the anti-tip device ...
User Manual Ver.1.0 (English, French)
Page 3
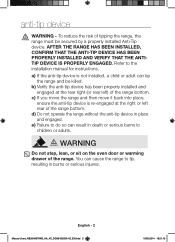
.... If you pull the range out from tilting forward more than a few inches. If it forward. Then, to verify that the Anti-Tip device is installed properly. English - 3 Manual Users_NE58H9970WS_AA_AC_DG68-00550A-00_EN.indd 3 19/05/2014 18:21:16 Confirm that the Anti-Tip device is engaged, grasp the top rear...
.... If you pull the range out from tilting forward more than a few inches. If it forward. Then, to verify that the Anti-Tip device is installed properly. English - 3 Manual Users_NE58H9970WS_AA_AC_DG68-00550A-00_EN.indd 3 19/05/2014 18:21:16 Confirm that the Anti-Tip device is engaged, grasp the top rear...
User Manual Ver.1.0 (English, French)
Page 7
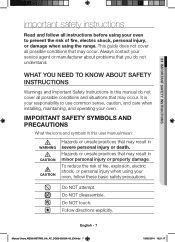
01 IMPORTANT SAFETY INSTRUCTIONS important safety instructions Read and follow all instructions before using your oven to use common sense, caution, and care when installing, maintaining, and operating your service agent or manufacturer about problems that you do not cover all possible conditions that may result in this user manual ...
01 IMPORTANT SAFETY INSTRUCTIONS important safety instructions Read and follow all instructions before using your oven to use common sense, caution, and care when installing, maintaining, and operating your service agent or manufacturer about problems that you do not cover all possible conditions that may result in this user manual ...

User Manual Ver.1.0 (English, French)
Page 8
... crevices around the oven door. All other servicing should follow them explicitly. Always disconnect the power to a qualified technician. Make sure the machine is properly installed and grounded by removing the fuse or switching off the circuit breaker. After reading this Owner's Manual. Note These warning icons and symbols are here...
... crevices around the oven door. All other servicing should follow them explicitly. Always disconnect the power to a qualified technician. Make sure the machine is properly installed and grounded by removing the fuse or switching off the circuit breaker. After reading this Owner's Manual. Note These warning icons and symbols are here...
User Manual Ver.1.0 (English, French)
Page 12
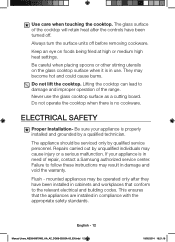
They may result in need of repair, contact a Samsung authorized service center. English - 12 Manual Users_NE58H9970WS_AA_AC_DG68-00550A-00_EN.indd 12 19/05/2014 18:21:18 Repairs carried out by qualified service personnel. mounted ... that conform to follow these instructions may become hot and could cause burns. Keep an eye on the glass cooktop surface when it is properly installed and grounded by a qualified technician. Never use . Do not operate the cooktop when there is in damage and void the warranty. Do not lift the...
They may result in need of repair, contact a Samsung authorized service center. English - 12 Manual Users_NE58H9970WS_AA_AC_DG68-00550A-00_EN.indd 12 19/05/2014 18:21:18 Repairs carried out by qualified service personnel. mounted ... that conform to follow these instructions may become hot and could cause burns. Keep an eye on the glass cooktop surface when it is properly installed and grounded by a qualified technician. Never use . Do not operate the cooktop when there is in damage and void the warranty. Do not lift the...

User Manual Ver.1.0 (English, French)
Page 14
During and after use aluminum foil to line the oven bottoms, except as suggested in the manual. Do not heat unopened food containers. Improper installation of these openings, the oven door, and the window of the oven door. OVEN DO NOT TOUCH THE HEATING ELEMENTS OR INTERIOR SURFACES OF THE ...
During and after use aluminum foil to line the oven bottoms, except as suggested in the manual. Do not heat unopened food containers. Improper installation of these openings, the oven door, and the window of the oven door. OVEN DO NOT TOUCH THE HEATING ELEMENTS OR INTERIOR SURFACES OF THE ...

User Manual Ver.1.0 (English, French)
Page 18
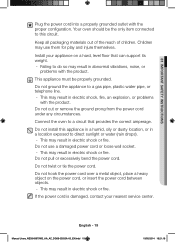
... latches, cracks in the door, or a door that is any damage such as dents on a broken cooktop. If you use , do not install or operate the oven and notify your dealer immediately. Among these areas are dark in electric shock, fire, an explosion, problems with caution. WARNING ...CRITICAL INSTALLATION WARNINGS This appliance must be careful to avoid steam burns. Unpack the oven. GLASS/CERAMIC COOKING SURFACES DO NOT TOUCH SURFACE UNITS OR AREAS...
... latches, cracks in the door, or a door that is any damage such as dents on a broken cooktop. If you use , do not install or operate the oven and notify your dealer immediately. Among these areas are dark in electric shock, fire, an explosion, problems with caution. WARNING ...CRITICAL INSTALLATION WARNINGS This appliance must be careful to avoid steam burns. Unpack the oven. GLASS/CERAMIC COOKING SURFACES DO NOT TOUCH SURFACE UNITS OR AREAS...
User Manual Ver.1.0 (English, French)
Page 19
... into a properly grounded outlet with the product. Children may result in a location exposed to direct sunlight or water (rain drops). - Do not install this circuit. This may use a damaged power cord or loose wall socket. - This may result in electric shock or fire. If the power ...on a hard, level floor that provides the correct amperage. English - 19 Manual Users_NE58H9970WS_AA_AC_DG68-00550A-00_EN.indd 19 19/05/2014 18:21:18 Install your nearest service center. Do not twist or tie the power cord. Do not use them for play and injure themselves. Keep all packaging ...
... into a properly grounded outlet with the product. Children may result in a location exposed to direct sunlight or water (rain drops). - Do not install this circuit. This may use a damaged power cord or loose wall socket. - This may result in electric shock or fire. If the power ...on a hard, level floor that provides the correct amperage. English - 19 Manual Users_NE58H9970WS_AA_AC_DG68-00550A-00_EN.indd 19 19/05/2014 18:21:18 Install your nearest service center. Do not twist or tie the power cord. Do not use them for play and injure themselves. Keep all packaging ...

User Manual Ver.1.0 (English, French)
Page 45
05 OPERATING THE OVEN USING THE GLIDING RACK The fully extendable Gliding Rack makes food preparation easier, especially when preparing heavier dishes. Installing the Gliding rack • With the Gliding rack in the "Closed" position and the oven off and cool, grasp the rack and frame and ... rack well out of the oven without touching the sides of the rack only to install it in the oven. Do not install the Gliding rack directly above the Flat rack and Recessed rack. CAUTION You can install the Gliding rack in any rack positions except the highest (level 7) and lowest (level 1)...
05 OPERATING THE OVEN USING THE GLIDING RACK The fully extendable Gliding Rack makes food preparation easier, especially when preparing heavier dishes. Installing the Gliding rack • With the Gliding rack in the "Closed" position and the oven off and cool, grasp the rack and frame and ... rack well out of the oven without touching the sides of the rack only to install it in the oven. Do not install the Gliding rack directly above the Flat rack and Recessed rack. CAUTION You can install the Gliding rack in any rack positions except the highest (level 7) and lowest (level 1)...
User Manual Ver.1.0 (English, French)
Page 46
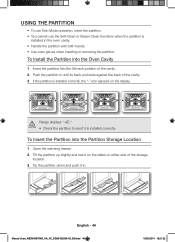
If the partition is installed correctly, the "-" icon appears on either side of the storage location. 3. Open the warming drawer... see if it on the slides on the display. Tilt the partition up slightly and rest it is installed in the oven cavity. • Handle the partition with both hands. • Use oven gloves when inserting or removing the... partition. To Install the Partition into the 5th rack position of the cavity. 3. To Insert the Partition into the Partition Storage Location 1....
If the partition is installed correctly, the "-" icon appears on either side of the storage location. 3. Open the warming drawer... see if it on the slides on the display. Tilt the partition up slightly and rest it is installed in the oven cavity. • Handle the partition with both hands. • Use oven gloves when inserting or removing the... partition. To Install the Partition into the 5th rack position of the cavity. 3. To Insert the Partition into the Partition Storage Location 1....

User Manual Ver.1.0 (English, French)
Page 76
.... See steps 4 through 7. 4. Repeat for easy cleanup. 3. Close the rack, turn rack right-side-up and place in the USING THE GLIDING RACK section. 2. See installing the gliding rack in the slide tracks, wipe it again. English - 76 Manual Users_NE58H9970WS_AA_AC_DG68-00550A-00_EN.indd 76 19/05/2014 18:21:38 Starting...
.... See steps 4 through 7. 4. Repeat for easy cleanup. 3. Close the rack, turn rack right-side-up and place in the USING THE GLIDING RACK section. 2. See installing the gliding rack in the slide tracks, wipe it again. English - 76 Manual Users_NE58H9970WS_AA_AC_DG68-00550A-00_EN.indd 76 19/05/2014 18:21:38 Starting...
User Manual Ver.1.0 (English, French)
Page 84
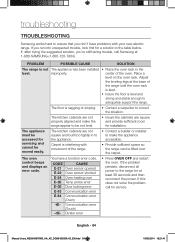
...726-7864). The kitchen cabinets are square and provide sufficient room for a solution in the table below. If this does not solve the problem, call Samsung at the base of the range until the oven rack is level. • Insure the floor is interfering with your new electric range. English -... not level. • Insure the cabinets are not square and built too tightly in the level. The floor is not The appliance has been installed • Place the oven rack in to the appliance. Carpet is level and strong and stable enough to adequately support the range. You have ...
...726-7864). The kitchen cabinets are square and provide sufficient room for a solution in the table below. If this does not solve the problem, call Samsung at the base of the range until the oven rack is level. • Insure the floor is interfering with your new electric range. English -... not level. • Insure the cabinets are not square and built too tightly in the level. The floor is not The appliance has been installed • Place the oven rack in to the appliance. Carpet is level and strong and stable enough to adequately support the range. You have ...

User Manual Ver.1.0 (English, French)
Page 90
... equipment, systems, utilities, services, parts, supplies, accessories, applications, installations, repairs, external wiring or connectors not supplied or authorized by SAMSUNG against manufacturing defects in -home service. SAMSUNG will repair or replace this product was not intended; altered product or...During this limited additional four-year warranty, you will provide in home service product must contact SAMSUNG for instructions, or fixing installation errors. Samsung will responsible for which occurs in the instruction book; All replaced parts and products become the ...
... equipment, systems, utilities, services, parts, supplies, accessories, applications, installations, repairs, external wiring or connectors not supplied or authorized by SAMSUNG against manufacturing defects in -home service. SAMSUNG will repair or replace this product was not intended; altered product or...During this limited additional four-year warranty, you will provide in home service product must contact SAMSUNG for instructions, or fixing installation errors. Samsung will responsible for which occurs in the instruction book; All replaced parts and products become the ...
User Manual Ver.1.0 (English, French)
Page 92
...or authorized by hardened spills of purchase, and is longer. delivery and installation; applications and uses for any labor or in all areas. cosmetic damage or exterior finish; SAMSUNG will provide in-home service during the limited warranty period specified above. ...Furthermore, damage to and from an authorized service center. Samsung will repair or replace this product or result in home service product must contact SAMSUNG for instructions, or fixing installation errors. The original dated bill of the product. Replacement parts and...
...or authorized by hardened spills of purchase, and is longer. delivery and installation; applications and uses for any labor or in all areas. cosmetic damage or exterior finish; SAMSUNG will provide in-home service during the limited warranty period specified above. ...Furthermore, damage to and from an authorized service center. Samsung will repair or replace this product or result in home service product must contact SAMSUNG for instructions, or fixing installation errors. The original dated bill of the product. Replacement parts and...

User Manual Ver.1.0 (English, French)
Page 96
CANADA U.S.A Consumer Electronics U.S.A Mobile Phones 1-800-SAMSUNG(726-7864) www.samsung.com/ca/support (English) www.samsung.com/ca_fr/support (French) 1-800-SAMSUNG(726-7864) www.samsung.com/us/support 1-800-SAMSUNG(726-7864) www.samsung.com/us/support DG68-00550A-00 Manual Users_NE58H9970WS_AA_AC_DG68-00550A-00_EN.indd 96 19/05/2014 18:21:44 Please be advised that the Samsung warranty does NOT cover service calls to explain product operation, correct improper installation, or perform normal cleaning or maintenance.
CANADA U.S.A Consumer Electronics U.S.A Mobile Phones 1-800-SAMSUNG(726-7864) www.samsung.com/ca/support (English) www.samsung.com/ca_fr/support (French) 1-800-SAMSUNG(726-7864) www.samsung.com/us/support 1-800-SAMSUNG(726-7864) www.samsung.com/us/support DG68-00550A-00 Manual Users_NE58H9970WS_AA_AC_DG68-00550A-00_EN.indd 96 19/05/2014 18:21:44 Please be advised that the Samsung warranty does NOT cover service calls to explain product operation, correct improper installation, or perform normal cleaning or maintenance.


