
Owners Manual
Page 1
Microwave Oven Owner's Manual ME1060WB/BB/SB ME1260WB/BB/SB ME1460WB/BB/SB MW1030WA/BA/SB MW1060WA/BA MW1150WA/BA MW1230WA/BA MW1235WA/BA MW1250WA/BA MW1255WA/BA 123 MW1260WA/BA 456 789 MW1430WA/BA 0 MW1455WA/BA MW1460WA/BA MW1660WA/BA Code No.: DE68-00064C-02
Microwave Oven Owner's Manual ME1060WB/BB/SB ME1260WB/BB/SB ME1460WB/BB/SB MW1030WA/BA/SB MW1060WA/BA MW1150WA/BA MW1230WA/BA MW1235WA/BA MW1250WA/BA MW1255WA/BA 123 MW1260WA/BA 456 789 MW1430WA/BA 0 MW1455WA/BA MW1460WA/BA MW1660WA/BA Code No.: DE68-00064C-02
Owners Manual
Page 2
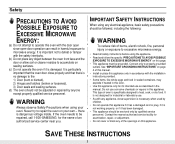
...If the oven needs to be repaired, call 1-800-SAMSUNG for its intended use as described in this oven. • Use this appliance only for the name of oven is damaged. Safety PRECAUTIONS TO AVOID POSSIBLE EXPOSURE TO EXCESSIVE MICROWAVE ENERGY: (a) Do not attempt to operate this oven with...allow soil or cleaner residue to accumulate on sealing surfaces. (c) Do not operate the oven if it is specifically designed to excessive microwave energy: • Read all safety instructions before using the appliance. • Read and follow the specific "PRECAUTIONS TO AVOID POSSIBLE EXPOSURE ...
...If the oven needs to be repaired, call 1-800-SAMSUNG for its intended use as described in this oven. • Use this appliance only for the name of oven is damaged. Safety PRECAUTIONS TO AVOID POSSIBLE EXPOSURE TO EXCESSIVE MICROWAVE ENERGY: (a) Do not attempt to operate this oven with...allow soil or cleaner residue to accumulate on sealing surfaces. (c) Do not operate the oven if it is specifically designed to excessive microwave energy: • Read all safety instructions before using the appliance. • Read and follow the specific "PRECAUTIONS TO AVOID POSSIBLE EXPOSURE ...
Owners Manual
Page 4
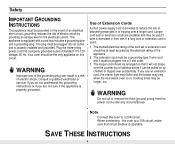
... do not understand the grounding instructions or if you use an extension cord, the interior light may flicker and the blower may vary when the microwave oven is properly installed and grounded. The longer cord should be plugged into a 3-slot outlet. 3. Plug the three-prong power cord into an outlet that...
... do not understand the grounding instructions or if you use an extension cord, the interior light may flicker and the blower may vary when the microwave oven is properly installed and grounded. The longer cord should be plugged into a 3-slot outlet. 3. Plug the three-prong power cord into an outlet that...
Owners Manual
Page 5
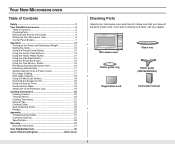
... and check to make sure that you have all the parts shown here. Your New Microwave oven Table of Contents Safety 2 Your New Microwave oven 5 Table of Contents 5 Checking Parts 5 Warranty and Service Information 6 Setting Up Your Microwave Oven 6 Control Panel Buttons 7 Operation 12 Turning on the Power and Selecting a Weight ... 31 Warranty Information 31 Guía Rápida(Spanish 35 Quick Reference(English Back Cover Checking Parts Unpack your dealer. 123 456 789 0 Microwave oven Roller guide ring Registration card Glass tray Roller guide (MW1660WA/BA) Instruction manual 5
... and check to make sure that you have all the parts shown here. Your New Microwave oven Table of Contents Safety 2 Your New Microwave oven 5 Table of Contents 5 Checking Parts 5 Warranty and Service Information 6 Setting Up Your Microwave Oven 6 Control Panel Buttons 7 Operation 12 Turning on the Power and Selecting a Weight ... 31 Warranty Information 31 Guía Rápida(Spanish 35 Quick Reference(English Back Cover Checking Parts Unpack your dealer. 123 456 789 0 Microwave oven Roller guide ring Registration card Glass tray Roller guide (MW1660WA/BA) Instruction manual 5

Owners Manual
Page 6
...the tray fit securely into a grounded outlet. Once plugged in the center of the pre-assembled roller guide.(MW1660WA/BA) 6 Your New Microwave oven Warranty and Service Information To help us better serve you should require warranty service, provide the above , and to aid in identification in... the indentation in the center of the oven.(MW1660WA/BA) For service assistance and the location of the nearest service center, please call Samsung Electronics America, Inc., at least four inches of space behind, above information with a copy of the oven. MODEL NUMBER SERIAL NUMBER...
...the tray fit securely into a grounded outlet. Once plugged in the center of the pre-assembled roller guide.(MW1660WA/BA) 6 Your New Microwave oven Warranty and Service Information To help us better serve you should require warranty service, provide the above , and to aid in identification in... the indentation in the center of the oven.(MW1660WA/BA) For service assistance and the location of the nearest service center, please call Samsung Electronics America, Inc., at least four inches of space behind, above information with a copy of the oven. MODEL NUMBER SERIAL NUMBER...
Owners Manual
Page 7
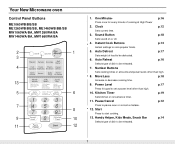
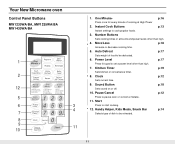
... or correct a mistake. 12. Auto Reheat p.16 Selects type of cooking at High Power 2. Kitchen Timer p.19 Sets kitchen or convenience timer. 11. Your New Microwave oven Control Panel Buttons ME1060WB/BB/SB ME1260WB/BB/SB, ME1460WB/BB/SB MW1060WA/BA, MW1260WA/BA MW1460WA/BA, MW1660WA/BA 2 1 3 4 13 5 6 123 7 4 56 7 89...
... or correct a mistake. 12. Auto Reheat p.16 Selects type of cooking at High Power 2. Kitchen Timer p.19 Sets kitchen or convenience timer. 11. Your New Microwave oven Control Panel Buttons ME1060WB/BB/SB ME1260WB/BB/SB, ME1460WB/BB/SB MW1060WA/BA, MW1260WA/BA MW1460WA/BA, MW1660WA/BA 2 1 3 4 13 5 6 123 7 4 56 7 89...
Owners Manual
Page 8
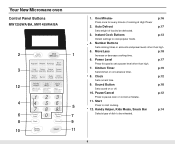
... than high. 5. Handy Helper, Kids Meals, Snack Bar p.14 Selects type of cooking at High Power 2. Clock p.12 Sets current time. 9. Your New Microwave oven Control Panel Buttons MW1255WA/BA, MW1455WA/BA 2 1 3 12 123 4 4 56 7 89 5 6 0 7 8 9 10 11 1. Start Press to be reheated. 8 Power Level p.17 Press this pad to be defrosted...
... than high. 5. Handy Helper, Kids Meals, Snack Bar p.14 Selects type of cooking at High Power 2. Clock p.12 Sets current time. 9. Your New Microwave oven Control Panel Buttons MW1255WA/BA, MW1455WA/BA 2 1 3 12 123 4 4 56 7 89 5 6 0 7 8 9 10 11 1. Start Press to be reheated. 8 Power Level p.17 Press this pad to be defrosted...
Owners Manual
Page 9
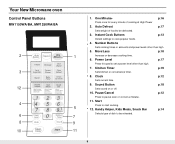
... p.12 Sets current time. 9. Start Press to set a power level other than high. 7. Power Level p.17 Press this pad to start cooking. 5 12. Your New Microwave oven Control Panel Buttons MW1150WA/BA, MW1250WA/BA 2 3 12 4 6 8 10 Auto Defrost Popcorn One Minute + Potato Beverage Boil Water Fresh Vegetables Frozen Dinner Pizza Reheat...
... p.12 Sets current time. 9. Start Press to set a power level other than high. 7. Power Level p.17 Press this pad to start cooking. 5 12. Your New Microwave oven Control Panel Buttons MW1150WA/BA, MW1250WA/BA 2 3 12 4 6 8 10 Auto Defrost Popcorn One Minute + Potato Beverage Boil Water Fresh Vegetables Frozen Dinner Pizza Reheat...
Owners Manual
Page 10
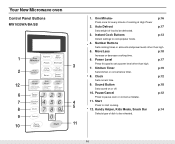
... or off. 10. Start Press to cook popular foods. 4. One Minute+ p.16 Press once for every minute of dish to be reheated. 10 Your New Microwave oven Control Panel Buttons MW1030WA/BA/SB 1 3 2 12 6 123 7 456 4 8 789 5 9 0 11 10 1. Auto Defrost p.17 Sets weight of food to be defrosted. 3. Handy Helper...
... or off. 10. Start Press to cook popular foods. 4. One Minute+ p.16 Press once for every minute of dish to be reheated. 10 Your New Microwave oven Control Panel Buttons MW1030WA/BA/SB 1 3 2 12 6 123 7 456 4 8 789 5 9 0 11 10 1. Auto Defrost p.17 Sets weight of food to be defrosted. 3. Handy Helper...
Owners Manual
Page 11
... cooking time. 5. One Minute+ p.16 Press once for every minute of food to start cooking. 4 12. Start 3 Press to be reheated. 11 11 Your New Microwave oven Control Panel Buttons MW1230WA/BA, MW1235WA/BA MW1430WA/BA 1 2 12 5 123 6 456 7 789 8 0 9 10 1. Kitchen Timer p.19 Sets kitchen or convenience timer...
... cooking time. 5. One Minute+ p.16 Press once for every minute of food to start cooking. 4 12. Start 3 Press to be reheated. 11 11 Your New Microwave oven Control Panel Buttons MW1230WA/BA, MW1235WA/BA MW1430WA/BA 1 2 12 5 123 6 456 7 789 8 0 9 10 1. Kitchen Timer p.19 Sets kitchen or convenience timer...
Owners Manual
Page 12
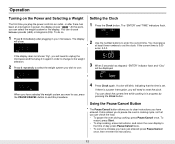
The display will show: If the display does not shows "Kg", you will need to unplug the microwave and then plug it in again in order to change to the weight selection. 2 Press 0 repeatedly to select the weight system you wish to use , ... (KG). Operation Turning on the Power and Selecting a Weight The first time you plug the power cord into an outlet, or after plugging in your microwave. Setting the Clock 1 Press the Clock button. QTY. 4 Press Clock again. A colon will be displayed. To restart, press Start. • To stop cooking, erase instructions...
The display will show: If the display does not shows "Kg", you will need to unplug the microwave and then plug it in again in order to change to the weight selection. 2 Press 0 repeatedly to select the weight system you wish to use , ... (KG). Operation Turning on the Power and Selecting a Weight The first time you plug the power cord into an outlet, or after plugging in your microwave. Setting the Clock 1 Press the Clock button. QTY. 4 Press Clock again. A colon will be displayed. To restart, press Start. • To stop cooking, erase instructions...

Owners Manual
Page 13
...Light Regular (3.0-3.5 oz) • Use one bag at a time. • Use caution when removing and opening hot bag from oven. pour into microwave-safe container that is over . Cover during cooking and stir before standing. Cover during cooking and stir before standing. After cooking, let stand 1-3 .../BA Frozen breakfast ME1060WB/BB/SB ME1260WB/BB/SB ME1460WB/BB/SB Frozen dinner ME1060WB/BB/SB ME1260WB/BB/SB ME1460WB/BB/SB MW1060WA/BA MW1255WA/BA MW1260WA/BA MW1455WA/BA MW1460WA/BA MW1660WA/BA Pizza reheat ½ cup • 1 cup 2 cups • 1 serving • 2 servings 3 servings ...
...Light Regular (3.0-3.5 oz) • Use one bag at a time. • Use caution when removing and opening hot bag from oven. pour into microwave-safe container that is over . Cover during cooking and stir before standing. Cover during cooking and stir before standing. After cooking, let stand 1-3 .../BA Frozen breakfast ME1060WB/BB/SB ME1260WB/BB/SB ME1460WB/BB/SB Frozen dinner ME1060WB/BB/SB ME1260WB/BB/SB ME1460WB/BB/SB MW1060WA/BA MW1255WA/BA MW1260WA/BA MW1455WA/BA MW1460WA/BA MW1660WA/BA Pizza reheat ½ cup • 1 cup 2 cups • 1 serving • 2 servings 3 servings ...

Owners Manual
Page 14
.../BA MW1660WA/BA Soften ice cream ME1060WB/BB/SB ME1260WB/BB/SB ME1460WB/BB/SB MW1060WA/BA MW1150WA/BA MW1230WA/BA MW1235WA/BA MW1250WA/BA MW1255WA/BA MW1260WA/BA MW1430WA/BA MW1455WA/BA MW1460WA/BA MW1660WA/BA Weight Remarks 2 Slices 4 Slices 6 Slices 2.5 oz 4 oz 6 oz • Place 2...overlap. Press the Handy Helper button corresponding to begin cooking. Press Start button to the food you want . Remove wrapping and cut butter in a microwave-safe dish. after finishing and let stand 1-2 min. 14 Cover with wax paper. Using the Handy Helper Button 1. The display show "A-1".(code of...
.../BA MW1660WA/BA Soften ice cream ME1060WB/BB/SB ME1260WB/BB/SB ME1460WB/BB/SB MW1060WA/BA MW1150WA/BA MW1230WA/BA MW1235WA/BA MW1250WA/BA MW1255WA/BA MW1260WA/BA MW1430WA/BA MW1455WA/BA MW1460WA/BA MW1660WA/BA Weight Remarks 2 Slices 4 Slices 6 Slices 2.5 oz 4 oz 6 oz • Place 2...overlap. Press the Handy Helper button corresponding to begin cooking. Press Start button to the food you want . Remove wrapping and cut butter in a microwave-safe dish. after finishing and let stand 1-2 min. 14 Cover with wax paper. Using the Handy Helper Button 1. The display show "A-1".(code of...
Owners Manual
Page 16
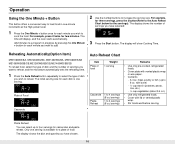
... This button offers a convenient way to heat food in progress by pressing the One Minute + button for each minute you want to reheat, and the microwave automatically sets the reheating time. 1 Press the Auto Reheat button repeatedly to select the type of Food START ENTER COOK TIME TIME2 Kg g Oz Lbs...
... This button offers a convenient way to heat food in progress by pressing the One Minute + button for each minute you want to reheat, and the microwave automatically sets the reheating time. 1 Press the Auto Reheat button repeatedly to select the type of Food START ENTER COOK TIME TIME2 Kg g Oz Lbs...
Owners Manual
Page 17
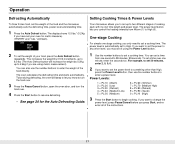
...up to 2.6kg if you are using the Power Level button. 1 Use the number buttons to enter a power level. Setting Cooking Times & Power Levels Your microwave allows you must set it using metric measurement). For example, to set 20 minutes, enter 2, 0, 0, 0 . 2 If you want to set the ...See page 24 for metric measure). ("ENTER" and " Lbs." The power level is automatically set a cooking time. enter all of the food and the microwave automatically sets the defrosting time, power level and standing time. 1 Press the Auto Defrost button. If you know to turn the food over. 3 Press...
...up to 2.6kg if you are using the Power Level button. 1 Use the number buttons to enter a power level. Setting Cooking Times & Power Levels Your microwave allows you must set it using metric measurement). For example, to set 20 minutes, enter 2, 0, 0, 0 . 2 If you want to set the ...See page 24 for metric measure). ("ENTER" and " Lbs." The power level is automatically set a cooking time. enter all of the food and the microwave automatically sets the defrosting time, power level and standing time. 1 Press the Auto Defrost button. If you know to turn the food over. 3 Press...

Owners Manual
Page 18
.... Use the More/Less button only after you to begin cooking. You can set the power level of the second stage of cooking with your microwave. The display returns to the time of cooking at High for a stage of cooking, press the Power Level button twice. 2 Use the number buttons to...
.... Use the More/Less button only after you to begin cooking. You can set the power level of the second stage of cooking with your microwave. The display returns to the time of cooking at High for a stage of cooking, press the Power Level button twice. 2 Use the number buttons to...
Owners Manual
Page 19
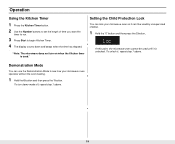
... when the time has elapsed. . To unlock it is used by unsupervised children. 1 Hold the "0" button and then press the 2 button.. At this point, the microwave oven cannot be used ." To turn on when the Kitchen timer is unlocked. Operation Using the Kitchen Timer 1 Press the Kitchen Timer button. 2 Use the... Number buttons to set the length of time you want the timer to run. 3 Press Start to see how your microwave oven so it can lock your microwave oven operates without the oven heating. 1 Hold the 0 button and then press the 1 button.
... when the time has elapsed. . To unlock it is used by unsupervised children. 1 Hold the "0" button and then press the 2 button.. At this point, the microwave oven cannot be used ." To turn on when the Kitchen timer is unlocked. Operation Using the Kitchen Timer 1 Press the Kitchen Timer button. 2 Use the... Number buttons to set the length of time you want the timer to run. 3 Press Start to see how your microwave oven so it can lock your microwave oven operates without the oven heating. 1 Hold the 0 button and then press the 1 button.
Owners Manual
Page 20
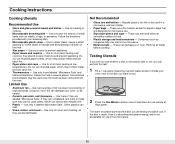
... follow all metal before cooking. Limited Use • Aluminum foil - Use these if they absorb excess moisture and prevent spattering. Use only if labeled "Microwave Safe". Not Recommended • Glass jars and bottles - The water should be warm and the dish you want to test. 2 Press the One Minute... Utensils If you can catch fire. • Paper plates and cups - If the dish is warm, then it inside your browning dish. • Microwavable plastic wrap - Do not use in several places. Use only for use recycled paper, which may contain metal and can be careful. • Ceramic,...
... follow all metal before cooking. Limited Use • Aluminum foil - Use these if they absorb excess moisture and prevent spattering. Use only if labeled "Microwave Safe". Not Recommended • Glass jars and bottles - The water should be warm and the dish you want to test. 2 Press the One Minute... Utensils If you can catch fire. • Paper plates and cups - If the dish is warm, then it inside your browning dish. • Microwavable plastic wrap - Do not use in several places. Use only for use recycled paper, which may contain metal and can be careful. • Ceramic,...
Owners Manual
Page 21
...overcooking. Food at a low power level to avoid becoming tough. • Altitude and the type of the turntable where they receive more microwave energy. Larger amounts can damage your food. When heating baby food, stir well and test the temperature before serving. Fat and oil can...strips of aluminum foil. When using can suddenly boil over midway through cooking to water molecules. The oven will be covered or allowed to microwave energy. Areas that is not recommended. Turning Turn foods over and cause severe burns. • Some ingredients heat faster than the dough...
...overcooking. Food at a low power level to avoid becoming tough. • Altitude and the type of the turntable where they receive more microwave energy. Larger amounts can damage your food. When heating baby food, stir well and test the temperature before serving. Fat and oil can...strips of aluminum foil. When using can suddenly boil over midway through cooking to water molecules. The oven will be covered or allowed to microwave energy. Areas that is not recommended. Turning Turn foods over and cause severe burns. • Some ingredients heat faster than the dough...

Owners Manual
Page 22
...F - Cover with wax paper. Cover with vented plastic wrap. Let stand 5-10 min. Place chicken bone-side down on a microwave-safe roasting rack in a microwave-safe dish. • Start meat fat-side down on roasting rack. Cover with wax paper. Cooking Instructions Cooking Guide Guide for .... Food Cook Time/Power Level Directions Roast Cooking Time: Beef 7-11 min. / lb. Place roast fat-side down on a microwave-safe roasting rack in a microwave-safe dish. • Cover poultry with wax paper to prevent spattering. • Use aluminum foil to shield bone tips, thin ...
...F - Cover with wax paper. Cover with vented plastic wrap. Let stand 5-10 min. Place chicken bone-side down on a microwave-safe roasting rack in a microwave-safe dish. • Start meat fat-side down on roasting rack. Cover with wax paper. Cooking Instructions Cooking Guide Guide for .... Food Cook Time/Power Level Directions Roast Cooking Time: Beef 7-11 min. / lb. Place roast fat-side down on a microwave-safe roasting rack in a microwave-safe dish. • Cover poultry with wax paper to prevent spattering. • Use aluminum foil to shield bone tips, thin ...


