User Manual Ver.1.0 (English)
Page 10
... of the oven clean. This appliance can break. Food will not cook properly without the glass tray in narrow-necked bottles. The containers can cause low-level exposure to clean the appliance. - WARNING CRITICAL CLEANING INSTRUCTIONS Do not clean the appliance by spraying water directly onto it is in the glass...
... of the oven clean. This appliance can break. Food will not cook properly without the glass tray in narrow-necked bottles. The containers can cause low-level exposure to clean the appliance. - WARNING CRITICAL CLEANING INSTRUCTIONS Do not clean the appliance by spraying water directly onto it is in the glass...

User Manual Ver.1.0 (English)
Page 12
...Service. (Refer to follow these instructions closely so that your microwave oven was damaged during shipping, or if you can buy it from the Samsung Contact Center (1-800-726-7864) or on-line web site (www.samsungparts.com) * High Rack English - 12 MC17F808KDT_AA_DE68-04224A_EN.indd 12... Guide Ring Grease Filter (Installed) * Charcoal filter * Exhaust adaptor * Hardware kit (Screws & Brackets) Manuals (User & Installation) Templates (Top & Wall) Cooking Guide Manual * Low Rack * Medium Rack If you need an accessory marked with a *, you do not have all the parts shown below.
...Service. (Refer to follow these instructions closely so that your microwave oven was damaged during shipping, or if you can buy it from the Samsung Contact Center (1-800-726-7864) or on-line web site (www.samsungparts.com) * High Rack English - 12 MC17F808KDT_AA_DE68-04224A_EN.indd 12... Guide Ring Grease Filter (Installed) * Charcoal filter * Exhaust adaptor * Hardware kit (Screws & Brackets) Manuals (User & Installation) Templates (Top & Wall) Cooking Guide Manual * Low Rack * Medium Rack If you need an accessory marked with a *, you do not have all the parts shown below.

User Manual Ver.1.0 (English)
Page 14
CHECKING THE CONTROL PANEL Speed Cook (page 24) Bake (page 35) Microwave (page 34) Express Menu (page 33) Select Stop/Clear (Page 17) Kitchen Timer (page 17) Steam Clean (page 18) Light Hi/Lo/Off (page 17) Vent Hi/Mid/Low/Off (page 17) Slim Fry (page 20) Auto Cook (page 28) Roast (page 35) Brown (page 35) Speed Bake/Roast (page 35 Defrost (page 19) Microwave +30 Sec. (page 17) Knob Dial Start My Settings (page 15) Fit Choice (page 21) Warm Hold (page 18) Eco Mode (page 18) Turntable On/Off (page 18) MC17F808KDT_AA_DE68-04224A_EN.indd 14 English - 14 2013-07-11 �� 11:04:51
CHECKING THE CONTROL PANEL Speed Cook (page 24) Bake (page 35) Microwave (page 34) Express Menu (page 33) Select Stop/Clear (Page 17) Kitchen Timer (page 17) Steam Clean (page 18) Light Hi/Lo/Off (page 17) Vent Hi/Mid/Low/Off (page 17) Slim Fry (page 20) Auto Cook (page 28) Roast (page 35) Brown (page 35) Speed Bake/Roast (page 35 Defrost (page 19) Microwave +30 Sec. (page 17) Knob Dial Start My Settings (page 15) Fit Choice (page 21) Warm Hold (page 18) Eco Mode (page 18) Turntable On/Off (page 18) MC17F808KDT_AA_DE68-04224A_EN.indd 14 English - 14 2013-07-11 �� 11:04:51
User Manual Ver.1.0 (English)
Page 15
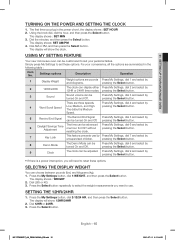
... time can be turned On and Off. SELECTING THE DISPLAY WEIGHT You can display either Press My Settings, dial 2 and select by 4 Word Scroll Speed Low, Medium, and High. Dial AM or PM, and then press the Select button. Dial 12HR or 24HR. 3. For your personal tastes. Press My Settings, dial...
... time can be turned On and Off. SELECTING THE DISPLAY WEIGHT You can display either Press My Settings, dial 2 and select by 4 Word Scroll Speed Low, Medium, and High. Dial AM or PM, and then press the Select button. Dial 12HR or 24HR. 3. For your personal tastes. Press My Settings, dial...

User Manual Ver.1.0 (English)
Page 17
...Clear button once. Press the Start button to the cooking time. 2. Each step adds 5 seconds to begin cooking. Press once for high, twice for low, three times to set the number of day, press the Stop/ Clear button twice. • To clear instructions you want the timer to turn it... the cooking time by set cooking time. USING THE MICROWAVE +30 SEC. As you dial clockwise, you have turned the fan on for fan speed Low, and four times to a cooking procedure, dial in These Increments 5 seconds 10 seconds 30 seconds 1 minute 2 minutes 5 minutes 2. The fan will display. Each ...
...Clear button once. Press the Start button to the cooking time. 2. Each step adds 5 seconds to begin cooking. Press once for high, twice for low, three times to set the number of day, press the Stop/ Clear button twice. • To clear instructions you want the timer to turn it... the cooking time by set cooking time. USING THE MICROWAVE +30 SEC. As you dial clockwise, you have turned the fan on for fan speed Low, and four times to a cooking procedure, dial in These Increments 5 seconds 10 seconds 30 seconds 1 minute 2 minutes 5 minutes 2. The fan will display. Each ...

User Manual Ver.1.0 (English)
Page 25
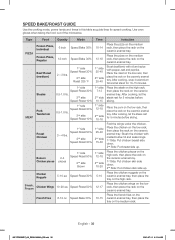
... TOASTER ITEMS 2 servings rack, then place the rack on the ceramic B enamel tray. Fold the wings under the chicken. Place the chicken on the low rack, then place the rack on the 4 servings ceramic enamel tray. each piece = 4 oz.) Place the shrimp on the ceramic 3 SHRIMP, FRESH.... Place the tuna steaks on the 4 TUNA STEAK 2 servings high rack, then place the rack on the ceramic enamel tray. Place the waffles on the low rack, 8 WAFFLES, FROZEN 2 servings 3 servings (1 serving= 2 Waffles) then place the rack on (2 pieces, 8 oz.) the ceramic enamel tray. POULTRY ...
... TOASTER ITEMS 2 servings rack, then place the rack on the ceramic B enamel tray. Fold the wings under the chicken. Place the chicken on the low rack, then place the rack on the 4 servings ceramic enamel tray. each piece = 4 oz.) Place the shrimp on the ceramic 3 SHRIMP, FRESH.... Place the tuna steaks on the 4 TUNA STEAK 2 servings high rack, then place the rack on the ceramic enamel tray. Place the waffles on the low rack, 8 WAFFLES, FROZEN 2 servings 3 servings (1 serving= 2 Waffles) then place the rack on (2 pieces, 8 oz.) the ceramic enamel tray. POULTRY ...

User Manual Ver.1.0 (English)
Page 26
... microwave. When the microwave beeps, turn over the steak and F restart the microwave. FOOD Amount Directions Accessory Type 1 BEEF ROAST Place the roast on the low rack, 2 lbs (0.91kg) 3 lbs (1.36kg) then place the rack on the ceramic 3/4 Inch, 1 llb. When the microwave beeps, turn over the steak and restart the...
... microwave. When the microwave beeps, turn over the steak and F restart the microwave. FOOD Amount Directions Accessory Type 1 BEEF ROAST Place the roast on the low rack, 2 lbs (0.91kg) 3 lbs (1.36kg) then place the rack on the ceramic 3/4 Inch, 1 llb. When the microwave beeps, turn over the steak and restart the...

User Manual Ver.1.0 (English)
Page 27
F 3 PORK TENDERLOIN Small - 1 Piece (0.5-1 lbs) Large - 1 Piece (1.5-2 lbs) Place the pork on the low rack, then place the rack on the high rack. POTATO 2 SWEET POTATO Pierce the potatoes 3 times with a fork. Pierce the sweet potatoes 3 times 2 ea. 4 ea. (8~...
F 3 PORK TENDERLOIN Small - 1 Piece (0.5-1 lbs) Large - 1 Piece (1.5-2 lbs) Place the pork on the low rack, then place the rack on the high rack. POTATO 2 SWEET POTATO Pierce the potatoes 3 times with a fork. Pierce the sweet potatoes 3 times 2 ea. 4 ea. (8~...

User Manual Ver.1.0 (English)
Page 28
...FRIED CHICKEN 2 servings Place the chicken on the ceramic 4 servings enamel tray, then place the tray on the ceramic enamel tray. per serving) the low rack. Dial the food you want to cook, and then press the Select button. (For items you do not need to 4 servings (8 oz./.... FOOD Amount Directions Accessory Type 3 CHICKEN WINGS 2 servings (10 ea.) 4 servings (20 ea.) (5 wings per serving) Place the chicken wings on the low rack, then place the rack on (1 piece per serving) beeps, turn over the sweet potato fries and restart the oven. When the oven (3 oz. per...
...FRIED CHICKEN 2 servings Place the chicken on the ceramic 4 servings enamel tray, then place the tray on the ceramic enamel tray. per serving) the low rack. Dial the food you want to cook, and then press the Select button. (For items you do not need to 4 servings (8 oz./.... FOOD Amount Directions Accessory Type 3 CHICKEN WINGS 2 servings (10 ea.) 4 servings (20 ea.) (5 wings per serving) Place the chicken wings on the low rack, then place the rack on (1 piece per serving) beeps, turn over the sweet potato fries and restart the oven. When the oven (3 oz. per...

User Manual Ver.1.0 (English)
Page 30
... tray on a microwave safe plate. Place the rolls on the greased ceramic enamel tray, then place the tray on the low rack. 5. Cover with a fork and place on the low rack. When the 2 servings (4 oz.) microwave beeps, add spaghetti G and restart the microwave. Place the biscuits on... the greased ceramic enamel tray, then place the A tray on the A low rack. Preheat the microwave to 375 °F. Place the rolls on the greased ceramic enamel tray, then place the tray on top of water. ...
... tray on a microwave safe plate. Place the rolls on the greased ceramic enamel tray, then place the tray on the low rack. 5. Cover with a fork and place on the low rack. When the 2 servings (4 oz.) microwave beeps, add spaghetti G and restart the microwave. Place the biscuits on... the greased ceramic enamel tray, then place the A tray on the A low rack. Preheat the microwave to 375 °F. Place the rolls on the greased ceramic enamel tray, then place the tray on top of water. ...

User Manual Ver.1.0 (English)
Page 31
...Cook No. A + D (Except Ceramic enamel tray) 2 CINNAMON ROLLS 8 ea. Place the egg rolls on the ceramic enamel tray, then place the tray on the low rack. Pour the batter into an 8x8 inch microwave safe pan, then place the A pan on the medium rack. 1 BITE SIZE APPETIZERS 2 servings (8 ea.) 4 ...375 °F. Place the turnovers on REFRIGERATED 4 servings (4 ea.) the greased ceramic enamel tray, D then place the tray on the low rack. Place the fish sticks on the low rack, then place the rack on the medium rack. D COOKIE 5 DOUGH, PRE FORMED 10 ea. Place one filled pan on ...
...Cook No. A + D (Except Ceramic enamel tray) 2 CINNAMON ROLLS 8 ea. Place the egg rolls on the ceramic enamel tray, then place the tray on the low rack. Pour the batter into an 8x8 inch microwave safe pan, then place the A pan on the medium rack. 1 BITE SIZE APPETIZERS 2 servings (8 ea.) 4 ...375 °F. Place the turnovers on REFRIGERATED 4 servings (4 ea.) the greased ceramic enamel tray, D then place the tray on the low rack. Place the fish sticks on the low rack, then place the rack on the medium rack. D COOKIE 5 DOUGH, PRE FORMED 10 ea. Place one filled pan on ...

User Manual Ver.1.0 (English)
Page 32
... °F. G Place the chocolate chips in a microwave safe bowl. Place the caramels in a microwave safe dish. G 9 MELT MARSHMALLOWS 10 oz. A 7. Place the butter on the low rack. Place the carton in center of microwave. CATEGORY Cook No. Place the potato bites on the ceramic enamel tray, then place the tray on...
... °F. G Place the chocolate chips in a microwave safe bowl. Place the caramels in a microwave safe dish. G 9 MELT MARSHMALLOWS 10 oz. A 7. Place the butter on the low rack. Place the carton in center of microwave. CATEGORY Cook No. Place the potato bites on the ceramic enamel tray, then place the tray on...

User Manual Ver.1.0 (English)
Page 34
... the Start button to begin cooking. Use the dial to set a cooking time. Use the dial to set a second cooking time. 4. POWER LEVEL 1 Warm 2 Low 3 Defrost 4 Medium low 5 Medium 6 Simmer 7 Medium high 8 Reheat 9 Sauté 10 High One-stage Cooking For simple one cooking stage, you must set a cooking time. Press the...
... the Start button to begin cooking. Use the dial to set a cooking time. Use the dial to set a second cooking time. 4. POWER LEVEL 1 Warm 2 Low 3 Defrost 4 Medium low 5 Medium 6 Simmer 7 Medium high 8 Reheat 9 Sauté 10 High One-stage Cooking For simple one cooking stage, you must set a cooking time. Press the...
User Manual Ver.1.0 (English)
Page 35
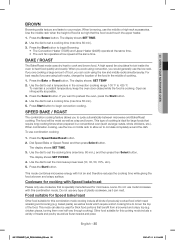
... of food is specially manufactured for this combination mode. The display shows SET TIME. 2. For best results if you would generally use the low rack. Use the dial to begin convection cooking. The display shows SET POWER. 4. Food suitable for Speed bake/roast Other food suitable for.... A high speed fan circulates hot air inside the oven to set a cooking time (max time 60 min). 5. If you are using the low and middle racks simultaneoulsy. The display shows: SET TEMP 2. Open as infrequently as crisp and brown. Use the dial to heat food quickly and...
... of food is specially manufactured for this combination mode. The display shows SET TIME. 2. For best results if you would generally use the low rack. Use the dial to begin convection cooking. The display shows SET POWER. 4. Food suitable for Speed bake/roast Other food suitable for.... A high speed fan circulates hot air inside the oven to set a cooking time (max time 60 min). 5. If you are using the low and middle racks simultaneoulsy. The display shows: SET TEMP 2. Open as infrequently as crisp and brown. Use the dial to heat food quickly and...
User Manual Ver.1.0 (English)
Page 36
... the chicken. Chicken Nuggets 5-10 ea. MC17F808KDT_AA_DE68-04224A_EN.indd 36 English - 36 2013-07-11 �� 11:04:53 Place the chicken on the low rack, then place the rack on the high rack. Speed Roast 30% 5-10 Place the chicken nuggets on the ceramic enamel tray, then place the... side 10-20 Place the chicken pieces on the high rack, then place the rack on the ceramic enamel tray. Place the roast on the low rack, then place the rack on the ceramic enamel tray. 1st Side: Put chicken skin side down . 2nd Side: Put breast side up . Pork Tenderloin...
... the chicken. Chicken Nuggets 5-10 ea. MC17F808KDT_AA_DE68-04224A_EN.indd 36 English - 36 2013-07-11 �� 11:04:53 Place the chicken on the low rack, then place the rack on the high rack. Speed Roast 30% 5-10 Place the chicken nuggets on the ceramic enamel tray, then place the... side 10-20 Place the chicken pieces on the high rack, then place the rack on the ceramic enamel tray. Place the roast on the low rack, then place the rack on the ceramic enamel tray. 1st Side: Put chicken skin side down . 2nd Side: Put breast side up . Pork Tenderloin...
User Manual Ver.1.0 (English)
Page 37
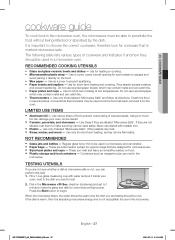
... be used once the food has been removed from the oven. The following table lists various types of exposed areas. Use for one minute at low temperatures. If they can shatter. • Paper bags - NOT RECOMMENDED • Glass jars and bottles - Do not use recycled paper, which may contain metal and...
... be used once the food has been removed from the oven. The following table lists various types of exposed areas. Use for one minute at low temperatures. If they can shatter. • Paper bags - NOT RECOMMENDED • Glass jars and bottles - Do not use recycled paper, which may contain metal and...

User Manual Ver.1.0 (English)
Page 38
... becoming tough. • Altitude and the type of the turntable where they receive more microwave energy. Keep this time to stir your oven. Food at a low power level to prevent it cook. To prevent overcooking, place thin or delicate parts toward the outside to prevent overcooking. Use only small amounts of...
... becoming tough. • Altitude and the type of the turntable where they receive more microwave energy. Keep this time to stir your oven. Food at a low power level to prevent it cook. To prevent overcooking, place thin or delicate parts toward the outside to prevent overcooking. Use only small amounts of...
