User Manual
Page 7
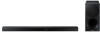
Launching the Samsung Audio Remote App 08 Using the Remote Control How to Use the Remote Control Adjusting the Soundbar volume with a TV remote control Using the Hidden Buttons Output specifications for the different sound effect modes 09 Installing the Wall Mount Installation Precautions Wallmount Components Detaching the Soundbar from the Wall 10 Software Update... 17 17 20 20 20 21 21 24 25 25 26 26 26 29 29 30 30 31 32 32 32 33 33 Installing the Samsung Audio Remote App -- 07 Connecting a Mobile Device Connecting via Bluetooth Using the...
Launching the Samsung Audio Remote App 08 Using the Remote Control How to Use the Remote Control Adjusting the Soundbar volume with a TV remote control Using the Hidden Buttons Output specifications for the different sound effect modes 09 Installing the Wall Mount Installation Precautions Wallmount Components Detaching the Soundbar from the Wall 10 Software Update... 17 17 20 20 20 21 21 24 25 25 26 26 26 29 29 30 30 31 32 32 32 33 33 Installing the Samsung Audio Remote App -- 07 Connecting a Mobile Device Connecting via Bluetooth Using the...
User Manual
Page 8
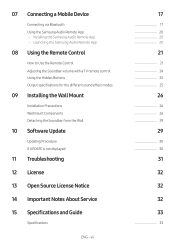
...Insert 2 AA batteries (1.5V) oriented so that their polarity is completely removed. For more information about power connections, see page 5. •• For Soundbar wall mounting components, see page 26. •• Micro USB to USB adapter and HDMI cables are labelled (1, 2, 3). ENG - 2 Inserting Batteries before using the...(Main Unit) Power Cord (AC/DC Adapter) Optical Cable •• The power connection steps are sold separately. To purchase, contact a Samsung Service Center or Samsung Customer Care. •• The appearance of the arrow until it is correct.
...Insert 2 AA batteries (1.5V) oriented so that their polarity is completely removed. For more information about power connections, see page 5. •• For Soundbar wall mounting components, see page 26. •• Micro USB to USB adapter and HDMI cables are labelled (1, 2, 3). ENG - 2 Inserting Batteries before using the...(Main Unit) Power Cord (AC/DC Adapter) Optical Cable •• The power connection steps are sold separately. To purchase, contact a Samsung Service Center or Samsung Customer Care. •• The appearance of the arrow until it is correct.
User Manual
Page 32
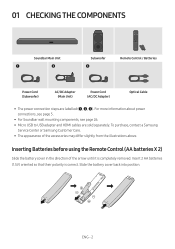
... have (plaster board, iron board, wood, etc.). Wallmount Components A B CENTER LINE A-TYPE : 616mm B-TYPE : 360mm B A Wall Mount Guide Holder-Screw (2 EA) Screw (2EA) Bracket-Wall Mount L Bracket-Wall Mount R ENG - 26 Diameter: M5 -- If not, reinforce the wall or choose another installation point. •• Purchase and use the fixing screws or anchors appropriate for the kind...
... have (plaster board, iron board, wood, etc.). Wallmount Components A B CENTER LINE A-TYPE : 616mm B-TYPE : 360mm B A Wall Mount Guide Holder-Screw (2 EA) Screw (2EA) Bracket-Wall Mount L Bracket-Wall Mount R ENG - 26 Diameter: M5 -- If not, reinforce the wall or choose another installation point. •• Purchase and use the fixing screws or anchors appropriate for the kind...

User Manual
Page 33
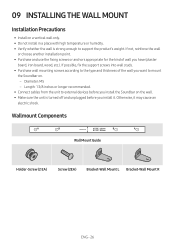
... A-TYPE : 616mm B-TYPE : 360mm B A Center Line ENG - 27 Place the Wall Mount Guide against the wall surface. •• The Wall Mount Guide must be level. •• If your TV), and then fix the Wall Mount Guide to the wall using tape. •• If you are large enough for the supporting screws, and... then remove the Wall Mount Guide. 1. Using an appropriately sized drill bit, drill a hole in the wall at least 2 inches (5 cm) below a TV, place the Center Line in the center of studs, ...
... A-TYPE : 616mm B-TYPE : 360mm B A Center Line ENG - 27 Place the Wall Mount Guide against the wall surface. •• The Wall Mount Guide must be level. •• If your TV), and then fix the Wall Mount Guide to the wall using tape. •• If you are large enough for the supporting screws, and... then remove the Wall Mount Guide. 1. Using an appropriately sized drill bit, drill a hole in the wall at least 2 inches (5 cm) below a TV, place the Center Line in the center of studs, ...

User Manual
Page 34
... •• Slightly tilt the Soundbar to insert both Bracket-Wall Mount L and R to position them correctly. Make sure to the Soundbar's bottom. Rear of the Bracket-Wall Mounts are firmly fixed. 6. For a proper fit, make sure both... sides are located behind the rear of Soundbar ENG - 28 Install the Soundbar with the attached Bracket-Wall Mounts by hanging the Bracket-Wall Mounts on the Holder-Screws on the Soundbar to attach both Holder-Screw heads into Bracket-Wall Mount holes. Wall Mount R Wall Mount...
... •• Slightly tilt the Soundbar to insert both Bracket-Wall Mount L and R to position them correctly. Make sure to the Soundbar's bottom. Rear of the Bracket-Wall Mounts are firmly fixed. 6. For a proper fit, make sure both... sides are located behind the rear of Soundbar ENG - 28 Install the Soundbar with the attached Bracket-Wall Mounts by hanging the Bracket-Wall Mounts on the Holder-Screws on the Soundbar to attach both Holder-Screw heads into Bracket-Wall Mount holes. Wall Mount R Wall Mount...
User Manual
Page 35
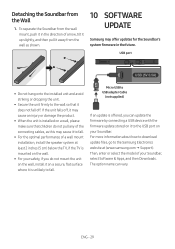
For more information about how to download update files, go to the USB port on it to the Samsung Electronics website at least 2 inches (5 cm) below the TV, if the TV is mounted on the wall. •• For your safety, if you can vary. ENG - 29 Micro USB to USB adapter Cable (...model of arrow, tilt it up slightly, and then pull it does not fall . •• For the optimal performance of a wall mount installation, install the speaker system at (www.samsung.com Support). If the unit falls off, it may cause an injury or damage the product. •• When the unit...
For more information about how to download update files, go to the USB port on it to the Samsung Electronics website at least 2 inches (5 cm) below the TV, if the TV is mounted on the wall. •• For your safety, if you can vary. ENG - 29 Micro USB to USB adapter Cable (...model of arrow, tilt it up slightly, and then pull it does not fall . •• For the optimal performance of a wall mount installation, install the speaker system at (www.samsung.com Support). If the unit falls off, it may cause an injury or damage the product. •• When the unit...


