User Manual
Page 5
... USA ONLY This perchlorate warning applies only to the Wall-mount Installation Guide 13 Connecting an External Device using Audio (analogue) cable or Optical (digital) cable 14 FUNCTIONS 14 Input Mode 15 Bluetooth 17 USING SAMSUNG AUDIO REMOTE APP 18 TV SoundConnect 19 USB 20 Software ...the Ferrite Core on the Subwoofer Speaker Cable 9 REMOTE CONTROL 9 Remote Control Buttons and Functions 11 CONNECTIONS 11 Installing the Wall Mount 12 Detaching the Wall Mount 12 Installing the bracket without referring to primary CR ( Manganese Dioxide ) Lithium coin cells in the product sold or distributed ...
... USA ONLY This perchlorate warning applies only to the Wall-mount Installation Guide 13 Connecting an External Device using Audio (analogue) cable or Optical (digital) cable 14 FUNCTIONS 14 Input Mode 15 Bluetooth 17 USING SAMSUNG AUDIO REMOTE APP 18 TV SoundConnect 19 USB 20 Software ...the Ferrite Core on the Subwoofer Speaker Cable 9 REMOTE CONTROL 9 Remote Control Buttons and Functions 11 CONNECTIONS 11 Installing the Wall Mount 12 Detaching the Wall Mount 12 Installing the bracket without referring to primary CR ( Manganese Dioxide ) Lithium coin cells in the product sold or distributed ...
User Manual
Page 6
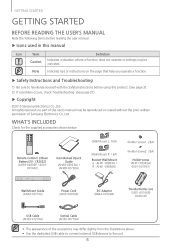
...Remote Control / Lithium Battery (3V : CR2032) (AH59-02692P / 4301- 001042) User Manual /Quick Guide (AH68-02823A) / (AH68-02792A) (Wall Mount L: 1EA) (Wall Mount R: 1EA) Bracket-Wall Mount (L : AH61-03883A / R : AH61-03884A) (Holder-screw1: 2EA) (Holder-screw2: 2EA) Holder-screw (AH61-03342A/ 6001-001961) Wall... of this product. (See page 3) 2) If a problem occurs, check Troubleshooting. (See page 21) ▶▶Copyright ©2015 Samsung Electronics Co.,Ltd. All rights reserved; no part of the accessories may be reproduced or copied without the prior written permission of...
...Remote Control / Lithium Battery (3V : CR2032) (AH59-02692P / 4301- 001042) User Manual /Quick Guide (AH68-02823A) / (AH68-02792A) (Wall Mount L: 1EA) (Wall Mount R: 1EA) Bracket-Wall Mount (L : AH61-03883A / R : AH61-03884A) (Holder-screw1: 2EA) (Holder-screw2: 2EA) Holder-screw (AH61-03342A/ 6001-001961) Wall... of this product. (See page 3) 2) If a problem occurs, check Troubleshooting. (See page 21) ▶▶Copyright ©2015 Samsung Electronics Co.,Ltd. All rights reserved; no part of the accessories may be reproduced or copied without the prior written permission of...
User Manual
Page 11
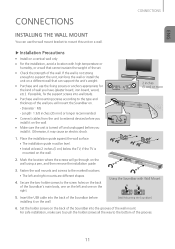
...into the back of the Soundbar before you install it on the back of the grooves. 11 Set the holder screws on the wall. [Wall Mounting the Soundbar] 6. Place the installation guide against the wall surface. ęę The installation guide must be level. ęę Install ... shock. 2 inches (5 cm) or more 1. Secure the two holder screws to external devices before installing it . Mark the location where the screws will mount the Soundbar on. --Diameter : M5 --Length: 1 3/8 inches (35 mm) or longer recommended. ●● Connect cables from the unit to the...
...into the back of the Soundbar before you install it on the back of the grooves. 11 Set the holder screws on the wall. [Wall Mounting the Soundbar] 6. Place the installation guide against the wall surface. ęę The installation guide must be level. ęę Install ... shock. 2 inches (5 cm) or more 1. Secure the two holder screws to external devices before installing it . Mark the location where the screws will mount the Soundbar on. --Diameter : M5 --Length: 1 3/8 inches (35 mm) or longer recommended. ●● Connect cables from the unit to the...
User Manual
Page 12
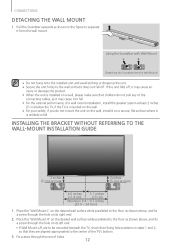
... the unit. ●● Secure the unit firmly to separate it does not fall off , it may cause it to fall . Place the "Wall Mount R" on the desired wall surface while paralleled to the floor as shown above , and fix a screw through the rest of the TV's bottom. 3. ...INSTALLING THE BRACKET WITHOUT REFERRING TO THE WALL-MOUNT INSTALLATION GUIDE 2 inches (5 cm) or more 2 inches (5 cm) or more 4.6 inches (11.6 cm) 5.1 inches (13 cm) Minimum 9.4 ~ 9.7 inches (23.9 ~ 24.6cm) 1. Place...
... the unit. ●● Secure the unit firmly to separate it does not fall off , it may cause it to fall . Place the "Wall Mount R" on the desired wall surface while paralleled to the floor as shown above , and fix a screw through the rest of the TV's bottom. 3. ...INSTALLING THE BRACKET WITHOUT REFERRING TO THE WALL-MOUNT INSTALLATION GUIDE 2 inches (5 cm) or more 2 inches (5 cm) or more 4.6 inches (11.6 cm) 5.1 inches (13 cm) Minimum 9.4 ~ 9.7 inches (23.9 ~ 24.6cm) 1. Place...


