User Manual
Page 2
...use of a card reader. å The contents and illustrations of their respective companies. 1 Please note that the manufacturer holds no responsibility for buying a Samsung Digital Camera. å Prior to using this camera, please read the user manual thoroughly. å If you require After Sales service, please bring the... cable Insert the supplied USB cable into the PC's USB port and the camera's USB connection terminal. (p.91) Check the camera's power. Samsung takes no responsibility for a trip or an important event) to use it on the memory card to the PC and can be moved to ...
...use of a card reader. å The contents and illustrations of their respective companies. 1 Please note that the manufacturer holds no responsibility for buying a Samsung Digital Camera. å Prior to using this camera, please read the user manual thoroughly. å If you require After Sales service, please bring the... cable Insert the supplied USB cable into the PC's USB port and the camera's USB connection terminal. (p.91) Check the camera's power. Samsung takes no responsibility for a trip or an important event) to use it on the memory card to the PC and can be moved to ...

User Manual
Page 3
...proximity to flammable or explosive gases, as a sealed vehicle, direct sunlight or other places of children or animals to your dealer or Samsung Camera Service centre. å Please do not use it. Switch off the camera, and then disconnect the power source. internal inspection, ...during prolonged use the camera and its accessories in camera malfunction. Positioning the flash too close proximity to you or your dealer or Samsung Camera Service centre. Should this be carried out by your subject's eyes may cause a fire or electric shock. å ...
...proximity to flammable or explosive gases, as a sealed vehicle, direct sunlight or other places of children or animals to your dealer or Samsung Camera Service centre. å Please do not use it. Switch off the camera, and then disconnect the power source. internal inspection, ...during prolonged use the camera and its accessories in camera malfunction. Positioning the flash too close proximity to you or your dealer or Samsung Camera Service centre. Should this be carried out by your subject's eyes may cause a fire or electric shock. å ...

User Manual
Page 4
Use battery with the correct specification for a long period of features 008 Front & Top 009 Back 010 Bottom 010 5 Function button 011 Self-timer lamp 011 Camera Status Lamp 011 Mode icon 012 Connecting to a Power Source 014 Inserting the memory card 015 Instructions on how to use the memory card RECORDING 017 LCD monitor indicator 018 How to use the menu 019 Starting the recording mode 019 Selecting modes 019 How to use the Smart Auto mode 020 How to use the Auto mode 021 How to use , always switch off the camera before moving the camera. Failure to do so may damage the cords or ...
Use battery with the correct specification for a long period of features 008 Front & Top 009 Back 010 Bottom 010 5 Function button 011 Self-timer lamp 011 Camera Status Lamp 011 Mode icon 012 Connecting to a Power Source 014 Inserting the memory card 015 Instructions on how to use the memory card RECORDING 017 LCD monitor indicator 018 How to use the menu 019 Starting the recording mode 019 Selecting modes 019 How to use the Smart Auto mode 020 How to use the Auto mode 021 How to use , always switch off the camera before moving the camera. Failure to do so may damage the cords or ...

User Manual
Page 5
Contents 023 How to use the Beauty Shot mode 023 How to use the Scene modes 025 How to use the Movie clip mode 025 Recording the movie clip without sound 025 Pausing while recording a movie clip (Successive Recording) 026 Things to Watch Out for When Taking Pictures 027 Using the camera buttons to set the camera 027 POWER button 027 SHUTTER button 027 ZOOM button 029 Info (DISP) / Up button 029 Macro / Down button 031 Focus lock 031 Flash / Left button 033 Self-timer / Right button 035 MENU button 035 OK button 035 Functions 036 How to Enable Functions Using the MENU Button 036 Exposure ...
Contents 023 How to use the Beauty Shot mode 023 How to use the Scene modes 025 How to use the Movie clip mode 025 Recording the movie clip without sound 025 Pausing while recording a movie clip (Successive Recording) 026 Things to Watch Out for When Taking Pictures 027 Using the camera buttons to set the camera 027 POWER button 027 SHUTTER button 027 ZOOM button 029 Info (DISP) / Up button 029 Macro / Down button 031 Focus lock 031 Flash / Left button 033 Self-timer / Right button 035 MENU button 035 OK button 035 Functions 036 How to Enable Functions Using the MENU Button 036 Exposure ...

User Manual
Page 6
Contents 049 Display 049 Language 049 Function Description 050 Start up image 050 Display Bright 050 Quick view 050 Display SAVE 051 Settings 051 Formatting a memory 051 Initialisation 052 Setting up the Date / Time / Date type 052 Time Zone 052 File name 053 Imprinting the recording date 053 Auto power off 054 Auto Focus lamp 054 Selecting Video out type 055 Setting the USB PLAY 056 056 056 057 057 058 Starting play mode Playing back a still image Playing back a movie clip Movie clip capture function Playing back a recorded voice Playing back a voice memo 058 LCD monitor Indicator 059 ...
Contents 049 Display 049 Language 049 Function Description 050 Start up image 050 Display Bright 050 Quick view 050 Display SAVE 051 Settings 051 Formatting a memory 051 Initialisation 052 Setting up the Date / Time / Date type 052 Time Zone 052 File name 053 Imprinting the recording date 053 Auto power off 054 Auto Focus lamp 054 Selecting Video out type 055 Setting the USB PLAY 056 056 056 057 057 058 Starting play mode Playing back a still image Playing back a movie clip Movie clip capture function Playing back a recorded voice Playing back a voice memo 058 LCD monitor Indicator 059 ...
User Manual
Page 7
Contents 073 Protecting images 073 Voice memo 074 DPOF 076 Copy To Card 077 PictBridge 078 PictBridge : Picture Selection 078 PictBridge : Print Setting 079 PictBridge : Reset 079 Important notes 081 Warning indicator 082 Before contacting a service centre 084 Specifications SOFTWARE 087 087 088 089 091 094 095 098 098 099 Software Notes System Requirements About the software Setting up the application software Starting PC mode Removing the removable disk Samsung Master Setting up the USB Driver for MAC Using the USB Driver for MAC FAQ 6
Contents 073 Protecting images 073 Voice memo 074 DPOF 076 Copy To Card 077 PictBridge 078 PictBridge : Picture Selection 078 PictBridge : Print Setting 079 PictBridge : Reset 079 Important notes 081 Warning indicator 082 Before contacting a service centre 084 Specifications SOFTWARE 087 087 088 089 091 094 095 098 098 099 Software Notes System Requirements About the software Setting up the application software Starting PC mode Removing the removable disk Samsung Master Setting up the USB Driver for MAC Using the USB Driver for MAC FAQ 6
User Manual
Page 8
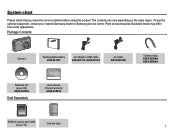
... Sold Separately User manual, Product warranty AD68-03597A SD/SDHC memory card / MMC (see p.16) Camera case 7 To buy the optional equipment, contact your nearest Samsung dealer or Samsung service centre. The contents can vary depending on the sales region.
... Sold Separately User manual, Product warranty AD68-03597A SD/SDHC memory card / MMC (see p.16) Camera case 7 To buy the optional equipment, contact your nearest Samsung dealer or Samsung service centre. The contents can vary depending on the sales region.

User Manual
Page 10
Identification of features Back LCD monitor Camera status lamp Zoom Tele(T) button (Digital zoom) Zoom Wide(W) button (Thumbnail) Mode dial Strap eyelet 5 function button MENU button Fn / Delete button Play mode button 9
Identification of features Back LCD monitor Camera status lamp Zoom Tele(T) button (Digital zoom) Zoom Wide(W) button (Thumbnail) Mode dial Strap eyelet 5 function button MENU button Fn / Delete button Play mode button 9

User Manual
Page 11
Identification of features Bottom Battery chamber Memory card slot Battery chamber cover Battery holder 5 Function button Information / Up button OK / Play & Pause button Flash / Left button Self-timer / Right button Macro / Down button Tripod socket Ä To open the battery chamber cover, slide it in the direction shown above. 10
Identification of features Bottom Battery chamber Memory card slot Battery chamber cover Battery holder 5 Function button Information / Up button OK / Play & Pause button Flash / Left button Self-timer / Right button Macro / Down button Tripod socket Ä To open the battery chamber cover, slide it in the direction shown above. 10

User Manual
Page 12
Blinking For the 2 seconds, the lamp blinks quickly at 1 second Blinking intervals. - Blinking After pressing the Shutter button, the image is taken in accordance with a PC The lamp blinks (LCD monitor turns off after about the camera mode setting. For the first 8 seconds, the lamp blinks at 0.25-second intervals. Camera Status Lamp Status Description Power on The lamp turns on and off when the camera is ready to take a picture After taking a picture The lamp blinks while saving the image data and turns off when the camera is ready to take a picture When fl...
Blinking For the 2 seconds, the lamp blinks quickly at 1 second Blinking intervals. - Blinking After pressing the Shutter button, the image is taken in accordance with a PC The lamp blinks (LCD monitor turns off after about the camera mode setting. For the first 8 seconds, the lamp blinks at 0.25-second intervals. Camera Status Lamp Status Description Power on The lamp turns on and off when the camera is ready to take a picture After taking a picture The lamp blinks while saving the image data and turns off when the camera is ready to take a picture When fl...

User Manual
Page 13
Batteries can lose power over time and are measured under Samsung's standard conditions and shooting conditions and may become warm. Using an AC cable : Connect the AC adapter to shot interval: 30Sec. Using a USB cable : Remove ...
Batteries can lose power over time and are measured under Samsung's standard conditions and shooting conditions and may become warm. Using an AC cable : Connect the AC adapter to shot interval: 30Sec. Using a USB cable : Remove ...

User Manual
Page 14
Connecting to a Power Source Important information about USB cable usage. å Use a USB cable with the correct specification. å If the camera is connected to the PC through a USB hub : connect the camera directly to the PC. å If the camera and other device. å Camera can not be detected using the camera. å Do not use the back side USB port of computer. å If the USB port of computer. In this case, use the flash frequently or take a movie clip with the camera power on, the battery won't be charged. Ê How to the PC at the same time. Turn the ...
Connecting to a Power Source Important information about USB cable usage. å Use a USB cable with the correct specification. å If the camera is connected to the PC through a USB hub : connect the camera directly to the PC. å If the camera and other device. å Camera can not be detected using the camera. å Do not use the back side USB port of computer. å If the USB port of computer. In this case, use the flash frequently or take a movie clip with the camera power on, the battery won't be charged. Ê How to the PC at the same time. Turn the ...

User Manual
Page 15
Turn off the camera's power before inserting the memory card. - Connecting to recharge or use recharge or use spare battery) spare battery) Battery empty. (Recharge or use spare battery) Ä When using the camera and the battery in a place that are 4 indicators for battery condition that is opened, do not force the battery chamber cover, this may be different from the actual battery status. 14 If the camera does not turn on the LCD may damage it. Do not insert the memory card the wrong way round. Battery indicator Battery status The battery is fully charged Low battery ...
Turn off the camera's power before inserting the memory card. - Connecting to recharge or use recharge or use spare battery) spare battery) Battery empty. (Recharge or use spare battery) Ä When using the camera and the battery in a place that are 4 indicators for battery condition that is opened, do not force the battery chamber cover, this may be different from the actual battery status. 14 If the camera does not turn on the LCD may damage it. Do not insert the memory card the wrong way round. Battery indicator Battery status The battery is fully charged Low battery ...

User Manual
Page 16
...camera power whenever the memory card is warm. To use the memory card in this camera. å Do not use a memory card formatted by the Samsung warranty. å The memory card is used in another digital camera or memory card reader. å If the memory card is removed while recording, ...deleting (formatting) or reading. å Samsung cannot be the case, you may become dirty or to copy important data onto other media as this may cause damage to format the memory...
...camera power whenever the memory card is warm. To use the memory card in this camera. å Do not use a memory card formatted by the Samsung warranty. å The memory card is used in another digital camera or memory card reader. å If the memory card is removed while recording, ...deleting (formatting) or reading. å Samsung cannot be the case, you may become dirty or to copy important data onto other media as this may cause damage to format the memory...

User Manual
Page 17
When using a 1GB SD memory, the specified shooting capacity will be affected by variables such as follows. Still image About 246 About 328 About 519 - - Card pins Write protect switch Label [SD (Secure Digital) memory card] å The SD/SDHC memory card has a write protect switch that prevents image files from being deleted or formatted. About 365 About 493 About 705 - - About 231 About 308 About 481 - - About 548 About 680 About 759 - - About 986 About 1095 About 1232 - - *Movie clip - - - About 45'42" About 01:19'07" å The zoom button doesn't...
When using a 1GB SD memory, the specified shooting capacity will be affected by variables such as follows. Still image About 246 About 328 About 519 - - Card pins Write protect switch Label [SD (Secure Digital) memory card] å The SD/SDHC memory card has a write protect switch that prevents image files from being deleted or formatted. About 365 About 493 About 705 - - About 231 About 308 About 481 - - About 548 About 680 About 759 - - About 986 About 1095 About 1232 - - *Movie clip - - - About 45'42" About 01:19'07" å The zoom button doesn't...

User Manual
Page 18
Description 5 Memory card icon / Internal memory icon 6 Battery 7 Flash 8 Self-timer 9 Macro 10 Photo Style Selector 11 Face Detection 12 OIS (Optical Image Stabilization) / Face Tone 13 Image Adjust / Without Sound / Face Retouch 14 Date / Time 15 Camera shake Warning 16 Auto Focus Frame 17 Drive mode 18 Metering 19 Image Quality / Frame Rate 20 Image Size 21 ISO 22 White Balance 23 Exposure compensation Icons 2009/01/01 01:00 PM Page - Description Icons 1 Recording mode 2 Optical / Digital Zoom bar / Digital Zoom rate 3 Voice Memo Number of ...
Description 5 Memory card icon / Internal memory icon 6 Battery 7 Flash 8 Self-timer 9 Macro 10 Photo Style Selector 11 Face Detection 12 OIS (Optical Image Stabilization) / Face Tone 13 Image Adjust / Without Sound / Face Retouch 14 Date / Time 15 Camera shake Warning 16 Auto Focus Frame 17 Drive mode 18 Metering 19 Image Quality / Frame Rate 20 Image Size 21 ISO 22 White Balance 23 Exposure compensation Icons 2009/01/01 01:00 PM Page - Description Icons 1 Recording mode 2 Optical / Digital Zoom bar / Digital Zoom rate 3 Voice Memo Number of ...

User Manual
Page 19
How to select a sub menu. Functions Sound Display Settings Exit EV White Balance ISO Face Detection Photo Size Quality ACB Change 2. Functions Sound Display Settings Exit Volume Start Sound Shutter Sound Beep AF Sound Self-Portrait Change 3. Functions Sound Display Settings Exit Volume Start Sound Shutter Sound Beep AF Sound Self-Portrait Press the LEFT or RIGHT button. Change Volume Start Sound Shutter Sound Beep AF Sound Self-Portrait Exit :Medium :Off :1 :1 :On :On Back Press the LEFT or RIGHT button. A menu for each camera mode appears. Functions Sound Display ...
How to select a sub menu. Functions Sound Display Settings Exit EV White Balance ISO Face Detection Photo Size Quality ACB Change 2. Functions Sound Display Settings Exit Volume Start Sound Shutter Sound Beep AF Sound Self-Portrait Change 3. Functions Sound Display Settings Exit Volume Start Sound Shutter Sound Beep AF Sound Self-Portrait Press the LEFT or RIGHT button. Change Volume Start Sound Shutter Sound Beep AF Sound Self-Portrait Exit :Medium :Off :1 :1 :On :On Back Press the LEFT or RIGHT button. A menu for each camera mode appears. Functions Sound Display ...

User Manual
Page 20
It will be used. å Even if there is a face detected, the camera may not select a portrait mode depending on the subject's position or lighting. å The camera may not select a tripod mode depending on shooting environments, such as camera shake, lighting, and distance to the subject. å The [Night] mode recognizes scenes only when the flash is set to off. The camera operates the [Tripod] mode after checking the shooting condition on the tripod for various scenes. 1. An appropriate mode icon will be helpful if you are not familiar with the camera settings for a ...
It will be used. å Even if there is a face detected, the camera may not select a portrait mode depending on the subject's position or lighting. å The camera may not select a tripod mode depending on shooting environments, such as camera shake, lighting, and distance to the subject. å The [Night] mode recognizes scenes only when the flash is set to off. The camera operates the [Tripod] mode after checking the shooting condition on the tripod for various scenes. 1. An appropriate mode icon will be helpful if you are not familiar with the camera settings for a ...

User Manual
Page 21
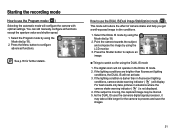
Insert the batteries taking with minimal user interaction. 1. Should this be the case, the camera is not inserted, an image will be stored in the internal memory. Starting the recording mode Each scene is inserted, an image will be stored on the memory card. 3. Insert the batteries (p.14). Close the battery chamber cover. 4. Point the camera towards the subject and compose the image by using the LCD monitor. 7. Press the shutter button to capture an image. å If the auto focus frame turns to capture an image clearly. å Avoid obstructing the lens or the flash ...
Insert the batteries taking with minimal user interaction. 1. Should this be the case, the camera is not inserted, an image will be stored in the internal memory. Starting the recording mode Each scene is inserted, an image will be stored on the memory card. 3. Insert the batteries (p.14). Close the battery chamber cover. 4. Point the camera towards the subject and compose the image by using the LCD monitor. 7. Press the shutter button to capture an image. å If the auto focus frame turns to capture an image clearly. å Avoid obstructing the lens or the flash ...
User Manual
Page 22
The digital zoom will display. If the lighting condition is darker than fluorescent lighting conditions, the DUAL IS will configure the camera with optimal settings. Starting the recording mode How to use the Program mode ( ) Selecting the automatic mode will not activate. 3. You can still manually configure all functions except the aperture value and shutter speed. 1. How to use the DUAL IS(Dual Image Stabilization) mode ( ) This mode will reduce the effect of camera shake and help you get a well-exposed image in dim conditions. 1. Point the camera towards ...
The digital zoom will display. If the lighting condition is darker than fluorescent lighting conditions, the DUAL IS will configure the camera with optimal settings. Starting the recording mode How to use the Program mode ( ) Selecting the automatic mode will not activate. 3. You can still manually configure all functions except the aperture value and shutter speed. 1. How to use the DUAL IS(Dual Image Stabilization) mode ( ) This mode will reduce the effect of camera shake and help you get a well-exposed image in dim conditions. 1. Point the camera towards ...