User Manual
Page 2
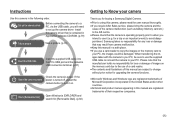
...Thank you for [Removable Disk]. (p.82) Getting to Know your PC. Check [Removable Disk] Open Windows's EXPLORER and search for buying a Samsung Digital Camera. åPrior to using this manual are registered trademarks of Microsoft Corporation incorporated in the United States and/or other countries. Ä..., preset the camera button to use the supplied USB cable to connect the camera to avoid disappointment. Set up the camera driver. Samsung takes no responsibility for loss or damage of images on . If the Check the camera's power power is contained in Application software ...
...Thank you for [Removable Disk]. (p.82) Getting to Know your PC. Check [Removable Disk] Open Windows's EXPLORER and search for buying a Samsung Digital Camera. åPrior to using this manual are registered trademarks of Microsoft Corporation incorporated in the United States and/or other countries. Ä..., preset the camera button to use the supplied USB cable to connect the camera to avoid disappointment. Set up the camera driver. Samsung takes no responsibility for loss or damage of images on . If the Check the camera's power power is contained in Application software ...

User Manual
Page 3
...avoided, could result in death or serious injury. å Do not use the flash in use and it . You must contact your dealer or Samsung Camera Service centre. å Please do not cover the camera or Charger. There is the possibility of injury from the camera's moving parts. å ... chamber. This may result in any form of extremes in close proximity to people or animals. Should this be carried out by your dealer or Samsung Camera Service centre. Always use it may cause heat to flammable or explosive gases, as a sealed vehicle, direct sunlight or other places of ...
...avoided, could result in death or serious injury. å Do not use the flash in use and it . You must contact your dealer or Samsung Camera Service centre. å Please do not cover the camera or Charger. There is the possibility of injury from the camera's moving parts. å ... chamber. This may result in any form of extremes in close proximity to people or animals. Should this be carried out by your dealer or Samsung Camera Service centre. Always use it may cause heat to flammable or explosive gases, as a sealed vehicle, direct sunlight or other places of ...

User Manual
Page 4
Do not insert the battery with the polarities reversed. å Remove the battery when not planning to use the camera for the camera. - Otherwise the battery may damage the cords or cables and cause a fire or electric shock. å Take care not to touch the lens or lens cover to use , always switch off the camera before moving the camera. Use battery with the correct specification for a long period of features 008 Front & Top 009 Back 010 Bottom / 5 Function button 010 Self-timer lamp 010 Camera Status Lamp 011 Mode icon 011 Connecting to a Power Source 012 Inserting the...
Do not insert the battery with the polarities reversed. å Remove the battery when not planning to use the camera for the camera. - Otherwise the battery may damage the cords or cables and cause a fire or electric shock. å Take care not to touch the lens or lens cover to use , always switch off the camera before moving the camera. Use battery with the correct specification for a long period of features 008 Front & Top 009 Back 010 Bottom / 5 Function button 010 Self-timer lamp 010 Camera Status Lamp 011 Mode icon 011 Connecting to a Power Source 012 Inserting the...

User Manual
Page 5
Contents 021 Things to Watch Out for When Taking Pictures 022 Using the camera buttons to set the camera 022 POWER button 022 SHUTTER button 022 ZOOM W / T button 024 Face Detection(FD) button 025 Function Description / Info / Up button 026 Macro / Down button 027 Focus lock 028 Flash / Left button 030 Self-timer / Right button 031 MENU / OK button 032 E (Effect) button 032 E (Effect) button : Colour 033 Fn button 033 How to use the Fn menu 034 Size 034 Quality / Frame rate 035 Metering 035 Sharpness 036 ISO 036 White balance 037 Exposure compensation 4 SETUP ...
Contents 021 Things to Watch Out for When Taking Pictures 022 Using the camera buttons to set the camera 022 POWER button 022 SHUTTER button 022 ZOOM W / T button 024 Face Detection(FD) button 025 Function Description / Info / Up button 026 Macro / Down button 027 Focus lock 028 Flash / Left button 030 Self-timer / Right button 031 MENU / OK button 032 E (Effect) button 032 E (Effect) button : Colour 033 Fn button 033 How to use the Fn menu 034 Size 034 Quality / Frame rate 035 Metering 035 Sharpness 036 ISO 036 White balance 037 Exposure compensation 4 SETUP ...
User Manual
Page 6
Contents 046 Formatting a memory 046 Initialisation 047 File name 047 Imprinting the recording date 048 Auto power off 048 Selecting Video out type 049 Auto Focus lamp 049 Selecting a battery type PLAY 050 50 050 050 051 051 051 052 052 052 054 054 055 055 055 056 Starting play mode Playing back a still image Playing back a movie clip Movie clip capture function Playing back a recorded voice Playing back a voice memo LCD monitor Indicator Using the camera buttons to set the camera Thumbnail / Enlargement button Info / Up button Play & Pause / Down button Left / Right / Menu / OK button ...
Contents 046 Formatting a memory 046 Initialisation 047 File name 047 Imprinting the recording date 048 Auto power off 048 Selecting Video out type 049 Auto Focus lamp 049 Selecting a battery type PLAY 050 50 050 050 051 051 051 052 052 052 054 054 055 055 055 056 Starting play mode Playing back a still image Playing back a movie clip Movie clip capture function Playing back a recorded voice Playing back a voice memo LCD monitor Indicator Using the camera buttons to set the camera Thumbnail / Enlargement button Info / Up button Play & Pause / Down button Left / Right / Menu / OK button ...

User Manual
Page 7
Contents SOFTWARE 077 77 077 078 079 081 084 085 085 085 086 089 Software Notes System Requirements About the software Setting up the application software Starting PC mode Removing the removable disk Setting up the USB Driver for MAC Using the USB Driver for MAC Removing the USB Driver for Windows 98SE Samsung Master FAQ 6
Contents SOFTWARE 077 77 077 078 079 081 084 085 085 085 086 089 Software Notes System Requirements About the software Setting up the application software Starting PC mode Removing the removable disk Setting up the USB Driver for MAC Using the USB Driver for MAC Removing the USB Driver for Windows 98SE Samsung Master FAQ 6
User Manual
Page 8
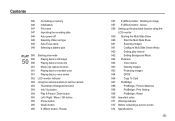
To buy the optional equipment, contact your nearest Samsung dealer or Samsung service centre. 01 READY System chart Please check that you have the correct contents before using this product. Included items Camera Optional items AA Alkaline Batteries USB cable Camera strap Software CD (see p.78) User manual, Product warranty SD/SDHC memory card / MMC (see p.12) Rechargeable battery (SNB-2512) Charger (SBC-N2) AV cable AC cord Camera case READY_ 7 The contents can vary depending on the sales region.
To buy the optional equipment, contact your nearest Samsung dealer or Samsung service centre. 01 READY System chart Please check that you have the correct contents before using this product. Included items Camera Optional items AA Alkaline Batteries USB cable Camera strap Software CD (see p.78) User manual, Product warranty SD/SDHC memory card / MMC (see p.12) Rechargeable battery (SNB-2512) Charger (SBC-N2) AV cable AC cord Camera case READY_ 7 The contents can vary depending on the sales region.

User Manual
Page 10
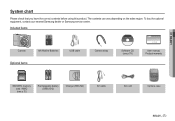
01 READY Identification of features Back LCD monitor Camera status lamp Zoom W button (Thumbnail) Zoom T button (Digital zoom) Face Detection(FD) button E (Effects) button Strap eyelet Fn / Delete button 5 function button Play mode / Printer button READY_ 9
01 READY Identification of features Back LCD monitor Camera status lamp Zoom W button (Thumbnail) Zoom T button (Digital zoom) Face Detection(FD) button E (Effects) button Strap eyelet Fn / Delete button 5 function button Play mode / Printer button READY_ 9

User Manual
Page 11
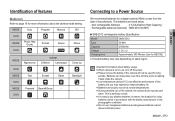
For the final 2 seconds, the lamp blinks quickly at 1 second intervals. - Identification of features Bottom / 5 Function button Battery chamber cover Memory card slot Tripod socket Battery chamber Function Description / Information / Up button MENU / OK button Flash / Left button Self-timer / Right button 10 _READY Macro / Down button Play & Pause button Self-timer lamp Icon ✢ ✡ Status Blinking Blinking Description - Camera Status Lamp Status Power on After taking a picture Description The lamp turns on the subject) For the first 8 seconds,...
For the final 2 seconds, the lamp blinks quickly at 1 second intervals. - Identification of features Bottom / 5 Function button Battery chamber cover Memory card slot Tripod socket Battery chamber Function Description / Information / Up button MENU / OK button Flash / Left button Self-timer / Right button 10 _READY Macro / Down button Play & Pause button Self-timer lamp Icon ✢ ✡ Status Blinking Blinking Description - Camera Status Lamp Status Power on After taking a picture Description The lamp turns on the subject) For the first 8 seconds,...
User Manual
Page 12
However, the duration for long periods. Important information about the camera mode setting. The batteries are prone to leaking if kept inside the camera. å Low temperatures (below . - MODE Auto Program Manual DIS ICON Š ‰ ✆ ÿ MODE ICON Photo Help Guide _ Portrait m Scene ³ Movie † MODE ICON Nightscene l SCENE Children Landscape no MODE Text ICON p Sunset s Dawn r MODE Firework Beach&Snow - Rechargeable batteries (Optional) : SNB-2512 (Ni-MH) Ê SNB-2512 rechargeable battery Specification Model SNB...
However, the duration for long periods. Important information about the camera mode setting. The batteries are prone to leaking if kept inside the camera. å Low temperatures (below . - MODE Auto Program Manual DIS ICON Š ‰ ✆ ÿ MODE ICON Photo Help Guide _ Portrait m Scene ³ Movie † MODE ICON Nightscene l SCENE Children Landscape no MODE Text ICON p Sunset s Dawn r MODE Firework Beach&Snow - Rechargeable batteries (Optional) : SNB-2512 (Ni-MH) Ê SNB-2512 rechargeable battery Specification Model SNB...

User Manual
Page 13
use spare bat- Do not insert the memory card the wrong way round. Battery indicator Battery status ihgf The battery is opened, do not force the battery chamber cover, this may damage the memory card slot. Ê There are 4 indicators for battery condition that are displayed on after you have inserted battery, please check whether the battery (+ / -). - If the camera does not turn on the LCD monitor. Low battery ca- pacity (Prepare pacity (Prepare to recharge or to a Power Source Ê Insert the battery as shown. - Doing so may damage it. tery) 12 _READY...
use spare bat- Do not insert the memory card the wrong way round. Battery indicator Battery status ihgf The battery is opened, do not force the battery chamber cover, this may damage the memory card slot. Ê There are 4 indicators for battery condition that are displayed on after you have inserted battery, please check whether the battery (+ / -). - If the camera does not turn on the LCD monitor. Low battery ca- pacity (Prepare pacity (Prepare to recharge or to a Power Source Ê Insert the battery as shown. - Doing so may damage it. tery) 12 _READY...

User Manual
Page 14
..., clean the memory card with a different camera. å Turn off or the memory card is removed while recording, deleting (formatting) or reading. å Samsung cannot be the case, you are extremes in another digital camera or memory card reader. å If the memory card is subjected to any liquid...lost data. å It is advisable to copy important data onto other media as this camera. å Do not use a memory card formatted by the Samsung warranty. å The memory card is used in temperature. å Do not allow the memory card to become corrupted : - If the power is ...
..., clean the memory card with a different camera. å Turn off or the memory card is removed while recording, deleting (formatting) or reading. å Samsung cannot be the case, you are extremes in another digital camera or memory card reader. å If the memory card is subjected to any liquid...lost data. å It is advisable to copy important data onto other media as this camera. å Do not use a memory card formatted by the Samsung warranty. å The memory card is used in temperature. å Do not allow the memory card to become corrupted : - If the power is ...

User Manual
Page 15
Card pins Write protect switch Label [SD (Secure Digital) memory card] å The SD/SDHC memory card has a write protect switch that prevents image files from being deleted or formatted. Still About 76 About 151 About 195 - - image ✩ About 91 About 179 About 252 - - ✨ About 140 About 269 About 372 - - „ About 459 About 600 About 744 - - *Movie ì - - - About 2'3" About 4'7" clip ❪ - - - S760 Recorded image size Super Fine Fine + About 65 About 130 þ About 74 About 147 Still } About 88 About 173 image ✩...
Card pins Write protect switch Label [SD (Secure Digital) memory card] å The SD/SDHC memory card has a write protect switch that prevents image files from being deleted or formatted. Still About 76 About 151 About 195 - - image ✩ About 91 About 179 About 252 - - ✨ About 140 About 269 About 372 - - „ About 459 About 600 About 744 - - *Movie ì - - - About 2'3" About 4'7" clip ❪ - - - S760 Recorded image size Super Fine Fine + About 65 About 130 þ About 74 About 147 Still } About 88 About 173 image ✩...

User Manual
Page 16
Description 5 Memory card icon / Internal memory icon 6 Battery 7 Image Size S860 S760 8 Image Quality / Frame Rate 9 Metering 10 Sharpness 11 ISO 12 White Balance 13 Exposure compensation 14 Date / Time 15 Camera shake Warning 16 Auto Focus Frame 17 Color 18 Macro 19 Self-timer 20 Flash 21 Aperture Value / Shutter Speed 22 Face Detection / Self Portrait Icons Page Ö / × - p.12 p.34 2007/12/01 01:00 PM F2.8, 1/45 / ¸ p.34 p.35 p.35 p.36 p.36 p.37 p.44 p.21 p.38 p.32 p.26 p.30 p.28 p.17 p.24/25 RECORDING_ 15 02 RECORDING Description Icons...
Description 5 Memory card icon / Internal memory icon 6 Battery 7 Image Size S860 S760 8 Image Quality / Frame Rate 9 Metering 10 Sharpness 11 ISO 12 White Balance 13 Exposure compensation 14 Date / Time 15 Camera shake Warning 16 Auto Focus Frame 17 Color 18 Macro 19 Self-timer 20 Flash 21 Aperture Value / Shutter Speed 22 Face Detection / Self Portrait Icons Page Ö / × - p.12 p.34 2007/12/01 01:00 PM F2.8, 1/45 / ¸ p.34 p.35 p.35 p.36 p.36 p.37 p.44 p.21 p.38 p.32 p.26 p.30 p.28 p.17 p.24/25 RECORDING_ 15 02 RECORDING Description Icons...

User Manual
Page 17
Insert the batteries (p.12). Insert the batteries taking a picture.) 5. As this camera has a 11MB internal memory, you press the shutter button down half way, it means that is incorrect, reset the date/time before taking note of the polarity (+ / -). 2. Select the AUTO mode by using the LCD monitor. 7. Should this mode for quick and easy picture taking with optimal settings. Close the battery chamber cover. 4. Point the camera towards the subject and compose the image by rotating the mode dial. 6. Press the shutter button to insert the memory card. Insert the memory card ...
Insert the batteries (p.12). Insert the batteries taking a picture.) 5. As this camera has a 11MB internal memory, you press the shutter button down half way, it means that is incorrect, reset the date/time before taking note of the polarity (+ / -). 2. Select the AUTO mode by using the LCD monitor. 7. Should this mode for quick and easy picture taking with optimal settings. Close the battery chamber cover. 4. Point the camera towards the subject and compose the image by rotating the mode dial. 6. Press the shutter button to insert the memory card. Insert the memory card ...

User Manual
Page 18
Up / Down button : changes aperture value Left / Right button : changes shutter speed. 3. As the DIS uses the camera's digital signal processor, it may be blurred. 5. Remember to keep the camera steady when you get a well-exposed image in the DIS mode. 2. This mode will reduce the effect of camera shake and help you are taking pictures. If the lighting condition is dis- RECORDING_ 17 Press the Fn button and menu for the shutter speed and aperture value will not activate. 3. The digital zoom will display. 02 RECORDING Starting the recording mode How to achieve a better...
Up / Down button : changes aperture value Left / Right button : changes shutter speed. 3. As the DIS uses the camera's digital signal processor, it may be blurred. 5. Remember to keep the camera steady when you get a well-exposed image in the DIS mode. 2. This mode will reduce the effect of camera shake and help you are taking pictures. If the lighting condition is dis- RECORDING_ 17 Press the Fn button and menu for the shutter speed and aperture value will not activate. 3. The digital zoom will display. 02 RECORDING Starting the recording mode How to achieve a better...

User Manual
Page 19
Available functions of the photo help guide å Function that can be used when focusing is difficult å Functions that can be used when the image is blurred å Function that can be used when filming in the dark å Function that can be used when adjusting the picture brightness å Function that can be used when focusing is successful, fully press the shutter button to shoot. This also enables the user to practice the best way to focus Focusing status can be checked by half-pressing shutter button - Green: Focusing successful - If focusing fails, half ...
Available functions of the photo help guide å Function that can be used when focusing is difficult å Functions that can be used when the image is blurred å Function that can be used when filming in the dark å Function that can be used when adjusting the picture brightness å Function that can be used when focusing is successful, fully press the shutter button to shoot. This also enables the user to practice the best way to focus Focusing status can be checked by half-pressing shutter button - Green: Focusing successful - If focusing fails, half ...

User Manual
Page 20
Starting the recording mode How to use the Scene modes ( Ç ) Use the menu to easily configure optimal settings for quick and easy portraits. light. ( u ) : Firework scenes. ( v ) : For ocean, lake, beach and snowscape scenes. How to use the Portrait mode ( È ) Please select this mode to capture an image. Select Portrait mode using the LCD monitor. 3. Press the shutter button to shoot a document. ( s ) : For taking pictures of shooting situations. 1. RECORDING_ 19 02 RECORDING Select the Scene mode by using mode dial. Point the camera towards the subject and...
Starting the recording mode How to use the Scene modes ( Ç ) Use the menu to easily configure optimal settings for quick and easy portraits. light. ( u ) : Firework scenes. ( v ) : For ocean, lake, beach and snowscape scenes. How to use the Portrait mode ( È ) Please select this mode to capture an image. Select Portrait mode using the LCD monitor. 3. Press the shutter button to shoot a document. ( s ) : For taking pictures of shooting situations. 1. RECORDING_ 19 02 RECORDING Select the Scene mode by using mode dial. Point the camera towards the subject and...

User Manual
Page 21
If you can record the movie clip without having to create multiple movie clips. Ê Using Successive Recording Steps from 1-2 are listed below. - Image size : 640x480, 320x240 (Selectable) - Movie clip file type : AVI (MJPEG) - Press the Pause button ( Ø ) to resume the recording. 6. Point the camera towards the subject and compose the image by rotating the Mode dial. ( The Movie clip mode icon and available recording time will display on the LCD monitor.). 2. Press the Pause button ( Ø ) again to pause recording. 5. Starting the recording mode ...
If you can record the movie clip without having to create multiple movie clips. Ê Using Successive Recording Steps from 1-2 are listed below. - Image size : 640x480, 320x240 (Selectable) - Movie clip file type : AVI (MJPEG) - Press the Pause button ( Ø ) to resume the recording. 6. Point the camera towards the subject and compose the image by rotating the Mode dial. ( The Movie clip mode icon and available recording time will display on the LCD monitor.). 2. Press the Pause button ( Ø ) again to pause recording. 5. Starting the recording mode ...

User Manual
Page 22
Press the shutter button all way down half way. If the subject is moving at high speed. - If the subject is highly reflective or shiny. - To take pictures against the light, please use a tripod, support the camera on shooting condi- 02 RECORDING Things to confirm focus and flash battery charge. When photographing a subject that has little contrast. - In this case, use the [Backlight] in the scene shooting mode (see page 19), fill-in a low lighting condition, the camera shake warning indicator ( Ã ) may appear on the LCD monitor. Doing so may...
Press the shutter button all way down half way. If the subject is moving at high speed. - If the subject is highly reflective or shiny. - To take pictures against the light, please use a tripod, support the camera on shooting condi- 02 RECORDING Things to confirm focus and flash battery charge. When photographing a subject that has little contrast. - In this case, use the [Backlight] in the scene shooting mode (see page 19), fill-in a low lighting condition, the camera shake warning indicator ( Ã ) may appear on the LCD monitor. Doing so may...