User Manual
Page 2
... incorporated in the United States and/or other countries. Set up the camera driver. x When you will need to the A/S centre. Samsung takes no responsibility for any loss or damage that may result from camera malfunction. x Keep this camera in the following order. When transferring...the memory card to Know your PC. Getting to your PC, be damaged. Open Windows EXPLORER and Check [Removable Disk] search for buying a Samsung Digital Camera. Install the camera driver that the camera is contained in Application software CD-ROM. (p.77) Take a picture Take a picture. (p.20...
... incorporated in the United States and/or other countries. Set up the camera driver. x When you will need to the A/S centre. Samsung takes no responsibility for any loss or damage that may result from camera malfunction. x Keep this camera in the following order. When transferring...the memory card to Know your PC. Getting to your PC, be damaged. Open Windows EXPLORER and Check [Removable Disk] search for buying a Samsung Digital Camera. Install the camera driver that the camera is contained in Application software CD-ROM. (p.77) Take a picture Take a picture. (p.20...
User Manual
Page 3
... disconnect the power source. the memory card slot and battery chamber. x Do not operate this be carried out by your dealer or Samsung Camera Service centre. Positioning the flash too close proximity to flammable or explosive gases, as a sealed vehicle, direct sunlight...Please do not cover the camera or Charger. x Do not use it. x Do not attempt to cool. You must contact your dealer or Samsung Camera Service centre. Swallowing battery or small camera accessories. Warning WARNING indicates a potentially hazardous situation which , if not avoided, will result in ...
... disconnect the power source. the memory card slot and battery chamber. x Do not operate this be carried out by your dealer or Samsung Camera Service centre. Positioning the flash too close proximity to flammable or explosive gases, as a sealed vehicle, direct sunlight...Please do not cover the camera or Charger. x Do not use it. x Do not attempt to cool. You must contact your dealer or Samsung Camera Service centre. Swallowing battery or small camera accessories. Warning WARNING indicates a potentially hazardous situation which , if not avoided, will result in ...
User Manual
Page 4
Do not insert the battery with hands or objects. After use the camera for a long period of a PC. x Take care not to touch the lens or lens cover to use the PORTRAIT mode 3 x Before inserting any connector cords or cables to use the memory card When Using the Camera for the camera. - x It is switched on how to other devices are using it continuously. x Do not fire the flash while it is highly likely to USB port of battery in a minor or moderate injury. x Avoid obstructing the lens or the flash when you are disconnected before unplugging the cable...
Do not insert the battery with hands or objects. After use the camera for a long period of a PC. x Take care not to touch the lens or lens cover to use the PORTRAIT mode 3 x Before inserting any connector cords or cables to use the memory card When Using the Camera for the camera. - x It is switched on how to other devices are using it continuously. x Do not fire the flash while it is highly likely to USB port of battery in a minor or moderate injury. x Avoid obstructing the lens or the flash when you are disconnected before unplugging the cable...
User Manual
Page 5
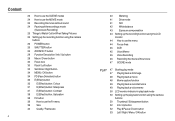
Content 4 23 How to use the SCENE modes 24 How to use the MOVIE mode 24 Recording the movie without sound 24 Pausing while recording a movie (Successive Recording) 25 Things to Watch Out for When Taking Pictures 26 Setting up the recording function using the camera buttons 26 POWER button 26 SHUTTER button 26 ZOOM W / T button 28 Function Description / Info / Up button 28 Macro / Down button 30 Focus lock 30 Flash / Left button 32 Self-timer / Right button 34 MENU / OK button 34 FD (Face Detection) button 36 E (Effect) button 36 E (Effect) button : Colour 37 E (Effect) button : Sharpness 37 E...
Content 4 23 How to use the SCENE modes 24 How to use the MOVIE mode 24 Recording the movie without sound 24 Pausing while recording a movie (Successive Recording) 25 Things to Watch Out for When Taking Pictures 26 Setting up the recording function using the camera buttons 26 POWER button 26 SHUTTER button 26 ZOOM W / T button 28 Function Description / Info / Up button 28 Macro / Down button 30 Focus lock 30 Flash / Left button 32 Self-timer / Right button 34 MENU / OK button 34 FD (Face Detection) button 36 E (Effect) button 36 E (Effect) button : Colour 37 E (Effect) button : Sharpness 37 E...

User Manual
Page 6
Content 53 Printer button 53 Delete button 54 E (Effect) button : Resize 55 E (Effect) button : Rotating an image 55 E (Effect) button : Colour 56 E (Effect) button : Image editing 56 ACB 56 Red eye Removal 56 Brightness control 57 Contrast control 57 Saturation control 57 Setting up the play back function using the LCD monitor 59 Multi slide show 59 Start the multi slide show 59 Selecting Images 60 Configure multi slide show effects 60 Setting play interval 60 Setting Background Music 61 Playback 61 Voice memo 61 Protecting images 62 Deleting images 62 DPOF 64 Copy To Card 65 ...
Content 53 Printer button 53 Delete button 54 E (Effect) button : Resize 55 E (Effect) button : Rotating an image 55 E (Effect) button : Colour 56 E (Effect) button : Image editing 56 ACB 56 Red eye Removal 56 Brightness control 57 Contrast control 57 Saturation control 57 Setting up the play back function using the LCD monitor 59 Multi slide show 59 Start the multi slide show 59 Selecting Images 60 Configure multi slide show effects 60 Setting play interval 60 Setting Background Music 61 Playback 61 Voice memo 61 Protecting images 62 Deleting images 62 DPOF 64 Copy To Card 65 ...

User Manual
Page 7
Content SOFTWARE 76 Software Notes 77 System Requirements 77 About the software 78 Setting up the application software 83 Removing the removable disk 84 Setting up the USB Driver for MAC 84 Using the USB Driver for MAC 85 Removing the USB Driver for Windows 98SE 85 Samsung Master APPENDIX 88 Specifications 91 Important notes 93 Warning indicator 94 Before contacting a service centre 96 FAQ 6
Content SOFTWARE 76 Software Notes 77 System Requirements 77 About the software 78 Setting up the application software 83 Removing the removable disk 84 Setting up the USB Driver for MAC 84 Using the USB Driver for MAC 85 Removing the USB Driver for Windows 98SE 85 Samsung Master APPENDIX 88 Specifications 91 Important notes 93 Warning indicator 94 Before contacting a service centre 96 FAQ 6

User Manual
Page 8
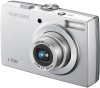
System chart Please check that you have the correct contents before using this product. To buy the optional equipment, contact your nearest Samsung dealer or Samsung service centre. Included items Camera Rechargeable battery (SLB-10A) USB cable (SUC-C3) AC adapter (SAC-47) AV cable Camera strap Software CD Optional Items User manual, Product warranty SD/SDHC/MMC memory card (see p.15) Camera case 7 The contents can vary depending on the sales region.
System chart Please check that you have the correct contents before using this product. To buy the optional equipment, contact your nearest Samsung dealer or Samsung service centre. Included items Camera Rechargeable battery (SLB-10A) USB cable (SUC-C3) AC adapter (SAC-47) AV cable Camera strap Software CD Optional Items User manual, Product warranty SD/SDHC/MMC memory card (see p.15) Camera case 7 The contents can vary depending on the sales region.

User Manual
Page 10
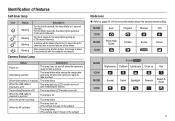
Identification of features Back LCD monitor Camera status lamp Zoom T button (Digital zoom) Zoom W button (Thumbnail) E (Effect) button Eyelet for camera strap Fn/Delete button 5-function button FD (Face Detection) button Play mode/Print button 9
Identification of features Back LCD monitor Camera status lamp Zoom T button (Digital zoom) Zoom W button (Thumbnail) E (Effect) button Eyelet for camera strap Fn/Delete button 5-function button FD (Face Detection) button Play mode/Print button 9

User Manual
Page 11
Identification of features Bottom Battery holder Battery chamber www.samsungcamera.com Battery chamber cover Tripod socket Memory card slot 5 Function button Function Description / Information / Up button MENU/OK button Flash / Left button Self-timer / Right button Macro / Down button Play & Pause button K To open the battery chamber cover, slide it in the direction shown above. 10
Identification of features Bottom Battery holder Battery chamber www.samsungcamera.com Battery chamber cover Tripod socket Memory card slot 5 Function button Function Description / Information / Up button MENU/OK button Flash / Left button Self-timer / Right button Macro / Down button Play & Pause button K To open the battery chamber cover, slide it in the direction shown above. 10
User Manual
Page 12
A picture will be taken after about 10 seconds and 2 seconds later a second picture will be taken After pressing the Shutter button, the image is taken in accordance with a PC When the USB cable is inserted to a printer When the printer is printing When the AF activates Description The lamp turns on and off when the camera is ready to take a picture The lamp blinks while saving the image data and turns off when the camera is ready to take a picture The lamp blinks The lamp lights up Text Sunset Dawn Backlight Firework Beach & Snow 11 MODE Auto Program Manual DIS ...
A picture will be taken after about 10 seconds and 2 seconds later a second picture will be taken After pressing the Shutter button, the image is taken in accordance with a PC When the USB cable is inserted to a printer When the printer is printing When the AF activates Description The lamp turns on and off when the camera is ready to take a picture The lamp blinks while saving the image data and turns off when the camera is ready to take a picture The lamp blinks The lamp lights up Text Sunset Dawn Backlight Firework Beach & Snow 11 MODE Auto Program Manual DIS ...
User Manual
Page 13
... the zoom position between the Wide and the Tele after every shot. x Low temperatures (below 0°C) can lose power over time and are measured under Samsung's standard conditions and shooting conditions and may vary depending on every second shot. Using the camera for 5 minutes and then Powering it off for long...
... the zoom position between the Wide and the Tele after every shot. x Low temperatures (below 0°C) can lose power over time and are measured under Samsung's standard conditions and shooting conditions and may vary depending on every second shot. Using the camera for 5 minutes and then Powering it off for long...
User Manual
Page 14
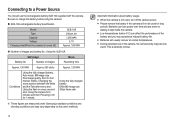
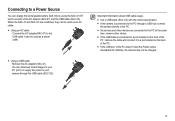
When the SAC-47 and SUC-C3 are connected to the USB cable. x Using a USB cable : Remove the AC adapter (SAC-47). You can charge the rechargeable battery SLB-10A by using the SAC-47 KIT which consists of the AC adapter (SAC-47) and the USB cable (SUC-C3). Important information about USB cable usage. x If the USB cable is connected to the PC through the USB cable (SUC-C3). x If the camera is connected to a port located on the front of the PC : remove the cable and connect it to a port located on the back of the PC doesn't meet the Power output standard(4.2V, 400mA), the camera ...
When the SAC-47 and SUC-C3 are connected to the USB cable. x Using a USB cable : Remove the AC adapter (SAC-47). You can charge the rechargeable battery SLB-10A by using the SAC-47 KIT which consists of the AC adapter (SAC-47) and the USB cable (SUC-C3). Important information about USB cable usage. x If the USB cable is connected to the PC through the USB cable (SUC-C3). x If the camera is connected to a port located on the front of the PC : remove the cable and connect it to a port located on the back of the PC doesn't meet the Power output standard(4.2V, 400mA), the camera ...

User Manual
Page 15
If you charge the battery with the fully discharged battery charged for more than 10 minutes before using force. x If you insert the fully discharged battery to charge the rechargeable battery (SLB-10A) Charging LED x Before inserting any cables or AC adapter, check the directions and do not turn on because of the low battery capacity. Charge the battery for a short time. Even if the charger is inserted, the camera power may be turned on or blink after inserting the rechargeable battery, please check whether the battery is inserted correctly. It may not be turned off or ...
If you charge the battery with the fully discharged battery charged for more than 10 minutes before using force. x If you insert the fully discharged battery to charge the rechargeable battery (SLB-10A) Charging LED x Before inserting any cables or AC adapter, check the directions and do not turn on because of the low battery capacity. Charge the battery for a short time. Even if the charger is inserted, the camera power may be turned on or blink after inserting the rechargeable battery, please check whether the battery is inserted correctly. It may not be turned off or ...
User Manual
Page 16
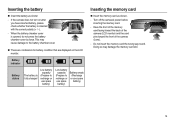
When the battery chamber cover is fully charged Low battery capacity (Prepare to recharge or use spare battery) Inserting the memory card „ Insert the memory card as shown - Doing so may cause damage to recharge or use spare battery) Battery empty (Recharge or use spare battery) Low battery capacity (Prepare to the battery chamber cover. „ There are 4 indicators for battery condition that are displayed on after you have inserted battery, please check whether the battery is inserted with the correct polarity (+ / -). www.samsungcamera.com - Turn off the camera...
When the battery chamber cover is fully charged Low battery capacity (Prepare to recharge or use spare battery) Inserting the memory card „ Insert the memory card as shown - Doing so may cause damage to recharge or use spare battery) Battery empty (Recharge or use spare battery) Low battery capacity (Prepare to the battery chamber cover. „ There are 4 indicators for battery condition that are displayed on after you have inserted battery, please check whether the battery is inserted with the correct polarity (+ / -). www.samsungcamera.com - Turn off the camera...

User Manual
Page 17
...a new memory card. If the power is switched off the camera power whenever the memory card is removed while recording, deleting (formatting) or reading. x Samsung cannot be the case, you may become dirty or to become corrupted : - To optimise the amount of extended use or store in an environment where...To use a memory card that the camera cannot recognise, or if it contains data that is warm. x Repeated use a memory card formatted by the Samsung warranty. x Do not use of the following, the recorded data may notice that the memory card is used incorrectly. -
...a new memory card. If the power is switched off the camera power whenever the memory card is removed while recording, deleting (formatting) or reading. x Samsung cannot be the case, you may become dirty or to become corrupted : - To optimise the amount of extended use or store in an environment where...To use a memory card that the camera cannot recognise, or if it contains data that is warm. x Repeated use a memory card formatted by the Samsung warranty. x Do not use of the following, the recorded data may notice that the memory card is used incorrectly. -

User Manual
Page 18
Instructions on how to use the memory card „ The camera can be cancelled. Card pins Write protect switch Label [SD (Secure Digital) memory card] x The SD/ SDHC memory card has a write protect switch that prevents image files from being deleted or formatted. About 4'05" About 13'15" x The recording times can be protected. By sliding the switch to the top of the SD memory card before taking a picture. „ When using a 256MB MMC memory, the specified shooting capacity will be as subject matter and memory card type. x Slide the switch to the bottom of the SD...
Instructions on how to use the memory card „ The camera can be cancelled. Card pins Write protect switch Label [SD (Secure Digital) memory card] x The SD/ SDHC memory card has a write protect switch that prevents image files from being deleted or formatted. About 4'05" About 13'15" x The recording times can be protected. By sliding the switch to the top of the SD memory card before taking a picture. „ When using a 256MB MMC memory, the specified shooting capacity will be as subject matter and memory card type. x Slide the switch to the bottom of the SD...
User Manual
Page 19
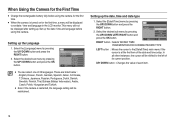
Select the [Date&Time] menu by pressing the UP/ DOWN button and press the RIGHT button. 2. This menu will not be displayed after setting up the Language 1. DISPLAY Language Date&Time Back London 08/01/01 13:00 yyyy/mm/dd Set RIGHT button : Selects WORLD TIME/ YEAR/MONTH/DAY/HOUR/MINUTE/DATE TYPE LEFT button : Moves the cursor to the [Date&Time] main menu if the cursor is restarted, the language setting will be shifted to set date / time and language in the LCD monitor. Setting up . These are listed below : - In all other instances, the cursor will be maintained. ...
Select the [Date&Time] menu by pressing the UP/ DOWN button and press the RIGHT button. 2. This menu will not be displayed after setting up the Language 1. DISPLAY Language Date&Time Back London 08/01/01 13:00 yyyy/mm/dd Set RIGHT button : Selects WORLD TIME/ YEAR/MONTH/DAY/HOUR/MINUTE/DATE TYPE LEFT button : Moves the cursor to the [Date&Time] main menu if the cursor is restarted, the language setting will be shifted to set date / time and language in the LCD monitor. Setting up . These are listed below : - In all other instances, the cursor will be maintained. ...

User Manual
Page 20
LCD monitor indicator in recording mode „ The LCD monitor displays information about the shooting functions and selections. [Image & Full Status] No. Number of available 21 shots remaining / Remaining time 6/00:00:00 p.17 22 Voice Memo/Mic. Off / p.45/46 23 Optical / Digital Zoom bar /Digital Zoom rate p.26 19 Description Icons Page 7 Sharpness p.37 8 Color / Saturation / p.36/38 9 Auto Focus Frame p.44 10 Camera shake Warning p.25 11 Date / Time 2008/01/01 01:00 PM p....
LCD monitor indicator in recording mode „ The LCD monitor displays information about the shooting functions and selections. [Image & Full Status] No. Number of available 21 shots remaining / Remaining time 6/00:00:00 p.17 22 Voice Memo/Mic. Off / p.45/46 23 Optical / Digital Zoom bar /Digital Zoom rate p.26 19 Description Icons Page 7 Sharpness p.37 8 Color / Saturation / p.36/38 9 Auto Focus Frame p.44 10 Camera shake Warning p.25 11 Date / Time 2008/01/01 01:00 PM p....
User Manual
Page 21
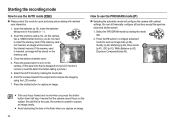
Insert the batteries taking with optimal settings.You can still manually configure all functions except the aperture value and shutter speed. 1. Close the battery chamber cover. 4. x If the auto focus frame turns to red when you press the shutter button down half way, it means that is displayed on the subject. Press the Fn button to capture an image. Select the AUTO mode by rotating the mode dial. 2. Press the shutter button to configure advanced functions such as Image Size (p.39), Quality (p.40), Metering (p.40), Drive mode (p.41), ISO (p.41), White ...
Insert the batteries taking with optimal settings.You can still manually configure all functions except the aperture value and shutter speed. 1. Close the battery chamber cover. 4. x If the auto focus frame turns to red when you press the shutter button down half way, it means that is displayed on the subject. Press the Fn button to capture an image. Select the AUTO mode by rotating the mode dial. 2. Press the shutter button to configure advanced functions such as Image Size (p.39), Quality (p.40), Metering (p.40), Drive mode (p.41), ISO (p.41), White ...

User Manual
Page 22
Up / Down button : changes aperture value Left / Right button : changes shutter speed. 3. Larger Aperture values make the object sharp but blur the background. Low Shutter speeds can capture a moving object in a still image as if the object is not displayed. - For best results only take an image. Select the MANUAL mode by rotating the Mode dial. 2. Press the shutter button to capture an image. „ Things to watch out for the shutter speed and aperture value will display. The digital zoom will not activate. - Avoid moving , the captured image may take a little longer ...
Up / Down button : changes aperture value Left / Right button : changes shutter speed. 3. Larger Aperture values make the object sharp but blur the background. Low Shutter speeds can capture a moving object in a still image as if the object is not displayed. - For best results only take an image. Select the MANUAL mode by rotating the Mode dial. 2. Press the shutter button to capture an image. „ Things to watch out for the shutter speed and aperture value will display. The digital zoom will not activate. - Avoid moving , the captured image may take a little longer ...