User Manual (ENGLISH)
Page 2
... responsibility for buying a Samsung Digital Camera. If you use a card reader to copy the images on the memory card to your camera Thank you for loss or damage of ...
... responsibility for buying a Samsung Digital Camera. If you use a card reader to copy the images on the memory card to your camera Thank you for loss or damage of ...

User Manual (ENGLISH)
Page 3
...a fire or electric shock. Do not continue to use the camera as this product in close proximity to you or your dealer or Samsung Camera Service centre. the memory card slot and battery chamber. WARNING WARNING indicates a potentially hazardous situation which , if not avoided, will result ...Battery and camera may become hot during prolonged use the camera and its accessories in death or serious injury. Exposure to your dealer or Samsung Camera Service centre. Always use and it time to modify this camera with wet hands. Do not attempt to cool. This may cause...
...a fire or electric shock. Do not continue to use the camera as this product in close proximity to you or your dealer or Samsung Camera Service centre. the memory card slot and battery chamber. WARNING WARNING indicates a potentially hazardous situation which , if not avoided, will result ...Battery and camera may become hot during prolonged use the camera and its accessories in death or serious injury. Exposure to your dealer or Samsung Camera Service centre. Always use and it time to modify this camera with wet hands. Do not attempt to cool. This may cause...
User Manual (ENGLISH)
Page 4
CAUTION CAUTION indicates a potentially hazardous situation which, if not avoided, may result in fire or injury. - These are disconnected before unplugging the cable from the subject. - When changing the composition, there may be demagnetized if left near the case. Avoid leaving magnetic strip cards near case. Leaking, overheating, or burst battery could result in a minor or moderate injury. Do not short circuit, heat or dispose of features 008 Front & Top 009 Back 010 Bottom 010 5 Function button 012 Connecting to a power source 015 Inserting the battery 015 ...
CAUTION CAUTION indicates a potentially hazardous situation which, if not avoided, may result in fire or injury. - These are disconnected before unplugging the cable from the subject. - When changing the composition, there may be demagnetized if left near the case. Avoid leaving magnetic strip cards near case. Leaking, overheating, or burst battery could result in a minor or moderate injury. Do not short circuit, heat or dispose of features 008 Front & Top 009 Back 010 Bottom 010 5 Function button 012 Connecting to a power source 015 Inserting the battery 015 ...
User Manual (ENGLISH)
Page 5
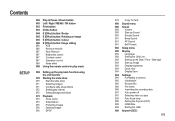
Contents 004 027 Things to watch out for when taking pictures 028 Focus lock 028 Using the camera buttons to set the camera 028 POWER button 029 Shutter button 029 Zoom W/T Lever 031 Command Lever 031 How to use the Command lever mode 032 Function Description / Info / Up button 033 Macro / Down button 035 Flash / Left button 037 Self-timer / Right button 039 MENU / OK button 040 Fn button 040 How to use the Fn menu 041 Fn button: Size 041 Focus Area 042 Fn button: Frame rate 042 Fn button: Metering 043 Fn button: Drive mode 044 Fn button: ISO 044 Fn button: White balance 045 Fn button: ...
Contents 004 027 Things to watch out for when taking pictures 028 Focus lock 028 Using the camera buttons to set the camera 028 POWER button 029 Shutter button 029 Zoom W/T Lever 031 Command Lever 031 How to use the Command lever mode 032 Function Description / Info / Up button 033 Macro / Down button 035 Flash / Left button 037 Self-timer / Right button 039 MENU / OK button 040 Fn button 040 How to use the Fn menu 041 Fn button: Size 041 Focus Area 042 Fn button: Frame rate 042 Fn button: Metering 043 Fn button: Drive mode 044 Fn button: ISO 044 Fn button: White balance 045 Fn button: ...
User Manual (ENGLISH)
Page 6
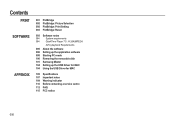
Contents SETUP 062 Play & Pause / Down button 063 Left / Right / MENU / OK button 063 Print button 063 Delete button 064 E (Effect) button: Resize 065 E (Effect) button: Rotating an image 065 E (Effect) button: Colour 066 E (Effect) button: Image editing 066 ACB 066 Red eye removal 067 Face Retouch 067 Brightness control 067 Contrast control 067 Saturation control 068 Noise effect 068 Using the remote control in play mode 069 Setting up the play back function using the LCD monitor 070 Starting the slide show 070 Start the slide show 071 Selecting Images 071 Configure slide show effects ...
Contents SETUP 062 Play & Pause / Down button 063 Left / Right / MENU / OK button 063 Print button 063 Delete button 064 E (Effect) button: Resize 065 E (Effect) button: Rotating an image 065 E (Effect) button: Colour 066 E (Effect) button: Image editing 066 ACB 066 Red eye removal 067 Face Retouch 067 Brightness control 067 Contrast control 067 Saturation control 068 Noise effect 068 Using the remote control in play mode 069 Setting up the play back function using the LCD monitor 070 Starting the slide show 070 Start the slide show 071 Selecting Images 071 Configure slide show effects ...
User Manual (ENGLISH)
Page 7
AVC) playback Requirements 095 About the software 096 Setting up the application software 098 Starting PC mode 100 Removing the removable disk 101 Samsung Master 104 Setting up the USB Driver for MAC 104 Using the USB Driver for MAC 105 Specifications 107 Important notes 109 Warning indicator 110 Before contacting a service centre 112 FAQ 115 FCC notice 006 Contents PRINT SOFTWARE APPENDIX 091 PictBridge 092 PictBridge: Picture Selection 092 PictBridge: Print Setting 093 PictBridge: Reset 093 Software notes 094 System requirements 094 QuickTime Player 7.5 : H.264(MPEG4.
AVC) playback Requirements 095 About the software 096 Setting up the application software 098 Starting PC mode 100 Removing the removable disk 101 Samsung Master 104 Setting up the USB Driver for MAC 104 Using the USB Driver for MAC 105 Specifications 107 Important notes 109 Warning indicator 110 Before contacting a service centre 112 FAQ 115 FCC notice 006 Contents PRINT SOFTWARE APPENDIX 091 PictBridge 092 PictBridge: Picture Selection 092 PictBridge: Print Setting 093 PictBridge: Reset 093 Software notes 094 System requirements 094 QuickTime Player 7.5 : H.264(MPEG4.
User Manual (ENGLISH)
Page 8
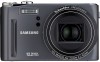
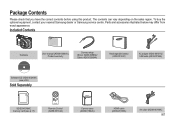
... Control (AD59-00164A) Camera case (AD69-01922A) HDMI cable (AD39-00160A) AV cable (AD39-00146A) 007 To buy the optional equipment, contact your nearest Samsung dealer or Samsung service centre. Package Contents Please check that you have the correct contents before using this product. Parts and accessories illustrated below may differ from...
... Control (AD59-00164A) Camera case (AD69-01922A) HDMI cable (AD39-00160A) AV cable (AD39-00146A) 007 To buy the optional equipment, contact your nearest Samsung dealer or Samsung service centre. Package Contents Please check that you have the correct contents before using this product. Parts and accessories illustrated below may differ from...

User Manual (ENGLISH)
Page 9
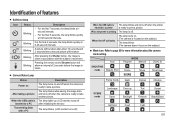
Identification of features Front & Top Mode dial Flash AF sensor/ Self-timer lamp Remote control sensor Lens 008 Zoom T Lever (Digital zoom) Zoom W Lever (Thumbnail) POWER button Speaker Microphone HDMI connection terminal HDMI connection terminal note To connect to the HDMI connection terminal, use the HDMI cable only.
Identification of features Front & Top Mode dial Flash AF sensor/ Self-timer lamp Remote control sensor Lens 008 Zoom T Lever (Digital zoom) Zoom W Lever (Thumbnail) POWER button Speaker Microphone HDMI connection terminal HDMI connection terminal note To connect to the HDMI connection terminal, use the HDMI cable only.

User Manual (ENGLISH)
Page 10
Identification of features Back Camera status lamp LCD monitor Command Lever Fn / Delete button 5-function button Play mode / Print button E (Effect) button Shutter button USB / AV / DC terminal Camera strap 009
Identification of features Back Camera status lamp LCD monitor Command Lever Fn / Delete button 5-function button Play mode / Print button E (Effect) button Shutter button USB / AV / DC terminal Camera strap 009

User Manual (ENGLISH)
Page 11
Identification of features Bottom Memory card slot Battery holder Battery chamber cover Battery chamber Tripod socket 010 5 Function button Function Description / Information / Up button Flash / Left button Self-timer / Right button MENU / OK button Macro /Play & Pause / Down button
Identification of features Bottom Memory card slot Battery holder Battery chamber cover Battery chamber Tripod socket 010 5 Function button Function Description / Information / Up button Flash / Left button Self-timer / Right button MENU / OK button Macro /Play & Pause / Down button
User Manual (ENGLISH)
Page 12
Camera Status Lamp Status Description Power on After taking a picture The lamp turns on the subject) Mode icon: Refer to page 20 for more information about 10 seconds and 2 seconds later a second picture will be taken after initializing the device) The lamp blinks. (LCD monitor turns off) When the USB cable is inserted to a printer When the printer is printing When the AF activates The lamp blinks and turns off when the printer is ready to take another picture. For the final 2 seconds, the lamp blinks quickly at 0.25-second intervals. After pressing the Shutter ...
Camera Status Lamp Status Description Power on After taking a picture The lamp turns on the subject) Mode icon: Refer to page 20 for more information about 10 seconds and 2 seconds later a second picture will be taken after initializing the device) The lamp blinks. (LCD monitor turns off) When the USB cable is inserted to a printer When the printer is printing When the AF activates The lamp blinks and turns off when the printer is ready to take another picture. For the final 2 seconds, the lamp blinks quickly at 0.25-second intervals. After pressing the Shutter ...
User Manual (ENGLISH)
Page 13
... charged battery MIN 640x480 image size 30fps frame rate. Batteries will not be used , turn off for long periods. These figures are measured under Samsung's standard conditions and shooting conditions and may vary depending on every second shot. When the camera is not used for 1 minute. Be sure to leaking...
... charged battery MIN 640x480 image size 30fps frame rate. Batteries will not be used , turn off for long periods. These figures are measured under Samsung's standard conditions and shooting conditions and may vary depending on every second shot. When the camera is not used for 1 minute. Be sure to leaking...

User Manual (ENGLISH)
Page 14
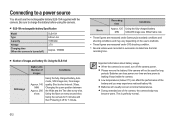
It can be used as an AC cable, and you can charge the rechargeable battery with the AC cable. If the camera and other device. Connecting to a power source Connecting the AC adapter with the USB cable can be used as a power cable. Important information about USB cable usage. In this case, use the back side USB port of computer. Camera can download stored images to your PC (p.98) or supply the power to your camera through a USB hub: connect the camera directly to the PC through the USB cable. Using a USB cable: Remove the AC adapter. If the USB port of the PC doesn't meet the...
It can be used as an AC cable, and you can charge the rechargeable battery with the AC cable. If the camera and other device. Connecting to a power source Connecting the AC adapter with the USB cable can be used as a power cable. Important information about USB cable usage. In this case, use the back side USB port of computer. Camera can download stored images to your PC (p.98) or supply the power to your camera through a USB hub: connect the camera directly to the PC through the USB cable. Using a USB cable: Remove the AC adapter. If the USB port of the PC doesn't meet the...
User Manual (ENGLISH)
Page 15
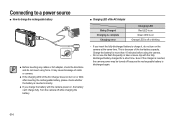
Charge the battery for a short time. Even if the charger is inserted, the camera power may cause breakage of the AC Charger does not turn on the camera at the same time. If the charging LED of cable or camera. If you insert the fully discharged battery to charge the rechargeable battery Before inserting any cables or AC adapter, check the directions and do not turn on or blink after inserting the rechargeable battery, please check whether the battery is discharged again. 014 If you charge the battery with the fully discharged battery charged for more than 10 minutes before ...
Charge the battery for a short time. Even if the charger is inserted, the camera power may cause breakage of the AC Charger does not turn on the camera at the same time. If the charging LED of cable or camera. If you insert the fully discharged battery to charge the rechargeable battery Before inserting any cables or AC adapter, check the directions and do not turn on or blink after inserting the rechargeable battery, please check whether the battery is discharged again. 014 If you charge the battery with the fully discharged battery charged for more than 10 minutes before ...

User Manual (ENGLISH)
Page 16
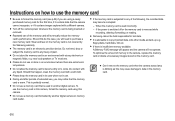
Inserting the memory card Insert the memory card as shown. - Turn off the camera's power before inserting the memory card. - If the camera does not turn on the LCD monitor. When the battery chamber cover is inserted with the correct polarity (+/-). - Recharge or use spare battery) Battery empty. Do not insert the memory card the wrong way round. Inserting the battery Insert the battery as shown. - Have the front label of the memory card facing toward the front of the camera (Lens) and the card pins toward the back of the camera (LCD monitor). - Battery indicator ...
Inserting the memory card Insert the memory card as shown. - Turn off the camera's power before inserting the memory card. - If the camera does not turn on the LCD monitor. When the battery chamber cover is inserted with the correct polarity (+/-). - Recharge or use spare battery) Battery empty. Do not insert the memory card the wrong way round. Inserting the battery Insert the battery as shown. - Have the front label of the memory card facing toward the front of the camera (Lens) and the card pins toward the back of the camera (LCD monitor). - Battery indicator ...
User Manual (ENGLISH)
Page 17
... fields, e.g. To optimise the amount of the memory card will eventually reduce the memory card's performance. Repeated use a memory card formatted by the Samsung warranty. Samsung cannot be the case, you may become dirty or to format the memory card (see p.84) if you are extremes in an environment with any...
... fields, e.g. To optimise the amount of the memory card will eventually reduce the memory card's performance. Repeated use a memory card formatted by the Samsung warranty. Samsung cannot be the case, you may become dirty or to format the memory card (see p.84) if you are extremes in an environment with any...
User Manual (ENGLISH)
Page 18
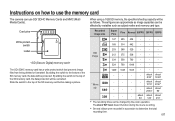
These figures are approximate as image capacities can be affected by the zoom operation. Recorded image size Super Fine Fine Normal 60FPS 30FPS 15FPS 147 285 404 - - - 168 314 442 - - - about about 29'33" 59' - - - about about 10'19" 20'47" - - - - Several videos were recorded in succession to the bottom of the SD memory card, the data will be protected. By sliding the switch to determine the total recording time. 017 about about 64' 120' 210' The recording times can use the memory card The camera can be changed by variables such as follows. ...
These figures are approximate as image capacities can be affected by the zoom operation. Recorded image size Super Fine Fine Normal 60FPS 30FPS 15FPS 147 285 404 - - - 168 314 442 - - - about about 29'33" 59' - - - about about 10'19" 20'47" - - - - Several videos were recorded in succession to the bottom of the SD memory card, the data will be protected. By sliding the switch to determine the total recording time. 017 about about 64' 120' 210' The recording times can use the memory card The camera can be changed by variables such as follows. ...
User Manual (ENGLISH)
Page 19
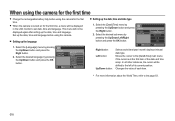
Moves the cursor to the [Date&Time] main menu if the cursor is turned on for the first time. This menu will not be displayed again after setting up the language 1. Select the [Language] menu by pressing the Up/Down button and press the Right button. 2. Select the [Date&Time] menu by pressing the Up/Down button and press the Right button. 2. DISPLAY Language Date&Time Back + Seoul, Tokyo 2009 / 01 / 01 13 : 00 Off OK Set Right button: Left button: Up/Down button: Selects world time/year/ month/ day/hour/minute/ date type. Setting up the date, time and language....
Moves the cursor to the [Date&Time] main menu if the cursor is turned on for the first time. This menu will not be displayed again after setting up the language 1. Select the [Language] menu by pressing the Up/Down button and press the Right button. 2. Select the [Date&Time] menu by pressing the Up/Down button and press the Right button. 2. DISPLAY Language Date&Time Back + Seoul, Tokyo 2009 / 01 / 01 13 : 00 Off OK Set Right button: Left button: Up/Down button: Selects world time/year/ month/ day/hour/minute/ date type. Setting up the date, time and language....
User Manual (ENGLISH)
Page 20
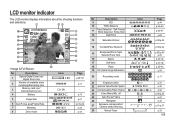
off 25 Auto Focus Frame 26 Histogram 27 Exposure compensation/ Camera shake Warning 28 Manual Focus ► 1/30 ► F3.3 / / p.31 p.45 p.52 p.54/p.25 p.41 p.32 p.31/p.27 p.33 019 Description 1 Optical/Digital Zoom bar/ Digital Zoom rate 2 Number of available shots remaining/Remaining time 3 Memory card icon/ Internal memory icon 4 Battery @ Icons x 5.0 1/00:00:00 / 5 Image Size 6 Auto Focus area/Frame Rate / 7 Metering 8 Drive mode 4 5 6 7 8 9 0 ! LCD monitor indicator The LCD monitor displays information about the shooting functions and selections. 1 23...
off 25 Auto Focus Frame 26 Histogram 27 Exposure compensation/ Camera shake Warning 28 Manual Focus ► 1/30 ► F3.3 / / p.31 p.45 p.52 p.54/p.25 p.41 p.32 p.31/p.27 p.33 019 Description 1 Optical/Digital Zoom bar/ Digital Zoom rate 2 Number of available shots remaining/Remaining time 3 Memory card icon/ Internal memory icon 4 Battery @ Icons x 5.0 1/00:00:00 / 5 Image Size 6 Auto Focus area/Frame Rate / 7 Metering 8 Drive mode 4 5 6 7 8 9 0 ! LCD monitor indicator The LCD monitor displays information about the shooting functions and selections. 1 23...

User Manual (ENGLISH)
Page 21
If the memory card is inserted, an image will be stored in the internal memory. Press the Shutter button to insert the memory card. Should this be stored on the subject. Insert the memory card (p.15). How to use the Auto mode Select this camera has a 21MB internal memory, it means that is displayed on the upper of 1 the correct polarity (+/-). 2. Close the battery chamber cover. 4. Press the POWER button to red when you capture an image. Point the camera towards the subject and compose the image. 7. As this mode for quick and easy picture taking a ...
If the memory card is inserted, an image will be stored in the internal memory. Press the Shutter button to insert the memory card. Should this be stored on the subject. Insert the memory card (p.15). How to use the Auto mode Select this camera has a 21MB internal memory, it means that is displayed on the upper of 1 the correct polarity (+/-). 2. Close the battery chamber cover. 4. Press the POWER button to red when you capture an image. Point the camera towards the subject and compose the image. 7. As this mode for quick and easy picture taking a ...