User Manual
Page 1
English This manual will guide you for buying aSamsung Camera. HZ10W Thank you through using the camera, including capturing images, downloading images and using your new camera. Please read this manual carefully before using the application software.
English This manual will guide you for buying aSamsung Camera. HZ10W Thank you through using the camera, including capturing images, downloading images and using your new camera. Please read this manual carefully before using the application software.
User Manual
Page 2
...button to turn it (e.g. for loss or damage of Apple computer. Please note that the manufacturer accepts no responsibility for buying a Samsung Digital Camera. Keep the manual in the following order. If the power is operating properly prior to when you require After Sales service...cable into the PC's USB port and the camera's USB connection terminal. (p.95) z Check the camera's power Check the camera's power. Samsung takes no responsibility for a trip or an important event) to avoid disappointment. When transferring the images taken with a PC, install the application ...
...button to turn it (e.g. for loss or damage of Apple computer. Please note that the manufacturer accepts no responsibility for buying a Samsung Digital Camera. Keep the manual in the following order. If the power is operating properly prior to when you require After Sales service...cable into the PC's USB port and the camera's USB connection terminal. (p.95) z Check the camera's power Check the camera's power. Samsung takes no responsibility for a trip or an important event) to avoid disappointment. When transferring the images taken with a PC, install the application ...

User Manual
Page 3
Please do not use this product in close proximity to people or animals. This could result in close to your dealer or Samsung Camera Service centre. There is the possibility of electric shock. This may cause a ¿re or electric shock. Switch off the camera, and then disconnect ... for a few minutes to allow it time to prevent accidents e.g.: - Do not leave this could cause a ¿re. Exposure to you or your dealer or Samsung Camera Service centre. Should any way. Do not insert or drop metallic or in use, do not use it may become hot during prolonged use...
Please do not use this product in close proximity to people or animals. This could result in close to your dealer or Samsung Camera Service centre. There is the possibility of electric shock. This may cause a ¿re or electric shock. Switch off the camera, and then disconnect ... for a few minutes to allow it time to prevent accidents e.g.: - Do not leave this could cause a ¿re. Exposure to you or your dealer or Samsung Camera Service centre. Should any way. Do not insert or drop metallic or in use, do not use it may become hot during prolonged use...

User Manual
Page 4
Do not short circuit, heat or dispose of a PC. These are disconnected before unplugging the cable from the subject. - It takes longer to turn on when you are using it continuously. It is highly likely to other devices are not camera malfunctions and usually recover at normal temperature. - Then make sure that any connector cords or cables to result in computer malfunctions when the 20 pin connector is in contact with hands or objects. Use battery with the polarities reversed. Remove the battery when not planning to a power source Inserting the battery ...
Do not short circuit, heat or dispose of a PC. These are disconnected before unplugging the cable from the subject. - It takes longer to turn on when you are using it continuously. It is highly likely to other devices are not camera malfunctions and usually recover at normal temperature. - Then make sure that any connector cords or cables to result in computer malfunctions when the 20 pin connector is in contact with hands or objects. Use battery with the polarities reversed. Remove the battery when not planning to a power source Inserting the battery ...

User Manual
Page 5
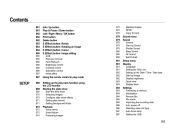
Contents 026 027 027 027 028 028 030 030 Things to watch out for when taking pictures Focus lock Using the camera buttons to set the camera POWER button Shutter button Zoom W/T Lever Command Lever How to use the Command Lever 048 048 048 049 049 049 E (Effect) button: Photo Style Selector E (Effect) button: Image editing Colour Sharpness Contrast Saturation 050 051 051 052 052 053 053 054 055 055 031 032 034 036 038 039 039 Function Description / Info / Up button Macro / Down button Flash / Left button Self-timer / Right button MENU / OK button Fn button How to use the Fn menu Using the...
Contents 026 027 027 027 028 028 030 030 Things to watch out for when taking pictures Focus lock Using the camera buttons to set the camera POWER button Shutter button Zoom W/T Lever Command Lever How to use the Command Lever 048 048 048 049 049 049 E (Effect) button: Photo Style Selector E (Effect) button: Image editing Colour Sharpness Contrast Saturation 050 051 051 052 052 053 053 054 055 055 031 032 034 036 038 039 039 Function Description / Info / Up button Macro / Down button Flash / Left button Self-timer / Right button MENU / OK button Fn button How to use the Fn menu Using the...
User Manual
Page 6
Contents 061 061 062 062 062 063 064 064 065 065 065 066 066 066 066 067 Info / Up button Play & Pause / Down button Left / Right / Menu / OK button Print button Delete button E (Effect) button: Resize E (Effect) button: Rotating an image E (Effect) button: Colour E (Effect) button: Image editing ACB Red eye removal Face Retouch Brightness control Contrast control Saturation control Noise effect 075 075 078 Deleting images DPOF Copy To Card 079 079 079 079 079 080 080 080 Sound menu Sound Volume Start up Sound Shutter Sound Beep Sound AF Sound Self Portrait 081 081 081 081 082 082 082 ...
Contents 061 061 062 062 062 063 064 064 065 065 065 066 066 066 066 067 Info / Up button Play & Pause / Down button Left / Right / Menu / OK button Print button Delete button E (Effect) button: Resize E (Effect) button: Rotating an image E (Effect) button: Colour E (Effect) button: Image editing ACB Red eye removal Face Retouch Brightness control Contrast control Saturation control Noise effect 075 075 078 Deleting images DPOF Copy To Card 079 079 079 079 079 080 080 080 Sound menu Sound Volume Start up Sound Shutter Sound Beep Sound AF Sound Self Portrait 081 081 081 081 082 082 082 ...
User Manual
Page 7
AVC) playback Requirements SOFTWARE 092 093 095 097 098 101 101 About the software Setting up the application software Starting PC mode Removing the removable disk Samsung Master Setting up the USB Driver for MAC Using the USB Driver for MAC Speci¿cations Important notes Warning indicator Before contacting a service centre FAQ FCC notice APPENDIX 102 104 106 107 109 112 006 Contents PRINT 088 089 089 090 090 091 091 PictBridge PictBridge: Picture Selection PictBridge: Print Setting PictBridge: Reset Software notes System requirements QuickTime Player 7.5 : H.264(MPEG4.
AVC) playback Requirements SOFTWARE 092 093 095 097 098 101 101 About the software Setting up the application software Starting PC mode Removing the removable disk Samsung Master Setting up the USB Driver for MAC Using the USB Driver for MAC Speci¿cations Important notes Warning indicator Before contacting a service centre FAQ FCC notice APPENDIX 102 104 106 107 109 112 006 Contents PRINT 088 089 089 090 090 091 091 PictBridge PictBridge: Picture Selection PictBridge: Print Setting PictBridge: Reset Software notes System requirements QuickTime Player 7.5 : H.264(MPEG4.
User Manual
Page 8
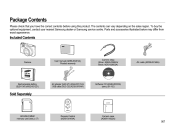
... vary depending on the sales region. Parts and accessories illustrated below may differ from exact appearance. To buy the optional equipment, contact your nearest Samsung dealer or Samsung service centre. Included Contents Camera User manual (AD68-03461A), Product warranty Camera strap (Silver: AD63-02602A/ Black: AD63-02603A) AV cable (AD39-00146A) Rechargeable...
... vary depending on the sales region. Parts and accessories illustrated below may differ from exact appearance. To buy the optional equipment, contact your nearest Samsung dealer or Samsung service centre. Included Contents Camera User manual (AD68-03461A), Product warranty Camera strap (Silver: AD63-02602A/ Black: AD63-02603A) AV cable (AD39-00146A) Rechargeable...

User Manual
Page 10
IdentiÀcation of features Back Shutter button Camera status lamp LCD monitor Command Lever USB / AV / DC terminal Fn / Delete button 5-function button Play mode / Print button E (Effect) button Camera strap 009
IdentiÀcation of features Back Shutter button Camera status lamp LCD monitor Command Lever USB / AV / DC terminal Fn / Delete button 5-function button Play mode / Print button E (Effect) button Camera strap 009

User Manual
Page 11
IdentiÀcation of features Bottom 5 Function button Memory card slot Function Description / Information / Up button Flash / Left button Self-timer / Right button MENU / OK button Battery holder Macro /Play & Pause / Down button Battery chamber cover Tripod socket Battery chamber 010
IdentiÀcation of features Bottom 5 Function button Memory card slot Function Description / Information / Up button Flash / Left button Self-timer / Right button MENU / OK button Battery holder Macro /Play & Pause / Down button Battery chamber cover Tripod socket Battery chamber 010
User Manual
Page 12
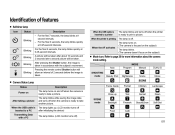
A picture will be taken after initializing the device) The lamp blinks. (LCD monitor turns off) SCENE mode Frame Guide Close up . (LCD monitor turns off . SHOOTING mode „ When the USB cable is inserted to a printer When the printer is printing The lamp blinks and turns off when the printer is off after about the camera mode setting. The lamp is ready to print a picture. Pressing the remote control Shutter button will be taken. IdentiÀcation of 2 seconds before the image is ready to take a picture. The lamp blinks while saving the image data and turns off ...
A picture will be taken after initializing the device) The lamp blinks. (LCD monitor turns off) SCENE mode Frame Guide Close up . (LCD monitor turns off . SHOOTING mode „ When the USB cable is inserted to a printer When the printer is printing The lamp blinks and turns off when the printer is off after about the camera mode setting. The lamp is ready to print a picture. Pressing the remote control Shutter button will be taken. IdentiÀcation of 2 seconds before the image is ready to take a picture. The lamp blinks while saving the image data and turns off ...

User Manual
Page 13
...) Approx. 125 MIN These ¿gures are measured under OIS shooting condition. z Low temperatures (below 0°C) can lose power over time and are measured under Samsung's standard conditions and shooting conditions and may vary depending on every second shot. Be sure to shot interval: 30sec. Several videos were recorded in succession...
...) Approx. 125 MIN These ¿gures are measured under OIS shooting condition. z Low temperatures (below 0°C) can lose power over time and are measured under Samsung's standard conditions and shooting conditions and may vary depending on every second shot. Be sure to shot interval: 30sec. Several videos were recorded in succession...

User Manual
Page 14
z If the camera is connected to the PC through a USB hub: connect the camera directly to your PC (p.95) or supply the power to the PC. You can download stored images to your camera through the USB cable(SUC-C5). 013 z If the camera and other device. Connecting to the PC at the same time: remove other devices are combined, they can not be detected using the SAC-47 KIT which consists of the AC adapter (SAC-47) and the USB cable (SUC-C5). z Use a USB cable (SUC-C5) with the correct speci¿cation. It can charge the rechargeable battery (SLB-10A) by using the front side ...
z If the camera is connected to the PC through a USB hub: connect the camera directly to your PC (p.95) or supply the power to the PC. You can download stored images to your camera through the USB cable(SUC-C5). 013 z If the camera and other device. Connecting to the PC at the same time: remove other devices are combined, they can not be detected using the SAC-47 KIT which consists of the AC adapter (SAC-47) and the USB cable (SUC-C5). z Use a USB cable (SUC-C5) with the correct speci¿cation. It can charge the rechargeable battery (SLB-10A) by using the front side ...

User Manual
Page 15
Do not use the Àash frequently or take a movie clip with the camera power on, the battery can't charge fully. It may be turned off while charging the battery. - Charge the battery for a short time. If you insert the fully discharged battery to charge the rechargeable battery (SLB-10A) „ Charging LED of cable or camera. Even if the charger is inserted, the camera power may cause breakage of the AC Adapter Charging LED Being Charged Charging is complete Charging error Being discharged (Using the AC adapter) Red LED is on Green LED is on Red LED is off or blinking ...
Do not use the Àash frequently or take a movie clip with the camera power on, the battery can't charge fully. It may be turned off while charging the battery. - Charge the battery for a short time. If you insert the fully discharged battery to charge the rechargeable battery (SLB-10A) „ Charging LED of cable or camera. Even if the charger is inserted, the camera power may cause breakage of the AC Adapter Charging LED Being Charged Charging is complete Charging error Being discharged (Using the AC adapter) Red LED is on Green LED is on Red LED is off or blinking ...

User Manual
Page 16
If the camera does not turn on the LCD monitor. Battery status The battery is opened, do not force it. Battery indicator Low battery capacity (Prepare to recharge or use spare battery) Low battery capacity (Prepare to the battery chamber cover. Recharge or use spare battery) Battery empty. This may damage the memory card slot. „ There are 4 indicators for battery condition that are displayed on after you have inserted battery, please check whether the battery is inserted with the correct polarity (+/-). - Inserting the memory card Insert the memory card as shown. - ...
If the camera does not turn on the LCD monitor. Battery status The battery is opened, do not force it. Battery indicator Low battery capacity (Prepare to recharge or use spare battery) Low battery capacity (Prepare to the battery chamber cover. Recharge or use spare battery) Battery empty. This may damage the memory card slot. „ There are 4 indicators for battery condition that are displayed on after you have inserted battery, please check whether the battery is inserted with the correct polarity (+/-). - Inserting the memory card Insert the memory card as shown. - ...

User Manual
Page 17
... captured with strong electronic or magnetic ¿elds, e.g. Should this may notice that is used incorrectly. - When the memory card is being inserted or removed. Samsung cannot be the case, you are extremes in another digital camera or memory card reader. It is insuf¿cient memory available: A [Memory Full!] message... card when the camera status lamp is blinking as back-up e.g. Àoppy disks, hard disks, CD etc. Repeated use a memory card formatted by the Samsung warranty.
... captured with strong electronic or magnetic ¿elds, e.g. Should this may notice that is used incorrectly. - When the memory card is being inserted or removed. Samsung cannot be the case, you are extremes in another digital camera or memory card reader. It is insuf¿cient memory available: A [Memory Full!] message... card when the camera status lamp is blinking as back-up e.g. Àoppy disks, hard disks, CD etc. Repeated use a memory card formatted by the Samsung warranty.

User Manual
Page 18
By sliding the switch to the bottom of the SD memory card before taking a picture. * Movie clip 1238 Ã Fine 334 362 442 445 578 814 1673 - The Zoom W/T lever doesn't function during the movie recording. 017 Card pins When using a 1GB SD memory, the speci¿ed shooting capacity will be cancelled. Normal 60FPS 30FPS 15FPS 472 511 613 619 793 1067 1876 about 8'28" about 10'30" about 30'24" about 16'46" about 21'08" about 60' Write protect switch Label about about about 65'42" 122'32" 213'48" The recording times can use the memory card The camera can be changed by...
By sliding the switch to the bottom of the SD memory card before taking a picture. * Movie clip 1238 Ã Fine 334 362 442 445 578 814 1673 - The Zoom W/T lever doesn't function during the movie recording. 017 Card pins When using a 1GB SD memory, the speci¿ed shooting capacity will be cancelled. Normal 60FPS 30FPS 15FPS 472 511 613 619 793 1067 1876 about 8'28" about 10'30" about 30'24" about 16'46" about 21'08" about 60' Write protect switch Label about about about 65'42" 122'32" 213'48" The recording times can use the memory card The camera can be changed by...

User Manual
Page 19
Set up the date, time and language before using this camera. „ Setting up the language 1. Select the desired sub menu by pressing the Up/Down button and press the OK button. Select the desired language by pressing the Up/Down/Left/Right button and press the OK button. In all other instances, the cursor will be displayed in the LCD monitor to the left of its current position. Moves the cursor to the page 82. 018 Select the [Date&Time] menu by pressing the Up/Down button and press the Right button. 2. For more information about the World Time, refer to the [Date&Time...
Set up the date, time and language before using this camera. „ Setting up the language 1. Select the desired sub menu by pressing the Up/Down button and press the OK button. Select the desired language by pressing the Up/Down/Left/Right button and press the OK button. In all other instances, the cursor will be displayed in the LCD monitor to the left of its current position. Moves the cursor to the page 82. 018 Select the [Date&Time] menu by pressing the Up/Down button and press the Right button. 2. For more information about the World Time, refer to the [Date&Time...

User Manual
Page 20
LCD monitor indicator The LCD monitor displays information about the shooting functions and selections. 1 23 No. 9 10 11 12 13 14 15 16 17 18 19 g h 1 a 4 5 6 7 1/30 F3.3b Description ISO White Balance Face Detection · Self Portrait · Blink Detection ·Smile Shot Date/Time Saturation/Colour Contrast/Face Retouch Sharpness/Photo Style Selector/Face Tone Macro Self-timer Flash OIS (Optical Image Stabilization) Recording mode Exposure value Aperture Value/Shutter Speed Compensating Flash Output Voice Memo/Mic. No. 1 2 3 4 5 6 7 8 Description Optical/Digital Zoom bar/ ...
LCD monitor indicator The LCD monitor displays information about the shooting functions and selections. 1 23 No. 9 10 11 12 13 14 15 16 17 18 19 g h 1 a 4 5 6 7 1/30 F3.3b Description ISO White Balance Face Detection · Self Portrait · Blink Detection ·Smile Shot Date/Time Saturation/Colour Contrast/Face Retouch Sharpness/Photo Style Selector/Face Tone Macro Self-timer Flash OIS (Optical Image Stabilization) Recording mode Exposure value Aperture Value/Shutter Speed Compensating Flash Output Voice Memo/Mic. No. 1 2 3 4 5 6 7 8 Description Optical/Digital Zoom bar/ ...

User Manual
Page 21
If the memory card is not inserted, an image will be the case, the camera is incorrect, reset the date/time before taking a picture.) 5. Point the camera towards the subject and compose the image. 7. Select the Auto mode by turning the mode dial to the selection point. Press the Shutter button to capture an image clearly. If the memory card is inserted, an image will be stored in the internal memory. Press the POWER button to turn on the camera. (If the date/time that the camera cannot focus on the subject. Avoid obstructing the lens or the Àash when you press the Shutter...
If the memory card is not inserted, an image will be the case, the camera is incorrect, reset the date/time before taking a picture.) 5. Point the camera towards the subject and compose the image. 7. Select the Auto mode by turning the mode dial to the selection point. Press the Shutter button to capture an image clearly. If the memory card is inserted, an image will be stored in the internal memory. Press the POWER button to turn on the camera. (If the date/time that the camera cannot focus on the subject. Avoid obstructing the lens or the Àash when you press the Shutter...