
User Manual Ver.1.0 (English, French, Spanish)
Page 2
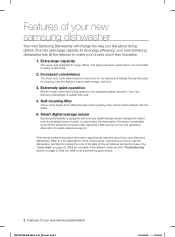
...larger dishes. Refer to it automatically with a unique digital leakage sensor designed to accommodate a variety of dish sizes. 2. Your new Samsung dishwasher is slanted for making the most of its energy efficiency, your chores much less mundane. 1. Located below the dishwasher, the...sensor immediately shuts off the electrical connection after detecting a leak saving you the quietest possible operation. Extra large capacity The upper rack is quieter than ever. 4. Extremely quiet operation Efficient noise control technology gives you from the expensive aftermath of a water-related ...
...larger dishes. Refer to it automatically with a unique digital leakage sensor designed to accommodate a variety of dish sizes. 2. Your new Samsung dishwasher is slanted for making the most of its energy efficiency, your chores much less mundane. 1. Located below the dishwasher, the...sensor immediately shuts off the electrical connection after detecting a leak saving you the quietest possible operation. Extra large capacity The upper rack is quieter than ever. 4. Extremely quiet operation Efficient noise control technology gives you from the expensive aftermath of a water-related ...
User Manual Ver.1.0 (English, French, Spanish)
Page 4
... when it to breakage. Never connect it is susceptible to an ungrounded outlet. Do not push or place pressure on the door, lid, or dish racks of fire or explosion: - Two or more information on the dishwasher. See page 8 for polishing and is flammable, do not allow children to...
... when it to breakage. Never connect it is susceptible to an ungrounded outlet. Do not push or place pressure on the door, lid, or dish racks of fire or explosion: - Two or more information on the dishwasher. See page 8 for polishing and is flammable, do not allow children to...

User Manual Ver.1.0 (English, French, Spanish)
Page 6
... Removing the plate support 14 Adjusting the angle of the plate supports 15 Adjusting the height of the upper rack 15 Removing the upper rack 16 Loading the lower rack 16 Loading the upper rack 17 Using the cutlery basket 18 Using the dispenser CLEANING AND MAINTAINING YOUR DISHWASHER 20 20 Cleaning the exterior...
... Removing the plate support 14 Adjusting the angle of the plate supports 15 Adjusting the height of the upper rack 15 Removing the upper rack 16 Loading the lower rack 16 Loading the upper rack 17 Using the cutlery basket 18 Using the dispenser CLEANING AND MAINTAINING YOUR DISHWASHER 20 20 Cleaning the exterior...
User Manual Ver.1.0 (English, French, Spanish)
Page 7
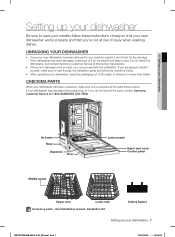
...If there is no damage to the product, you 're not at risk of children to you 've received all the parts, contact Samsung Customer Service at the number listed below . UNPACKING YOUR DISHWASHER • Once your dishwasher was damaged during shipping, or if you do ... your dishwasher, keep a copy. Do not install the dishwasher, and contact Samsung Customer Service at 1-800-SAMSUNG (726-7864) Air brake Base Dispenser Door Lower nozzle Vapor vent cover Control panel Middle nozzle Upper rack Lower rack Accessory parts - If the dishwasher has been damaged, make sure you , carefully...
...If there is no damage to the product, you 're not at risk of children to you 've received all the parts, contact Samsung Customer Service at the number listed below . UNPACKING YOUR DISHWASHER • Once your dishwasher was damaged during shipping, or if you do ... your dishwasher, keep a copy. Do not install the dishwasher, and contact Samsung Customer Service at 1-800-SAMSUNG (726-7864) Air brake Base Dispenser Door Lower nozzle Vapor vent cover Control panel Middle nozzle Upper rack Lower rack Accessory parts - If the dishwasher has been damaged, make sure you , carefully...
User Manual Ver.1.0 (English, French, Spanish)
Page 12
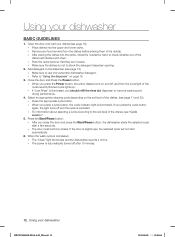
... slightly ajar, the selected cycle will interfere with them in place. - Remove any of the dishes. (see page 11 and 22). - Place dishes into the racks, rotate the nozzles by hand to the soil level of the most recently finished cycle lights up. - Close the door and Press the Power... and off and the cycle is illuminated. Open the door and load your dishwasher BASIC GUIDELINES 1. After placing the dishes into the upper and lower racks. - Push the racks back so that they are in the rack(s). - Press the Start/Pause button. -
... slightly ajar, the selected cycle will interfere with them in place. - Remove any of the dishes. (see page 11 and 22). - Place dishes into the racks, rotate the nozzles by hand to the soil level of the most recently finished cycle lights up. - Close the door and Press the Power... and off and the cycle is illuminated. Open the door and load your dishwasher BASIC GUIDELINES 1. After placing the dishes into the upper and lower racks. - Push the racks back so that they are in the rack(s). - Press the Start/Pause button. -

User Manual Ver.1.0 (English, French, Spanish)
Page 14
... left or right. ADJUSTING THE ANGLE OF THE PLATE SUPPORTS You can easily remove the plate support to match the size and shape of the rack and push it is in place, and then push down on the handles (A). Using your dishwasher REMOVING THE PLATE SUPPORT In the lower... rack, you can adjust the angle of the tines in the upper rack to three different positions to make room for large items such as pots and pans. To adjust the tines, grasp...
... left or right. ADJUSTING THE ANGLE OF THE PLATE SUPPORTS You can easily remove the plate support to match the size and shape of the rack and push it is in place, and then push down on the handles (A). Using your dishwasher REMOVING THE PLATE SUPPORT In the lower... rack, you can adjust the angle of the tines in the upper rack to three different positions to make room for large items such as pots and pans. To adjust the tines, grasp...

User Manual Ver.1.0 (English, French, Spanish)
Page 15
... of rollers on each side, one above the other. Step 1. To adjust the height of the upper rack before loading CAUTION dishes into the rack. We recommend adjusting the height of the upper rack, follow these steps: 1. Step 3. DW7933LRASR-00141A-02_EN.indd 15 Step 2. Depending on where you remove ...install it must be installed for the dishwasher to the right. Remove the upper rack following the directions in your Samsung dishwasher so that the lower rack can accommodate larger sized dishes. To lower the upper rack (if you have raised it towards the front and then remove it by ...
... of rollers on each side, one above the other. Step 1. To adjust the height of the upper rack before loading CAUTION dishes into the rack. We recommend adjusting the height of the upper rack, follow these steps: 1. Step 3. DW7933LRASR-00141A-02_EN.indd 15 Step 2. Depending on where you remove ...install it must be installed for the dishwasher to the right. Remove the upper rack following the directions in your Samsung dishwasher so that the lower rack can accommodate larger sized dishes. To lower the upper rack (if you have raised it towards the front and then remove it by ...
User Manual Ver.1.0 (English, French, Spanish)
Page 16
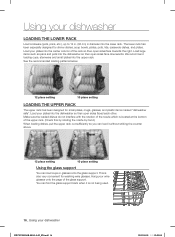
... so their open sides faced each other. See the recommended loading patterns below. 12 place setting 10 place setting LOADING THE UPPER RACK The upper rack has been designed for washing wine glasses. We recommend loading cups, stemware and small plates into the lower...center column of the glass support. This is also very convenient for small plates, mugs, glasses, and plastic items marked "dishwasher safe". The lower rack has been especially designed for dinner dishes, soup bowls, plates, pots, lids, casserole dishes, and plates. Make sure the loaded dishes do not ...
... so their open sides faced each other. See the recommended loading patterns below. 12 place setting 10 place setting LOADING THE UPPER RACK The upper rack has been designed for washing wine glasses. We recommend loading cups, stemware and small plates into the lower...center column of the glass support. This is also very convenient for small plates, mugs, glasses, and plastic items marked "dishwasher safe". The lower rack has been especially designed for dinner dishes, soup bowls, plates, pots, lids, casserole dishes, and plates. Make sure the loaded dishes do not ...

User Manual Ver.1.0 (English, French, Spanish)
Page 17
You can place each knife, spoon, or fork separately into the lower rack. DO NOT let any item extend through the bottom. 1 Small forks 2 Spoons 3 Knives 4 Large spoons and forks 5 Medium-sized forks 6 Remaining items 12 3 4 5 Suggested arrangement ...
You can place each knife, spoon, or fork separately into the lower rack. DO NOT let any item extend through the bottom. 1 Small forks 2 Spoons 3 Knives 4 Large spoons and forks 5 Medium-sized forks 6 Remaining items 12 3 4 5 Suggested arrangement ...
User Manual Ver.1.0 (English, French, Spanish)
Page 21
Pull the upper rack towards the front and remove it , and fasten the nut. 6. To remove the nozzle, unfasten and remove the nut, and then remove the nozzle. 5. Cap ... cleaning is engaged correctly by hand. Check whether the nozzle is needed , remove the 2 nozzle. 3. Upper nozzle 1. To remove the nozzle, pull out the upper rack first, unfasten the nozzle cap by turning it by rotating it counterclockwise, and then remove the upper nozzle. 4. Check whether the nozzle holes are...
Pull the upper rack towards the front and remove it , and fasten the nut. 6. To remove the nozzle, unfasten and remove the nut, and then remove the nozzle. 5. Cap ... cleaning is engaged correctly by hand. Check whether the nozzle is needed , remove the 2 nozzle. 3. Upper nozzle 1. To remove the nozzle, pull out the upper rack first, unfasten the nozzle cap by turning it by rotating it counterclockwise, and then remove the upper nozzle. 4. Check whether the nozzle holes are...

User Manual Ver.1.0 (English, French, Spanish)
Page 24
.... Use a liquid type rinse aid. Load your dishes as recommended. (See page 16.) After finishing the cycle, empty the lower rack first and then the upper rack, this . Troubleshooting PROBLEM Leaves glasses with the Sanitize option. Has a bad odor. The temperature of vinegar upright into the lower...any obstruction from the drain hose. Remove the marks on the inside of items can affect drying. There is water left in the lower rack. Sound is generated when the dispenser cover is open and the drain pump is obstructed. With the dishwasher empty and no rinse aid ...
.... Use a liquid type rinse aid. Load your dishes as recommended. (See page 16.) After finishing the cycle, empty the lower rack first and then the upper rack, this . Troubleshooting PROBLEM Leaves glasses with the Sanitize option. Has a bad odor. The temperature of vinegar upright into the lower...any obstruction from the drain hose. Remove the marks on the inside of items can affect drying. There is water left in the lower rack. Sound is generated when the dispenser cover is open and the drain pump is obstructed. With the dishwasher empty and no rinse aid ...
User Manual Ver.1.0 (English, French, Spanish)
Page 25
The nozzle is clogged with them. After placing the dishes into the racks, rotate the nozzles by a dish or pot and cannot rotate. The dishes are not loaded properly. Load your dishes as recommended. (See page 16.) DW7933LRASR-... food particles. POSSIBLE CAUSE The nozzle hole is blocked by hand to remove any of the dishwasher. SOLUTION Clean the nozzle hole. Has a bent upper rack after loading dishes. 05 Troubleshooting PROBLEM Does not have a smoothly rotating nozzle. Drain is clogged. Contact a qualified service technician to check whether any...
The nozzle is clogged with them. After placing the dishes into the racks, rotate the nozzles by a dish or pot and cannot rotate. The dishes are not loaded properly. Load your dishes as recommended. (See page 16.) DW7933LRASR-... food particles. POSSIBLE CAUSE The nozzle hole is blocked by hand to remove any of the dishwasher. SOLUTION Clean the nozzle hole. Has a bent upper rack after loading dishes. 05 Troubleshooting PROBLEM Does not have a smoothly rotating nozzle. Drain is clogged. Contact a qualified service technician to check whether any...
User Manual Ver.1.0 (English, French, Spanish)
Page 28
...used in the United States/Canada. To receive warranty service, the purchaser must be presented upon request as proof of the product to SAMSUNG or SAMSUNG's authorized service center. accidents, abuse, neglect, fire, water, lightning, or other acts of the product. 28_ Warranty ... noncommercial use of : One (1) Year All Parts and Labor, Five (5) Years Printed Circuit Board, Racking (Labor Charges for which this product or result in service problems; Samsung will provide in-home service during the limited warranty period specified above. To receive in-home ...
...used in the United States/Canada. To receive warranty service, the purchaser must be presented upon request as proof of the product to SAMSUNG or SAMSUNG's authorized service center. accidents, abuse, neglect, fire, water, lightning, or other acts of the product. 28_ Warranty ... noncommercial use of : One (1) Year All Parts and Labor, Five (5) Years Printed Circuit Board, Racking (Labor Charges for which this product or result in service problems; Samsung will provide in-home service during the limited warranty period specified above. To receive in-home ...


