User Manual
Page 14
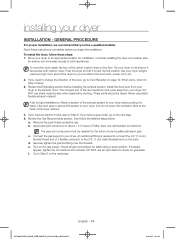
...the ventilation slots at the back of any liquefied petroleum gas. When done, return to the action of the dryer cabinet. 4. Review the Exhausting section before you need to change the direction of Teflon tape over the threads. DO NOT use plastic flexible exhaust ...step. 5. a. The pipe joint compound must point away from your dryer. To install the dryer, follow the lettered steps below . 3. Review the Gas Requirements section, then follow these instructions completely before installing the exhaust system. If bubbles appear, tighten the connections and recheck. Set...
...the ventilation slots at the back of any liquefied petroleum gas. When done, return to the action of the dryer cabinet. 4. Review the Exhausting section before you need to change the direction of Teflon tape over the threads. DO NOT use plastic flexible exhaust ...step. 5. a. The pipe joint compound must point away from your dryer. To install the dryer, follow the lettered steps below . 3. Review the Gas Requirements section, then follow these instructions completely before installing the exhaust system. If bubbles appear, tighten the connections and recheck. Set...
User Manual
Page 15
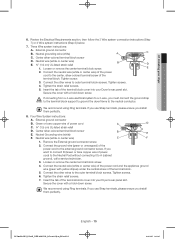
... the strain relief screws. 7. Remove the External ground connector screw. 2. Loosen or remove the center terminal block screw. 4. Tighten screws. 6. We recommend using Ring terminals. Review the Electrical Requirements section, then follow the 3 Wire system connection instructions (Step 7) or 4 Wire system instructions (Step 8) below. 7. Secure the cover with yellow stripes) under...
... the strain relief screws. 7. Remove the External ground connector screw. 2. Loosen or remove the center terminal block screw. 4. Tighten screws. 6. We recommend using Ring terminals. Review the Electrical Requirements section, then follow the 3 Wire system connection instructions (Step 7) or 4 Wire system instructions (Step 8) below. 7. Secure the cover with yellow stripes) under...