
User Manual (user Manual) (ver.1.0) (English)
Page 12
...exhaust out the bottom or the right or the left (electric model only), use the accessory exhaust kit (sold separately). On gas dryers, adequate clearance as the dryer. • WARNING: To reduce the risk of a child suffocating. Keep the dryer area clear of fi re when installed in an alcove...sure: • The exhaust system meets all local, state, and national codes. • That a flexible plastic duct is not used . A dryer produces combustible lint. The static pressure in front, 17" on top, 1" on the top and bottom. These instructions should be measured with the...
...exhaust out the bottom or the right or the left (electric model only), use the accessory exhaust kit (sold separately). On gas dryers, adequate clearance as the dryer. • WARNING: To reduce the risk of a child suffocating. Keep the dryer area clear of fi re when installed in an alcove...sure: • The exhaust system meets all local, state, and national codes. • That a flexible plastic duct is not used . A dryer produces combustible lint. The static pressure in front, 17" on top, 1" on the top and bottom. These instructions should be measured with the...
User Manual (user Manual) (ver.1.0) (English)
Page 15
... have a proper outlet installed by a qualified electrician. It is your responsibility to provide adequate electrical services for your dryer - Latest Revision (for Canada) and local codes and ordinances. Never connect the ground wire to plastic plumbing lines, gas lines... appropriate outlet that is properly installed and grounded in accordance with your dryer. Electric models WARNING Your dryer has a cord with an equipment-grounding conductor and a grounding plug. Gas models WARNING Your dryer has a cord with an equipment-grounding conductor and a grounding plug...
... have a proper outlet installed by a qualified electrician. It is your responsibility to provide adequate electrical services for your dryer - Latest Revision (for Canada) and local codes and ordinances. Never connect the ground wire to plastic plumbing lines, gas lines... appropriate outlet that is properly installed and grounded in accordance with your dryer. Electric models WARNING Your dryer has a cord with an equipment-grounding conductor and a grounding plug. Gas models WARNING Your dryer has a cord with an equipment-grounding conductor and a grounding plug...

User Manual (user Manual) (ver.1.0) (English)
Page 16
...The power cord should be found on both sides of the line is required. • All Canadian models are shipped with U.S. U.S. only Most U.S. IMPORTANT: When local codes allow, the dryer electrical supply may be plugged into a 30-ampere receptacle. • The power cord is NOT ...60 Hz AC approved electrical service fused through the neutral conductor. (Use 4-prong plug for 4 wire receptacle, NEMA type 14-30R.) Electric models - installing your dryer is recommended. It is required. A 30-ampere fuse or circuit breaker on both sides of the line is required. • If ...
...The power cord should be found on both sides of the line is required. • All Canadian models are shipped with U.S. U.S. only Most U.S. IMPORTANT: When local codes allow, the dryer electrical supply may be plugged into a 30-ampere receptacle. • The power cord is NOT ...60 Hz AC approved electrical service fused through the neutral conductor. (Use 4-prong plug for 4 wire receptacle, NEMA type 14-30R.) Electric models - installing your dryer is recommended. It is required. A 30-ampere fuse or circuit breaker on both sides of the line is required. • If ...
User Manual (user Manual) (ver.1.0) (English)
Page 17
...fied installer. Review the Exhausting section before you have an electric model, skip to check for installation. Never use sheet metal screws when assembling ducting. Use duct tape to secure this section to your dryer to the next step. 5. If you can attach the duct work ...from your dryer. d. Move your dryer before putting it in place. Leave enough room around the dryer so you have a gas model, go to your dryer. Install the duct work , power cord, etc. 2. Review the Gas Requirements section, then ...
...fied installer. Review the Exhausting section before you have an electric model, skip to check for installation. Never use sheet metal screws when assembling ducting. Use duct tape to secure this section to your dryer to the next step. 5. If you can attach the duct work ...from your dryer. d. Move your dryer before putting it in place. Leave enough room around the dryer so you have a gas model, go to your dryer. Install the duct work , power cord, etc. 2. Review the Gas Requirements section, then ...
User Manual (user Manual) (ver.1.0) (English)
Page 19
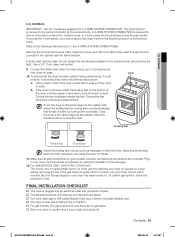
...the washer, follow the lettered steps below: a. If you use the 4-wire system, you cannot ground the dryer frame to operate on the floor. † For gas models: The gas is level side to side and then front to the following instructions for heat. Connect the Water...well socket. 9. To confirm gas ignition, check the exhaust for 3- MODELS: IMPORTANT - All U.S. Refer to back. To ensure that it must be level. To level the dryer, follow the directions above to air in your dryer off . b. Turning the feet clockwise retracts the feet. DV5471AG*, DV5451AG*: The ...
...the washer, follow the lettered steps below: a. If you use the 4-wire system, you cannot ground the dryer frame to operate on the floor. † For gas models: The gas is level side to side and then front to the following instructions for heat. Connect the Water...well socket. 9. To confirm gas ignition, check the exhaust for 3- MODELS: IMPORTANT - All U.S. Refer to back. To ensure that it must be level. To level the dryer, follow the directions above to air in your dryer off . b. Turning the feet clockwise retracts the feet. DV5471AG*, DV5451AG*: The ...
User Manual (user Manual) (ver.1.0) (English)
Page 29
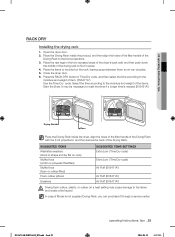
... in Time Dry cycle, and then select the time according to the moisture and weight of the Drying Rack to the moisture and weight of Model is needed.(DV5451A*) Drying Rack Door Place the Drying Rack inside the product, and then align the holes of the filter handle of ...item. (DV5471A*) Use the Time Dry cycle. Close the dryer door. 6. SETTINGS Extra Low ( Time Dry cycle) Extra Low ( Time Dry cycle) Air Fluff (DV5471A*) Air Fluff (DV5471A*) Air Fluff (DV5471A*) Drying foam rubber, ...
... in Time Dry cycle, and then select the time according to the moisture and weight of the Drying Rack to the moisture and weight of Model is needed.(DV5451A*) Drying Rack Door Place the Drying Rack inside the product, and then align the holes of the filter handle of ...item. (DV5471A*) Use the Time Dry cycle. Close the dryer door. 6. SETTINGS Extra Low ( Time Dry cycle) Extra Low ( Time Dry cycle) Air Fluff (DV5471A*) Air Fluff (DV5471A*) Air Fluff (DV5471A*) Drying foam rubber, ...


