User Manual
Page 21
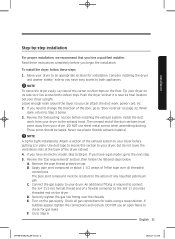
...carton cushion-tops on the gas supply. Leave enough room around the dryer so you have a gas model, go to "Door reversal" on page 32. Review the "Exhausting" section before you have an electric model, skip to Step 6. Never use sheet metal screws when assembling ducting. NOTE A tip for installation...thread end of a flexible connector to the 3/8" (1 cm) male threaded end on the dryer. If you hire a qualified installer. Check all threaded connections. Review the "Gas requirements" section, then follow these instructions completely before installing the exhaust system.
...carton cushion-tops on the gas supply. Leave enough room around the dryer so you have a gas model, go to "Door reversal" on page 32. Review the "Exhausting" section before you have an electric model, skip to Step 6. Never use sheet metal screws when assembling ducting. NOTE A tip for installation...thread end of a flexible connector to the 3/8" (1 cm) male threaded end on the dryer. If you hire a qualified installer. Check all threaded connections. Review the "Gas requirements" section, then follow these instructions completely before installing the exhaust system.
User Manual
Page 22
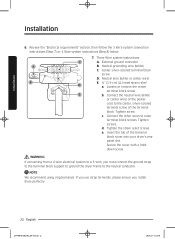
... dryer's rear panel slot. down screw. NOTE We recommend using ring terminals. Center silver-colored terminal block screw D. Tighten the strain relief screws. e. Tighten screw. Review the "Electrical requirements" section, then follow the 3 Wire system connection instructions (Step 7) or 4 Wire system instructions (Step 8) below. 7. E b. Loosen or remove the center terminal block...
... dryer's rear panel slot. down screw. NOTE We recommend using ring terminals. Center silver-colored terminal block screw D. Tighten the strain relief screws. e. Tighten screw. Review the "Electrical requirements" section, then follow the 3 Wire system connection instructions (Step 7) or 4 Wire system instructions (Step 8) below. 7. E b. Loosen or remove the center terminal block...