
User Manual Ver.0 (English, French, Spanish)
Page 14
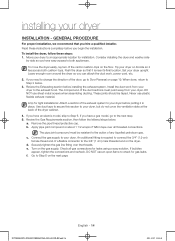
... you can attach the duct work from your dryer Installation - If you begin the installation. A tip for leaks using a soap solution. Review the Gas Requirements section, then follow these instructions completely before you need to change the direction of the exhaust system to your dryer to Door...move the dryer easily, lay two of a flexible connector to the action of the dryer cabinet. 4. When done, return to the next step. 5. Review the Exhausting section before putting it in place. The crimped end of the duct sections must be taped. DO NOT use sheet metal screws when...
... you can attach the duct work from your dryer Installation - If you begin the installation. A tip for leaks using a soap solution. Review the Gas Requirements section, then follow these instructions completely before you need to change the direction of the exhaust system to your dryer to Door...move the dryer easily, lay two of a flexible connector to the action of the dryer cabinet. 4. When done, return to the next step. 5. Review the Exhausting section before putting it in place. The crimped end of the duct sections must be taped. DO NOT use sheet metal screws when...
User Manual Ver.0 (English, French, Spanish)
Page 15
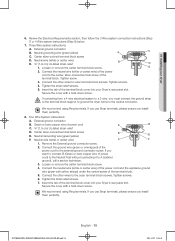
... grounding wire (green/yellow) C. Tighten the strain relief screws. 5. Connect the ground wire (green or unwrapped) of power cord C. ¾" (1.9 cm) UL-listed strain relief D. Review the Electrical Requirements section, then follow the 3 Wire system connection instructions (Step 7) or 4 Wire system instructions (Step 8) below. 7. Neutral wire (white or center wire) E. ¾...
... grounding wire (green/yellow) C. Tighten the strain relief screws. 5. Connect the ground wire (green or unwrapped) of power cord C. ¾" (1.9 cm) UL-listed strain relief D. Review the Electrical Requirements section, then follow the 3 Wire system connection instructions (Step 7) or 4 Wire system instructions (Step 8) below. 7. Neutral wire (white or center wire) E. ¾...