User Manual (ENGLISH)
Page 2
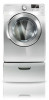
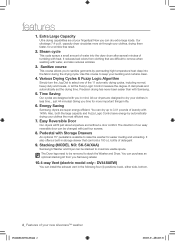
...This cycle sprays a small amount of water into the fabric during the drying cycle. It reduces bad odors from you Samsung retailer. 10.4-way Vent (electric model only : DV448AEW) You can dry extra-large loads. Precision drying has never been easier than with 1kWh. Giving you in life. ... are designed with just four screws. 8. bottle of our easy reversible door can hold a 100 oz. Sanitize course This course allows you can install the exhaust vent in the following four (4) positions: back, either side, bottom. 2_ Features of tumbling with water, and also reduces wrinkles....
...This cycle sprays a small amount of water into the fabric during the drying cycle. It reduces bad odors from you Samsung retailer. 10.4-way Vent (electric model only : DV448AEW) You can dry extra-large loads. Precision drying has never been easier than with 1kWh. Giving you in life. ... are designed with just four screws. 8. bottle of our easy reversible door can hold a 100 oz. Sanitize course This course allows you can install the exhaust vent in the following four (4) positions: back, either side, bottom. 2_ Features of tumbling with water, and also reduces wrinkles....
User Manual (ENGLISH)
Page 3
... that may result in severe personal injury or death. Do NOT attempt. If flexible metal (foil type) duct is installed, it must be easily crushed, and trap lint. Make sure the machine is your responsibility to the manufacturer's instructions and...installation instructions. Follow the information in this manual to minimize the risk of severe injury or death, follow all possible conditions and situations that may result in minor personal injury or property damage. Unplug the power plug from the wall socket. This manual contains valuable information on your new Samsung...
... that may result in severe personal injury or death. Do NOT attempt. If flexible metal (foil type) duct is installed, it must be easily crushed, and trap lint. Make sure the machine is your responsibility to the manufacturer's instructions and...installation instructions. Follow the information in this manual to minimize the risk of severe injury or death, follow all possible conditions and situations that may result in minor personal injury or property damage. Unplug the power plug from the wall socket. This manual contains valuable information on your new Samsung...
User Manual (ENGLISH)
Page 4
... must not be placed in contact with controls. Do not install or store this appliance where it will be performed by spontaneous combustion. To reduce the risk of fire or explosion: WARNING • • Do not ... traces of these flammable liquids or solids and their fumes have been removed. Heated foam rubber materials can, under certain circumstances, produce fire by a qualified installer, service agency, or the gas supplier. There are many highly flammable items used near children and pets. Before discarding or removing your dryer from becoming...
... must not be placed in contact with controls. Do not install or store this appliance where it will be performed by spontaneous combustion. To reduce the risk of fire or explosion: WARNING • • Do not ... traces of these flammable liquids or solids and their fumes have been removed. Heated foam rubber materials can, under certain circumstances, produce fire by a qualified installer, service agency, or the gas supplier. There are many highly flammable items used near children and pets. Before discarding or removing your dryer from becoming...
User Manual (ENGLISH)
Page 5
...hot enough to heat. The interior of the dryer and exhaust duct should be cleaned periodically by smell alone. See installation instructions for spontaneous combustion increases when items containing vegetable oil or cooking oil are exposed to catch fire. Oxidation creates ...specifications without notice. WARNING Gas leaks may contain significant amounts of continuing product improvements, Samsung reserves the right to reduce their temperature. Gas suppliers recommend you purchase and install a UL-approved gas detector. The potential for grounding this heat cannot escape, ...
...hot enough to heat. The interior of the dryer and exhaust duct should be cleaned periodically by smell alone. See installation instructions for spontaneous combustion increases when items containing vegetable oil or cooking oil are exposed to catch fire. Oxidation creates ...specifications without notice. WARNING Gas leaks may contain significant amounts of continuing product improvements, Samsung reserves the right to reduce their temperature. Gas suppliers recommend you purchase and install a UL-approved gas detector. The potential for grounding this heat cannot escape, ...
User Manual (ENGLISH)
Page 6
...SPECIAL LAUNDRY TIPS 28 TROUBLESHOOTING 29 APPENDIX 32 7 Tools needed for installation 7 See Exhaust Requirements 8 Ducting requirements 9 Important to installer 9 Location considerations 9 Alcove or closet installation 10 Mobile home installation 10 Exhausting 11 Gas requirements 12 Electrical requirements 12 Grounding 13 Electrical... connections 14 Connecting the inlet hose 15 Replacement parts and accessories 15 Installation 18 Final installation checklist 19 Dryer Exhaust Tips 20 Door Reversal 21 Overview of the control panel 23 Child lock ...
...SPECIAL LAUNDRY TIPS 28 TROUBLESHOOTING 29 APPENDIX 32 7 Tools needed for installation 7 See Exhaust Requirements 8 Ducting requirements 9 Important to installer 9 Location considerations 9 Alcove or closet installation 10 Mobile home installation 10 Exhausting 11 Gas requirements 12 Electrical requirements 12 Grounding 13 Electrical... connections 14 Connecting the inlet hose 15 Replacement parts and accessories 15 Installation 18 Final installation checklist 19 Dryer Exhaust Tips 20 Door Reversal 21 Overview of the control panel 23 Child lock ...
User Manual (ENGLISH)
Page 7
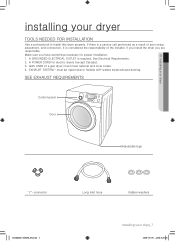
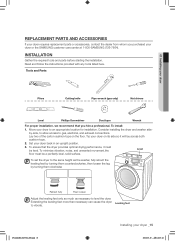
... 3. must meet national and local codes. 4. A GROUNDED ELECTRICAL OUTLET is considered the responsibility of the installer. Make sure you are responsible. 01 Installing your dryer installing your dryer_7 2008-03-25 ¿ÀÈÄ 6:25:39 If there is a service call ...SEE EXHAUST REQUIREMENTS Control panel Door Adjustable legs "Y"-connector DV448AEG-02555A_EN.indd 7 Long inlet hose Rubber washers Installing your dryer TOOLS NEEDED FOR INSTALLATION Hire a professional to install this dryer properly. GAS LINES (if a gas dryer) must be rigid metal or flexible stiff-walled ...
... 3. must meet national and local codes. 4. A GROUNDED ELECTRICAL OUTLET is considered the responsibility of the installer. Make sure you are responsible. 01 Installing your dryer installing your dryer_7 2008-03-25 ¿ÀÈÄ 6:25:39 If there is a service call ...SEE EXHAUST REQUIREMENTS Control panel Door Adjustable legs "Y"-connector DV448AEG-02555A_EN.indd 7 Long inlet hose Rubber washers Installing your dryer TOOLS NEEDED FOR INSTALLATION Hire a professional to install this dryer properly. GAS LINES (if a gas dryer) must be rigid metal or flexible stiff-walled ...
User Manual (ENGLISH)
Page 8
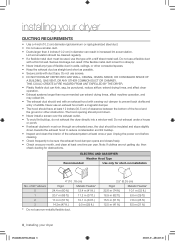
... 14.3m (47 ft.) 9.0 m (29 ft.) * Do not use the type with a magnetic damper. • The hood should point down. • Never install a screen over the exhaust outlet. • To avoid lint buildup, do not exhaust the dryer directly into a window well. Unplug the power cord before cleaning...(74 ft.) 10.1 m (33 ft.) 18.9 m (62 ft.) 8.8 m (29 ft.) 15.5 m (51 ft.) 7.6 m (25 ft.) 12.5 m (41 ft.) 6.5 m (21 ft.) 8_ Installing your dryer DUCTING REQUIREMENTS • Use a 4-inch (10.2 cm) diameter rigid aluminum or rigid galvanized steel duct. • Do not use screws. • DO NOT...
... 14.3m (47 ft.) 9.0 m (29 ft.) * Do not use the type with a magnetic damper. • The hood should point down. • Never install a screen over the exhaust outlet. • To avoid lint buildup, do not exhaust the dryer directly into a window well. Unplug the power cord before cleaning...(74 ft.) 10.1 m (33 ft.) 18.9 m (62 ft.) 8.8 m (29 ft.) 15.5 m (51 ft.) 7.6 m (25 ft.) 12.5 m (41 ft.) 6.5 m (21 ft.) 8_ Installing your dryer DUCTING REQUIREMENTS • Use a 4-inch (10.2 cm) diameter rigid aluminum or rigid galvanized steel duct. • Do not use screws. • DO NOT...
User Manual (ENGLISH)
Page 9
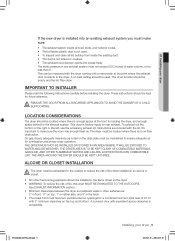
...REMOVE THE DOOR FROM ALL DISCARDED APPLIANCES TO AVOID THE DANGER OF A CHILD WARNING SUFFOCATING. It's important to reduce the risk of fire when installed in the back. • The closet front must have two unobstructed air openings for a combined minimum total area of fire, this dryer MUST ... with equivalent space clearance is factory-ready for future reference. THE AREA AROUND THE DRYER SHOULD BE KEPT LINT-FREE. ALCOVE OR CLOSET INSTALLATION The dryer must be empty and the lint filter clean. These instructions should be located where there is no -heat setting should be ...
...REMOVE THE DOOR FROM ALL DISCARDED APPLIANCES TO AVOID THE DANGER OF A CHILD WARNING SUFFOCATING. It's important to reduce the risk of fire when installed in the back. • The closet front must have two unobstructed air openings for a combined minimum total area of fire, this dryer MUST ... with equivalent space clearance is factory-ready for future reference. THE AREA AROUND THE DRYER SHOULD BE KEPT LINT-FREE. ALCOVE OR CLOSET INSTALLATION The dryer must be empty and the lint filter clean. These instructions should be located where there is no -heat setting should be ...

User Manual (ENGLISH)
Page 10
...materials that has adequate fresh air. NEVER USE A PLASTIC OR NON-METAL FLEXIBLE DUCT. installing your dryer DV448AEG-02555A_EN.indd 10 2008-03-25 ¿ÀÈÄ 6:25:40 Call 1-800-SAMSUNG for more information. EXHAUSTING Exhausting the dryer to the outside with the Outline for use ...with metal. When installing a dryer in an WARNING alcove or closet. Locate an area that will prevent large...
...materials that has adequate fresh air. NEVER USE A PLASTIC OR NON-METAL FLEXIBLE DUCT. installing your dryer DV448AEG-02555A_EN.indd 10 2008-03-25 ¿ÀÈÄ 6:25:40 Call 1-800-SAMSUNG for more information. EXHAUSTING Exhausting the dryer to the outside with the Outline for use ...with metal. When installing a dryer in an WARNING alcove or closet. Locate an area that will prevent large...
User Manual (ENGLISH)
Page 11
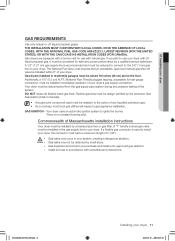
... disconnected from the gas supply pipe system during any liquefied petroleum gas. • As a courtesy, most local gas utilities will inspect a gas appliance installation. Additionally, a 1/8" (0.3 cm) N.P.T. (National Pipe Thread) plugged tapping, accessible for test gauge connection, must be detected by a qualified service technician...smell alone. If a flexible gas connector is recommended and must be raised 18 inches (46 cm) above the floor. THE INSTALLATION MUST CONFORM WITH LOCAL CODES, OR IN THE ABSENCE OF LOCAL CODES, WITH THE NATIONAL FUEL GAS CODE ANSI/Z223.1, LATEST REVISION...
... disconnected from the gas supply pipe system during any liquefied petroleum gas. • As a courtesy, most local gas utilities will inspect a gas appliance installation. Additionally, a 1/8" (0.3 cm) N.P.T. (National Pipe Thread) plugged tapping, accessible for test gauge connection, must be detected by a qualified service technician...smell alone. If a flexible gas connector is recommended and must be raised 18 inches (46 cm) above the floor. THE INSTALLATION MUST CONFORM WITH LOCAL CODES, OR IN THE ABSENCE OF LOCAL CODES, WITH THE NATIONAL FUEL GAS CODE ANSI/Z223.1, LATEST REVISION...

User Manual (ENGLISH)
Page 12
...• WARNING • • Improper connection of the equipment grounding conductor can result in doubt as to the equipment grounding terminal. 12_ Installing your dryer - The plug must be run with local codes, or in the absence of fire, electrical shock, or personal injury, all wiring...be plugged into an appropriate outlet that is to be permanently wired, the dryer must be plugged into an appropriate outlet that is properly installed and grounded in accordance with a qualified electrician or serviceman if you are in a risk of least resistance for your dryer - Latest ...
...• WARNING • • Improper connection of the equipment grounding conductor can result in doubt as to the equipment grounding terminal. 12_ Installing your dryer - The plug must be run with local codes, or in the absence of fire, electrical shock, or personal injury, all wiring...be plugged into an appropriate outlet that is to be permanently wired, the dryer must be plugged into an appropriate outlet that is properly installed and grounded in accordance with a qualified electrician or serviceman if you are in a risk of least resistance for your dryer - Latest ...
User Manual (ENGLISH)
Page 13
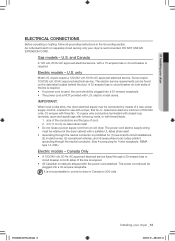
...use with a suitable UL-listed strain relief. • Grounding through the neutral conductor. (Use 4-prong plug for (1) new branch-circuit installations, (2) mobile homes, (3) recreational vehicles, and (4) areas where local codes prohibit grounding through the neutral conductor is U.L. The power cord ... terminated with closed loop terminals, open-end spade lugs with turned up ends, or with U.S. DV448AEG-02555A_EN.indd 13 Installing your dryer ELECTRICAL CONNECTIONS Before operating or testing, follow all grounding instructions in Canada to 208 volts. An individual branch ...
...use with a suitable UL-listed strain relief. • Grounding through the neutral conductor. (Use 4-prong plug for (1) new branch-circuit installations, (2) mobile homes, (3) recreational vehicles, and (4) areas where local codes prohibit grounding through the neutral conductor is U.L. The power cord ... terminated with closed loop terminals, open-end spade lugs with turned up ends, or with U.S. DV448AEG-02555A_EN.indd 13 Installing your dryer ELECTRICAL CONNECTIONS Before operating or testing, follow all grounding instructions in Canada to 208 volts. An individual branch ...
User Manual (ENGLISH)
Page 14
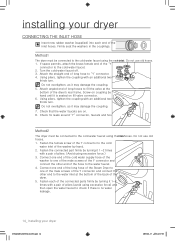
... 7. If space permits, attach the brass female end of pliers. (Avoid using the newhoinslest . Do not overtighten, as it is no water leakage. 14_ Installing your dryer CONNECTING THE INLET HOSE Insert new rubber washer (supplied) into each of the dryer's rear frame. Fasten the female screw of the Y connector...to the cold water faucet using excessive force) and then open the water faucet to check if there is seated on fill valve connector. 6. installing your dryer DV448AEG-02555A-04_EN.indd 14 2009-02-17 ¿ÀÈÄ 4:07:58 Attach angled end of long hoses to the ...
... 7. If space permits, attach the brass female end of pliers. (Avoid using the newhoinslest . Do not overtighten, as it is no water leakage. 14_ Installing your dryer CONNECTING THE INLET HOSE Insert new rubber washer (supplied) into each of the dryer's rear frame. Fasten the female screw of the Y connector...to the cold water faucet using excessive force) and then open the water faucet to check if there is seated on fill valve connector. 6. installing your dryer DV448AEG-02555A-04_EN.indd 14 2009-02-17 ¿ÀÈÄ 4:07:58 Attach angled end of long hoses to the ...
User Manual (ENGLISH)
Page 15
... electrical, and exhaust connections. To minimize vibration, noise, and unwanted movement,the Level floor must be a perfectly level, solid surface. To install: 1. Lay two of the carton cushion-tops on its side so it must be level. by turning them clockwise Retract fully Then loosen Adjust...you purchased your dryer _15 2008-03-25 ¿ÀÈÄ 6:25:46 DV448AEG-02555A_EN.indd 15 Installing your dryer or the SAMSUNG customer care center at 1-800-SAMSUNG (726-7864). Extending the leveling feet more than necessary can cause the dryer Leveling feet to level the ...
... electrical, and exhaust connections. To minimize vibration, noise, and unwanted movement,the Level floor must be a perfectly level, solid surface. To install: 1. Lay two of the carton cushion-tops on its side so it must be level. by turning them clockwise Retract fully Then loosen Adjust...you purchased your dryer _15 2008-03-25 ¿ÀÈÄ 6:25:46 DV448AEG-02555A_EN.indd 15 Installing your dryer or the SAMSUNG customer care center at 1-800-SAMSUNG (726-7864). Extending the leveling feet more than necessary can cause the dryer Leveling feet to level the ...
User Manual (ENGLISH)
Page 16
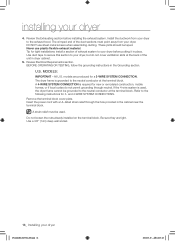
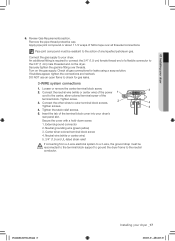
... neutral conductor at the back of exhaust system to the exhaust hood. If the 4-wire system is grounded to your dryer before installing the exhaust system. Remove the terminal block cover plate. Be sure they are produced for new or remodeled construction, mobile homes,.... Tip for 3- Refer to the following instructions for tight installations: install a section of the unit in the cabinet near the terminal block. installing your dryer. and 4-WIRE SYSTEM CONNECTIONS. Use a 3/8" (1cm) deep well socket. 16_ Installing your dryer to your dryer, but do not permit grounding ...
... neutral conductor at the back of exhaust system to the exhaust hood. If the 4-wire system is grounded to your dryer before installing the exhaust system. Remove the terminal block cover plate. Be sure they are produced for new or remodeled construction, mobile homes,.... Tip for 3- Refer to the following instructions for tight installations: install a section of the unit in the cabinet near the terminal block. installing your dryer. and 4-WIRE SYSTEM CONNECTIONS. Use a 3/8" (1cm) deep well socket. 16_ Installing your dryer to your dryer, but do not permit grounding ...
User Manual (ENGLISH)
Page 17
01 Installing your dryer _17 2008-03-25 ¿ÀÈÄ 6:25:49 Pipe joint compound must be resistant to check for leaks using a soap solution. ... is required to the 3/8" (1 cm) male threaded end on the gas supply. Tighten screw. 3. Secure the cover with a hold-down screw. 1. DV448AEG-02555A_EN.indd 17 Installing your dryer 6. Connect the neutral wire (white or center wire) of the power cord to the center, silver-colored terminal screw of a flexible connector to...
01 Installing your dryer _17 2008-03-25 ¿ÀÈÄ 6:25:49 Pipe joint compound must be resistant to check for leaks using a soap solution. ... is required to the 3/8" (1 cm) male threaded end on the gas supply. Tighten screw. 3. Secure the cover with a hold-down screw. 1. DV448AEG-02555A_EN.indd 17 Installing your dryer 6. Connect the neutral wire (white or center wire) of the power cord to the center, silver-colored terminal screw of a flexible connector to...
User Manual (ENGLISH)
Page 18
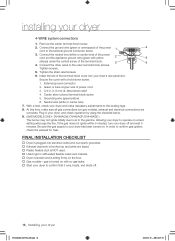
... ignite within 5 minutes, turn your dryer 4-WIRE system connections 1. Tighten screws. 5. Neutral wire (white or center wire) 7. installing your dryer off . 18_ Installing your dryer, and check operation by using the checklist below. 9. (GAS MODELS ONLY- Insert the tab of the terminal block cover...been turned on a heat setting will purge the line. Connect the ground wire (green or unwrapped) of the terminal block. 4. FINAL INSTALLATION CHECKLIST Dryer is turned on gas models), exhaust and electrical connections are taped. Plastic flexible duct is NOT used. ...
... ignite within 5 minutes, turn your dryer 4-WIRE system connections 1. Tighten screws. 5. Neutral wire (white or center wire) 7. installing your dryer off . 18_ Installing your dryer, and check operation by using the checklist below. 9. (GAS MODELS ONLY- Insert the tab of the terminal block cover...been turned on a heat setting will purge the line. Connect the ground wire (green or unwrapped) of the terminal block. 4. FINAL INSTALLATION CHECKLIST Dryer is turned on gas models), exhaust and electrical connections are taped. Plastic flexible duct is NOT used. ...
User Manual (ENGLISH)
Page 19
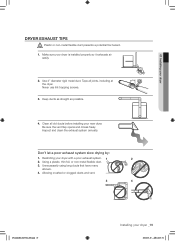
... drying by: 1. Allowing crushed or clogged ducts and vent. 3 4 DV448AEG-02555A_EN.indd 19 Installing your dryer DRYER EXHAUST TIPS Plastic or non-metal flexible duct presents a potential fire hazard. 01 Installing your dryer _19 2008-03-25 ¿ÀÈÄ 6:25:52 Tape all old ducts... new dryer. Keep ducts as straight as possible. 4. Inspect and clean the exhaust system annually. Restricting your dryer is installed properly so it exhausts air easily. 2. Using a plastic, thin foil, or non-metal flexible duct. 3. WARNING 1. Unnecessarily using long ducts that have...
... drying by: 1. Allowing crushed or clogged ducts and vent. 3 4 DV448AEG-02555A_EN.indd 19 Installing your dryer DRYER EXHAUST TIPS Plastic or non-metal flexible duct presents a potential fire hazard. 01 Installing your dryer _19 2008-03-25 ¿ÀÈÄ 6:25:52 Tape all old ducts... new dryer. Keep ducts as straight as possible. 4. Inspect and clean the exhaust system annually. Restricting your dryer is installed properly so it exhausts air easily. 2. Using a plastic, thin foil, or non-metal flexible duct. 3. WARNING 1. Unnecessarily using long ducts that have...
User Manual (ENGLISH)
Page 20
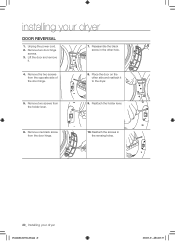
... screws. 3. Lift the door and remove it to the dryer. 5. Reassemble the black screw in the remaing holes. 20_ Installing your dryer DOOR REVERSAL 1. Place the door on the other hole. 4. installing your dryer DV448AEG-02555A_EN.indd 20 2008-03-25 ¿ÀÈÄ 6:25:55 Remove one black screw from...
... screws. 3. Lift the door and remove it to the dryer. 5. Reassemble the black screw in the remaing holes. 20_ Installing your dryer DOOR REVERSAL 1. Place the door on the other hole. 4. installing your dryer DV448AEG-02555A_EN.indd 20 2008-03-25 ¿ÀÈÄ 6:25:55 Remove one black screw from...
User Manual (ENGLISH)
Page 25
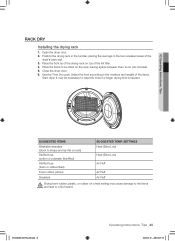
02 Operating Instructions, Tips RACK DRY Installing the drying rack 1. Select the time according to reset the timer if a longer drying time is needed. It may cause damage to the items WARNING ...
02 Operating Instructions, Tips RACK DRY Installing the drying rack 1. Select the time according to reset the timer if a longer drying time is needed. It may cause damage to the items WARNING ...


