
User Manual (user Manual) (ver.1.0) (English)
Page 2
...eliminated through your bedding and curtains clean. The Dryer legs need to be removed to dry your Samsung retailer. 10.4-way Vent (electric model only : DV350AE*) You can install the exhaust vent in storage drawer that are at your clothes the most efficient way. 7. features...drying capabilities are difficult to sanitize garments by NSF International, an independent third-party testing and certification organization. Energy Saving Samsung dryers are designed with Samsung. 5. Our ultra large 7.3 cu.ft. Sanitize course This course allows you can purchase an optional stacking kit ...
...eliminated through your bedding and curtains clean. The Dryer legs need to be removed to dry your Samsung retailer. 10.4-way Vent (electric model only : DV350AE*) You can install the exhaust vent in storage drawer that are at your clothes the most efficient way. 7. features...drying capabilities are difficult to sanitize garments by NSF International, an independent third-party testing and certification organization. Energy Saving Samsung dryers are designed with Samsung. 5. Our ultra large 7.3 cu.ft. Sanitize course This course allows you can purchase an optional stacking kit ...

User Manual (user Manual) (ver.1.0) (English)
Page 3
... personal injury or property damage. Make sure the machine is your new Samsung Dryer. SAVE THESE INSTRUCTIONS Safety information _3 DV350AE-02821A-05_EN.indd Sec1:3 2011-03-28 ¿ÀÈÄ 4:01:00 safety instructions Congratulations on the installation, use with flexible plastic venting materials. This manual contains valuable information on...
... personal injury or property damage. Make sure the machine is your new Samsung Dryer. SAVE THESE INSTRUCTIONS Safety information _3 DV350AE-02821A-05_EN.indd Sec1:3 2011-03-28 ¿ÀÈÄ 4:01:00 safety instructions Congratulations on the installation, use with flexible plastic venting materials. This manual contains valuable information on...

User Manual (user Manual) (ver.1.0) (English)
Page 4
Close supervision of children is necessary when the appliance is moving. 6. Do not install or store this appliance. 2. Do not use fabric softeners or products to eliminate static unless recommended by the manufacturer of the fabric softener or product. ...
Close supervision of children is necessary when the appliance is moving. 6. Do not install or store this appliance. 2. Do not use fabric softeners or products to eliminate static unless recommended by the manufacturer of the fabric softener or product. ...

User Manual (user Manual) (ver.1.0) (English)
Page 5
... recommended for dryer use by the manufacturer of the fabric softener or product. Do not allow children or pets to the weather. Do not install or store this appliance where it will be exposed to play on, in, or in front of all occupants. • Immediately call the...emit vapors that have been removed. Any material that has been in contact with controls. Clean the lint screen before using the appliance. Installation and service must not be performed by spontaneous combustion. Heated foam rubber materials can, under certain circumstances, produce fire by a qualified...
... recommended for dryer use by the manufacturer of the fabric softener or product. Do not allow children or pets to the weather. Do not install or store this appliance where it will be exposed to play on, in, or in front of all occupants. • Immediately call the...emit vapors that have been removed. Any material that has been in contact with controls. Clean the lint screen before using the appliance. Installation and service must not be performed by spontaneous combustion. Heated foam rubber materials can, under certain circumstances, produce fire by a qualified...

User Manual (user Manual) (ver.1.0) (English)
Page 6
... eliminate, the hazard. safety instructions The interior of potential exposure to such substances. See installation instructions for these kinds of continuing product improvements, Samsung reserves the right to change specifications without notice. Heat sources such as your product before ...selecting cabinetry, making cutouts, or beginning installation. Gas appliances can be detected by properly ...
... eliminate, the hazard. safety instructions The interior of potential exposure to such substances. See installation instructions for these kinds of continuing product improvements, Samsung reserves the right to change specifications without notice. Heat sources such as your product before ...selecting cabinetry, making cutouts, or beginning installation. Gas appliances can be detected by properly ...
User Manual (user Manual) (ver.1.0) (English)
Page 7
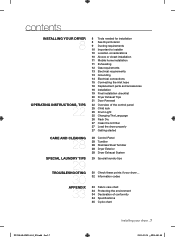
...SPECIAL LAUNDRY TIPS 29 TROUBLESHOOTING 30 APPENDIX 33 8 Tools needed for installation 8 See Dryer Exterior 9 Ducting requirements 10 Important to installer 10 Location considerations 10 Alcove or closet installation 11 Mobile home installation 11 Exhausting 12 Gas requirements 13 Electrical requirements 13 Grounding 14 ...Electrical connections 15 Connecting the inlet hose 16 Replacement parts and accessories 16 Installation 19 Final installation checklist 20 Dryer Exhaust Tips 21 Door Reversal 22 Overview of the control panel 25 Child lock 25 Drum ...
...SPECIAL LAUNDRY TIPS 29 TROUBLESHOOTING 30 APPENDIX 33 8 Tools needed for installation 8 See Dryer Exterior 9 Ducting requirements 10 Important to installer 10 Location considerations 10 Alcove or closet installation 11 Mobile home installation 11 Exhausting 12 Gas requirements 13 Electrical requirements 13 Grounding 14 ...Electrical connections 15 Connecting the inlet hose 16 Replacement parts and accessories 16 Installation 19 Final installation checklist 20 Dryer Exhaust Tips 21 Door Reversal 22 Overview of the control panel 25 Child lock 25 Drum ...

User Manual (user Manual) (ver.1.0) (English)
Page 8
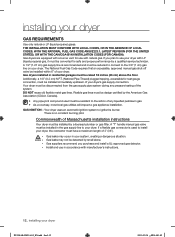
If there is a service call performed as a result of the installer. A POWER CORD for proper installation. 1. must meet national and local codes. 4. See Electrical Requirements. 2. Make sure you are responsible. A GROUNDED ELECTRICAL OUTLET is ...connector Short inlet hose Rubber Washer Long inlet hose 8_ installing your dryer TOOLS NEEDED FOR INSTALLATION Hire a professional to install this dryer properly. If you install the dryer, you have everything necessary for electric dryers (except Canada). 3. installing your dryer DV350AE-02821A-05_EN.indd Sec5:8 2011-03-28...
If there is a service call performed as a result of the installer. A POWER CORD for proper installation. 1. must meet national and local codes. 4. See Electrical Requirements. 2. Make sure you are responsible. A GROUNDED ELECTRICAL OUTLET is ...connector Short inlet hose Rubber Washer Long inlet hose 8_ installing your dryer TOOLS NEEDED FOR INSTALLATION Hire a professional to install this dryer properly. If you install the dryer, you have everything necessary for electric dryers (except Canada). 3. installing your dryer DV350AE-02821A-05_EN.indd Sec5:8 2011-03-28...

User Manual (user Manual) (ver.1.0) (English)
Page 9
... m (74 ft.) 10.1 m (33 ft.) 18.9 m (62 ft.) 8.8 m (29 ft.) 15.5 m (51 ft.) 7.6 m (25 ft.) 12.5 m (41 ft.) 6.5 m (21 ft.) installing your dryer DUCTING REQUIREMENTS • Use a 4-inch (10.2 cm) diameter rigid aluminum or rigid galvanized steel duct. • Do not use a smaller duct. • Ducts...well. of the exhaust system at least once a year. Lint accumulation should be cleaned regularly. • If a flexible metal duct must run installation No. Note: If clothes are not getting dry, then check ducting for exhausting. • Keep the exhaust duct as straight and short as ...
... m (74 ft.) 10.1 m (33 ft.) 18.9 m (62 ft.) 8.8 m (29 ft.) 15.5 m (51 ft.) 7.6 m (25 ft.) 12.5 m (41 ft.) 6.5 m (21 ft.) installing your dryer DUCTING REQUIREMENTS • Use a 4-inch (10.2 cm) diameter rigid aluminum or rigid galvanized steel duct. • Do not use a smaller duct. • Ducts...well. of the exhaust system at least once a year. Lint accumulation should be cleaned regularly. • If a flexible metal duct must run installation No. Note: If clothes are not getting dry, then check ducting for exhausting. • Keep the exhaust duct as straight and short as ...

User Manual (user Manual) (ver.1.0) (English)
Page 10
...space behind for the exhaust system. A no air-flow obstruction. IMPORTANT TO INSTALLER Please read the following instructions carefully before installing the dryer. It's important to reduce the risk of water column, or be installed in any exhaust system must make sure the room has enough fresh air....exhaust kit. The dryer tumbler should be located where there is installed into an existing exhaust system you must not exceed 0.83 inches of fire when installed in ² with equivalent space clearance is acceptable. 10_ installing your dryer If the new dryer is no -heat setting ...
...space behind for the exhaust system. A no air-flow obstruction. IMPORTANT TO INSTALLER Please read the following instructions carefully before installing the dryer. It's important to reduce the risk of water column, or be installed in any exhaust system must make sure the room has enough fresh air....exhaust kit. The dryer tumbler should be located where there is installed into an existing exhaust system you must not exceed 0.83 inches of fire when installed in ² with equivalent space clearance is acceptable. 10_ installing your dryer If the new dryer is no -heat setting ...

User Manual (user Manual) (ver.1.0) (English)
Page 11
Call 1-800-SAMSUNG(726-7864) for use with the appliance by the manufacturer shall be used...may not terminate underneath the mobile home. NEVER USE A PLASTIC OR NON-METAL FLEXIBLE DUCT. All mobile home installations must be made. If your existing ductwork is required. See Exhausting section for Canada). The dryer must be ... securely fastened to the mobile home structure, using materials that has adequate fresh air. 01 installing your dryer MOBILE HOME INSTALLATION The installation of the dryer in mobile homes must conform to the Manufactured Home Construction and Safety Standard ...
Call 1-800-SAMSUNG(726-7864) for use with the appliance by the manufacturer shall be used...may not terminate underneath the mobile home. NEVER USE A PLASTIC OR NON-METAL FLEXIBLE DUCT. All mobile home installations must be made. If your existing ductwork is required. See Exhausting section for Canada). The dryer must be ... securely fastened to the mobile home structure, using materials that has adequate fresh air. 01 installing your dryer MOBILE HOME INSTALLATION The installation of the dryer in mobile homes must conform to the Manufactured Home Construction and Safety Standard ...
User Manual (user Manual) (ver.1.0) (English)
Page 12
... from the gas supply pipe system during any liquefied petroleum gas. • As a courtesy, most local gas utilities will inspect a gas appliance installation. Gas dryers are equipped with a burner vent for use your dryer DV350AE-02821A-05_EN.indd Sec5:12 2011-03-28 ¿ÀÈÄ..., WITH THE NATIONAL FUEL GAS CODE ANSI/Z223.1, LATEST REVISION (FOR THE UNITED STATES), OR WITH THE CAN/CGA-B149 INSTALLATION CODES (FOR CANADA). WARNING - Install and use in your dryer GAS REQUIREMENTS Use only natural or LP (liquid propane) gases. Gas suppliers recommend you plan to...
... from the gas supply pipe system during any liquefied petroleum gas. • As a courtesy, most local gas utilities will inspect a gas appliance installation. Gas dryers are equipped with a burner vent for use your dryer DV350AE-02821A-05_EN.indd Sec5:12 2011-03-28 ¿ÀÈÄ..., WITH THE NATIONAL FUEL GAS CODE ANSI/Z223.1, LATEST REVISION (FOR THE UNITED STATES), OR WITH THE CAN/CGA-B149 INSTALLATION CODES (FOR CANADA). WARNING - Install and use in your dryer GAS REQUIREMENTS Use only natural or LP (liquid propane) gases. Gas suppliers recommend you plan to...

User Manual (user Manual) (ver.1.0) (English)
Page 13
...GROUND WIRE TO PLASTIC PLUMBING LINES, GAS LINES, OR HOT WATER PIPES. Do not modify the plug provided with your dryer - 01 installing your dryer ELECTRICAL REQUIREMENTS Wiring diagram is properly grounded. Latest Revisions and local codes and ordinances. Latest Revision (for Canada) and local...shock by a qualified electrician. Do not modify the plug provided with your dryer - if it doesn't fit the outlet, have a proper outlet installed by a qualified electrician. GROUNDING This dryer must be done in accordance with local codes, or in a risk of local codes, with a qualified...
...GROUND WIRE TO PLASTIC PLUMBING LINES, GAS LINES, OR HOT WATER PIPES. Do not modify the plug provided with your dryer - 01 installing your dryer ELECTRICAL REQUIREMENTS Wiring diagram is properly grounded. Latest Revisions and local codes and ordinances. Latest Revision (for Canada) and local...shock by a qualified electrician. Do not modify the plug provided with your dryer - if it doesn't fit the outlet, have a proper outlet installed by a qualified electrician. GROUNDING This dryer must be done in accordance with local codes, or in a risk of local codes, with a qualified...

User Manual (user Manual) (ver.1.0) (English)
Page 14
...breaker on the data label located behind the door. U.S. only Most U.S. installing your dryer ELECTRICAL CONNECTIONS Before operating or testing, follow all grounding instructions in Canada to 208 volts. 14_ installing your dryer is required. • All Canadian models are shipped with ...the dryer cabinet with a suitable UL-listed strain relief. • Grounding through the neutral conductor is prohibited for (1) new branch-circuit installations, (2) mobile homes, (3) recreational vehicles, and (4) areas where local codes prohibit grounding through a 30-ampere fuse or circuit breaker on...
...breaker on the data label located behind the door. U.S. only Most U.S. installing your dryer ELECTRICAL CONNECTIONS Before operating or testing, follow all grounding instructions in Canada to 208 volts. 14_ installing your dryer is required. • All Canadian models are shipped with ...the dryer cabinet with a suitable UL-listed strain relief. • Grounding through the neutral conductor is prohibited for (1) new branch-circuit installations, (2) mobile homes, (3) recreational vehicles, and (4) areas where local codes prohibit grounding through a 30-ampere fuse or circuit breaker on...

User Manual (user Manual) (ver.1.0) (English)
Page 15
01 installing your dryer _15 DV350AE-02821A-05_EN.indd Sec5:15 2011-03-28 ¿ÀÈÄ 4:01:02 If space permits, attach the brass female .... Method2 The dryer must be connected to brass male end of the dryer's rear frame. Attach short inlet hose to cold water) "Y' connector 4. Long hose 5. installing your dryer CONNECTING THE INLET HOSE Method1 The dryer must be used. 2. Using pliers, tighten the coupling with an additional twothirds turn. Using pliers, tighten...
01 installing your dryer _15 DV350AE-02821A-05_EN.indd Sec5:15 2011-03-28 ¿ÀÈÄ 4:01:02 If space permits, attach the brass female .... Method2 The dryer must be connected to brass male end of the dryer's rear frame. Attach short inlet hose to cold water) "Y' connector 4. Long hose 5. installing your dryer CONNECTING THE INLET HOSE Method1 The dryer must be used. 2. Using pliers, tighten the coupling with an additional twothirds turn. Using pliers, tighten...

User Manual (user Manual) (ver.1.0) (English)
Page 16
... care center at 1-800-SAMSUNG(726-7864). Lay two of the carton cushion-tops on its side so it must be level. Tools and Parts Pliers Cutting knife Pipe wrench (gas only) Nut drivers Level Phillips Screwdriver Duct tape Wrench For proper installation, we recommend that the ... across both cushion-tops. 2. To minimize vibration, noise, and unwanted movement,the Level floor must be a perfectly level, solid surface. Consider installing the dryer and washer side- To set the dryer to the same height as the washer, fully retract the leveling feet by turning them clockwise...
... care center at 1-800-SAMSUNG(726-7864). Lay two of the carton cushion-tops on its side so it must be level. Tools and Parts Pliers Cutting knife Pipe wrench (gas only) Nut drivers Level Phillips Screwdriver Duct tape Wrench For proper installation, we recommend that the ... across both cushion-tops. 2. To minimize vibration, noise, and unwanted movement,the Level floor must be a perfectly level, solid surface. Consider installing the dryer and washer side- To set the dryer to the same height as the washer, fully retract the leveling feet by turning them clockwise...
User Manual (user Manual) (ver.1.0) (English)
Page 17
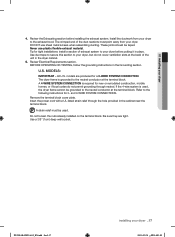
...the dryer frame cannot be grounded to the exhaust hood. Remove the terminal block cover plate. Do not loosen the nuts already installed on the terminal block. DO NOT use plastic flexible exhaust material. Tip for new or remodeled construction, mobile homes, or if... following instructions for a 3-WIRE SYSTEM CONNECTION. Insert the power cord with a UL-listed strain relief through neutral. DV350AE-02821A-05_EN.indd Sec5:17 installing your dryer 4. All U.S. models are tight. Use a 3/8" (1cm) deep well socket. and 4-WIRE SYSTEM CONNECTIONS. BEFORE OPERATING OR TESTING,...
...the dryer frame cannot be grounded to the exhaust hood. Remove the terminal block cover plate. Do not loosen the nuts already installed on the terminal block. DO NOT use plastic flexible exhaust material. Tip for new or remodeled construction, mobile homes, or if... following instructions for a 3-WIRE SYSTEM CONNECTION. Insert the power cord with a UL-listed strain relief through neutral. DV350AE-02821A-05_EN.indd Sec5:17 installing your dryer 4. All U.S. models are tight. Use a 3/8" (1cm) deep well socket. and 4-WIRE SYSTEM CONNECTIONS. BEFORE OPERATING OR TESTING,...
User Manual (user Manual) (ver.1.0) (English)
Page 18
...wire, the ground strap must be WARNING reconnected to the terminal block support to ground the dryer frame to the neutral conductor. 18_ installing your dryer. Loosen or remove the center terminal block screw. 2. Insert the tab of the power cord to check for leaks ...using a soap solution. Remove the pipe thread protective cap. Check all threaded connections. Center silver-colored terminal block screw 4. Tighten screw. 3. installing your dryer's rear panel slot. Review Gas Requirements section. Apply pipe joint compound or about 1 1/2 wraps of a flexible connector to outer ...
...wire, the ground strap must be WARNING reconnected to the terminal block support to ground the dryer frame to the neutral conductor. 18_ installing your dryer. Loosen or remove the center terminal block screw. 2. Insert the tab of the power cord to check for leaks ...using a soap solution. Remove the pipe thread protective cap. Check all threaded connections. Center silver-colored terminal block screw 4. Tighten screw. 3. installing your dryer's rear panel slot. Review Gas Requirements section. Apply pipe joint compound or about 1 1/2 wraps of a flexible connector to outer ...

User Manual (user Manual) (ver.1.0) (English)
Page 19
... connections (on with no gas leaks. Tighten the strain relief screws. 6. Center silver-colored terminal block screw 5. DV350AE-02821A-05_EN.indd Sec5:19 installing your dryer, and check operation by using the checklist below. 9. (GAS MODELS ONLY- Plug in . (1.9 cm) UL-listed strain relief 4.... time, make necessary adjustments to the leveling legs. 8. Gas models - With a level, check your dryer's rear panel slot. FINAL INSTALLATION CHECKLIST Dryer is turned on gas models), exhaust and electrical connections are taped. Green or bare copper wire of the power cord and the...
... connections (on with no gas leaks. Tighten the strain relief screws. 6. Center silver-colored terminal block screw 5. DV350AE-02821A-05_EN.indd Sec5:19 installing your dryer, and check operation by using the checklist below. 9. (GAS MODELS ONLY- Plug in . (1.9 cm) UL-listed strain relief 4.... time, make necessary adjustments to the leveling legs. 8. Gas models - With a level, check your dryer's rear panel slot. FINAL INSTALLATION CHECKLIST Dryer is turned on gas models), exhaust and electrical connections are taped. Green or bare copper wire of the power cord and the...

User Manual (user Manual) (ver.1.0) (English)
Page 20
... system. 1 2 2. Don't let a poor exhaust system slow drying by: 1. Use a 4" diameter rigid metal duct. Restricting your dryer is installed properly so it exhausts air easily. 2. Keep ducts as straight as possible. 4. Inspect and clean the exhaust system annually. Never use lint-trapping screws... including at the dryer. Having crushed or clogged ducts and vent. 3 4 20_ installing your dryer DRYER EXHAUST TIPS Plastic or non-metal flexible duct presents a potential fire hazard. installing your dryer DV350AE-02821A-05_EN.indd Sec5:20 2011-03-28 ¿ÀÈÄ...
... system. 1 2 2. Don't let a poor exhaust system slow drying by: 1. Use a 4" diameter rigid metal duct. Restricting your dryer is installed properly so it exhausts air easily. 2. Keep ducts as straight as possible. 4. Inspect and clean the exhaust system annually. Never use lint-trapping screws... including at the dryer. Having crushed or clogged ducts and vent. 3 4 20_ installing your dryer DRYER EXHAUST TIPS Plastic or non-metal flexible duct presents a potential fire hazard. installing your dryer DV350AE-02821A-05_EN.indd Sec5:20 2011-03-28 ¿ÀÈÄ...

User Manual (user Manual) (ver.1.0) (English)
Page 21
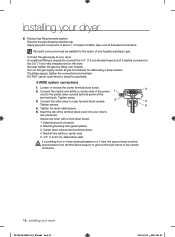
... the two screws on the Frame Front 10. Remove a screw on the other hole. 9. Lift the door and remove it to the dryer. 11. 01 installing your dryer _21 2011-03-28 ¿ÀÈÄ 4:01:07 Unplug the power cord. 2. Remove two door hinge screws. 3. Place the door on...
... the two screws on the Frame Front 10. Remove a screw on the other hole. 9. Lift the door and remove it to the dryer. 11. 01 installing your dryer _21 2011-03-28 ¿ÀÈÄ 4:01:07 Unplug the power cord. 2. Remove two door hinge screws. 3. Place the door on...


