User Manual (ENGLISH)
Page 7
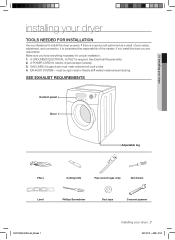
... call performed as a result of poor setup, adjustment, and connection, it is required. SEE EXHAUST REQUIREMENTS Control panel Door Adjustable leg Pliers Cutting knife Pipe wrench (gas only) Nut drivers Level Phillips Screwdriver Duct tape Crescent spanner DV337AEW-02453A-04_EN.indd 7 Installing your dryer TOOLS NEEDED FOR INSTALLATION Hire a professional to install...
... call performed as a result of poor setup, adjustment, and connection, it is required. SEE EXHAUST REQUIREMENTS Control panel Door Adjustable leg Pliers Cutting knife Pipe wrench (gas only) Nut drivers Level Phillips Screwdriver Duct tape Crescent spanner DV337AEW-02453A-04_EN.indd 7 Installing your dryer TOOLS NEEDED FOR INSTALLATION Hire a professional to install...
User Manual (ENGLISH)
Page 15
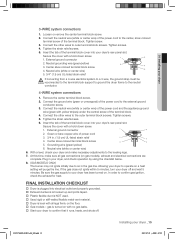
...with all gas connections (on gas models), exhaust and electrical connections are complete. With a level, check your dryer's rear panel slot. At this time, make necessary adjustments to the leveling legs. 7. If the gas does not ignite within 5 minutes, turn your dryer to the outer.... 5. Tighten the strain relief screws. 6. Center silver-colored terminal block screw 5. Allowing your dryer off . External ground connector 2. gas is level with a hold -down screw. 1. Installing your dryer to your dryer 3-WIRE system connections 1. Tighten the strain relief screws. 5. Be sure ...
...with all gas connections (on gas models), exhaust and electrical connections are complete. With a level, check your dryer's rear panel slot. At this time, make necessary adjustments to the leveling legs. 7. If the gas does not ignite within 5 minutes, turn your dryer to the outer.... 5. Tighten the strain relief screws. 6. Center silver-colored terminal block screw 5. Allowing your dryer off . External ground connector 2. gas is level with a hold -down screw. 1. Installing your dryer to your dryer 3-WIRE system connections 1. Tighten the strain relief screws. 5. Be sure ...

