User Manual (user Manual) (ver.1.0) (English)
Page 3
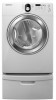
... this manual to minimize the risk of fire or explosion or to the manufacturer's instructions and local codes. • Do not install a clothes dryer with clothes dryers. Always contact your dryer's many benefits and features. WHAT YOU NEED TO KNOW ABOUT SAFETY INSTRUCTIONS...injury or death. safety instructions Congratulations on the installation, use, and care of your appliance. Make sure the machine is installed, it must be easily crushed, and trap lint. This manual contains valuable information on your new Samsung Dryer. IMPORTANT SAFETY SYMBOLS AND PRECAUTIONS WARNING CAUTION...
... this manual to minimize the risk of fire or explosion or to the manufacturer's instructions and local codes. • Do not install a clothes dryer with clothes dryers. Always contact your dryer's many benefits and features. WHAT YOU NEED TO KNOW ABOUT SAFETY INSTRUCTIONS...injury or death. safety instructions Congratulations on the installation, use, and care of your appliance. Make sure the machine is installed, it must be easily crushed, and trap lint. This manual contains valuable information on your new Samsung Dryer. IMPORTANT SAFETY SYMBOLS AND PRECAUTIONS WARNING CAUTION...
User Manual (user Manual) (ver.1.0) (English)
Page 4
...opening and surrounding areas free from becoming trapped inside. Read all occupants. • Immediately call your gas supplier, call the fire department. Do not install or store this appliance where it will be dried on , in, or in front of the appliance unless specifically recommended in your dryer from service... and exhaust duct should be placed in contact with a cleaning solvent or flammable liquids or solids should not be cleaned periodically by a qualified installer, service agency, or the gas supplier. Installation and service must not be exposed to the weather.
...opening and surrounding areas free from becoming trapped inside. Read all occupants. • Immediately call your gas supplier, call the fire department. Do not install or store this appliance where it will be dried on , in, or in front of the appliance unless specifically recommended in your dryer from service... and exhaust duct should be placed in contact with a cleaning solvent or flammable liquids or solids should not be cleaned periodically by a qualified installer, service agency, or the gas supplier. Installation and service must not be exposed to the weather.
User Manual (user Manual) (ver.1.0) (English)
Page 5
...are hot. Gas leaks may prevent heat from escaping and can warm these oils. Residual oil on top of continuing product improvements, Samsung reserves the right to reduce their temperature. WARNING coins, knives, pins, etc. WARNING Gas leaks may contain significant amounts of items...items, allowing an oxidation reaction in a dangerous situation. Heat sources such as your product before selecting cabinetry, making cutouts, or beginning installation. All washed and unwashed fabrics that have run through the Cool Down cycle. Do not sit on clothing can be properly grounded. ...
...are hot. Gas leaks may prevent heat from escaping and can warm these oils. Residual oil on top of continuing product improvements, Samsung reserves the right to reduce their temperature. WARNING coins, knives, pins, etc. WARNING Gas leaks may contain significant amounts of items...items, allowing an oxidation reaction in a dangerous situation. Heat sources such as your product before selecting cabinetry, making cutouts, or beginning installation. All washed and unwashed fabrics that have run through the Cool Down cycle. Do not sit on clothing can be properly grounded. ...

User Manual (user Manual) (ver.1.0) (English)
Page 6
... Exhausting 11 Gas requirements 12 Electrical requirements 12 Grounding 13 Electrical connections 14 Replacement parts and accessories 14 Installation 17 Final installation checklist 18 Dryer Exhaust Tips 19 Door Reversal 20 Overview of the control panel 22 Child lock 23 Rack Dry 24 Clean the lint filter ...
... Exhausting 11 Gas requirements 12 Electrical requirements 12 Grounding 13 Electrical connections 14 Replacement parts and accessories 14 Installation 17 Final installation checklist 18 Dryer Exhaust Tips 19 Door Reversal 20 Overview of the control panel 22 Child lock 23 Rack Dry 24 Clean the lint filter ...
User Manual (user Manual) (ver.1.0) (English)
Page 7
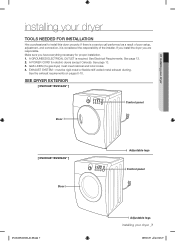
... ] Door Adjustable legs Control panel DV218AEW-02568A-02_EN.indd 7 Adjustable legs installing your dryer TOOLS NEEDED FOR INSTALLATION Hire a professional to install this dryer properly. Make sure you are responsible. A POWER CORD for proper installation. 1. must meet national and local codes. 4. See the exhaust requirements on...connection, it is required. If there is a service call performed as a result of the installer. See page 12. 2. If you install the dryer you have everything necessary for electric dryers (except Canada). See page 13. 3. See Electrical Requirements.
... ] Door Adjustable legs Control panel DV218AEW-02568A-02_EN.indd 7 Adjustable legs installing your dryer TOOLS NEEDED FOR INSTALLATION Hire a professional to install this dryer properly. Make sure you are responsible. A POWER CORD for proper installation. 1. must meet national and local codes. 4. See the exhaust requirements on...connection, it is required. If there is a service call performed as a result of the installer. See page 12. 2. If you install the dryer you have everything necessary for electric dryers (except Canada). See page 13. 3. See Electrical Requirements.
User Manual (user Manual) (ver.1.0) (English)
Page 8
...(74 ft.) 10.1 m (33 ft.) 18.9 m (62 ft.) 8.8 m (29 ft.) 15.5 m (51 ft.) 7.6 m (25 ft.) 12.5 m (41 ft.) 6.5 m (21 ft.) 8_ installing your dryer DUCTING REQUIREMENTS • Use a 4-inch (10.2 cm) diameter rigid aluminum or rigid galvanized steel duct. • Do not use screws. • DO NOT...affect dryer operation. • Exhaust systems longer than 4 inches (10.2 cm) in diameter can result in walls, ceilings, or other obstruction. installing your dryer DV218AEW-02568A-02_EN.indd 8 2009-01-09 ¿ÀÀü 11:43:28 The hood opening should be cleaned regularly. &#...
...(74 ft.) 10.1 m (33 ft.) 18.9 m (62 ft.) 8.8 m (29 ft.) 15.5 m (51 ft.) 7.6 m (25 ft.) 12.5 m (41 ft.) 6.5 m (21 ft.) 8_ installing your dryer DUCTING REQUIREMENTS • Use a 4-inch (10.2 cm) diameter rigid aluminum or rigid galvanized steel duct. • Do not use screws. • DO NOT...affect dryer operation. • Exhaust systems longer than 4 inches (10.2 cm) in diameter can result in walls, ceilings, or other obstruction. installing your dryer DV218AEW-02568A-02_EN.indd 8 2009-01-09 ¿ÀÀü 11:43:28 The hood opening should be cleaned regularly. &#...
User Manual (user Manual) (ver.1.0) (English)
Page 9
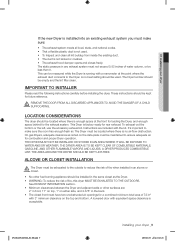
... OTHER FLAMMABLE VAPORS AND LIQUIDS. A louvered door with equivalent space clearance is factory-ready for combustion and proper Dryer operation. ALCOVE OR CLOSET INSTALLATION The Dryer must be exhausted to the outside to ensure adequate air for rear exhaust. These instructions should be less than 0. A DRYER PRODUCES...front, 17" on top, 1" on the data plate must have two unobstructed air openings for the exhaust system. A no air-flow obstruction. 01 installing your dryer _9 2009-01-09 ¿ÀÀü 11:43:28 This can be used . • To Inspect and clean all lint ...
... OTHER FLAMMABLE VAPORS AND LIQUIDS. A louvered door with equivalent space clearance is factory-ready for combustion and proper Dryer operation. ALCOVE OR CLOSET INSTALLATION The Dryer must be exhausted to the outside to ensure adequate air for rear exhaust. These instructions should be less than 0. A DRYER PRODUCES...front, 17" on top, 1" on the data plate must have two unobstructed air openings for the exhaust system. A no air-flow obstruction. 01 installing your dryer _9 2009-01-09 ¿ÀÀü 11:43:28 This can be used . • To Inspect and clean all lint ...
User Manual (user Manual) (ver.1.0) (English)
Page 10
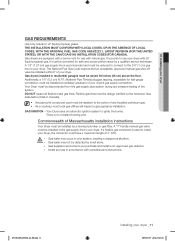
...Standards Z240 (for anchoring the Dryer to the floor must conform to the outside will not support combustion. When installing a Dryer in a mobile home, provisions for Canada). Call 1-800-SAMSUNG for more information. EXHAUSTING Exhausting the Dryer to the local codes. Outside the U.S. A minimum of 72 in.... If your dryer DV218AEW-02568A-02_EN.indd 10 2009-01-09 ¿ÀÀü 11:43:28 installing your dryer MOBILE HOME INSTALLATION The installation of the Dryer in mobile homes must be assembled with screws or other fastening means that extend into the room...
...Standards Z240 (for anchoring the Dryer to the floor must conform to the outside will not support combustion. When installing a Dryer in a mobile home, provisions for Canada). Call 1-800-SAMSUNG for more information. EXHAUSTING Exhausting the Dryer to the local codes. Outside the U.S. A minimum of 72 in.... If your dryer DV218AEW-02568A-02_EN.indd 10 2009-01-09 ¿ÀÀü 11:43:28 installing your dryer MOBILE HOME INSTALLATION The installation of the Dryer in mobile homes must be assembled with screws or other fastening means that extend into the room...
User Manual (user Manual) (ver.1.0) (English)
Page 11
.... Gas suppliers recommend you plan to your dryer's gas supply connection. DO NOT reuse old flexible metal gas lines. Flexible gas lines must be installed immediately upstream of your system, creating a dangerous situation. Additionally, a 1/8" (0.3 cm) N.P.T. (National Pipe Thread) plugged tapping, accessible for use... your dryer. Your Dryer must be converted for safe and proper performance by a licensed plumber or gas fitter. Gas dryers installed in the gas supply line to use your dryer. Your Dryer uses an automatic ignition system to the action of any pressure...
.... Gas suppliers recommend you plan to your dryer's gas supply connection. DO NOT reuse old flexible metal gas lines. Flexible gas lines must be installed immediately upstream of your system, creating a dangerous situation. Additionally, a 1/8" (0.3 cm) N.P.T. (National Pipe Thread) plugged tapping, accessible for use... your dryer. Your Dryer must be converted for safe and proper performance by a licensed plumber or gas fitter. Gas dryers installed in the gas supply line to use your dryer. Your Dryer uses an automatic ignition system to the action of any pressure...
User Manual (user Manual) (ver.1.0) (English)
Page 12
... must be grounded. The plug must be run with the circuit conductors and connected to whether your Dryer is properly grounded. B149 Installation Codes - The plug must be done in accordance with your Dryer - If a power cord is not used and the Electric ... plug. It is your responsibility to provide adequate electrical services for your Dryer. if it doesn't fit the outlet, have a proper outlet installed by a qualified electrician. Gas models Your Dryer has a cord with your Dryer - GROUNDING This Dryer must be plugged into an appropriate outlet...
... must be grounded. The plug must be run with the circuit conductors and connected to whether your Dryer is properly grounded. B149 Installation Codes - The plug must be done in accordance with your Dryer - If a power cord is not used and the Electric ... plug. It is your responsibility to provide adequate electrical services for your Dryer. if it doesn't fit the outlet, have a proper outlet installed by a qualified electrician. Gas models Your Dryer has a cord with your Dryer - GROUNDING This Dryer must be plugged into an appropriate outlet...
User Manual (user Manual) (ver.1.0) (English)
Page 13
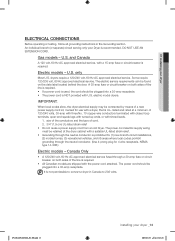
...be connected by means of a new power supply cord kit, marked for use with a dryer, that is prohibited for (1) new branch-circuit installations, (2) mobile homes, (3) recreational vehicles, and (4) areas where local codes prohibit grounding through the neutral conductor. (Use 4-prong plug for 4 ... • If a power cord is used, the cord should be plugged into a 30-amp receptacle. DV218AEW-02568A-02_EN.indd 13 installing your dryer ELECTRICAL CONNECTIONS Before operating or testing, follow all grounding instructions in Canada to convert a dryer in the Grounding section. U.S. Electric...
...be connected by means of a new power supply cord kit, marked for use with a dryer, that is prohibited for (1) new branch-circuit installations, (2) mobile homes, (3) recreational vehicles, and (4) areas where local codes prohibit grounding through the neutral conductor. (Use 4-prong plug for 4 ... • If a power cord is used, the cord should be plugged into a 30-amp receptacle. DV218AEW-02568A-02_EN.indd 13 installing your dryer ELECTRICAL CONNECTIONS Before operating or testing, follow all grounding instructions in Canada to convert a dryer in the Grounding section. U.S. Electric...

User Manual (user Manual) (ver.1.0) (English)
Page 14
... from whom you hire a professional. Tools and Parts Pliers Cutting knife Pipe wrench (gas only) Nut drivers Level Phillips Screwdriver Duct tape Wrench For proper installation, we recommend that the dryer provides optimal drying performance, it will allow access to level the dryer. This will lay across both cushion-tops. 2. Lay... two of the carton cushion-tops on its side so it must be level. Tip your dryer or the SAMSUNG customer care center at 1-800-SAMSUNG (726-7864). To ensure that you purchased your dryer on the floor.
... from whom you hire a professional. Tools and Parts Pliers Cutting knife Pipe wrench (gas only) Nut drivers Level Phillips Screwdriver Duct tape Wrench For proper installation, we recommend that the dryer provides optimal drying performance, it will allow access to level the dryer. This will lay across both cushion-tops. 2. Lay... two of the carton cushion-tops on its side so it must be level. Tip your dryer or the SAMSUNG customer care center at 1-800-SAMSUNG (726-7864). To ensure that you purchased your dryer on the floor.
User Manual (user Manual) (ver.1.0) (English)
Page 15
... codes do not cover ventilation slots at the terminal block. Securely tighten the gas line fitting over all gas connections for tight installations: install a section of Teflon tape over threads. Turn on the terminal block. DO NOT use an open flame to your Dryer. Pipe.... Check all threaded connections. Use a 3/8" (1cm) deep well socket. 6. Remove the pipe thread protective cap. DV218AEW-02568A-02_EN.indd 15 installing your dryer 4. Review the Exhausting section before putting it in dryer cabinet. 5. DO NOT use plastic flexible exhaust material. Tip for leaks using...
... codes do not cover ventilation slots at the terminal block. Securely tighten the gas line fitting over all gas connections for tight installations: install a section of Teflon tape over threads. Turn on the terminal block. DO NOT use an open flame to your Dryer. Pipe.... Check all threaded connections. Use a 3/8" (1cm) deep well socket. 6. Remove the pipe thread protective cap. DV218AEW-02568A-02_EN.indd 15 installing your dryer 4. Review the Exhausting section before putting it in dryer cabinet. 5. DO NOT use plastic flexible exhaust material. Tip for leaks using...
User Manual (user Manual) (ver.1.0) (English)
Page 16
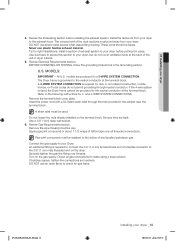
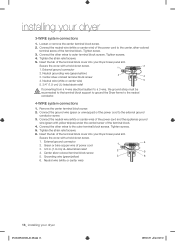
... to the center, silver-colored terminal screw of the terminal block cover into your Dryer's rear panel slot. Secure the cover with a hold -down screw. 1. installing your dryer DV218AEW-02568A-02_EN.indd 16 2009-01-09 ¿ÀÀü 11:43:32 Tighten screw. 3. Connect the ground wire (green or... or bare copper wire of the power cord and the appliance ground wire (green with a hold -down screw. 1. Neutral wire (white or center wire) 16_ installing your dryer 3-WIRE system connections 1.
... to the center, silver-colored terminal screw of the terminal block cover into your Dryer's rear panel slot. Secure the cover with a hold -down screw. 1. installing your dryer DV218AEW-02568A-02_EN.indd 16 2009-01-09 ¿ÀÀü 11:43:32 Tighten screw. 3. Connect the ground wire (green or... or bare copper wire of the power cord and the appliance ground wire (green with a hold -down screw. 1. Neutral wire (white or center wire) 16_ installing your dryer 3-WIRE system connections 1.

User Manual (user Manual) (ver.1.0) (English)
Page 17
...on a heat setting will purge the line. DV218AEW-02568A-02_EN.indd 17 installing your dryer 6. In order to operate on . Allowing your Dryer, and check operation by using the checklist below. 8. (GAS MODELS ONLY : DV218AGW, DV218AGB, DV209AGW) The burner may not ignite initially due to confirm that... it runs, heats, and shuts off and wait 5 minutes. Plug in your Dryer to confirm gas ignition, check the exhaust for heat. 01 installing your dryer _17 2009-01-09 ...
...on a heat setting will purge the line. DV218AEW-02568A-02_EN.indd 17 installing your dryer 6. In order to operate on . Allowing your Dryer, and check operation by using the checklist below. 8. (GAS MODELS ONLY : DV218AGW, DV218AGB, DV209AGW) The burner may not ignite initially due to confirm that... it runs, heats, and shuts off and wait 5 minutes. Plug in your Dryer to confirm gas ignition, check the exhaust for heat. 01 installing your dryer _17 2009-01-09 ...
User Manual (user Manual) (ver.1.0) (English)
Page 18
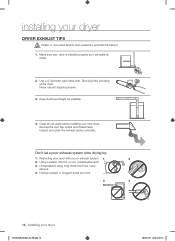
... with a poor exhaust system. 1 2 2. Use a 4" diameter rigid metal duct. Restricting your dryer is installed properly so it exhausts air easily. 2. Having crushed or clogged ducts and vent. 3 4 18_ installing your new dryer. Keep ducts as straight as possible. 4. Don't let a poor exhaust system slow drying by...: 1. Using a plastic, thin foil, or non-metal flexible duct. 3. Tape all old ducts before installing your dryer DV218AEW-02568A-02_EN.indd 18 2009-01-09 ¿ÀÀü 11:43:33 Clean all joints, including at the dryer...
... with a poor exhaust system. 1 2 2. Use a 4" diameter rigid metal duct. Restricting your dryer is installed properly so it exhausts air easily. 2. Having crushed or clogged ducts and vent. 3 4 18_ installing your new dryer. Keep ducts as straight as possible. 4. Don't let a poor exhaust system slow drying by...: 1. Using a plastic, thin foil, or non-metal flexible duct. 3. Tape all old ducts before installing your dryer DV218AEW-02568A-02_EN.indd 18 2009-01-09 ¿ÀÀü 11:43:33 Clean all joints, including at the dryer...

User Manual (user Manual) (ver.1.0) (English)
Page 19
... the Frame Front 10. Reinsert the black screw in the remaining holes. Reinsert the screw (Step 4) on the Frame Front 5. DV218AEW-02568A-02_EN.indd 19 installing your dryer DOOR REVERSAL 1. Remove one black screw from the holder lever. 7. Reattach the screws in the other side and reattach it . 4. Unplug the power...
... the Frame Front 10. Reinsert the black screw in the remaining holes. Reinsert the screw (Step 4) on the Frame Front 5. DV218AEW-02568A-02_EN.indd 19 installing your dryer DOOR REVERSAL 1. Remove one black screw from the holder lever. 7. Reattach the screws in the other side and reattach it . 4. Unplug the power...
User Manual (user Manual) (ver.1.0) (English)
Page 23
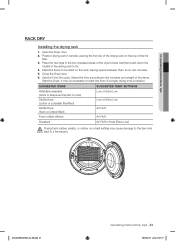
... operating Instructions, tips _23 2009-01-09 ¿ÀÀü 11:43:37 Use the Time Dry cycle. 02 operating Instructions, tips RACK DRY Installing the drying rack 1. Open the Dryer door. 2.
... operating Instructions, tips _23 2009-01-09 ¿ÀÀü 11:43:37 Use the Time Dry cycle. 02 operating Instructions, tips RACK DRY Installing the drying rack 1. Open the Dryer door. 2.
User Manual (user Manual) (ver.1.0) (English)
Page 27
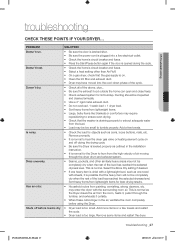
... not be completely dry when the rest of the above, plus... • Be sure the exhaust hood outside . • When these odors linger in the installation instruction. • It is normal. Doesn't heat. Remove some items and restart the dryer. PROBLEM Doesn't run. may have moved into the cool-down phase...
... not be completely dry when the rest of the above, plus... • Be sure the exhaust hood outside . • When these odors linger in the installation instruction. • It is normal. Doesn't heat. Remove some items and restart the dryer. PROBLEM Doesn't run. may have moved into the cool-down phase...
User Manual (user Manual) (ver.1.0) (English)
Page 32
...; The original dated bill of products, equipment, systems, utilities, services, parts, supplies, accessories, applications, installations, repairs, external wiring or connectors not supplied or authorized by SAMSUNG against manufacturing defects in materials and workmanship for instructions, or fixing installation errors. This limited warranty covers manufacturing defects in materials and workmanship encountered in normal, noncommercial...
...; The original dated bill of products, equipment, systems, utilities, services, parts, supplies, accessories, applications, installations, repairs, external wiring or connectors not supplied or authorized by SAMSUNG against manufacturing defects in materials and workmanship for instructions, or fixing installation errors. This limited warranty covers manufacturing defects in materials and workmanship encountered in normal, noncommercial...


