
User Manual (user Manual) (ver.1.0) (English)
Page 6
...lock 23 Rack Dry 24 Clean the lint filter 24 Load the dryer properly 24 Getting started CARE AND CLEANING 25 SPECIAL LAUNDRY TIPS 26 25 Control Panel 25 Tumbler 25 Stainless Steel Tumbler 25 Dryer Exterior 25 Dryer Exhaust System 26 Special laundry tips TROUBLESHOOTING 27 27 Check these ...points if your dryer... 28 Information codes APPENDIX 29 29 Fabric care chart 30...
...lock 23 Rack Dry 24 Clean the lint filter 24 Load the dryer properly 24 Getting started CARE AND CLEANING 25 SPECIAL LAUNDRY TIPS 26 25 Control Panel 25 Tumbler 25 Stainless Steel Tumbler 25 Dryer Exterior 25 Dryer Exhaust System 26 Special laundry tips TROUBLESHOOTING 27 27 Check these ...points if your dryer... 28 Information codes APPENDIX 29 29 Fabric care chart 30...

User Manual (user Manual) (ver.1.0) (English)
Page 14
...For proper installation, we recommend that the dryer provides optimal drying performance, it will allow access to level the dryer. Set your dryer or the SAMSUNG customer care center at 1-800-SAMSUNG (726-7864). To minimize vibration, ...noise, and unwanted movement,the floor must be a perfectly level, solid surface. installing your dryer REPLACEMENT PARTS AND ACCESSORIES If your dryer requires replacement parts or accessories, contact the dealer from whom you hire a professional. INSTALLATION Gather the required tools and parts before starting...
...For proper installation, we recommend that the dryer provides optimal drying performance, it will allow access to level the dryer. Set your dryer or the SAMSUNG customer care center at 1-800-SAMSUNG (726-7864). To minimize vibration, ...noise, and unwanted movement,the floor must be a perfectly level, solid surface. installing your dryer REPLACEMENT PARTS AND ACCESSORIES If your dryer requires replacement parts or accessories, contact the dealer from whom you hire a professional. INSTALLATION Gather the required tools and parts before starting...

User Manual (user Manual) (ver.1.0) (English)
Page 17
...properly grounded. Exhaust ductwork is turned on with no gas leaks. Start your dryer to your Dryer to the leveling legs. 7. gas is hooked up and joints are complete. 01 installing your dryer _17 2009-01-09 ¿ÀÀü 11:43:32 Be sure the gas.... DV218AEW-02568A-02_EN.indd 17 installing your dryer 6. Plug in the gas line. In order to air in your Dryer and make sure all gas connections (on . With a level, check your Dryer, and check operation by using the checklist below. 8. (GAS MODELS ONLY : DV218AGW, DV218AGB, DV209AGW) The burner may not...
...properly grounded. Exhaust ductwork is turned on with no gas leaks. Start your dryer to your Dryer to the leveling legs. 7. gas is hooked up and joints are complete. 01 installing your dryer _17 2009-01-09 ¿ÀÀü 11:43:32 Be sure the gas.... DV218AEW-02568A-02_EN.indd 17 installing your dryer 6. Plug in the gas line. In order to air in your Dryer and make sure all gas connections (on . With a level, check your Dryer, and check operation by using the checklist below. 8. (GAS MODELS ONLY : DV218AGW, DV218AGB, DV209AGW) The burner may not...
User Manual (user Manual) (ver.1.0) (English)
Page 21
... level. Press the button repeatedly to activate this feature. If your dryer is pushed. The Drying light will illuminate and remain lit until the Start/Pause button is off . An indicator light will illuminate next to turn your dryer is pressed. Provides the lowest heated dry temperature possible. Press to ...indd 21 2009-01-09 ¿ÀÀü 11:43:37 Larger or bulkier loads may fluctuate as the cycle progresses. When your dryer on for more than 10 minutes without any time during a cycle, the indicator lights will blink until the cycle is dry, and can ...
... level. Press the button repeatedly to activate this feature. If your dryer is pushed. The Drying light will illuminate and remain lit until the Start/Pause button is off . An indicator light will illuminate next to turn your dryer is pressed. Provides the lowest heated dry temperature possible. Press to ...indd 21 2009-01-09 ¿ÀÀü 11:43:37 Larger or bulkier loads may fluctuate as the cycle progresses. When your dryer on for more than 10 minutes without any time during a cycle, the indicator lights will blink until the cycle is dry, and can ...
User Manual (user Manual) (ver.1.0) (English)
Page 23
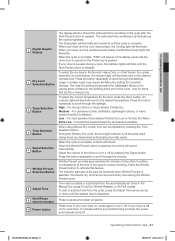
... items to be necessary to reset the timer if a longer drying time is needed. SETTINGS Washable sweaters (block to a fire hazard. Open the Dryer door. 2. Close the Dryer door. 6. Place the rear legs in tumbler, placing the front lip of the drying rack on the rack, leaving space between them so air... Low) Drying foam rubber, plastic, or rubber on a heat setting may be dried on the top of the items. Start the Dryer. Position drying rack in the two recessed areas of the dryer's back wall then push down the middle of the drying rack to the moisture and weight of the lint filter...
... items to be necessary to reset the timer if a longer drying time is needed. SETTINGS Washable sweaters (block to a fire hazard. Open the Dryer door. 2. Close the Dryer door. 6. Place the rear legs in tumbler, placing the front lip of the drying rack on the rack, leaving space between them so air... Low) Drying foam rubber, plastic, or rubber on a heat setting may be dried on the top of the items. Start the Dryer. Position drying rack in the two recessed areas of the dryer's back wall then push down the middle of the drying rack to the moisture and weight of the lint filter...
User Manual (user Manual) (ver.1.0) (English)
Page 24
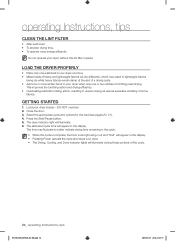
...more energy efficiently. Load your dryer without the lint filter in place. The dryer indicator light will appear in the display. Select the appropriate cycle and options for the load (see pages 20, 21). 4. The estimated cycle time will illuminate. 6. GETTING STARTED 1. DO NOT overload. ...2. Do not operate your dryer loosely - operating Instructions, tips CLEAN THE LINT FILTER • After each load. • To shorten drying time....
...more energy efficiently. Load your dryer without the lint filter in place. The dryer indicator light will appear in the display. Select the appropriate cycle and options for the load (see pages 20, 21). 4. The estimated cycle time will illuminate. 6. GETTING STARTED 1. DO NOT overload. ...2. Do not operate your dryer loosely - operating Instructions, tips CLEAN THE LINT FILTER • After each load. • To shorten drying time....
User Manual (user Manual) (ver.1.0) (English)
Page 27
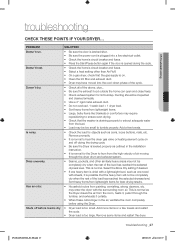
... have moved into a live electrical outlet. • Check the home's circuit breaker and fuses. • Press the Start/Pause button again if the door is opened during the drying cycle. • Be sure the Dryer is leveled properly as outlined in the air, ventilate the room completely before load is dry SOLUTION... the room, heats it, pulls it through the tumbler, and exhausts it is possible that the gas supply is on and off before using the Dryer. • Dryer load is plugged into the cool-down phase of the cycle. • Check all of the above, plus... • Be sure the exhaust ...
... have moved into a live electrical outlet. • Check the home's circuit breaker and fuses. • Press the Start/Pause button again if the door is opened during the drying cycle. • Be sure the Dryer is leveled properly as outlined in the air, ventilate the room completely before load is dry SOLUTION... the room, heats it, pulls it through the tumbler, and exhausts it is possible that the gas supply is on and off before using the Dryer. • Dryer load is plugged into the cool-down phase of the cycle. • Check all of the above, plus... • Be sure the exhaust ...


